Getting Started
Installing the AcnooCRM Admin Panel: A Step-by-Step Setup Guide
- Uploaded Date: 22-July-2026
- Project: AcnooCRM
- Author: Acnoo
- Support Email: acnooteam@gmail.com
Thank you for purchasing our product. If you have any questions that are beyond the scope of this documentation file, please feel free to email us via our user page contact form or directly to Support email at acnooteam@gmail.com
Requirements
- PHP >= 8.2
- Ctype PHP Extension
- cURL PHP Extension
- DOM PHP Extension
- Fileinfo PHP Extension
- Filter PHP Extension
- Hash PHP Extension
- Mbstring PHP Extension
- OpenSSL PHP Extension
- PCRE PHP Extension
- PDO PHP Extension
- Session PHP Extension
- Tokenizer PHP Extension
- XML PHP Extension
For more information about deployment see the Laravel documentation here https://laravel.com/docs/12.x/deployment
Download Project from Envato
After successfully purchase AcnooCRM download the project from Envato download page
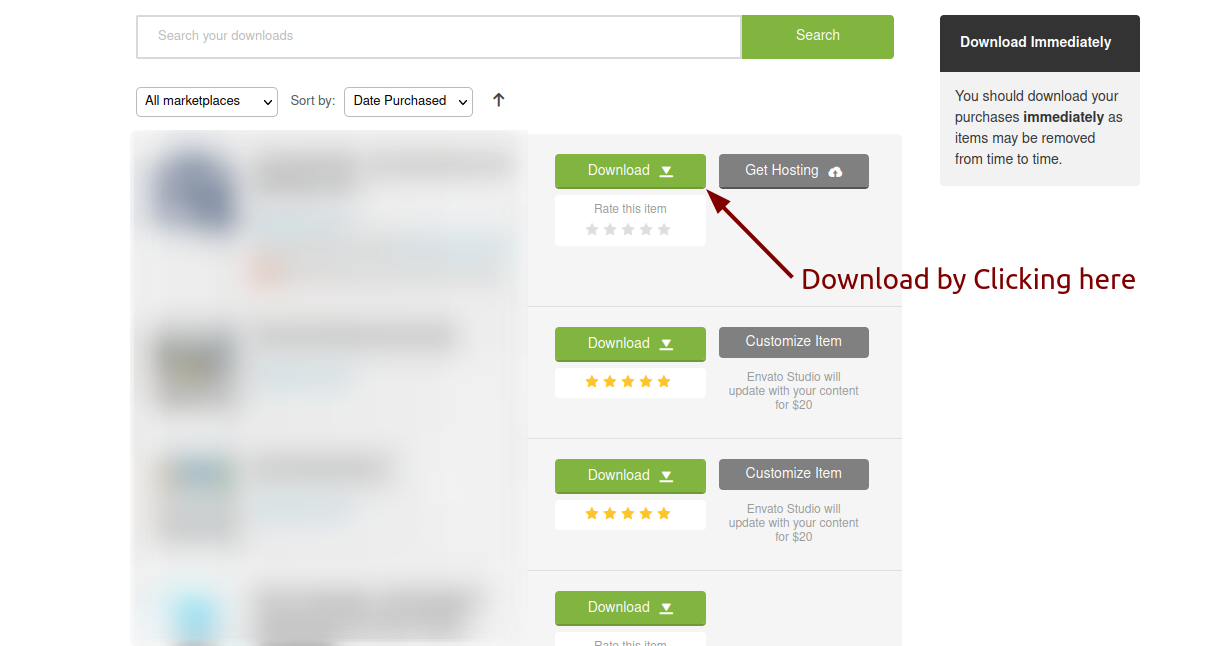
Extract the downloaded file. You will have another zip file named AcnooCRM-Admin-Panel.zip containing the main project's files and a documentation folder. You are reading this documentation, that means you already have theme both.
Creating Database
Before installing, you will need to create a new database. If you already know how to do this or have already created one, skip to the next step.
Note: Please use empty database. In most cases you should be able to create a database from your cpanel.
Login to your cPanel by entering this in your browser url
yourdomian.com/cpanel
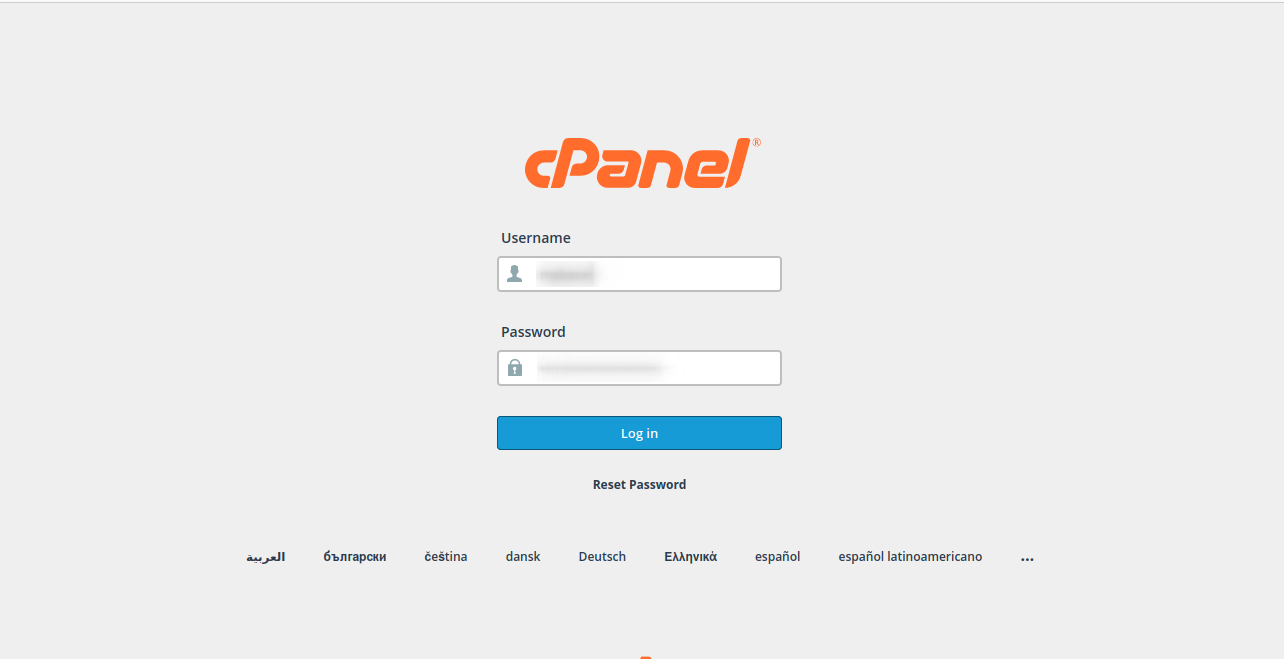
Step: 1
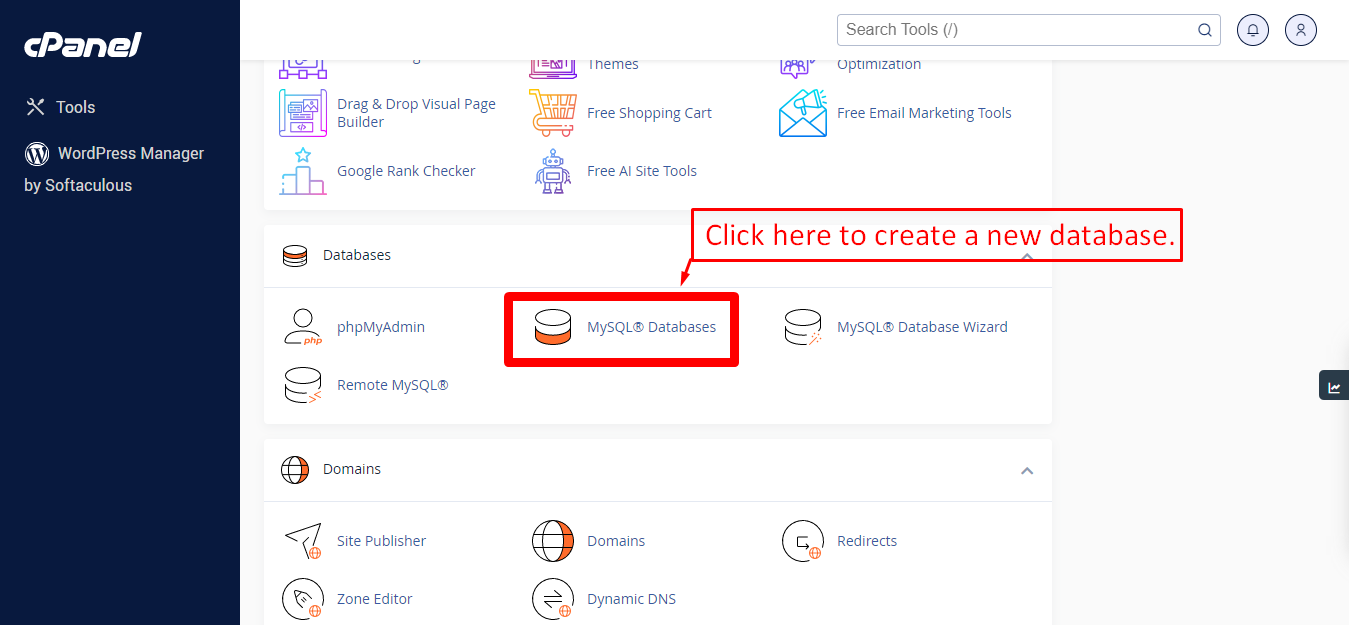
Step: 2
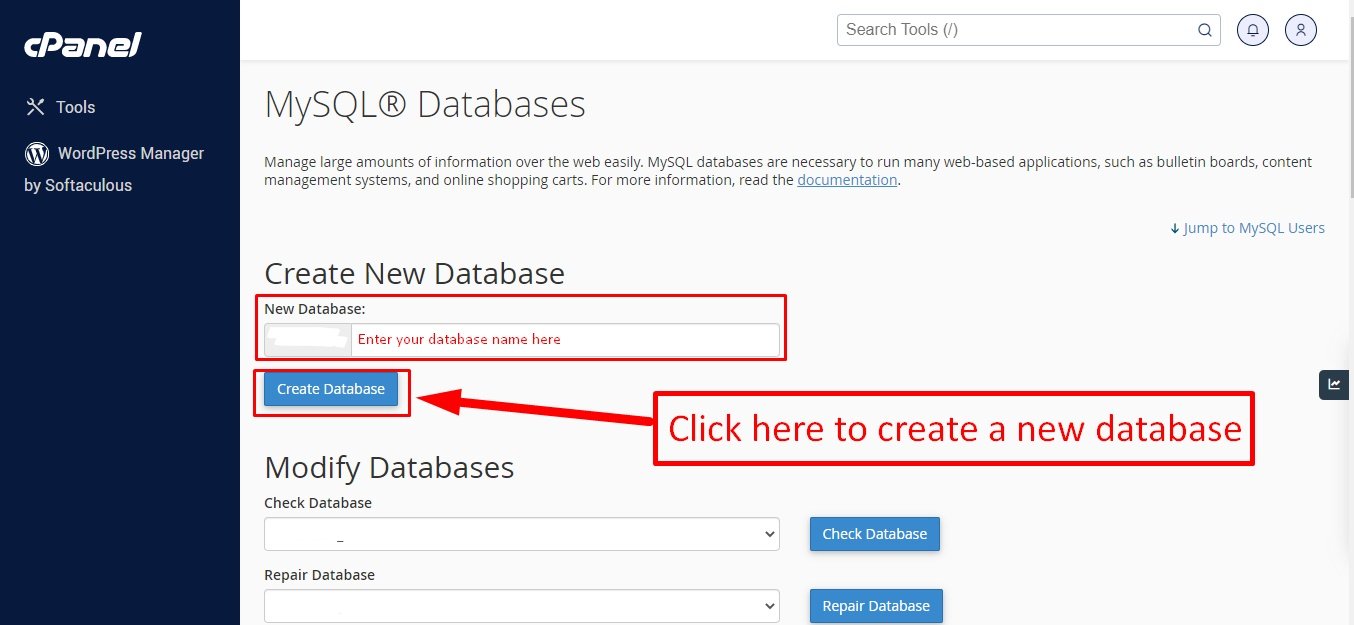
Step: 3
Now you need to create a new user. On the same page go to create a new database user
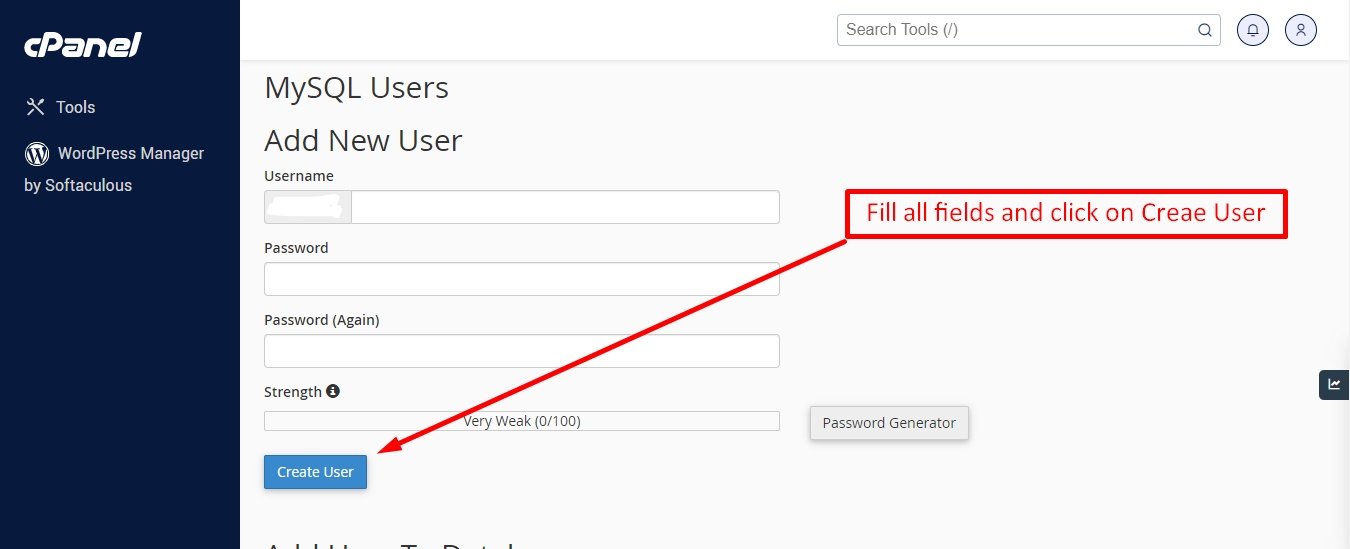
Step: 4
Now add the user to the database
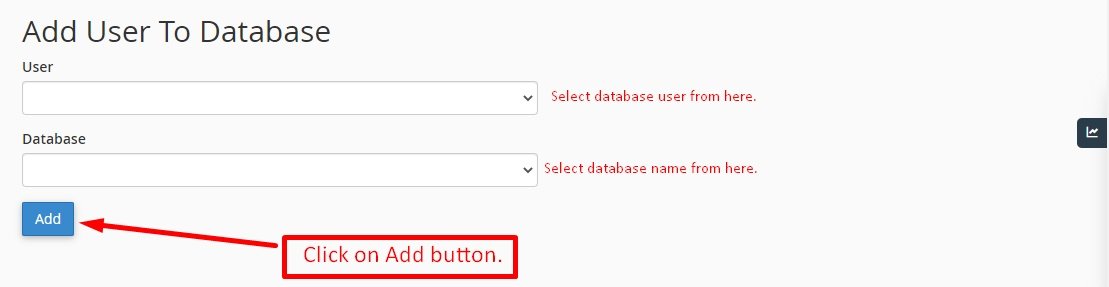
Step: 5
And select full permissions on the database to that user
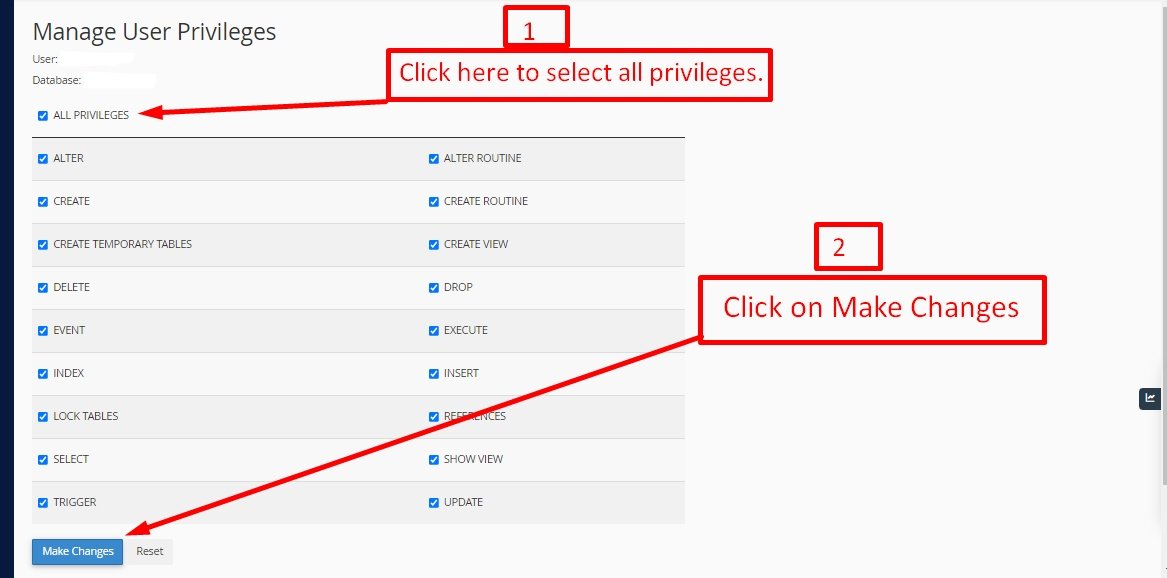
Uploading Files
On some operating systems, the dotfiles are hidden by default. Before starting to upload the files, please make sure your file explorer has the option to view hidden files turned on.
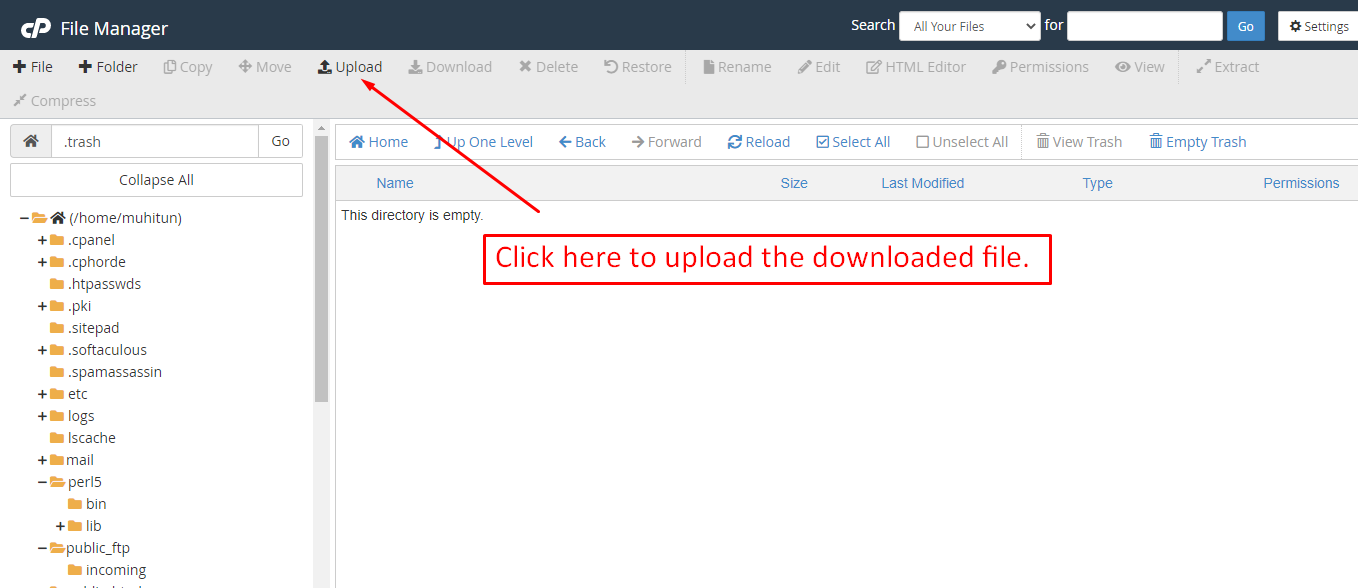
After creating a database, Upload the AcnooCRM-Admin-Panel.zip file on the web root folder of your domain. This folder is generally called public_html, html, or example.com, but depending on your server's configuration, it might be named differently.
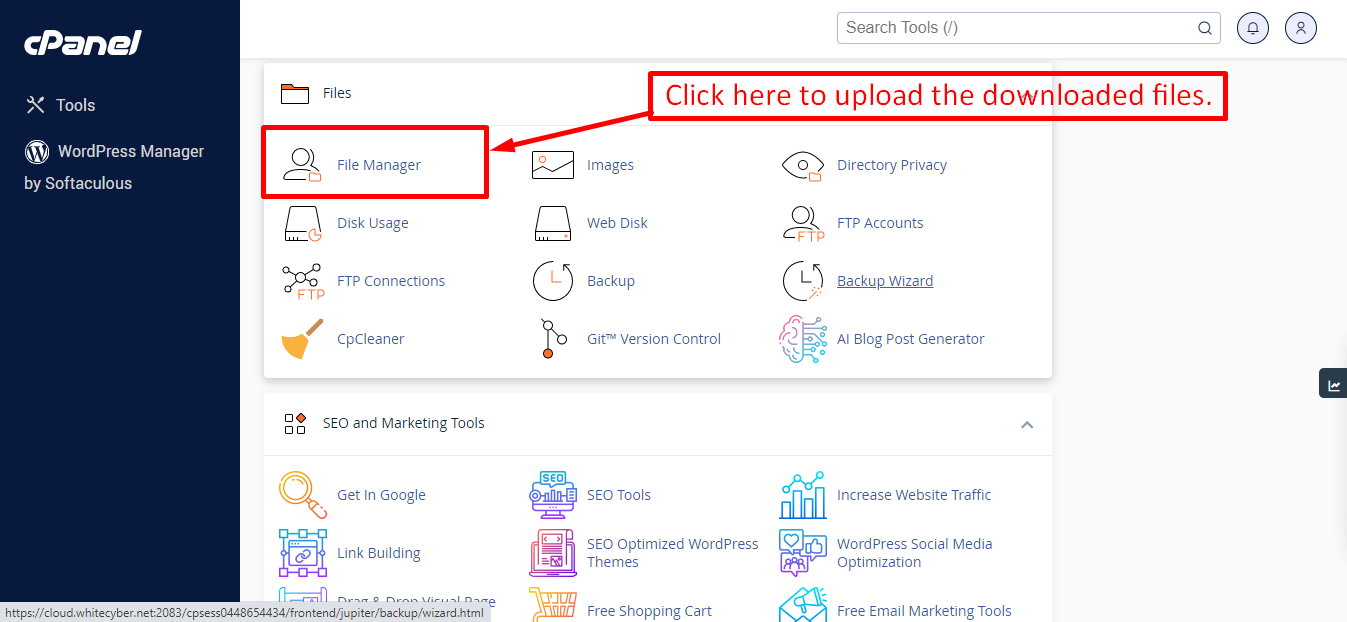
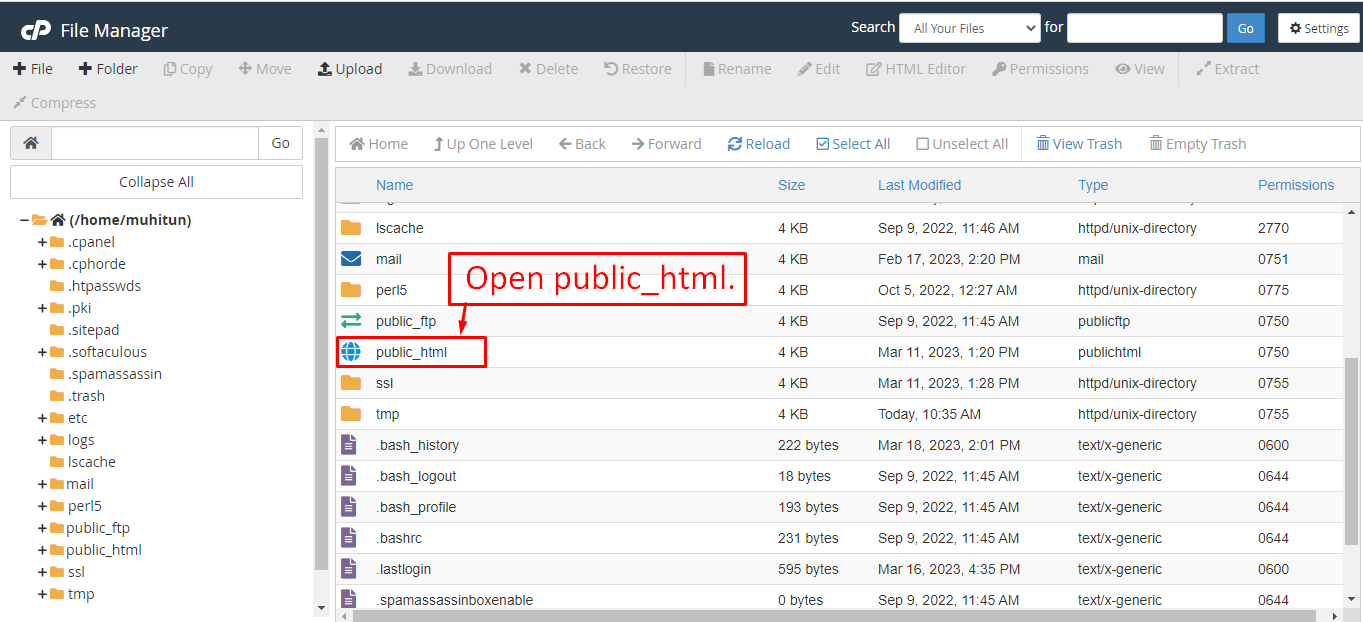
After that in the public_html directory upload the downloaded file.
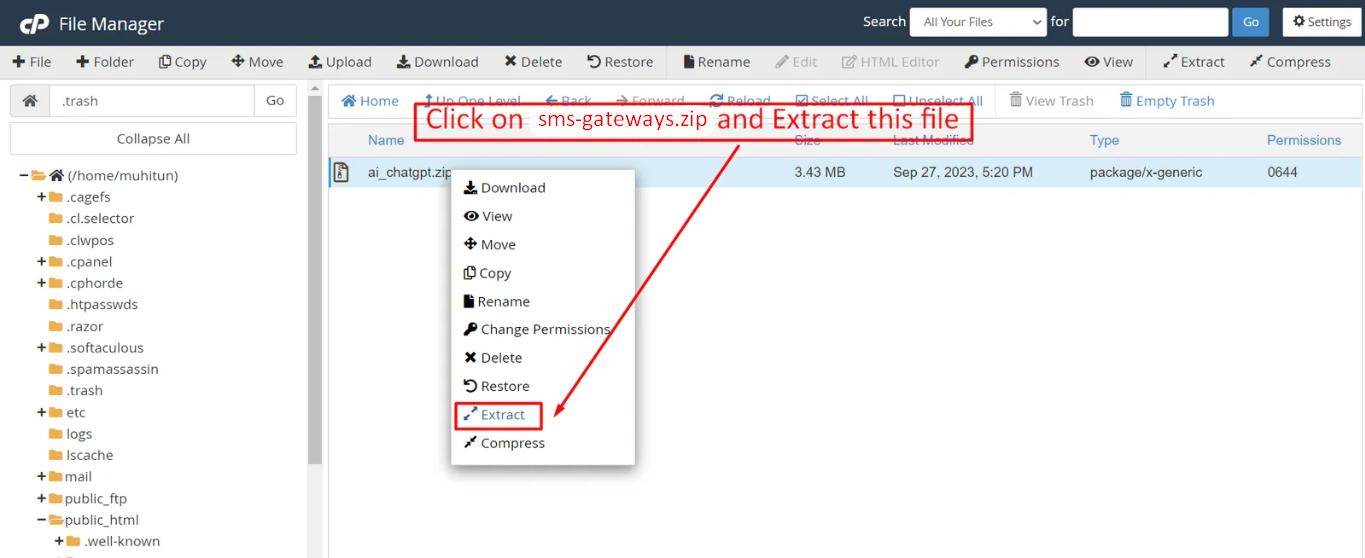
Note: Important Make sure that you have .env file in your folder.
Note: Make sure that .htaccess file got copied properly from the download to your server.
Installation Wizard
Go to your website address, then you'll see an installation wizard. To open the installer. Visit
yourdomain.com/install
Now the installer will show up.The First screen will be Welcome Screen
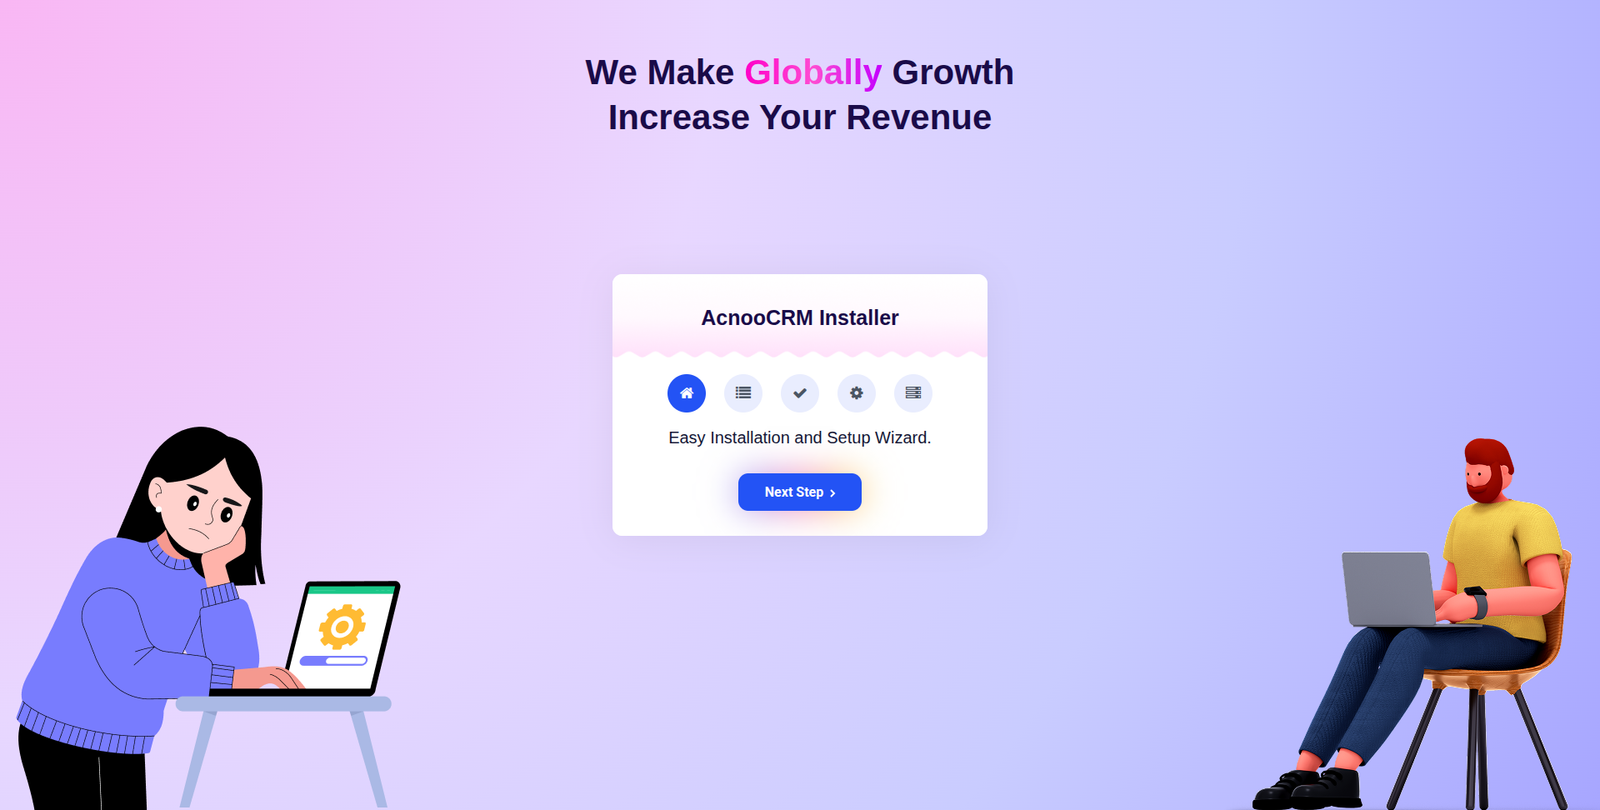
Note : If you are not able to access the website by accessing yourdomain.com/install, but you are able to access it via yourdomain.com/index.php/install, this means that you probably don't have Apache mod_rewrite installed and enabled.
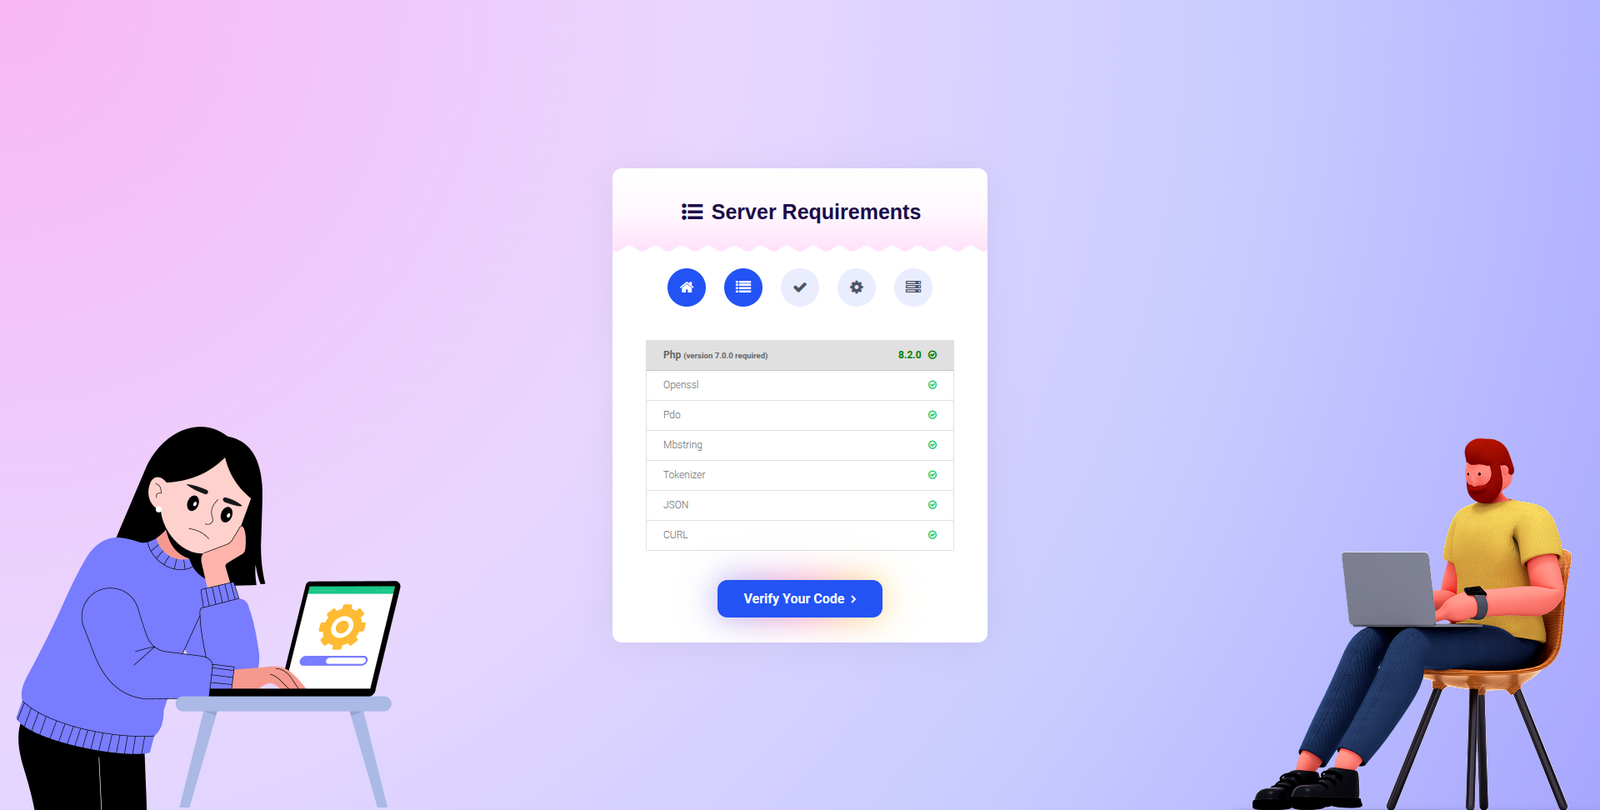
Server Requirements
After clicking on "Check requirement" button, you will be redirected to System Requirements step during the installation wizard, System Requirements.
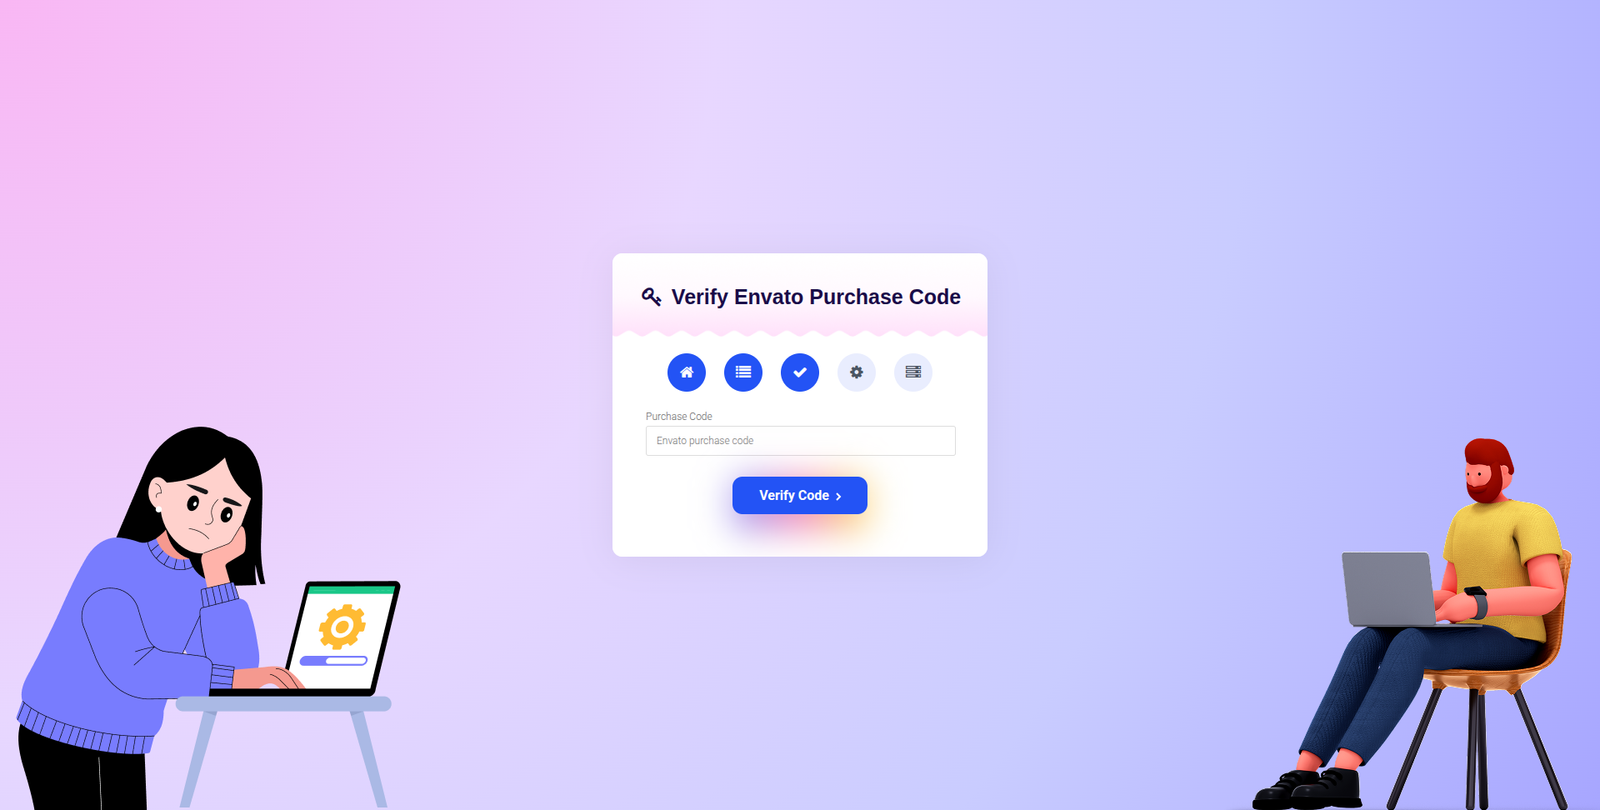
Verify Code
Here enter your Envato Purchase Code to proceed.
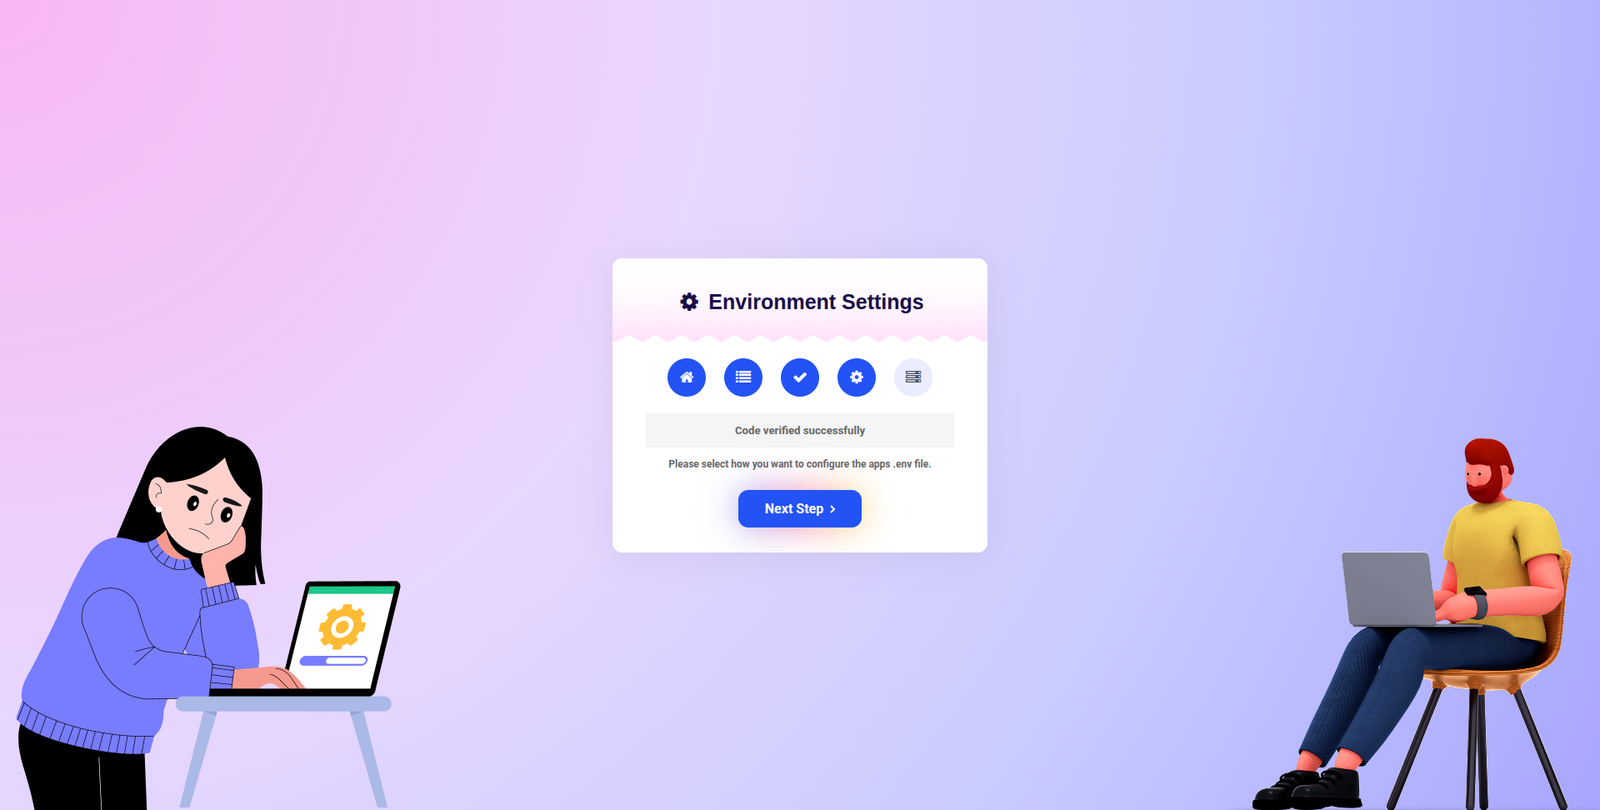
Database/Environment Setting
If your code is verified, simply click 'Next' to proceed to the next step.
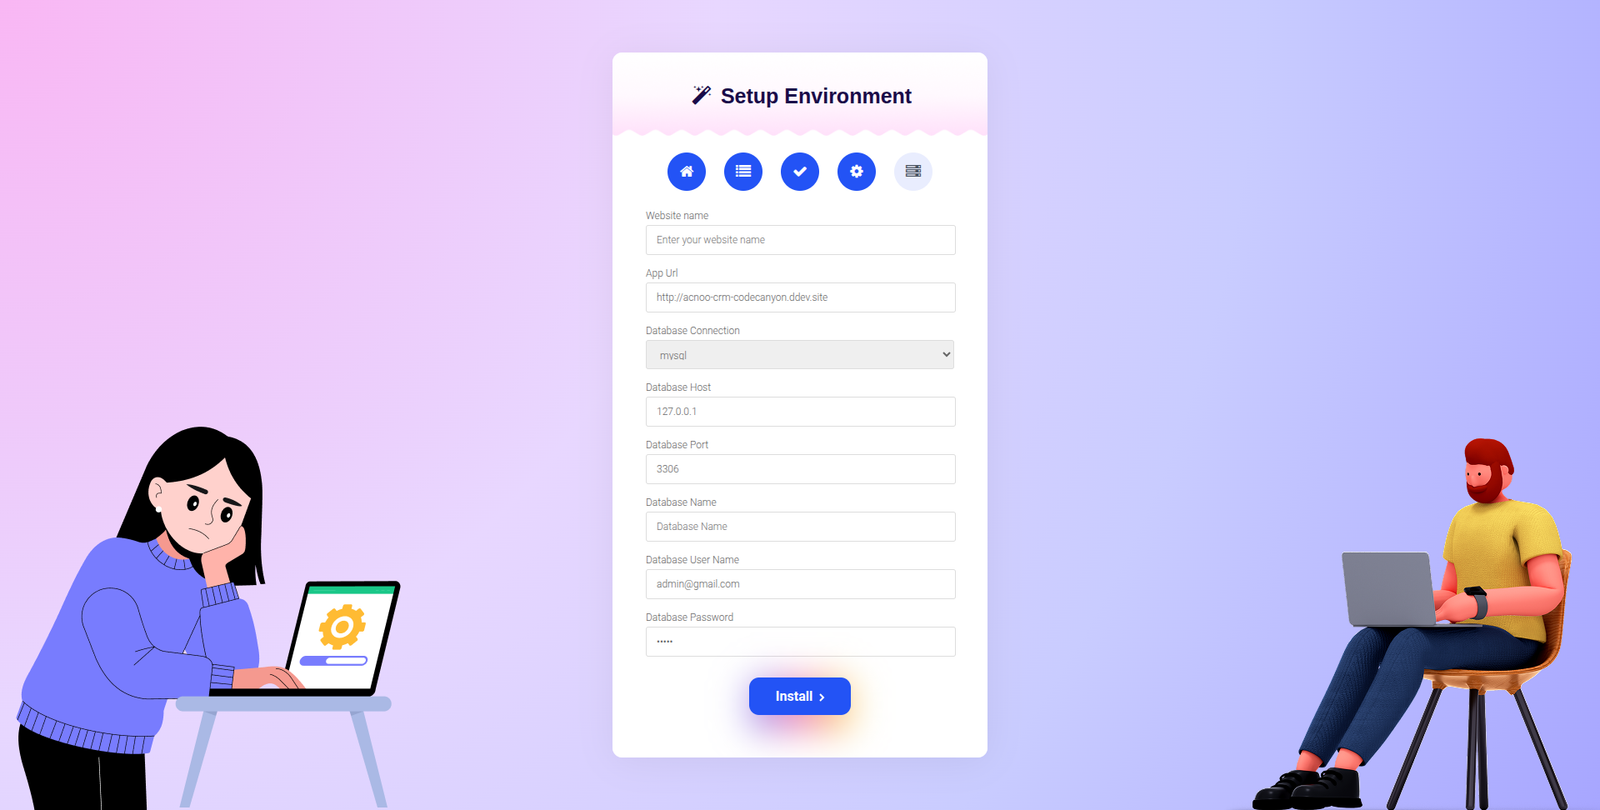
Please enter your database credentials and click 'Install' to continue.
Exit
The last step is exit step.
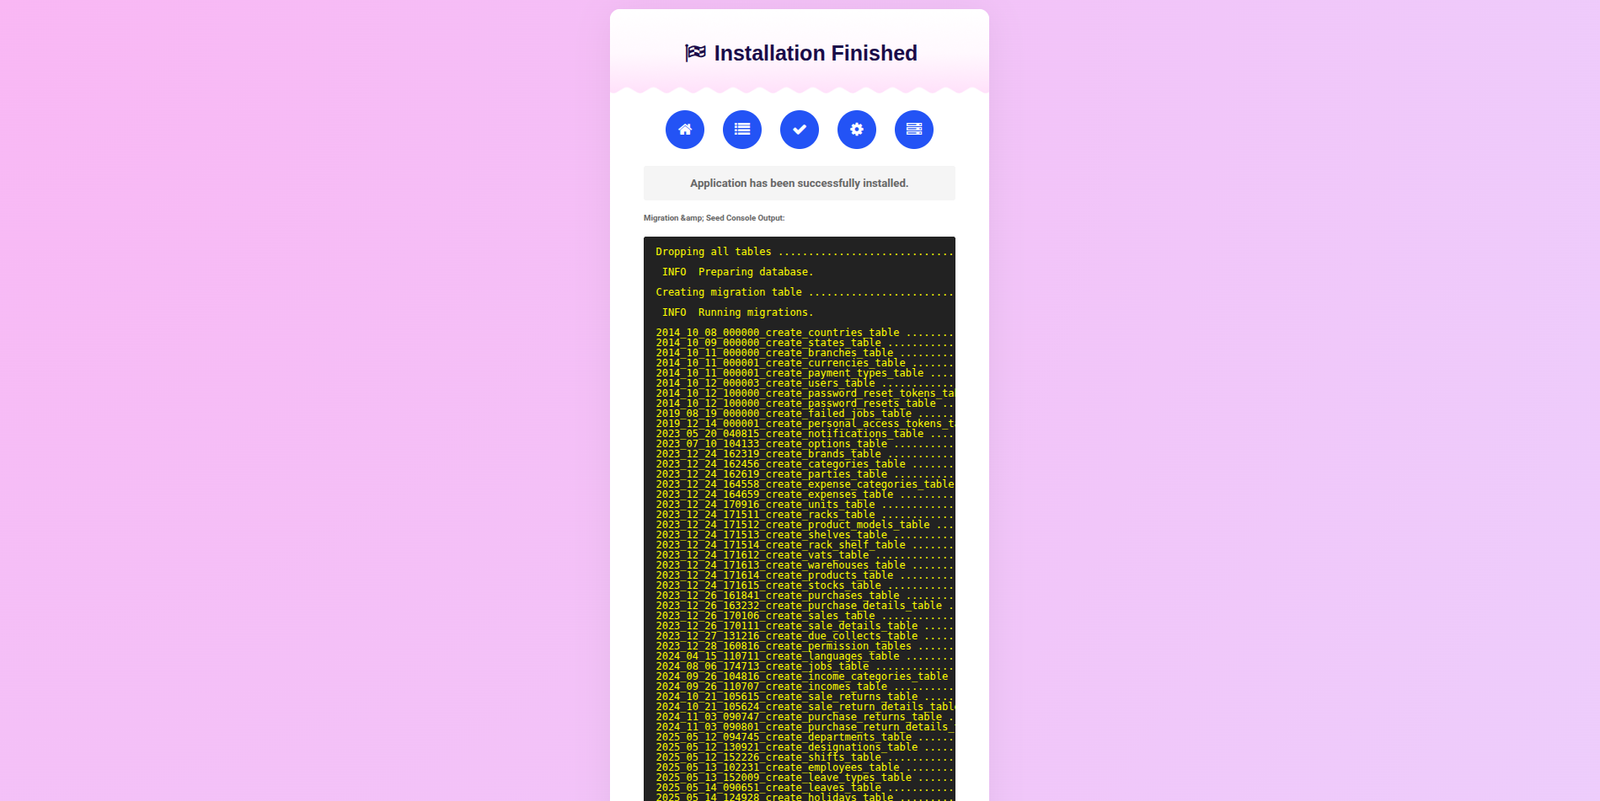
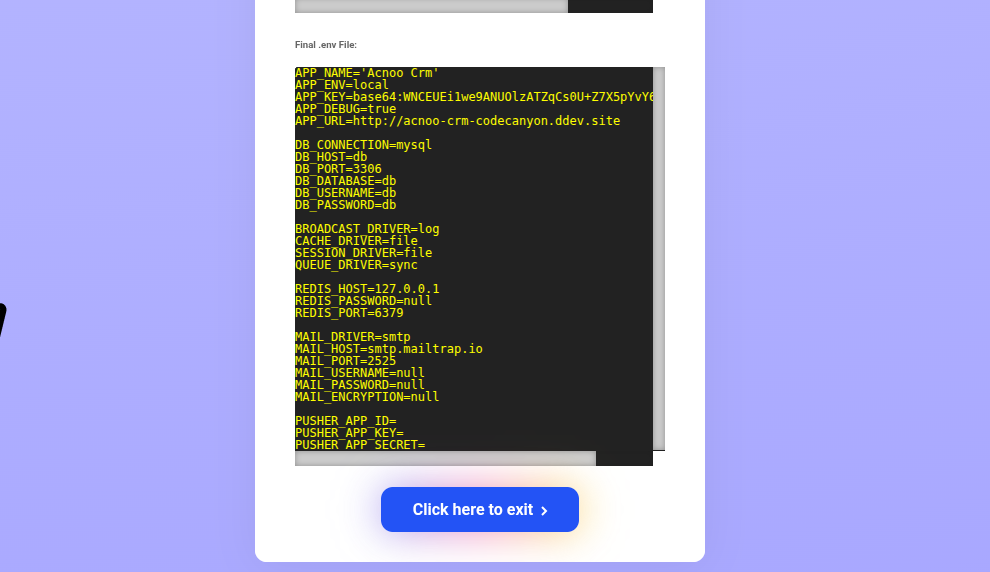
Congratulations you have successfully installed this project on your server. 😀
Default Password
You can login using several methods depending on your role.
Super Admin
superadmin@superadmin.com
superadmin
Admin
admin@admin.com
admin
Staff
staff@acnoo.com
staff
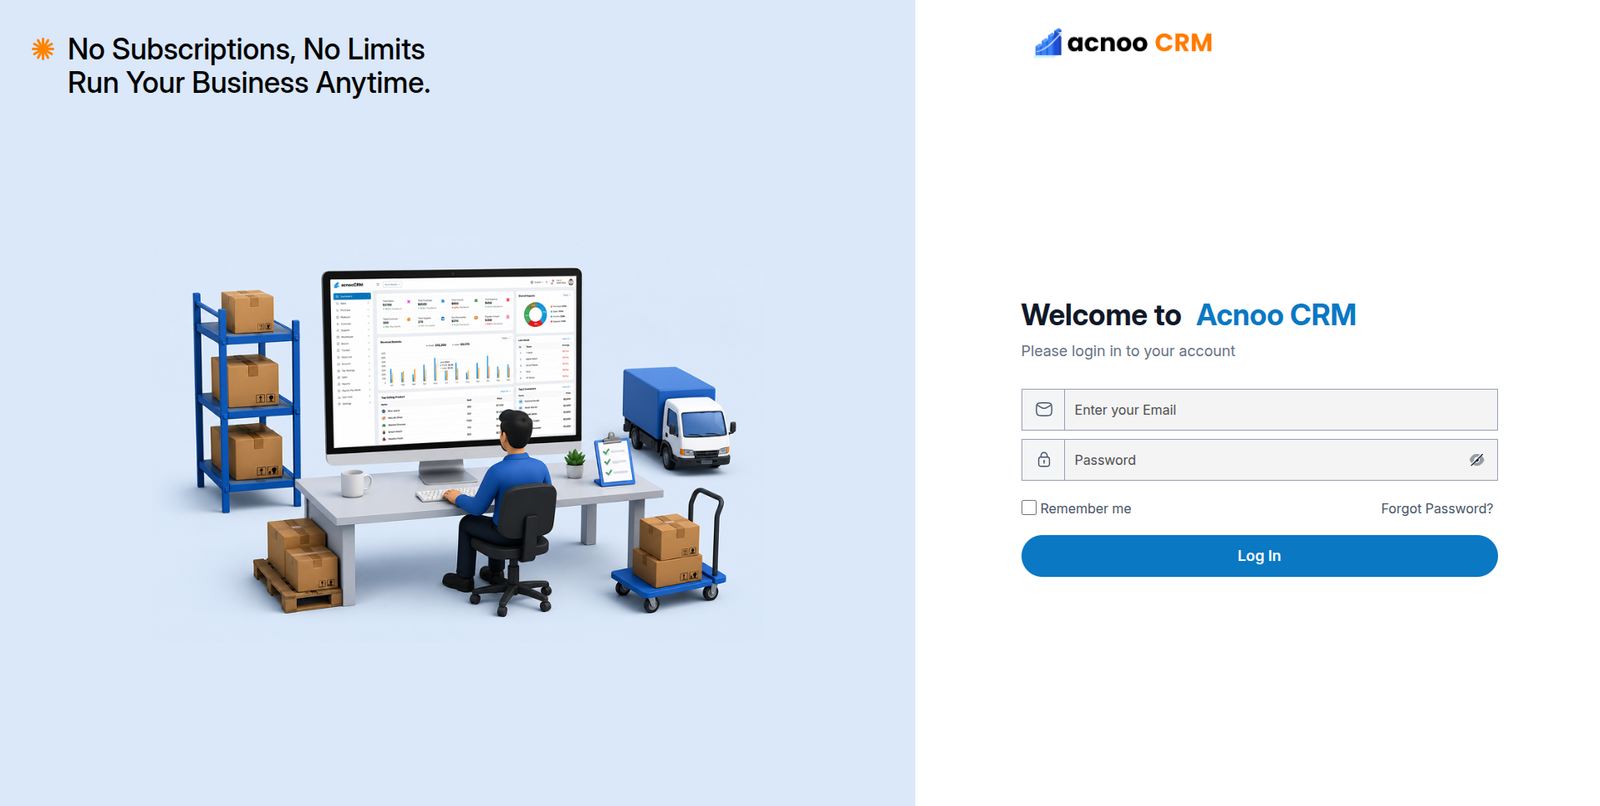
In this project, different modules are assigned based on user roles: Super Admin, Admin, Manager. Each role has distinct responsibilities tailored to their specific tasks and permissions. Below, we will discuss how each user role operates within the system.
Dashboard
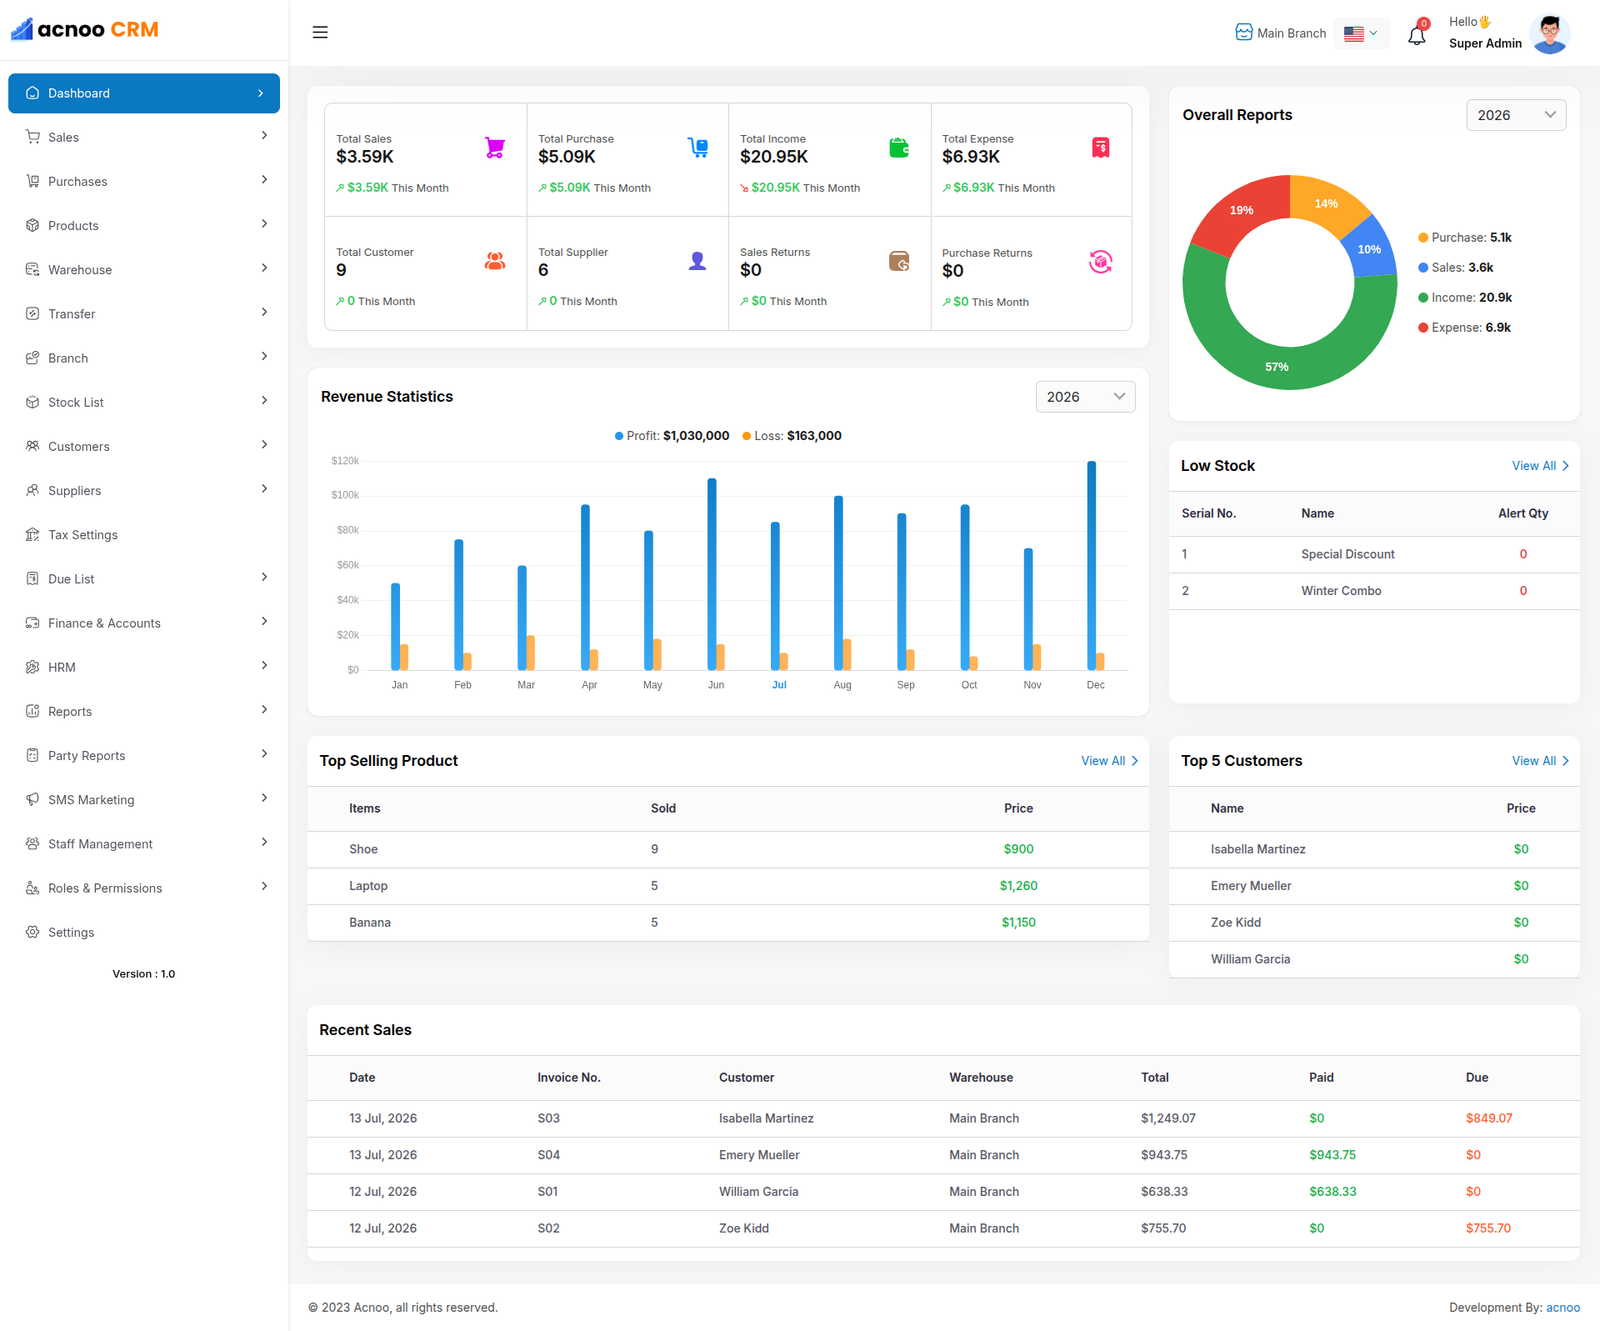
This is the admin dashboard page. The essential information regarding the project are displayed here.
Create Sale
By clicking on "Sale New," you can create a new sale. First, select a customer. If you choose "Guest," an optional field is available to provide a phone number. By selecting register customer the product prices displayed on the right will automatically update based on the selected customer's type (Retailer, Wholesaler, or Dealer).
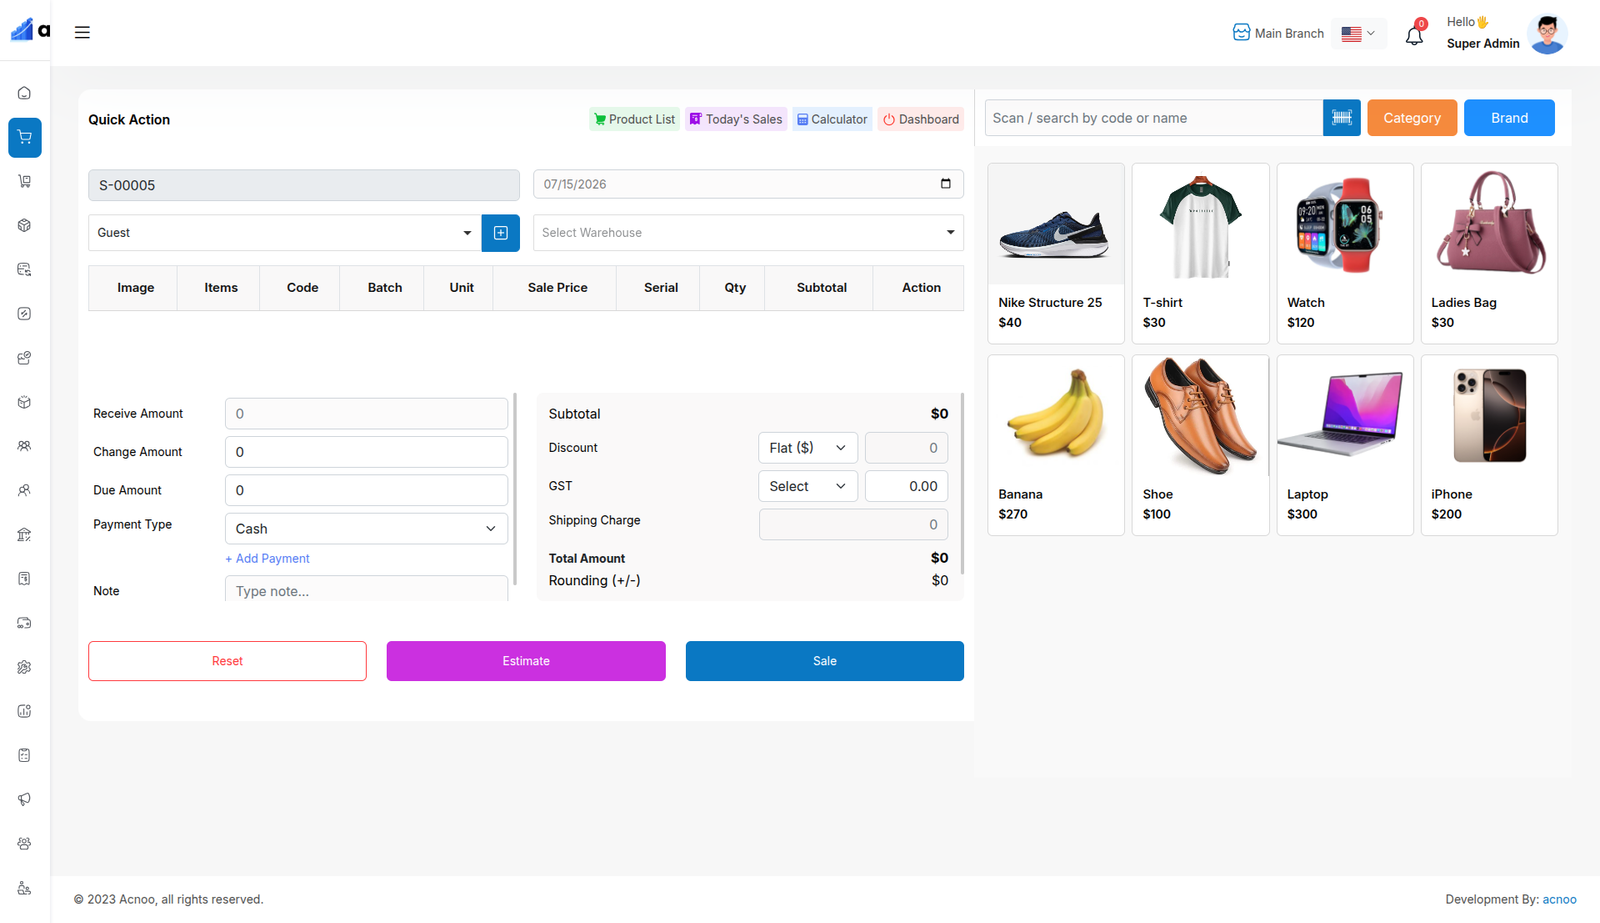
Select Product
Next, you need to select a product for the sale. You have the option to search by product name or code. Additionally, you can filter products by Category or Brand. For example, if you click on the category, you will see a list of categories. From there, you can select a category, and the products will be filtered accordingly. A screenshot is provided for the Category Filter. The same process applies for filtering by Brand.
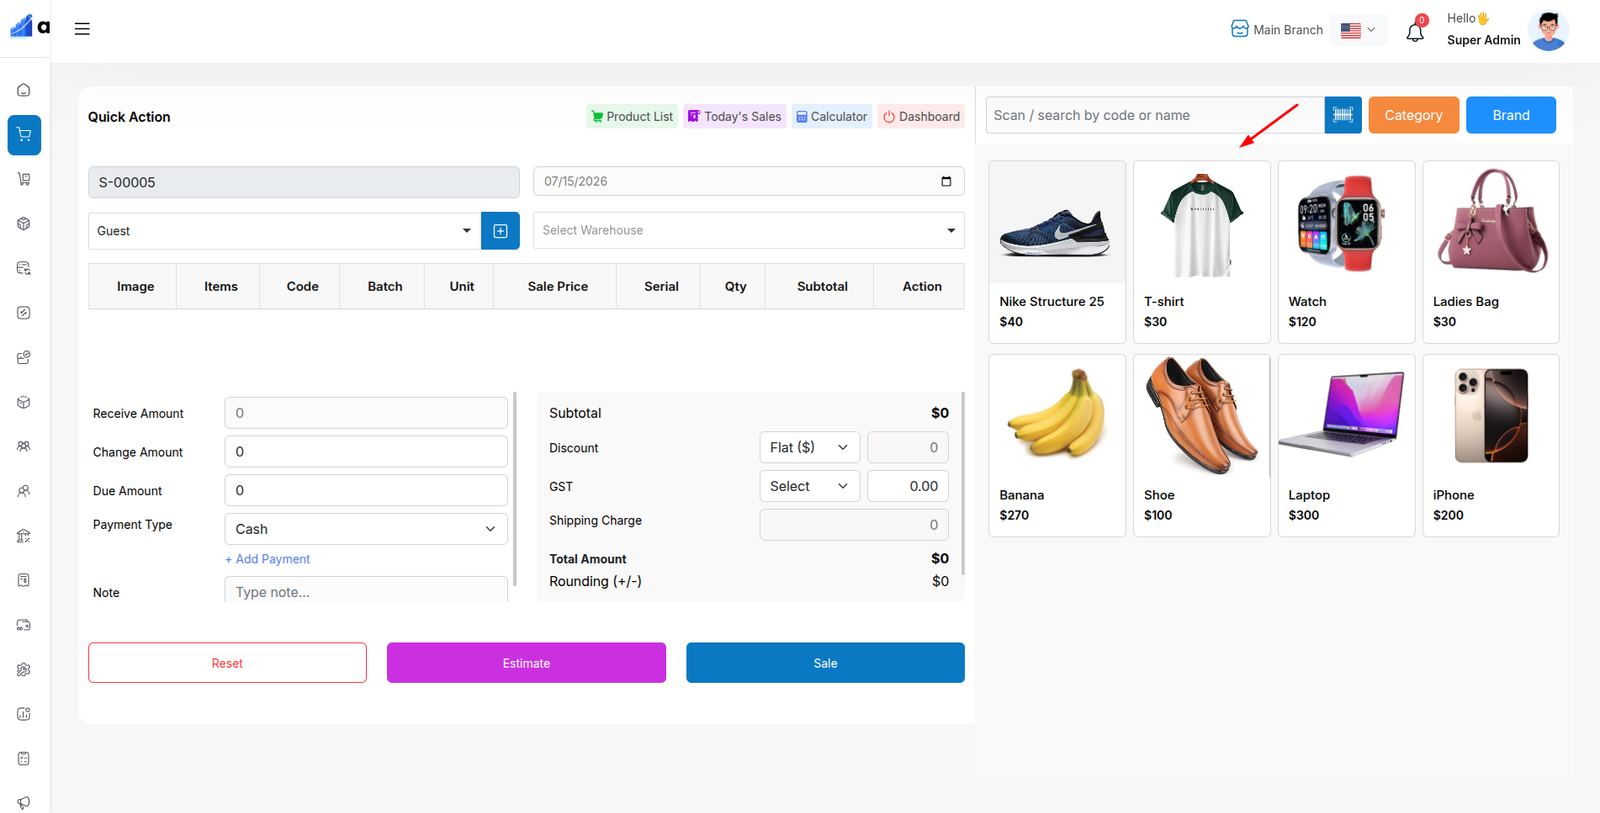
Add to Cart & store product
When you click on a product, it will be automatically added to the cart if this product available in stock. You can adjust the quantity by using the plus or minus buttons, or directly update the quantity by entering a value. To remove a product from the cart, simply click the red cross button.
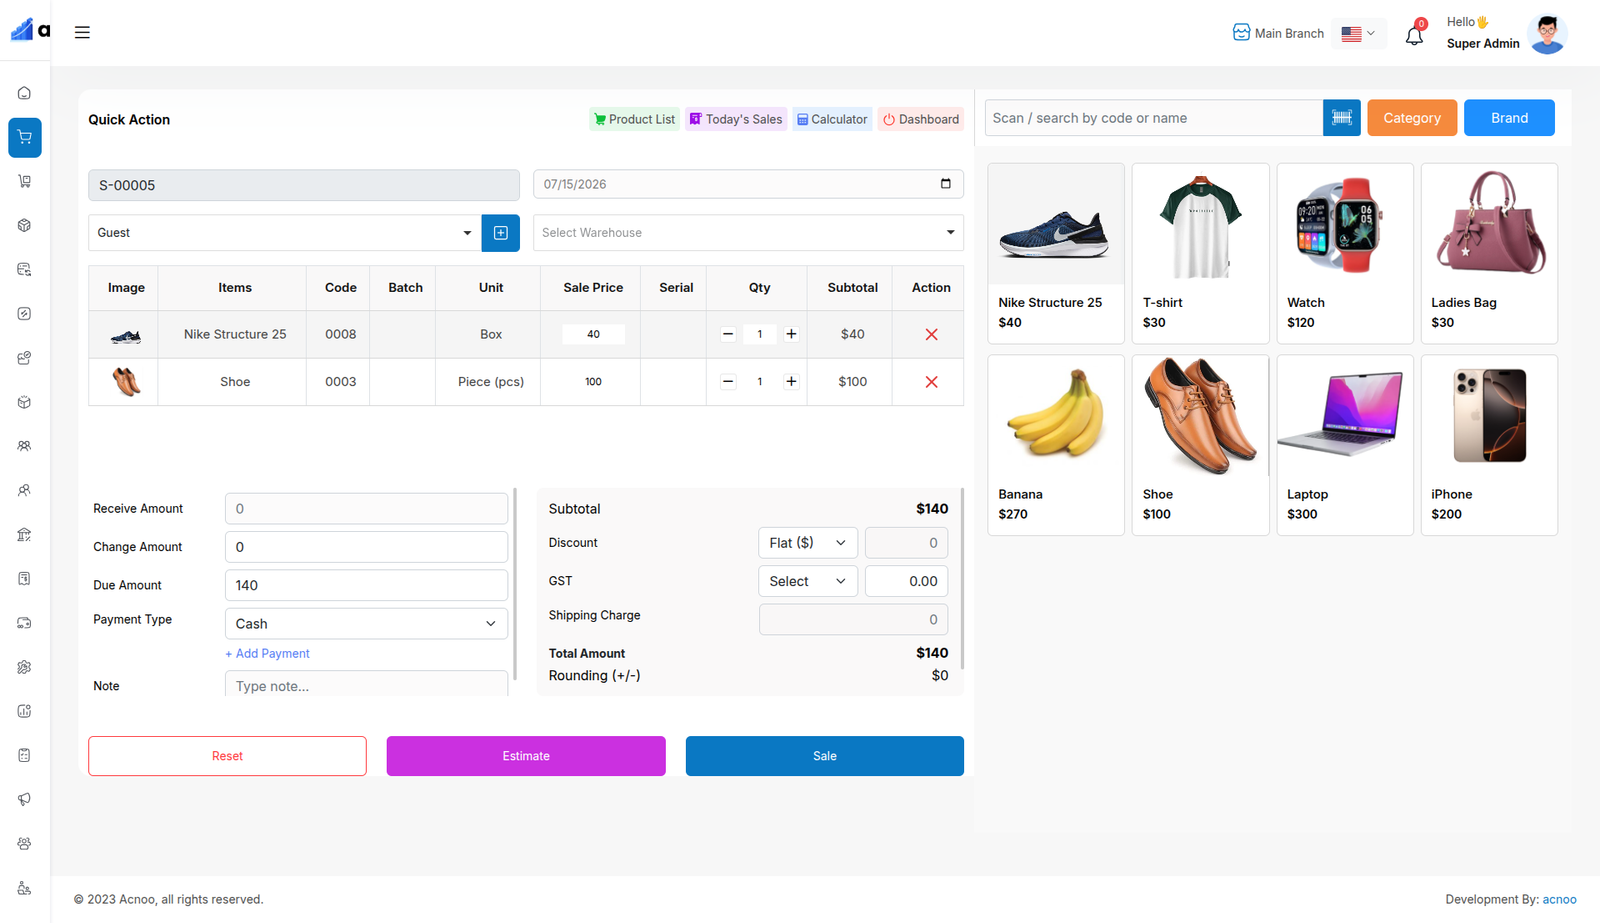
Below, you will see the subtotal of all products. You can also add VAT or a discount to the subtotal. After the calculations, the total amount will be displayed. Next, you can enter the received amount. If the received amount is greater than the total amount, the remaining balance will be shown in the "Change Amount" field. If the received amount is less, the "Due Amount" field will display the difference. If you want to remove all products from the list, click the cancel button. Once everything is correct, click the save button to complete the sale.
Sale List
This appears to be a screenshot of the Sale list page, where you can filter data using the search function. Additionally, you can view invoices, as well as edit, delete, or use the multi-delete option. Furthermore, you will have the option to initiate a Sale Return from this list. Please note, once a sale return is processed, you will no longer be able to update or delete the sale.
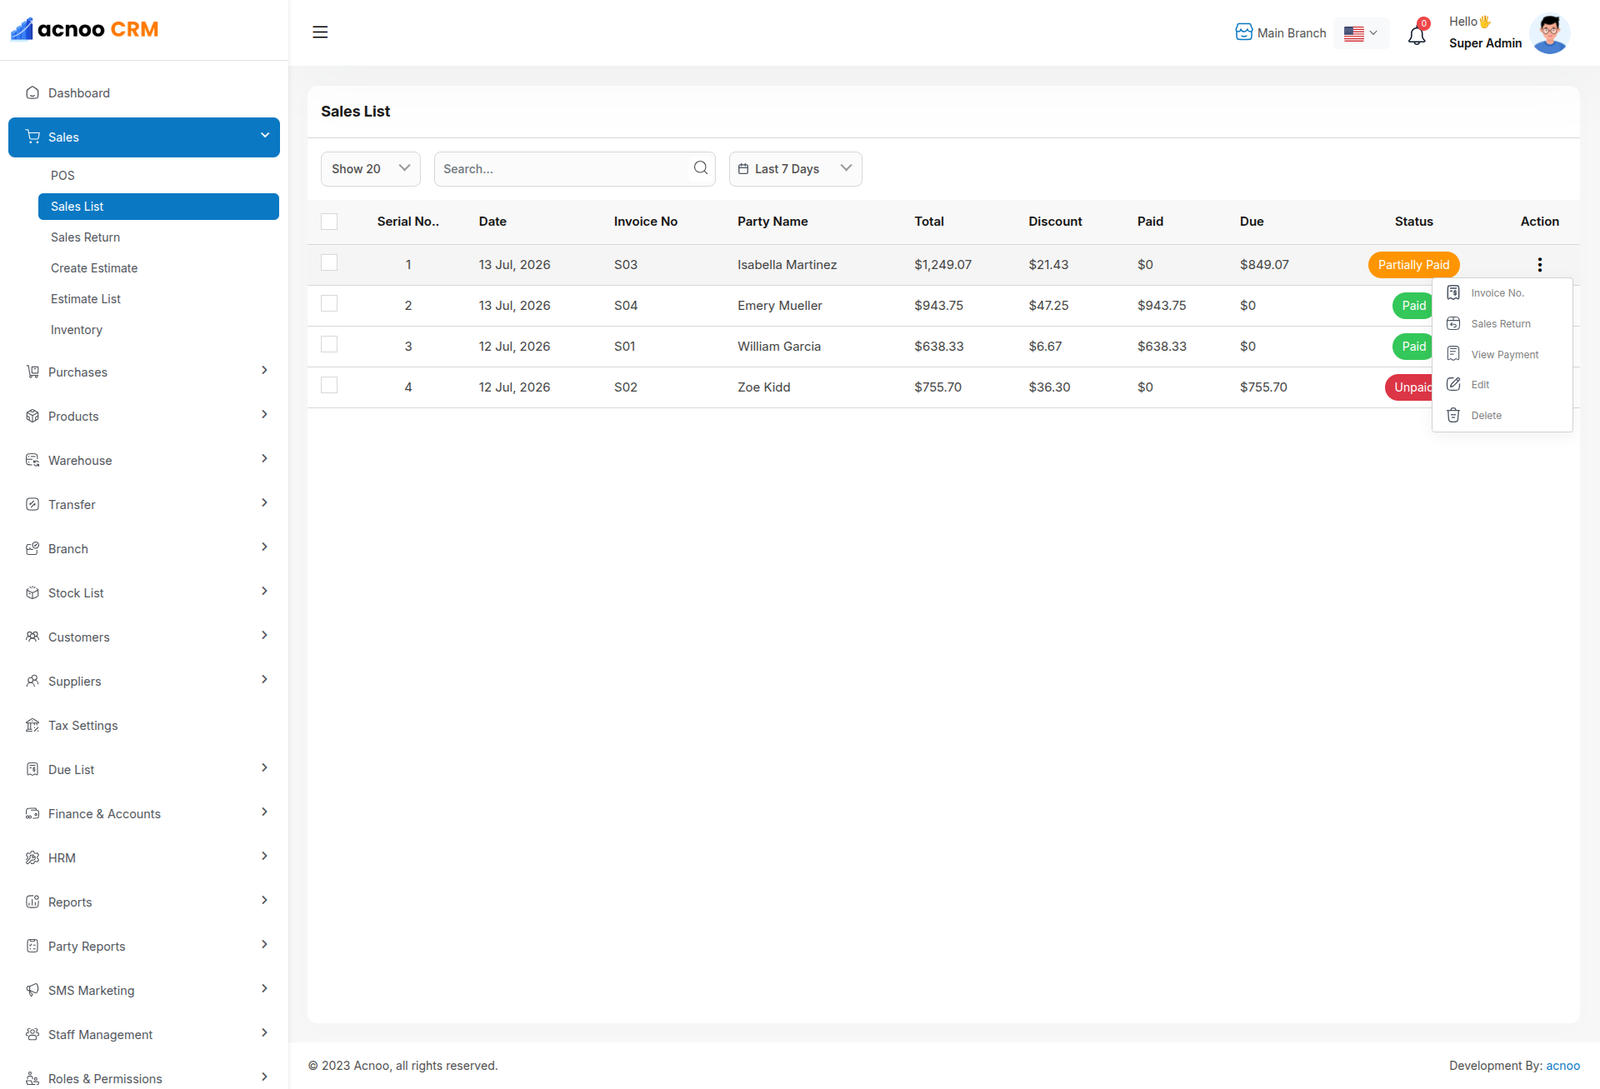
Create Sale Return
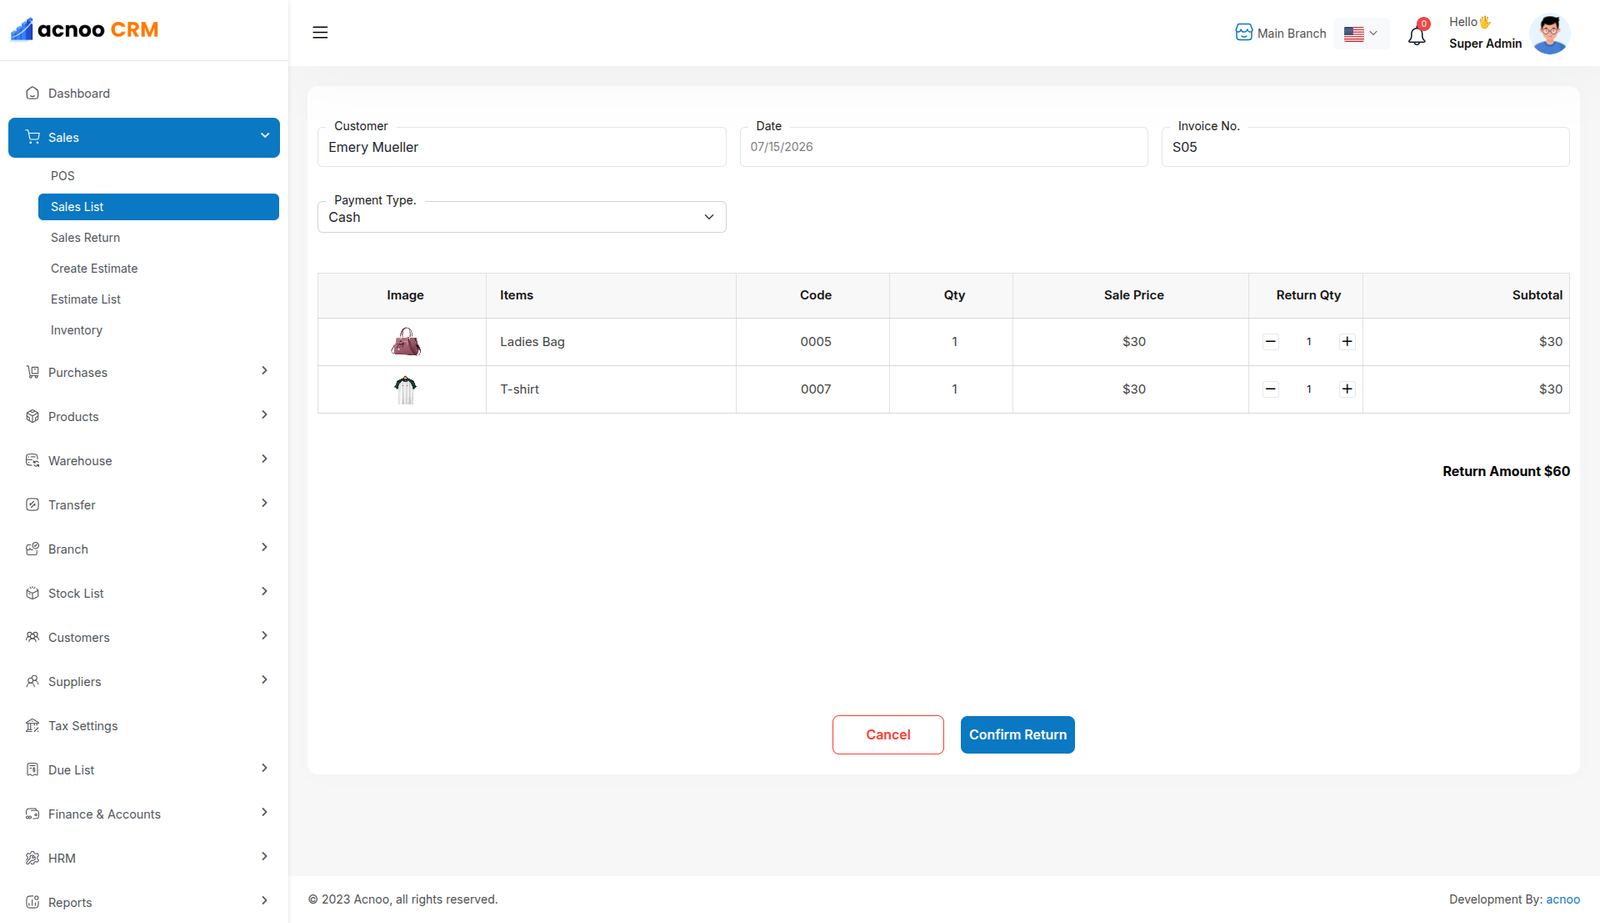
From the Sale list, when you click on Sales Return, this page will appear. By adjusting the quantity, you can return the desired amount. However, you cannot return more than the quantity sold.
Sale Return List
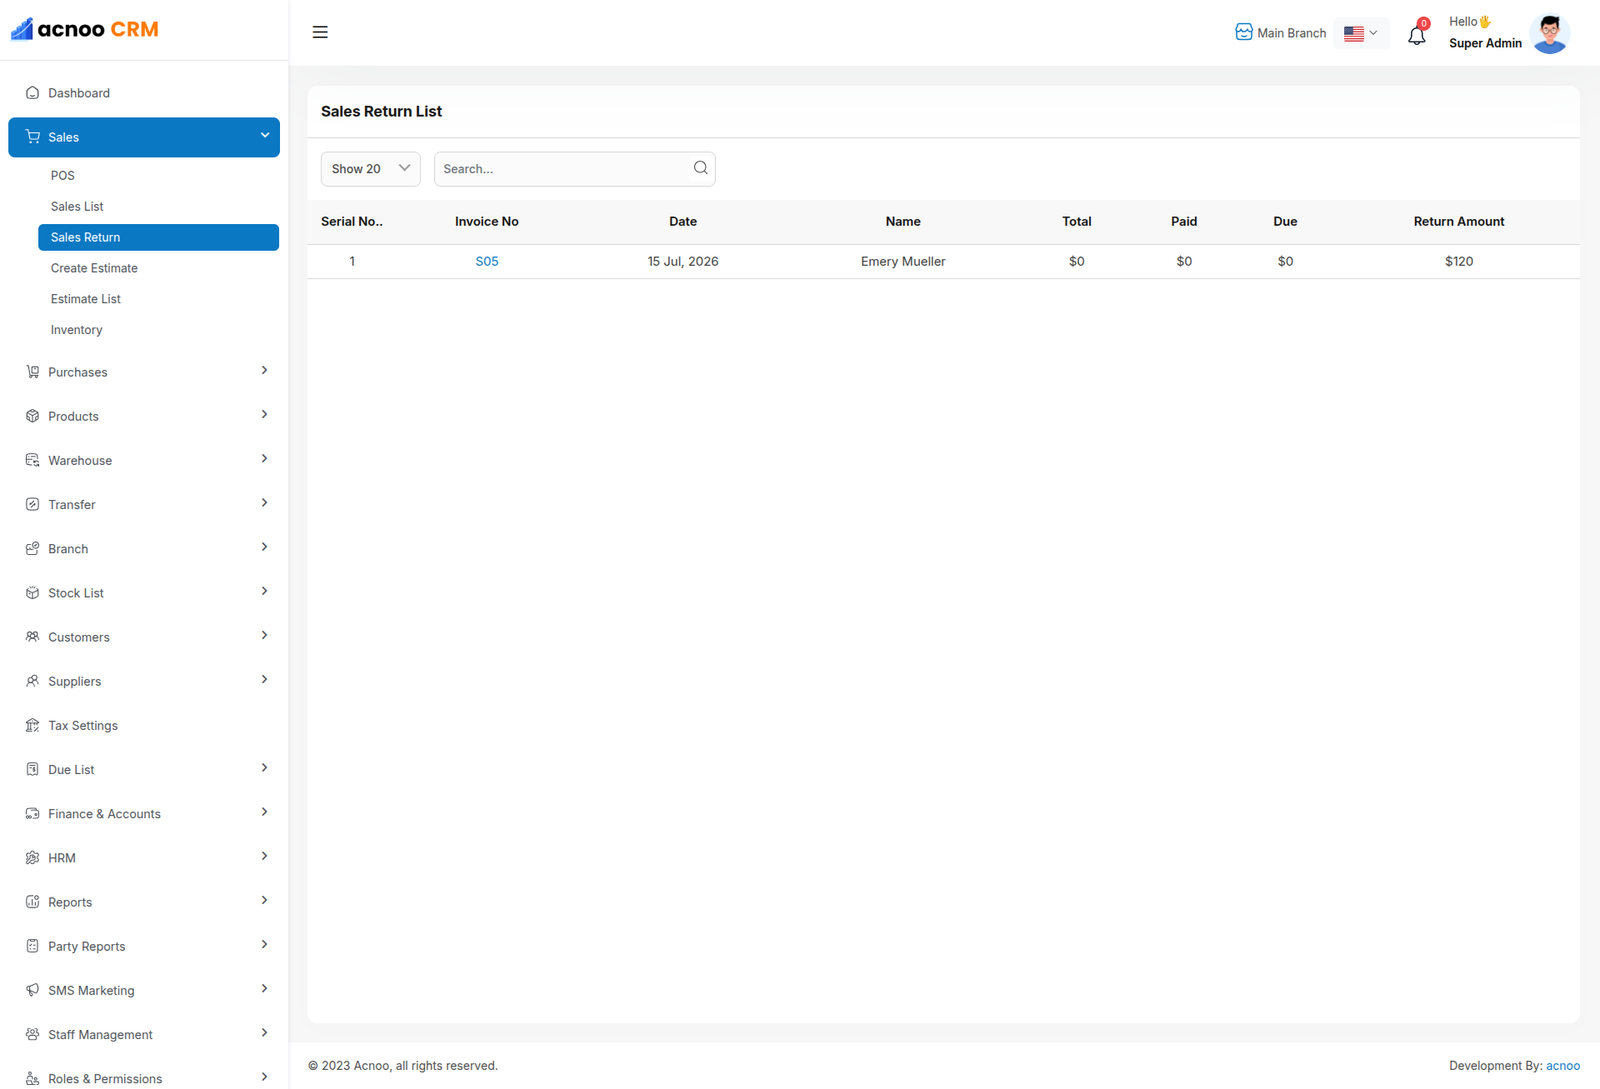
Here, you can view the complete list of sale returns with a filtering option. To view an invoice, simply click on the invoice No.
Create Purchase
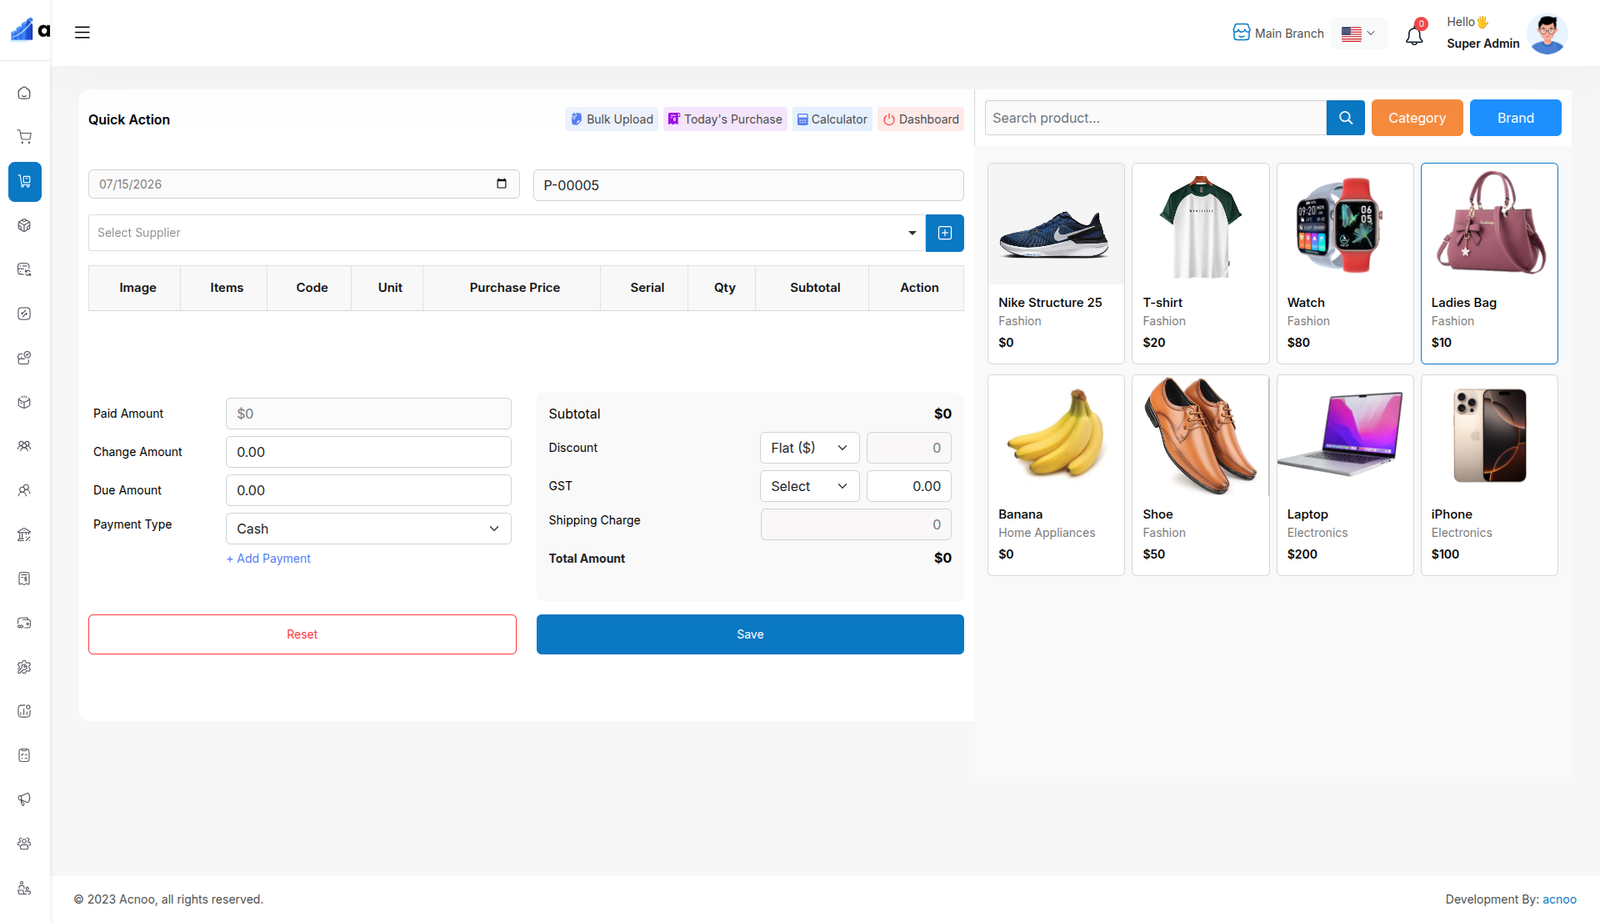
By clicking on "Purchase New," you can create a new purchase. First, select a supplier. Next, choose a product for the purchase. Additionally, you can filter products by Category or Brand, using the same filters as in the Sale process.
Select Product
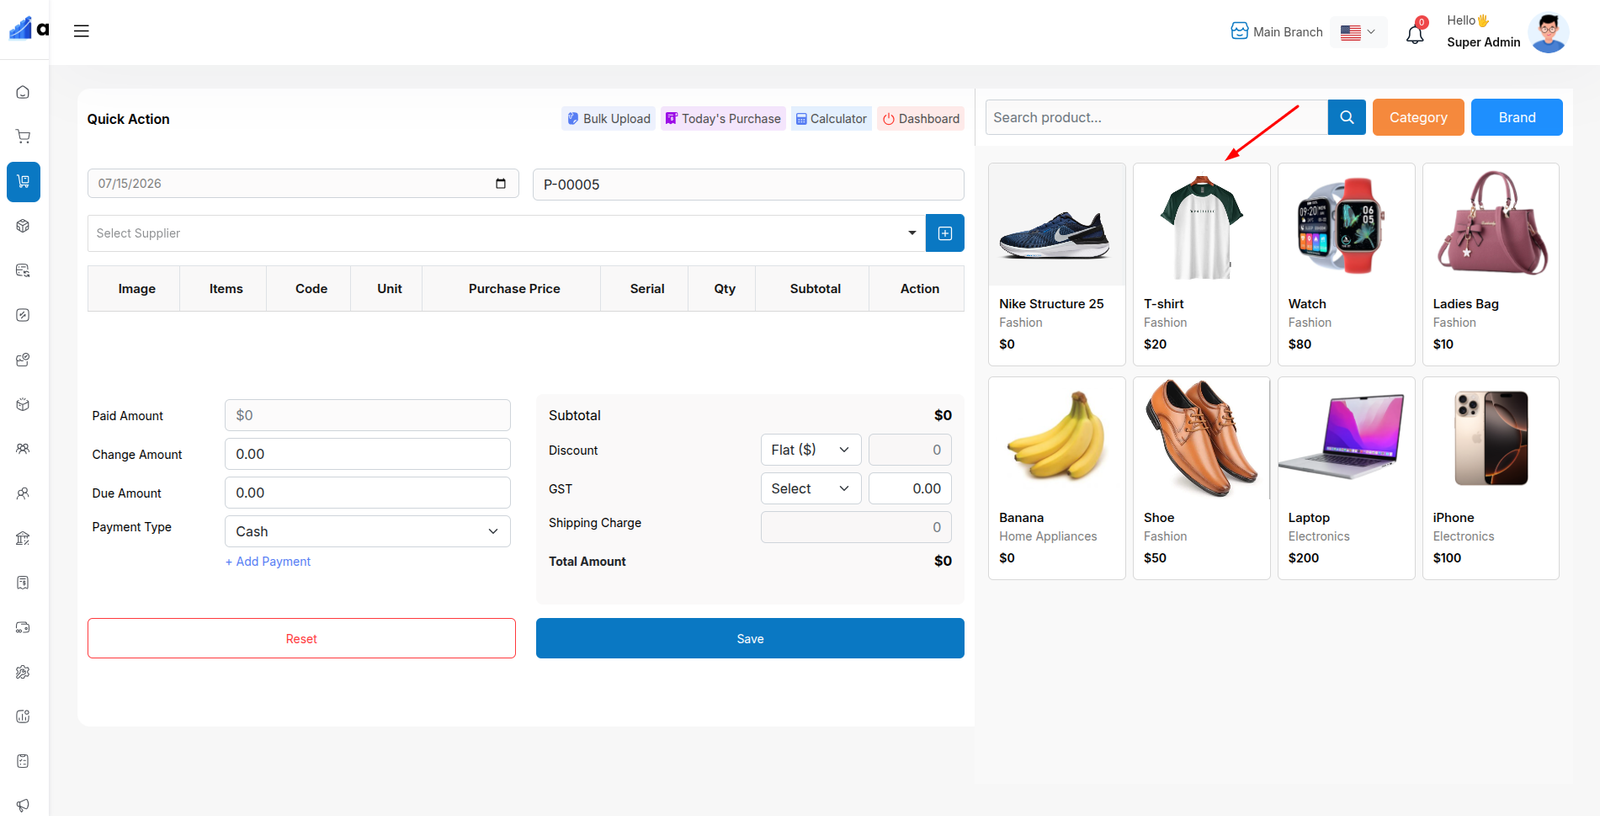
Next, select a product for the purchase. When you choose a product, a pop-up will appear. Enter the quantity you wish to purchase and update the prices as needed. Once done, click save.
Add to Cart & store product
After clicking the save button in the pop-up window, the product will automatically appear in the cart list. You can adjust the quantity using the plus or minus buttons or update it directly by entering a value. To remove a product from the cart, click the red cross button.
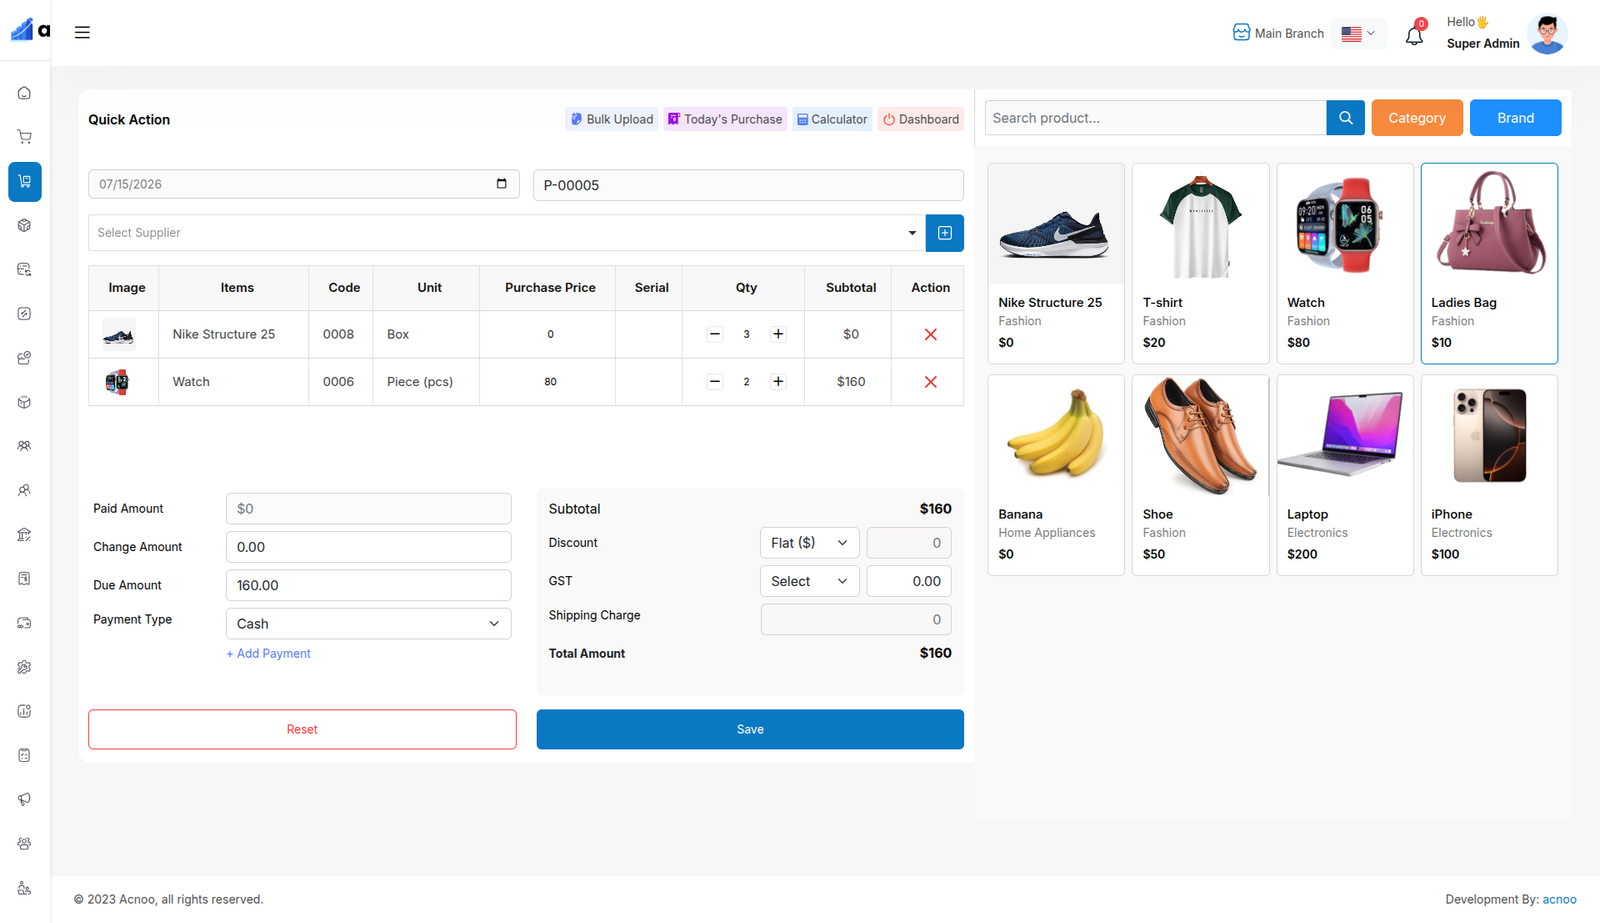
Below, you will see the subtotal of all products. You can also add discount to the subtotal. After the calculations, the total amount will be displayed. Next, you can enter the received amount. If the received amount is greater than the total amount, the remaining balance will be shown in the "Change Amount" field. If the received amount is less, the "Due Amount" field will display the difference. If you want to remove all products from the list, click the cancel button. Once everything is correct, click the save button to complete the purchase.
Purchase List
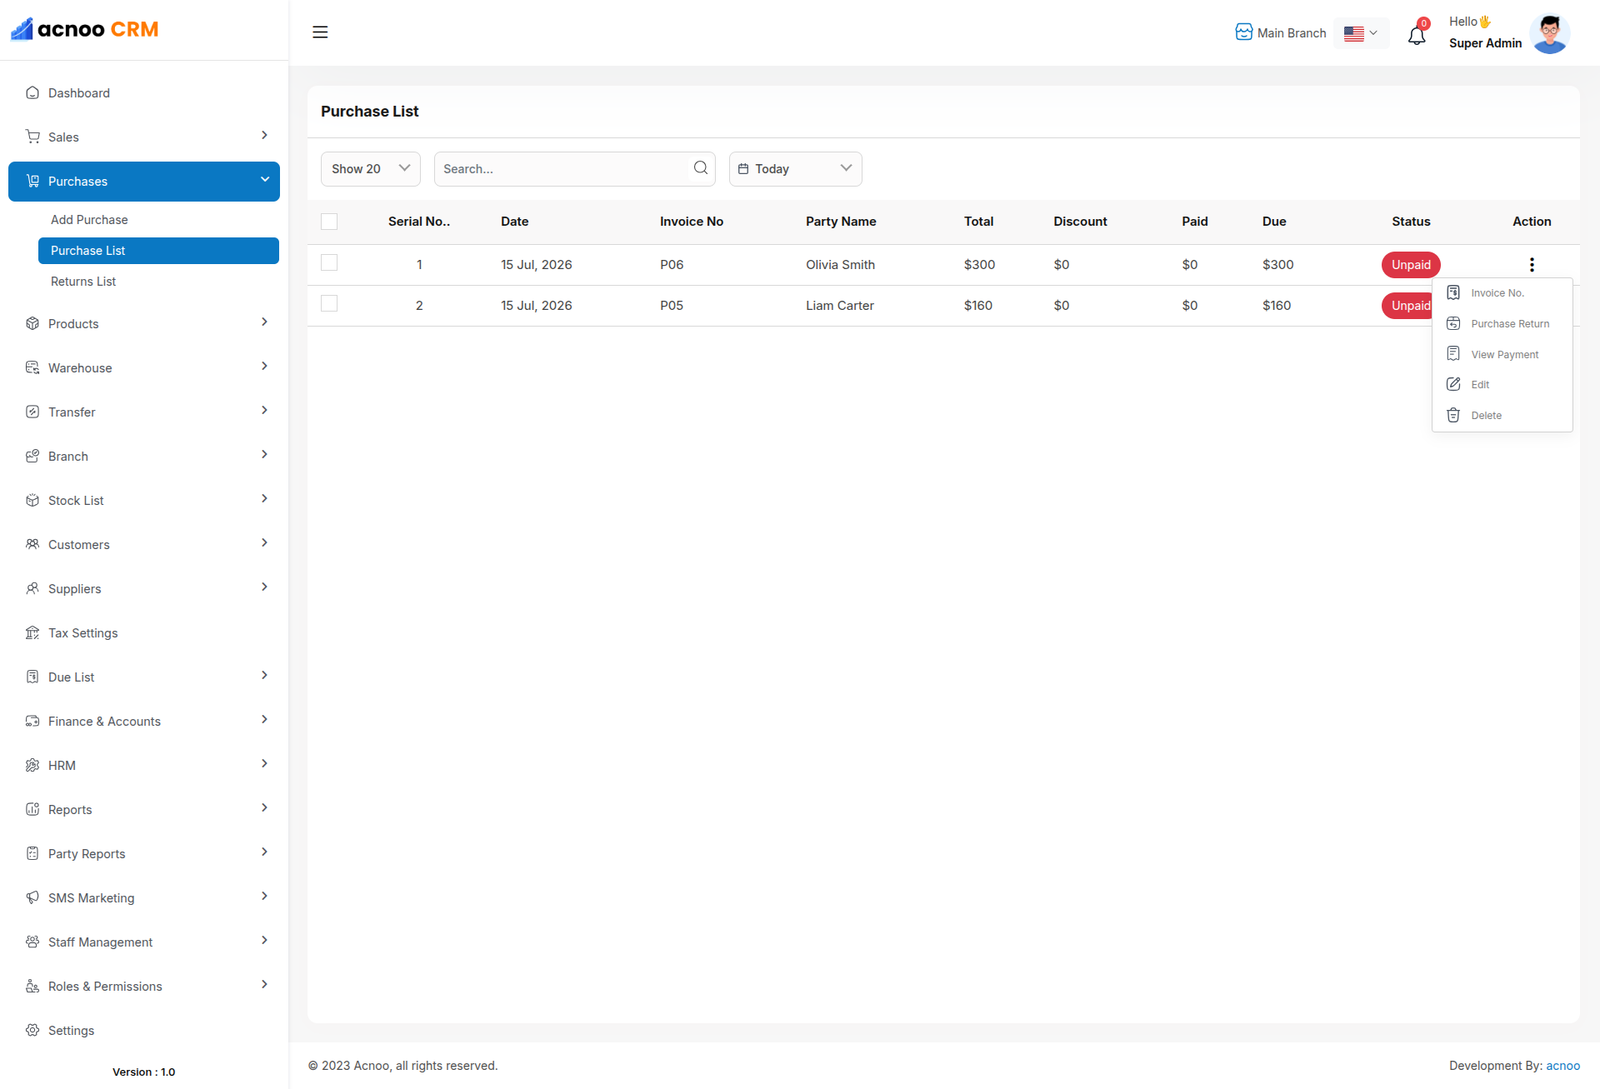
This appears to be a screenshot of the Purchase list page, where you can filter data using the search function. Additionally, you can view invoices, as well as edit, delete, or use the multi-delete option. Furthermore, you will have the option to initiate a Purchase Return from this list. Please note, once a Purchase return is processed, you will no longer be able to update or delete the Purchase.
Create Purchase Return
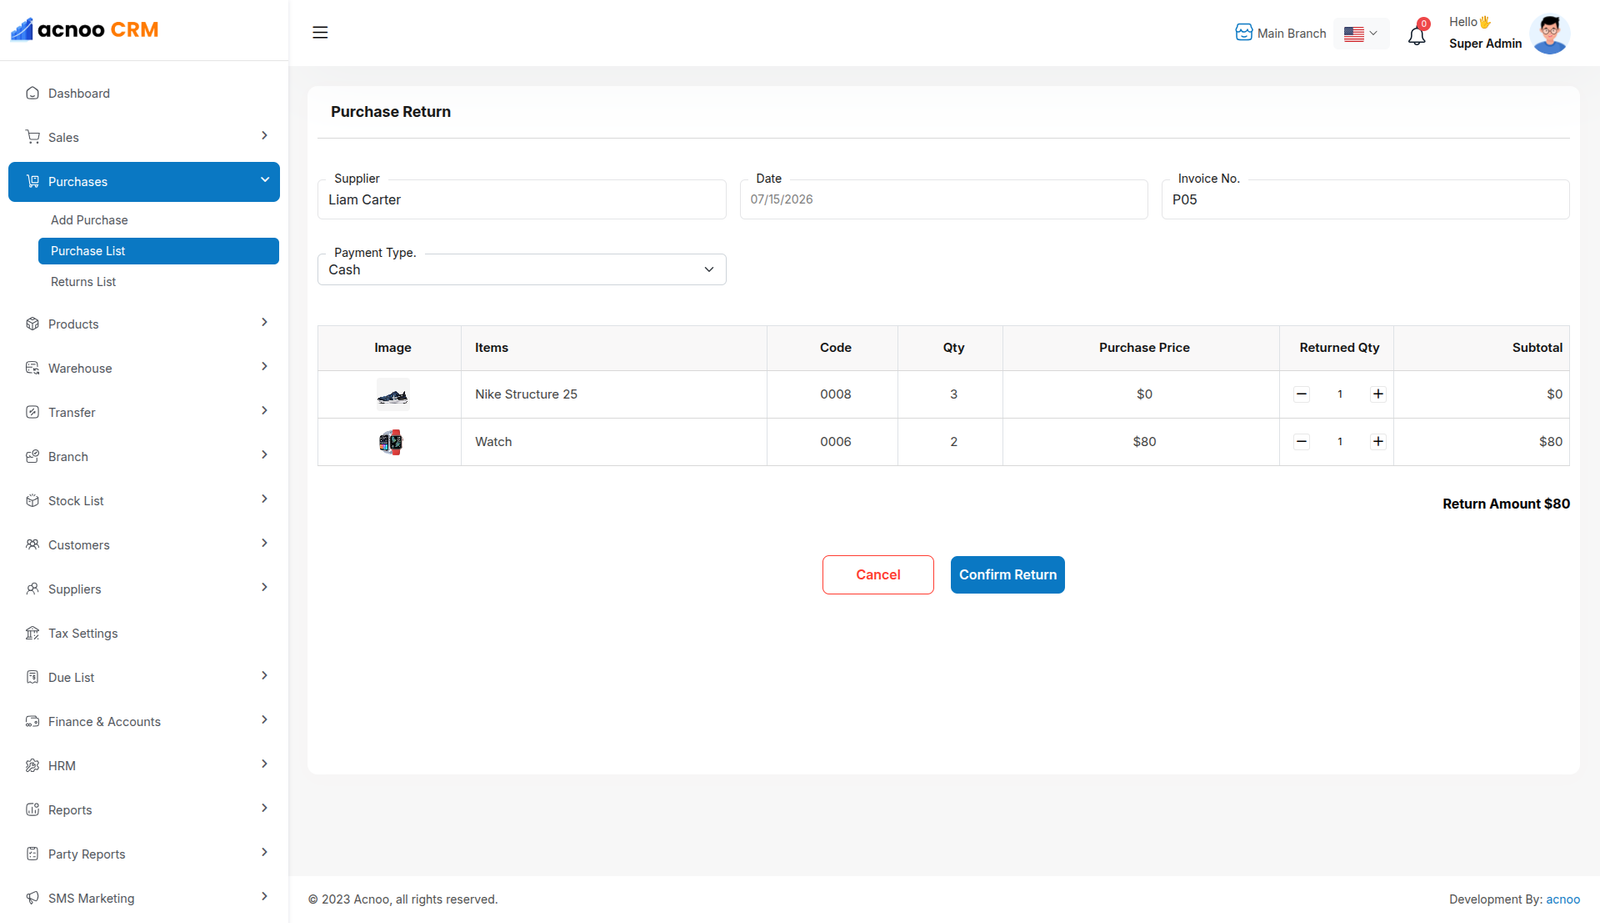
From the Purchase list, clicking on Purchases Return will open this page. You can adjust the quantity to return the desired amount, but you cannot return more than the purchased quantity.
Return List
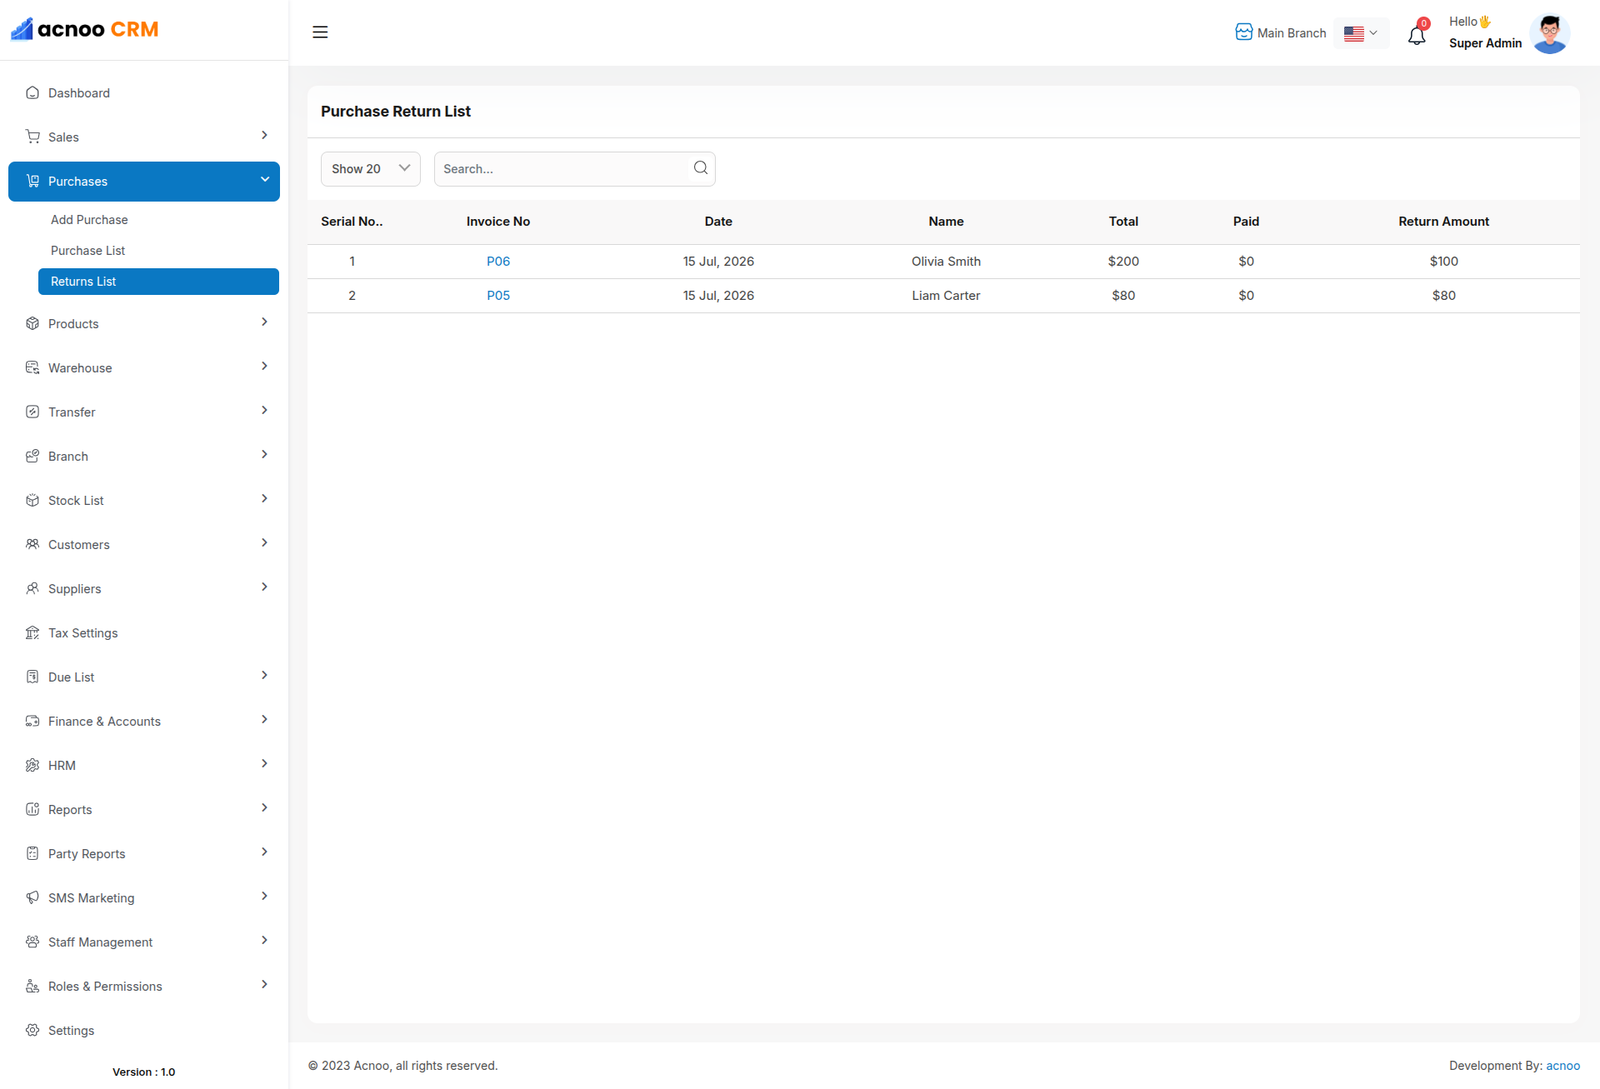
Here, you can view the complete list of Purchase returns with a filtering option. To view an invoice, simply click on the invoice No.
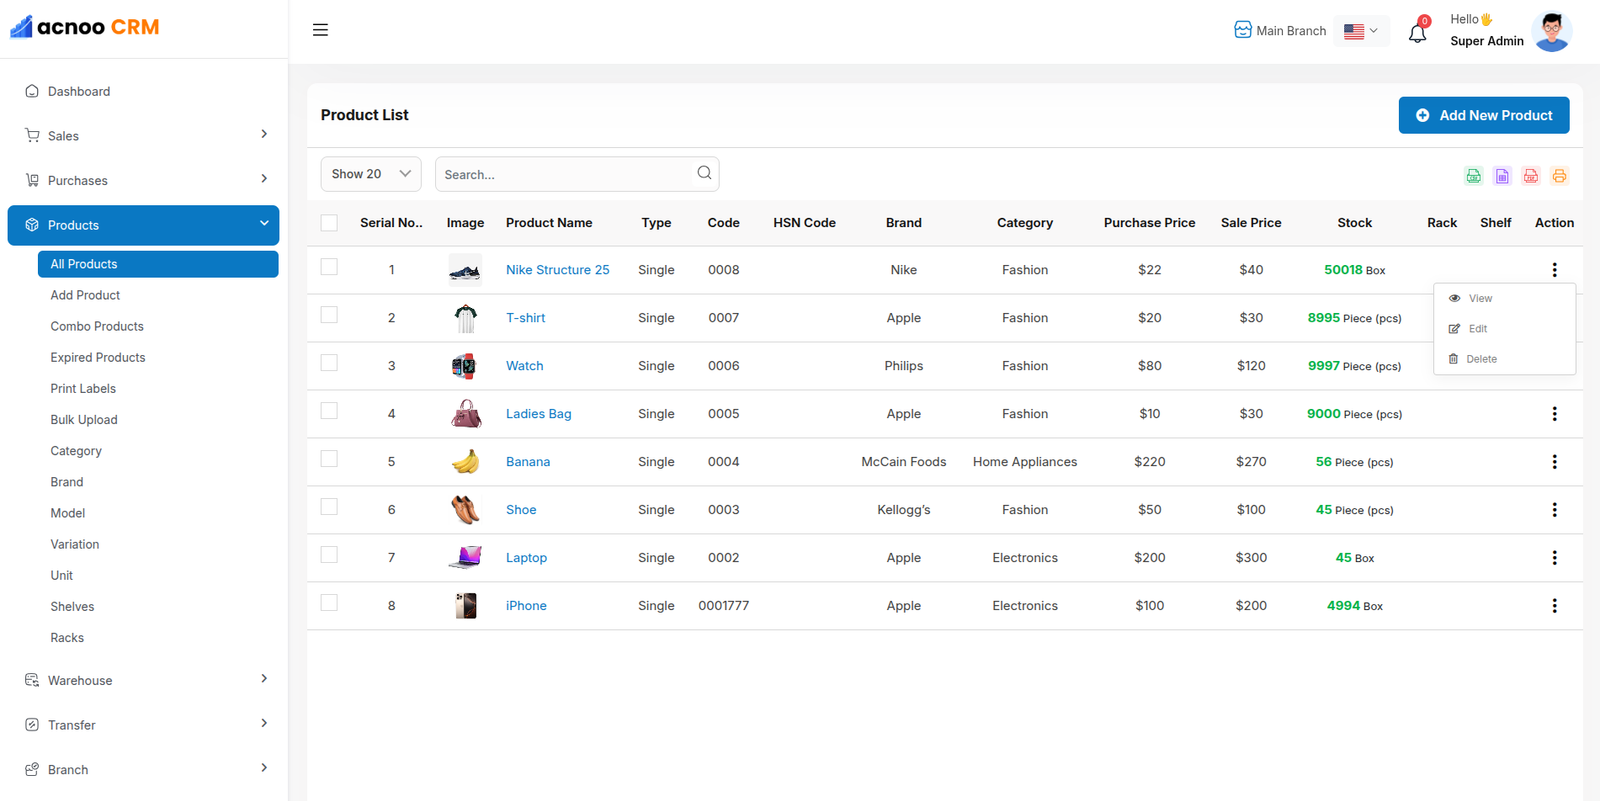
Product List
Here, you can view the Product list with filtering options available. The list can be exported as Excel, CSV, and there is also a print option. By clicking the "View" button, you can see details in a pop-up window. Additionally, you can edit, delete, or perform multi-delete actions.
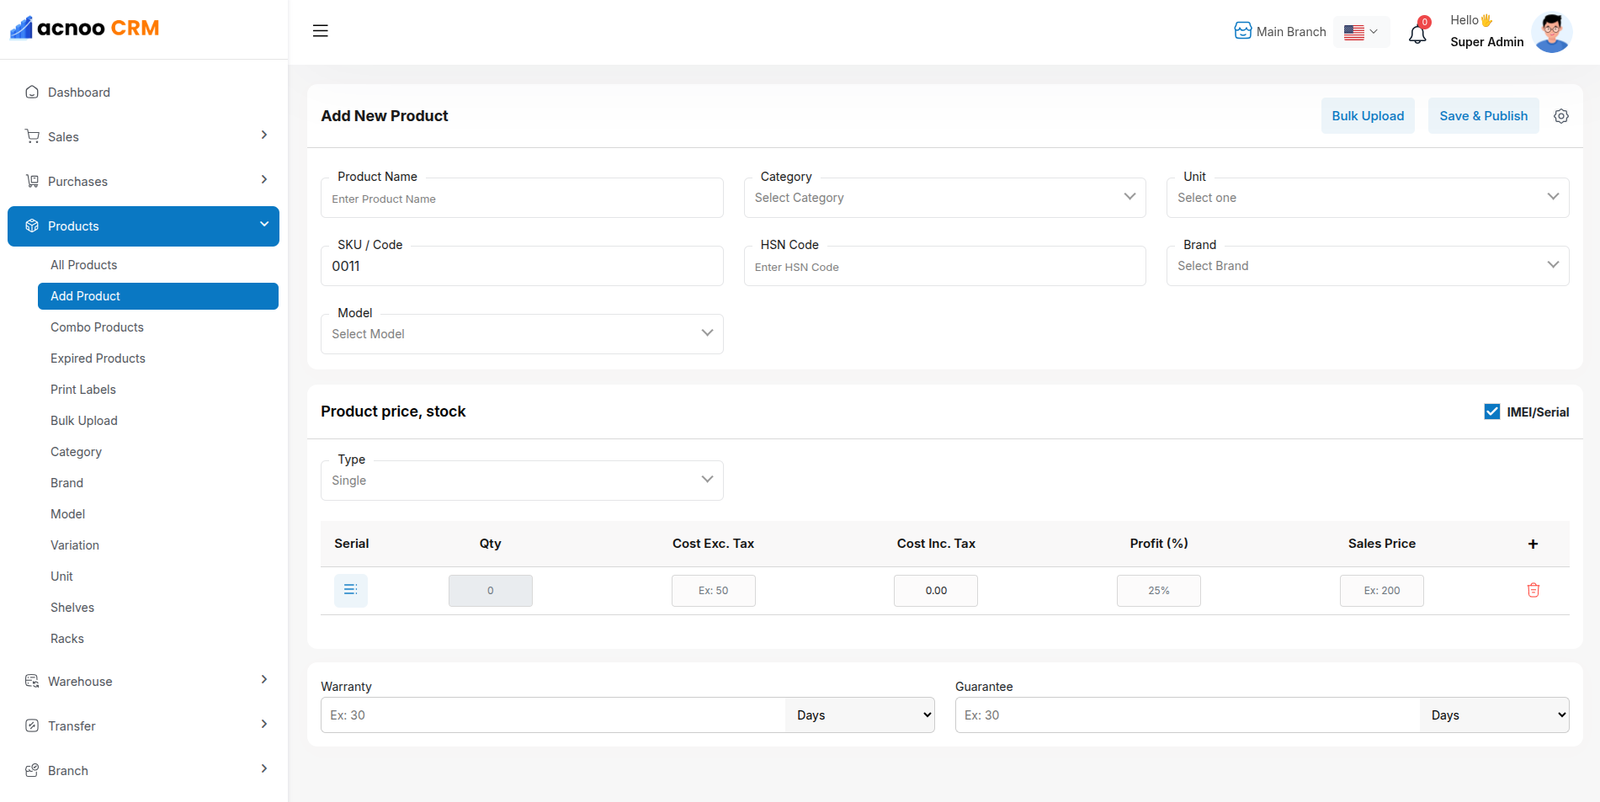
Create Product
You can create a product by filling in the required fields. When you select a Product Category, the associated variation fields (such as capacity, color, size, type, or weight) linked to that category will appear. You can then provide the necessary variations. The Product Code field will suggest a code by default, but you can update it if needed. Ensure you carefully input the product price. If everything is correct, click the save button to store the product.
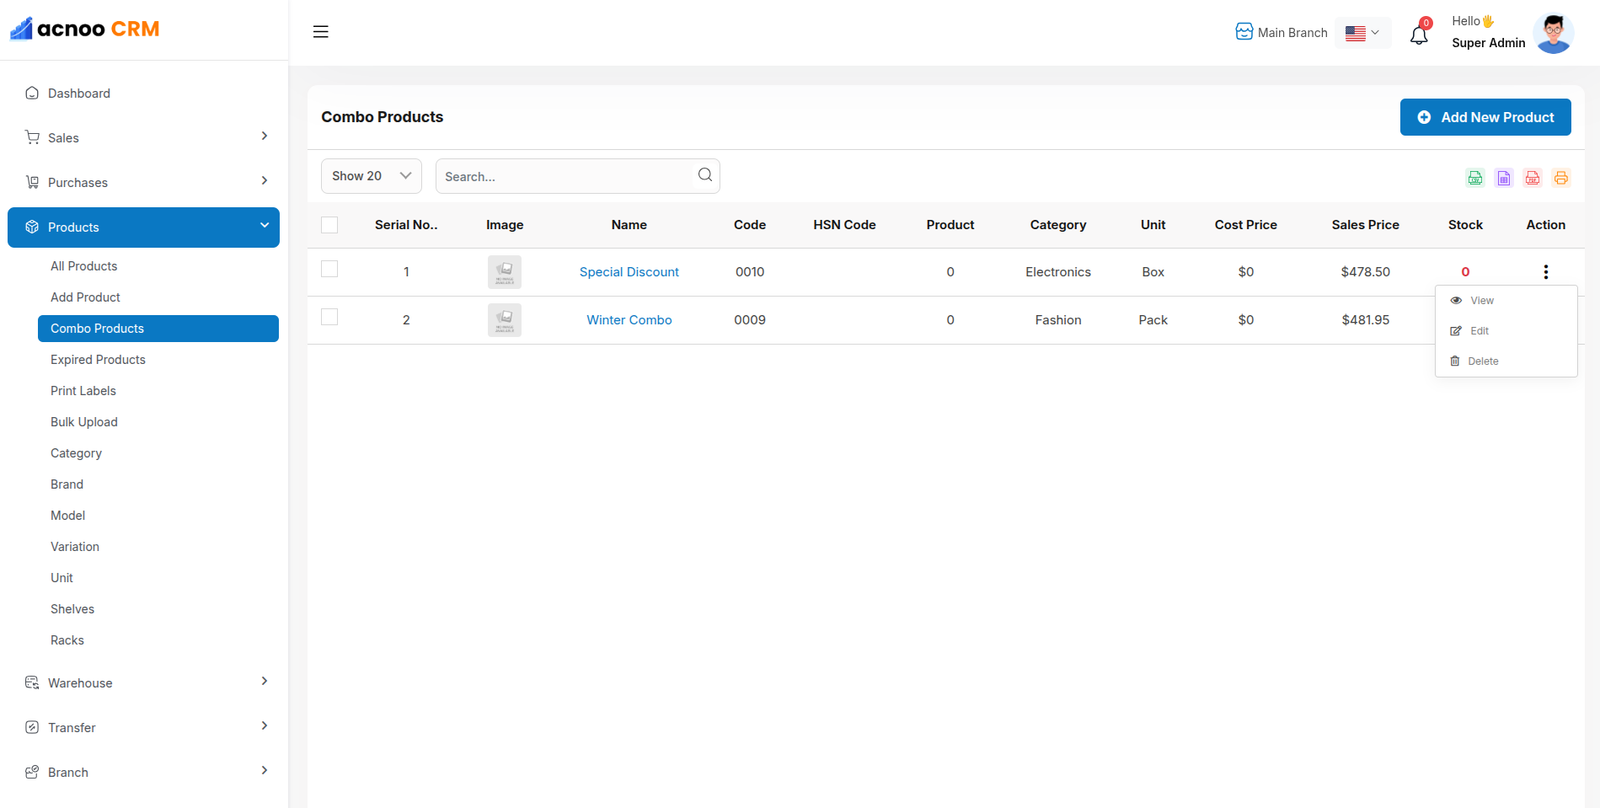
Combo Product
Here, you can view the Combo Product list with filtering options available. The list can be exported as Excel, CSV, and there is also a print option. By clicking the "View" button, you can see details in a pop-up window. Additionally, you can edit, delete, or perform multi-delete actions.
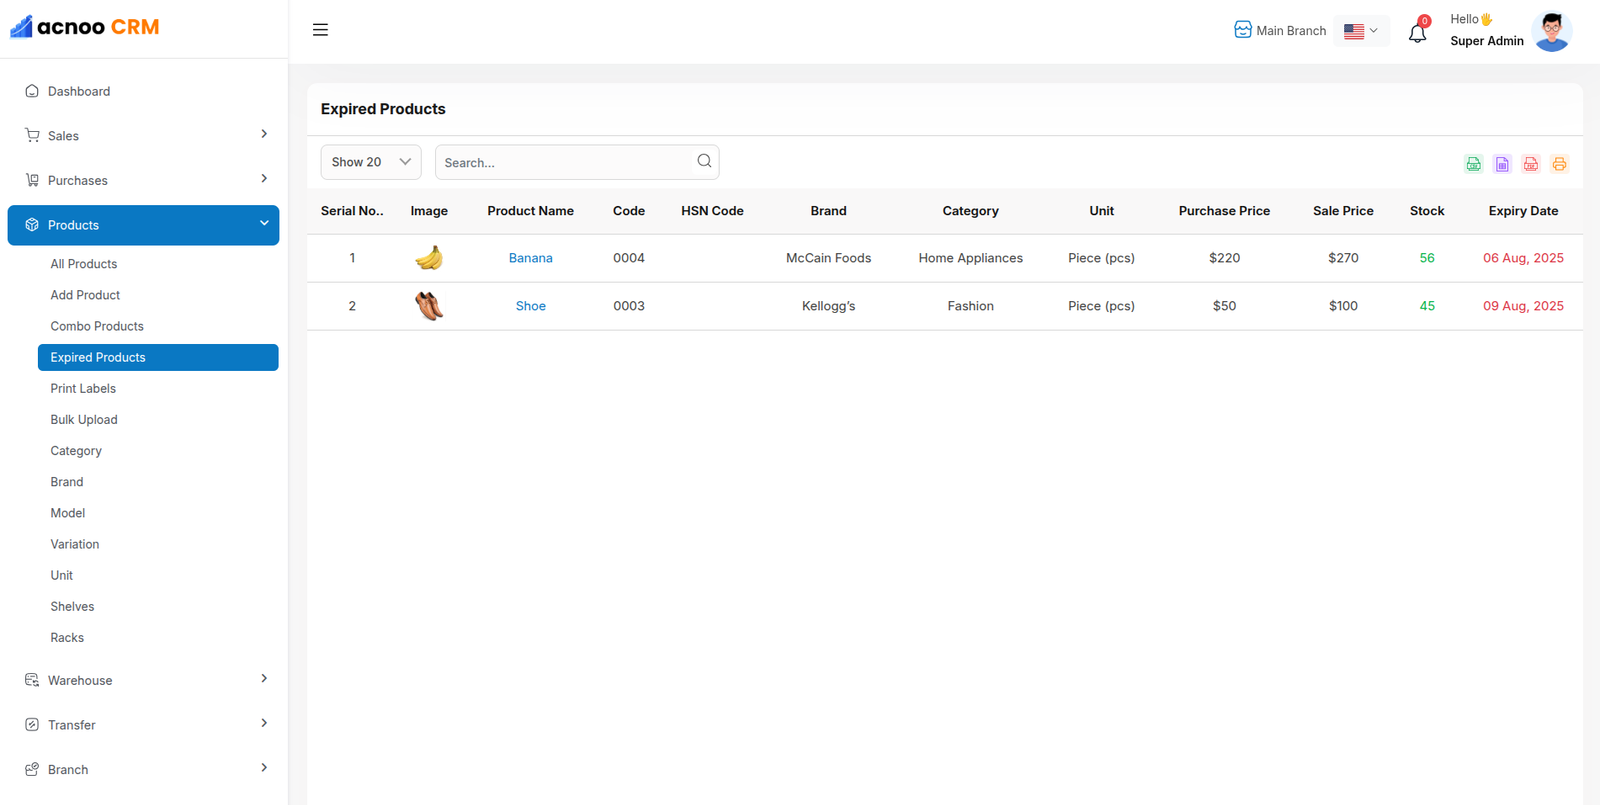
Expired Product List
Here, you can view the expire Product list with filtering options available. The list can be exported as Excel, CSV, and there is also a print option. By clicking the "View" button, you can see details in a pop-up window.
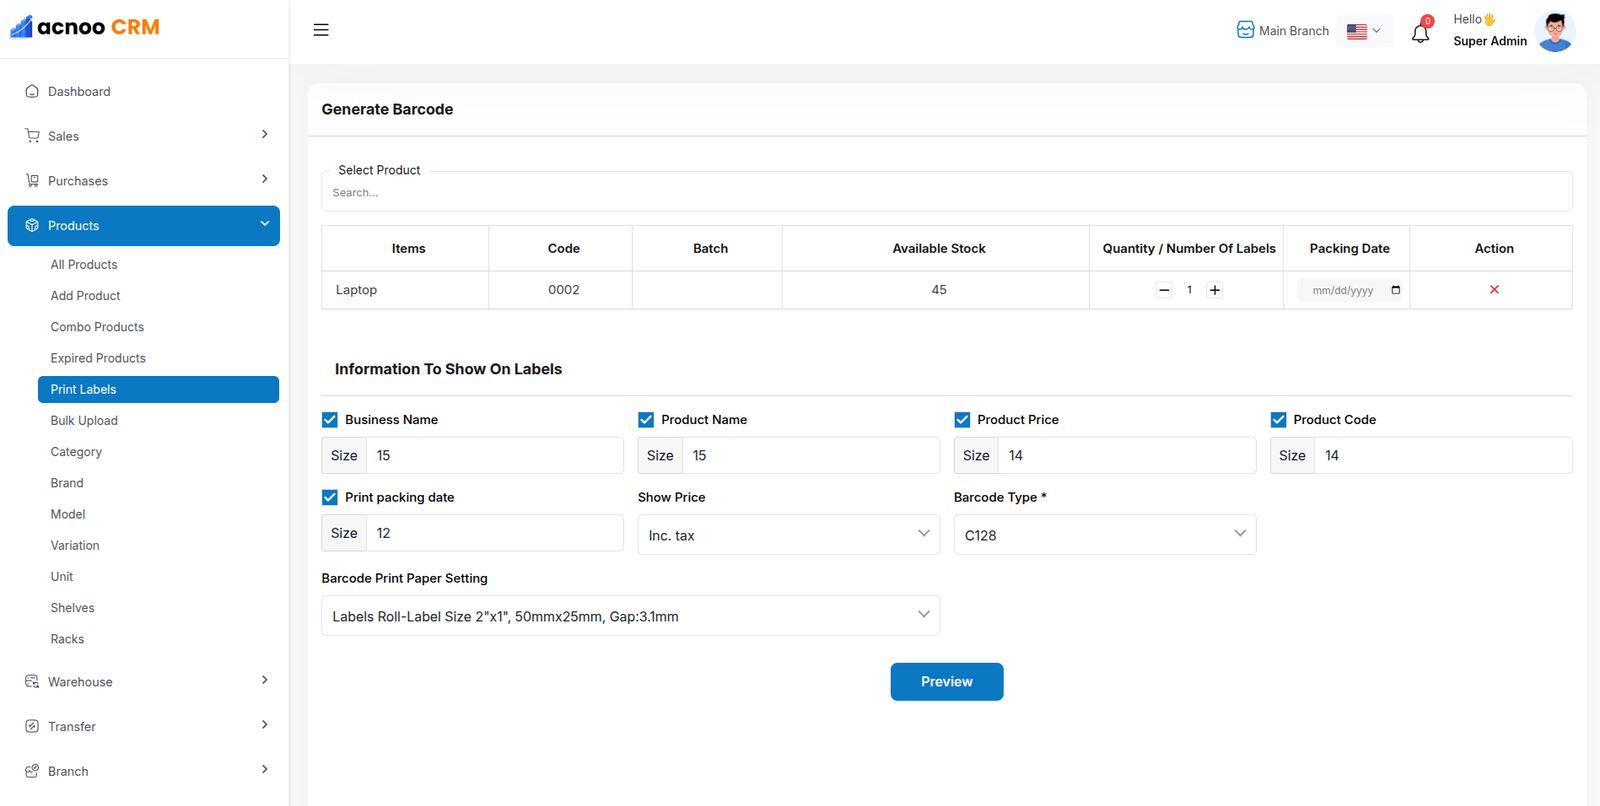
Print Labels
The Barcode Label Module in AcnooCRM allows users to generate and print barcode labels for selected products. Users can choose which information appears on the labels, including business name, product name, price, product code, packing date, and barcode. Each label uses the size defined for the product, and paper settings can be adjusted to ensure proper printing. Users can preview labels before printing to verify layout and content.
Bulk Uploads
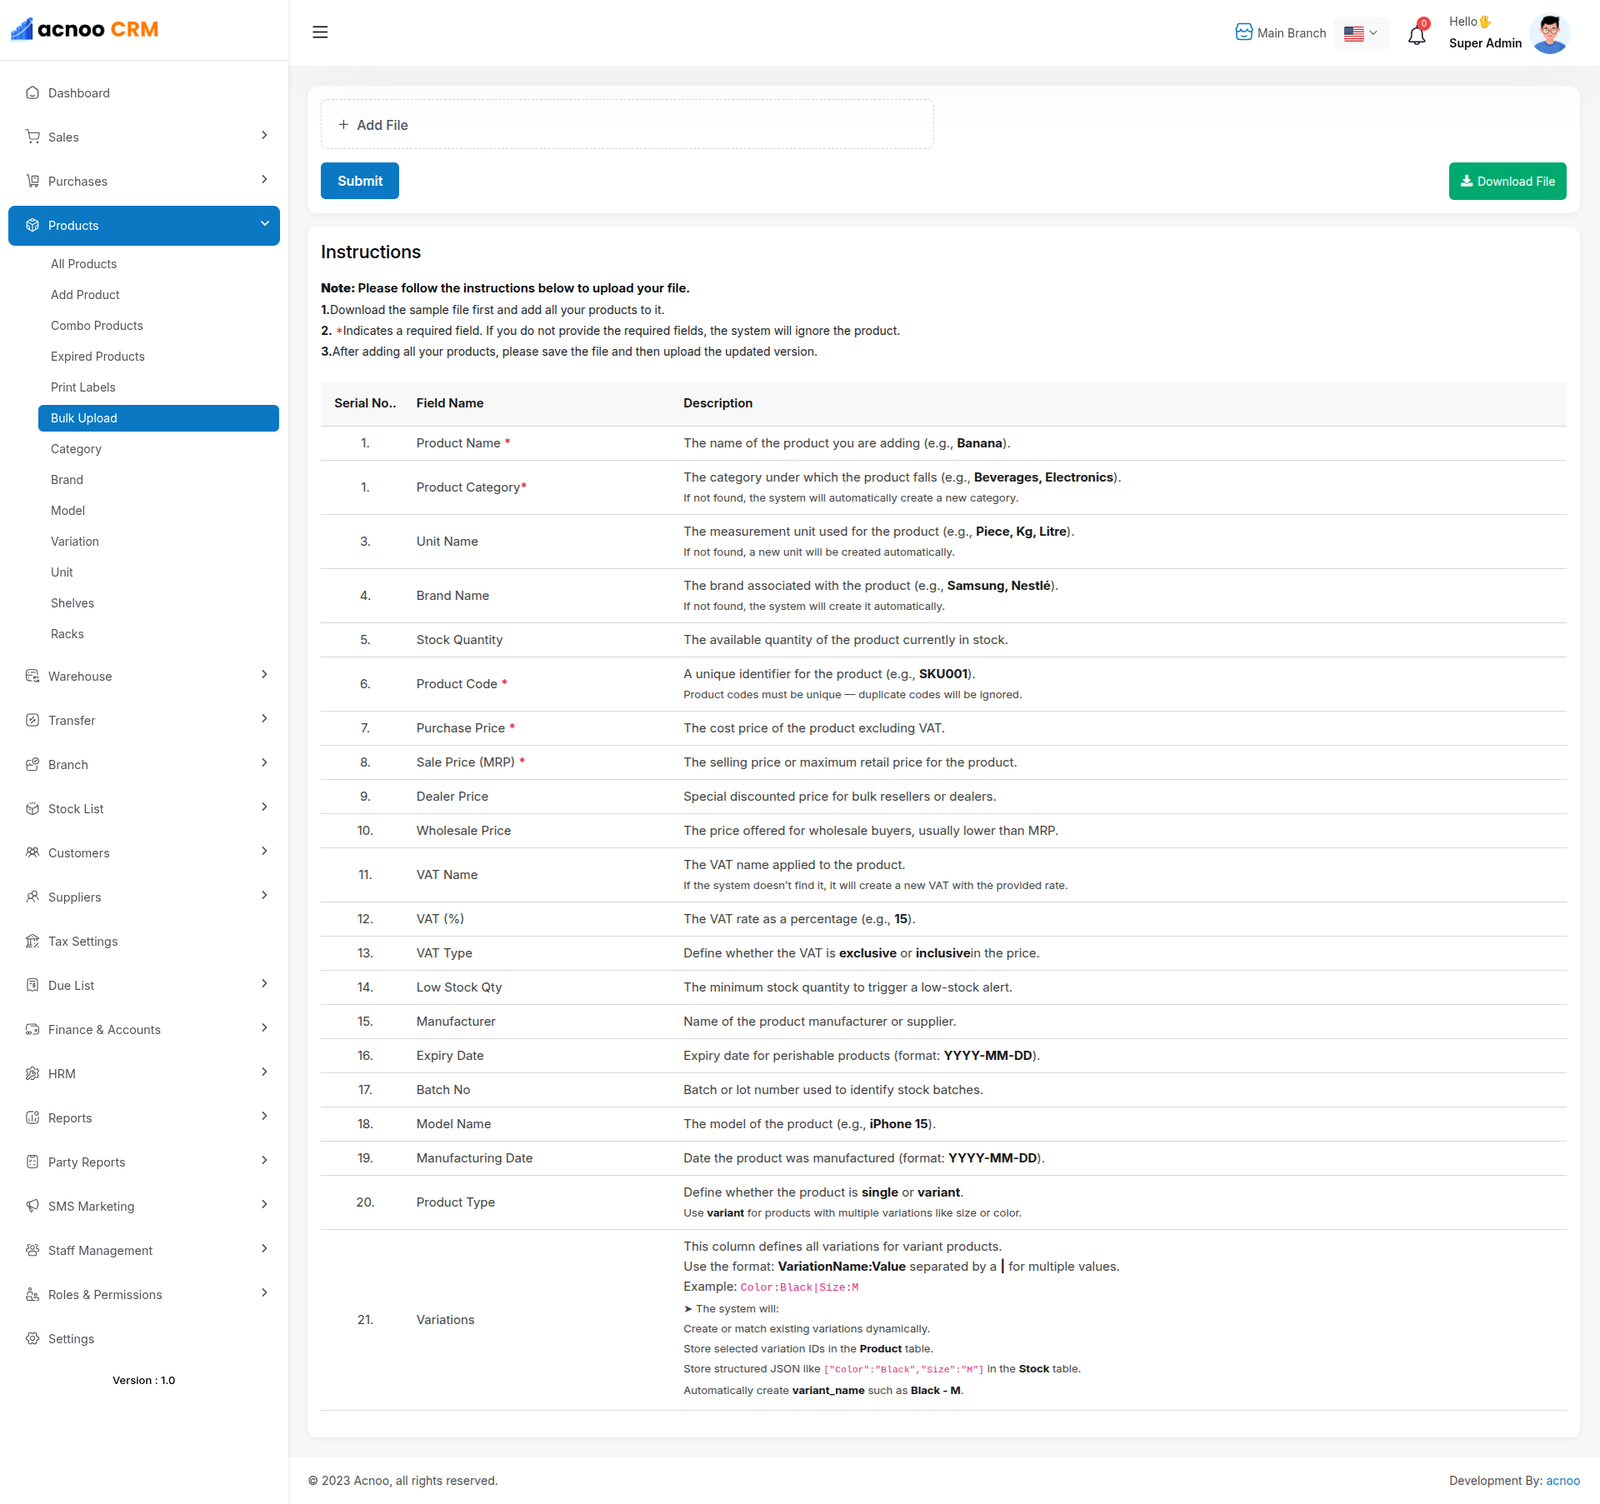
From the **Bulk Upload** module, users can upload a list of products in bulk. You can download a demo Excel file by clicking the download file button. This file contains all the columns that need to be filled, and columns marked with an asterisk (*) indicate mandatory fields. After completing the file, use the **Choose File** option to select your edited file for bulk upload, then click the **Submit** button. All roles, conditions, and instructions are illustrated in the image below for better understanding.
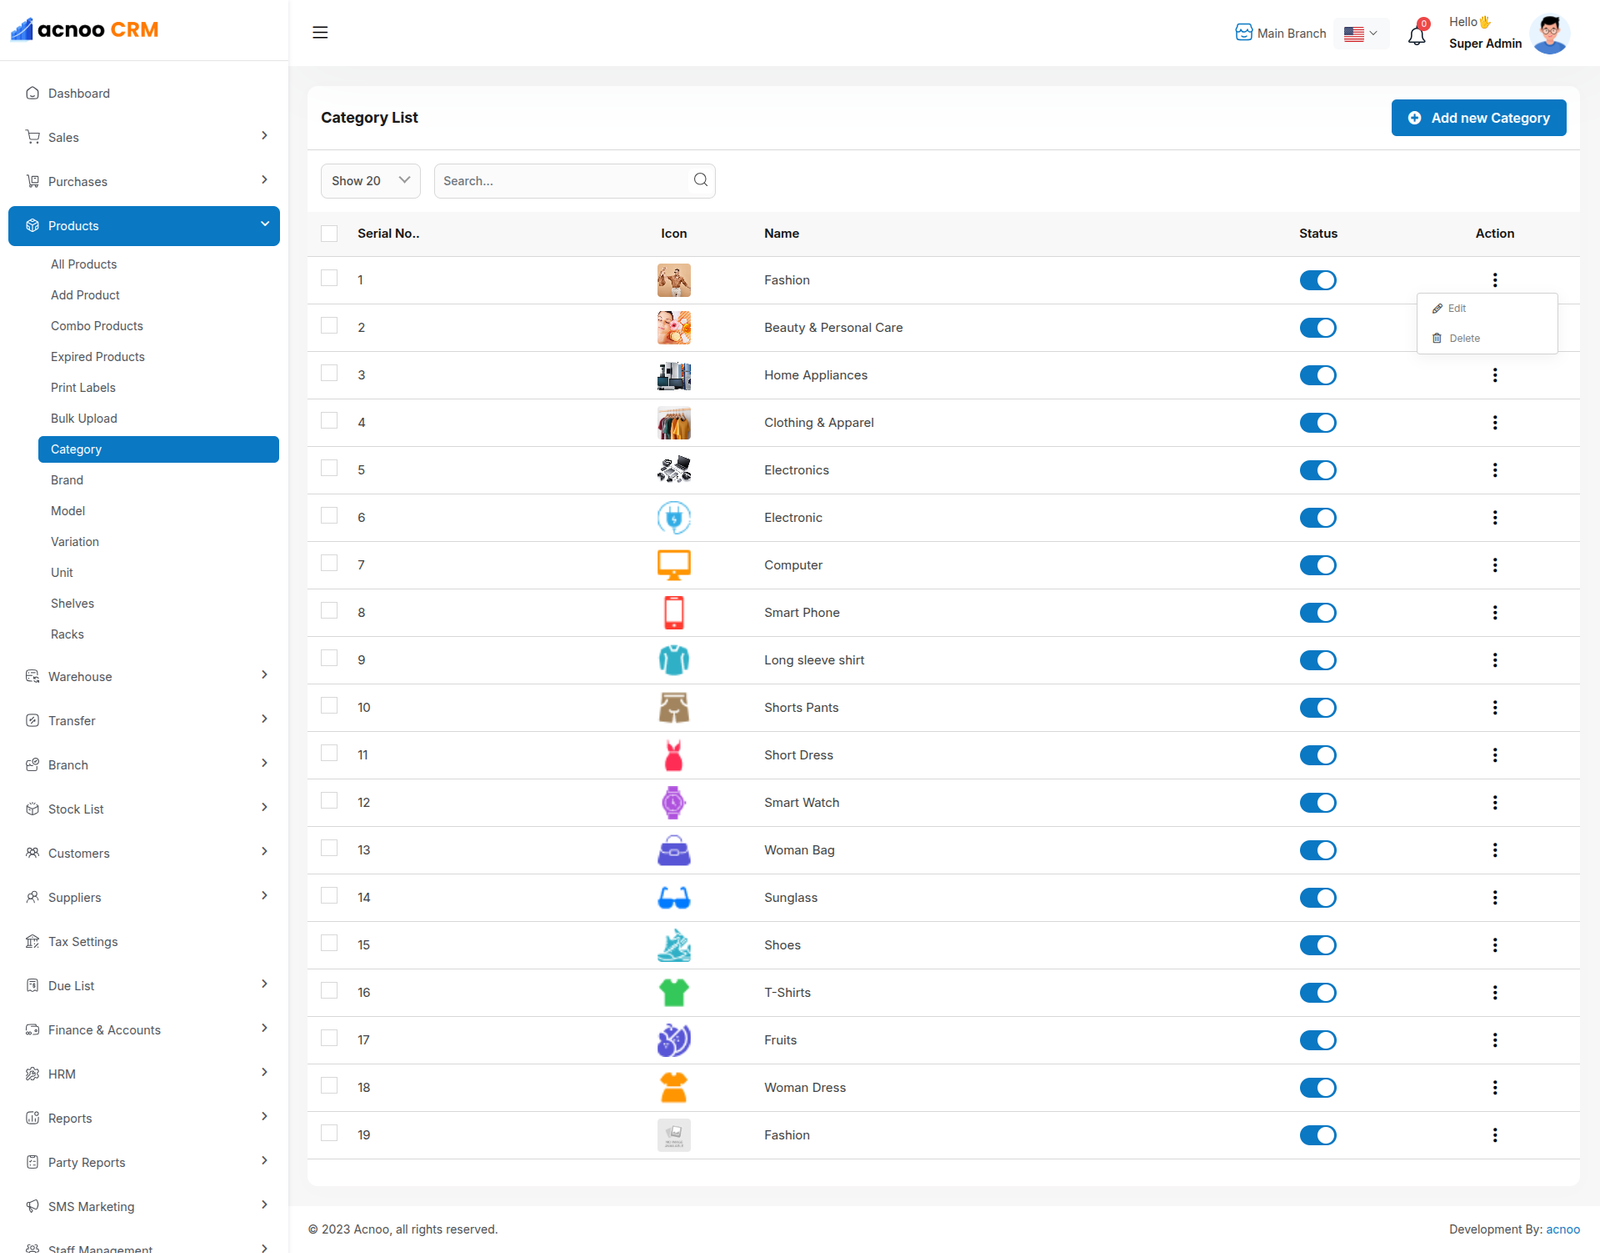
Category List
You can view the Category list with available filtering options. Furthermore, you have the ability to edit, delete, or use the multi-delete function.
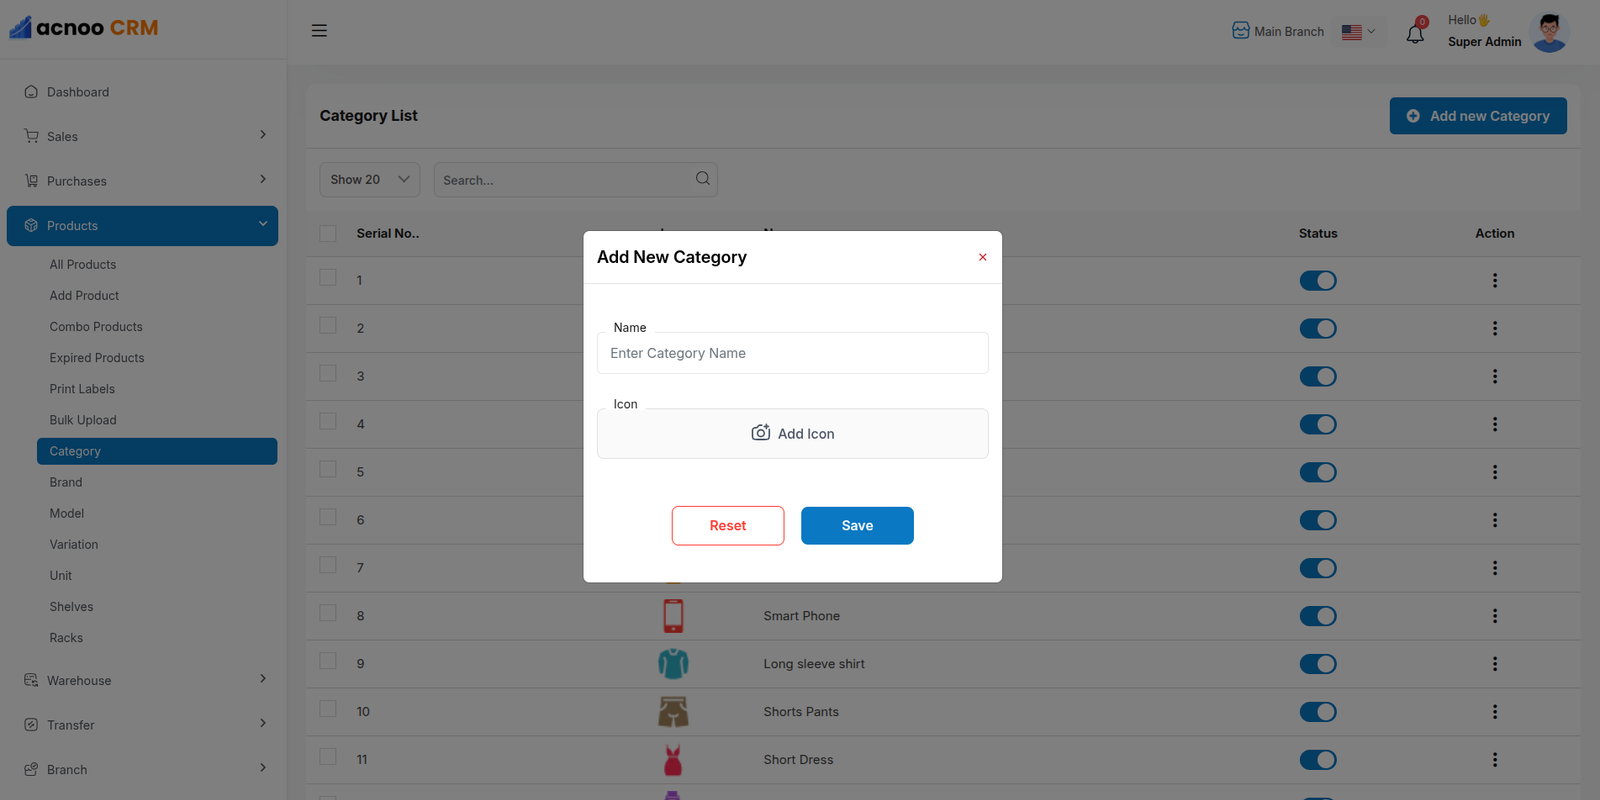
Create Category
You can create a Category by filling in the required fields and selecting the desired variation.
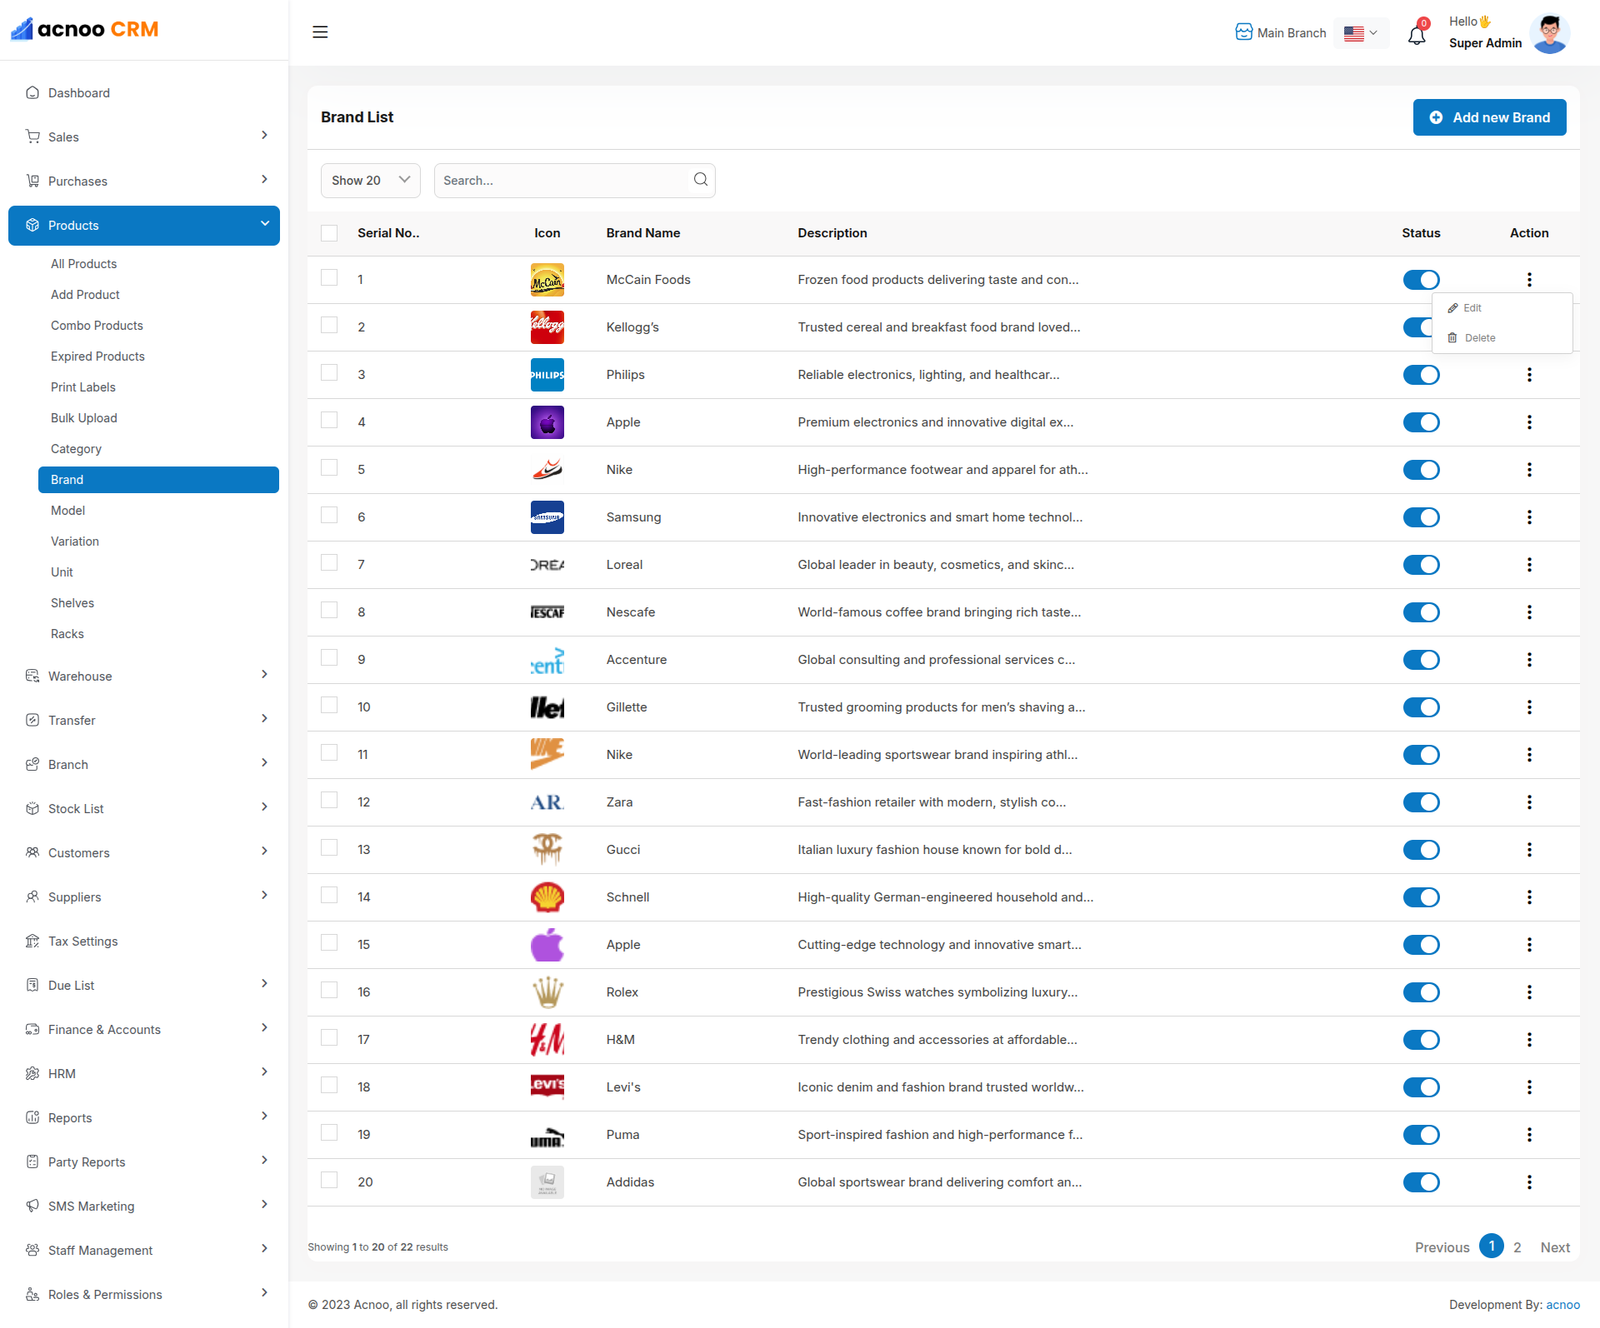
Brand List
You can view the Brand list with available filtering options. Furthermore, you have the ability to edit, delete, or use the multi-delete function.
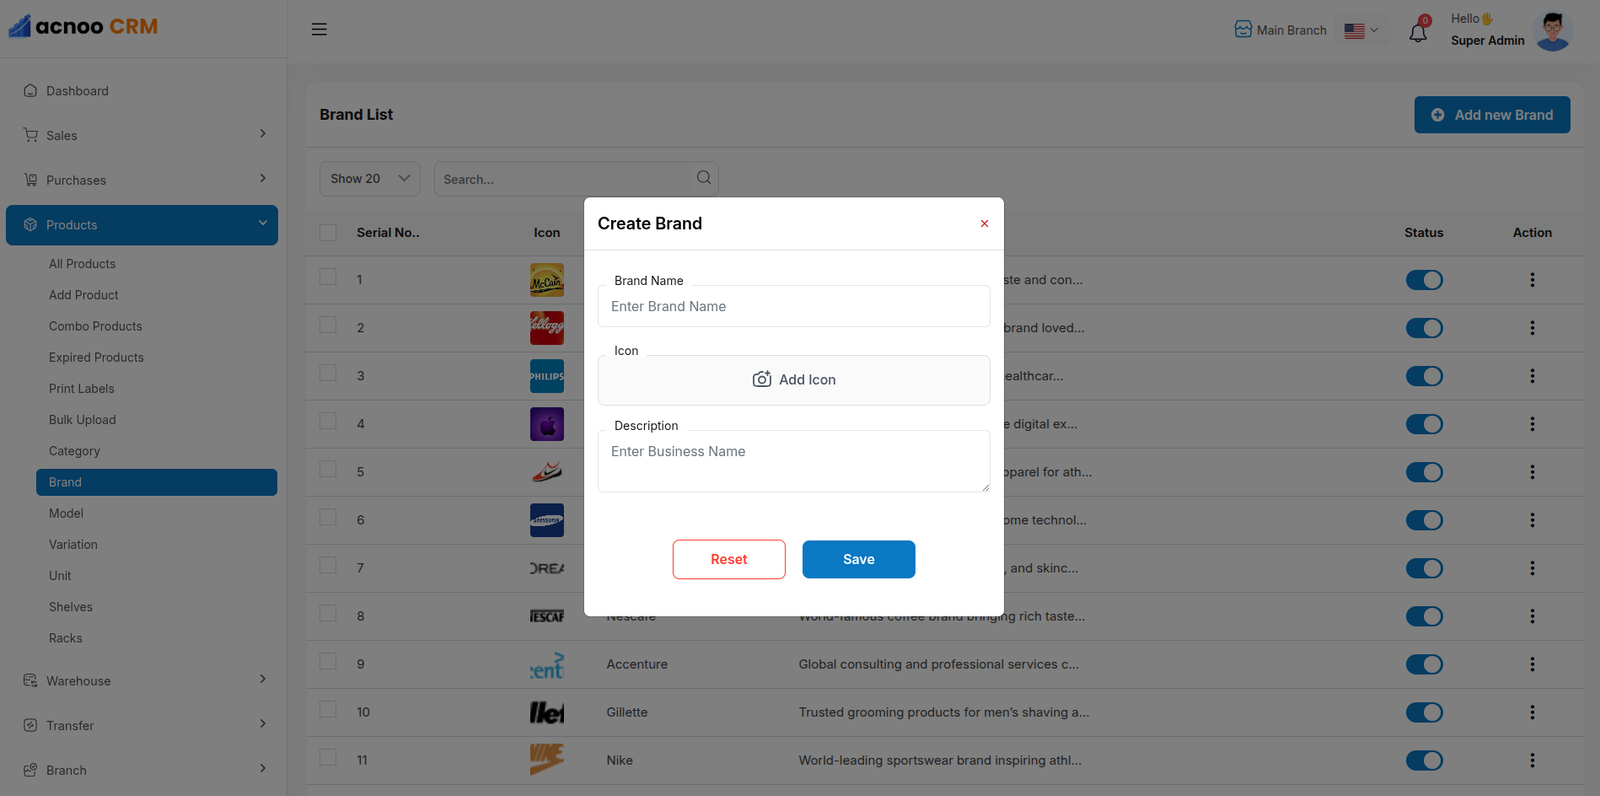
Create Brand
You can create a Brand by filling in the required fields.
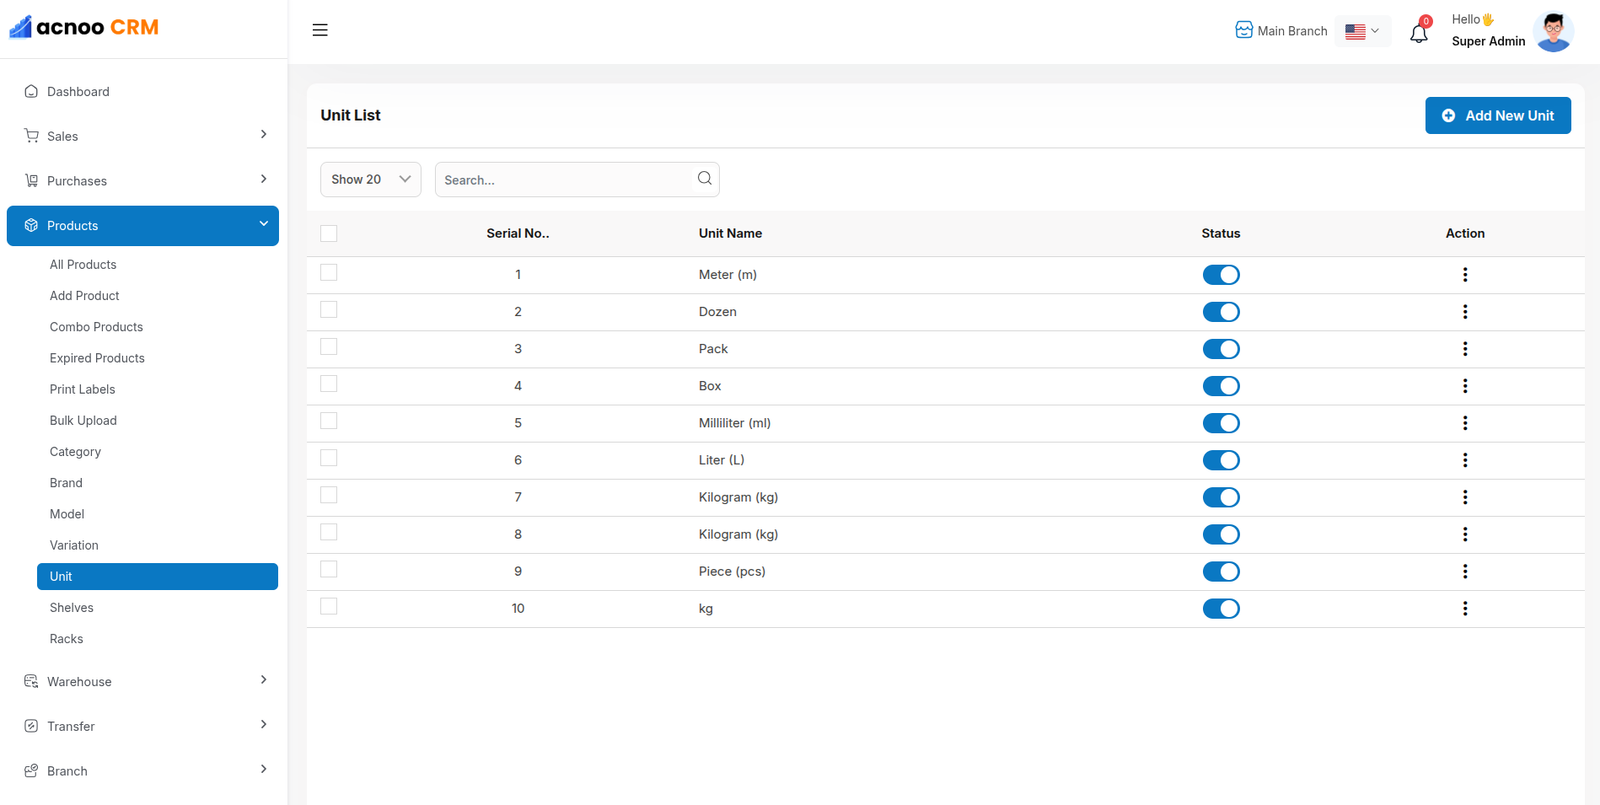
Unit List
You can view the Unit list with available filtering options. Furthermore, you have the ability to edit, delete, or use the multi-delete function.
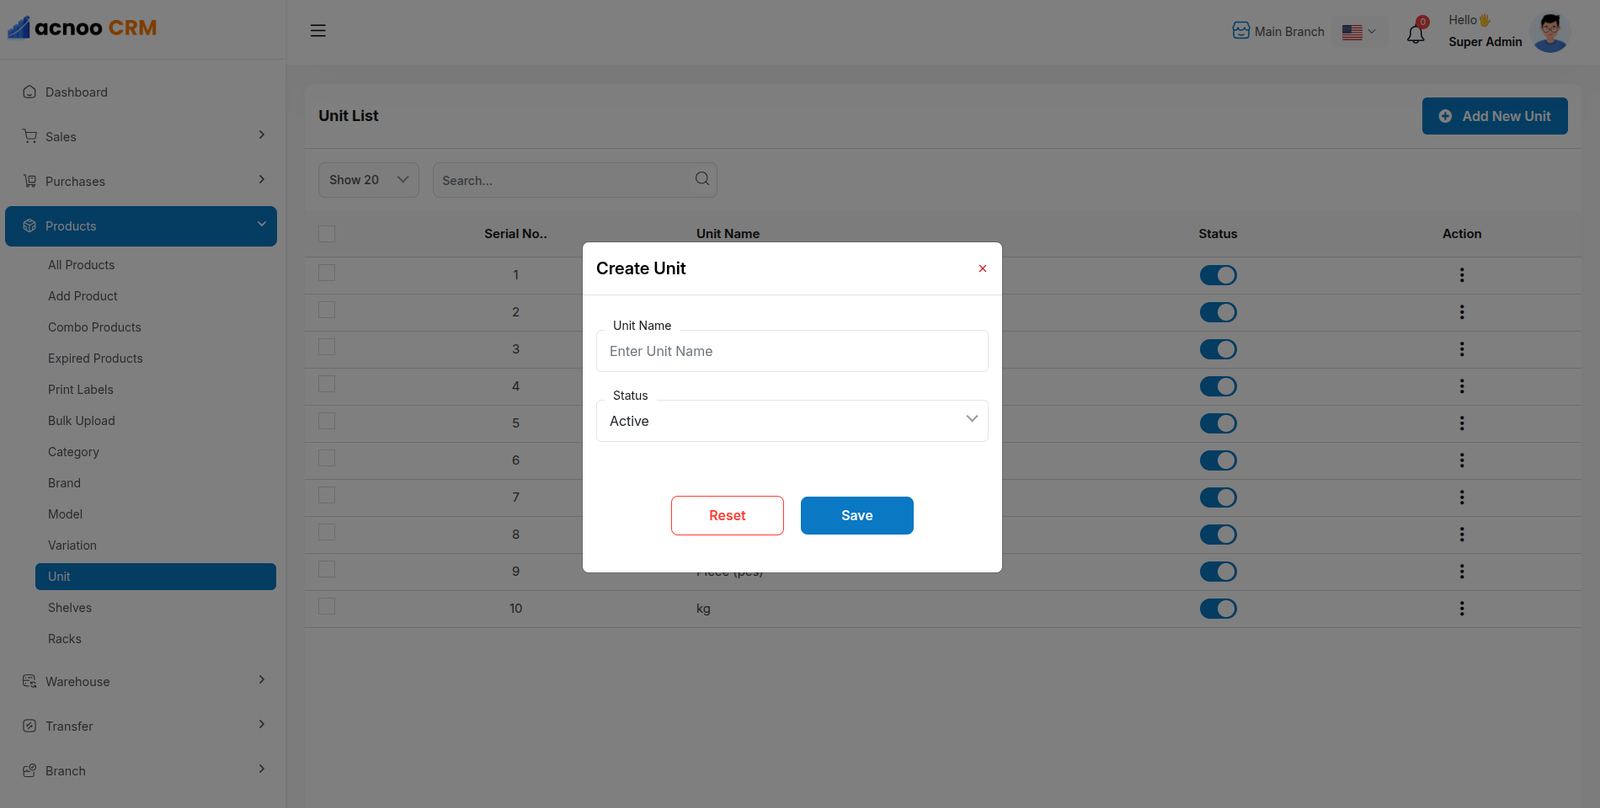
Create Unit
You can create a Category by filling in the required fields.
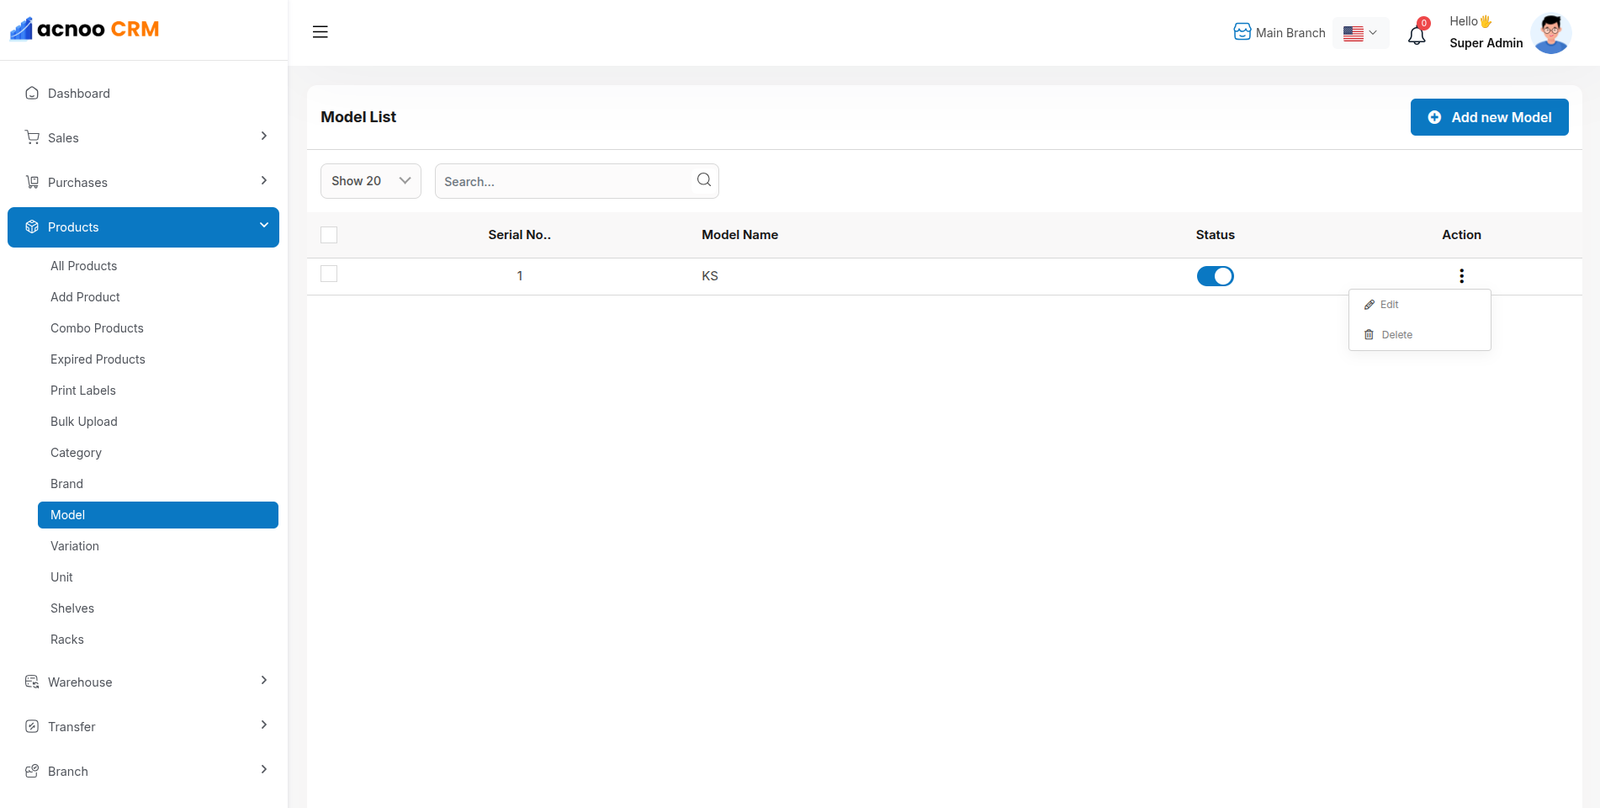
Model List
You can view the model list with available filtering options. Furthermore, you have the ability to edit, delete, or use the multi-delete function.
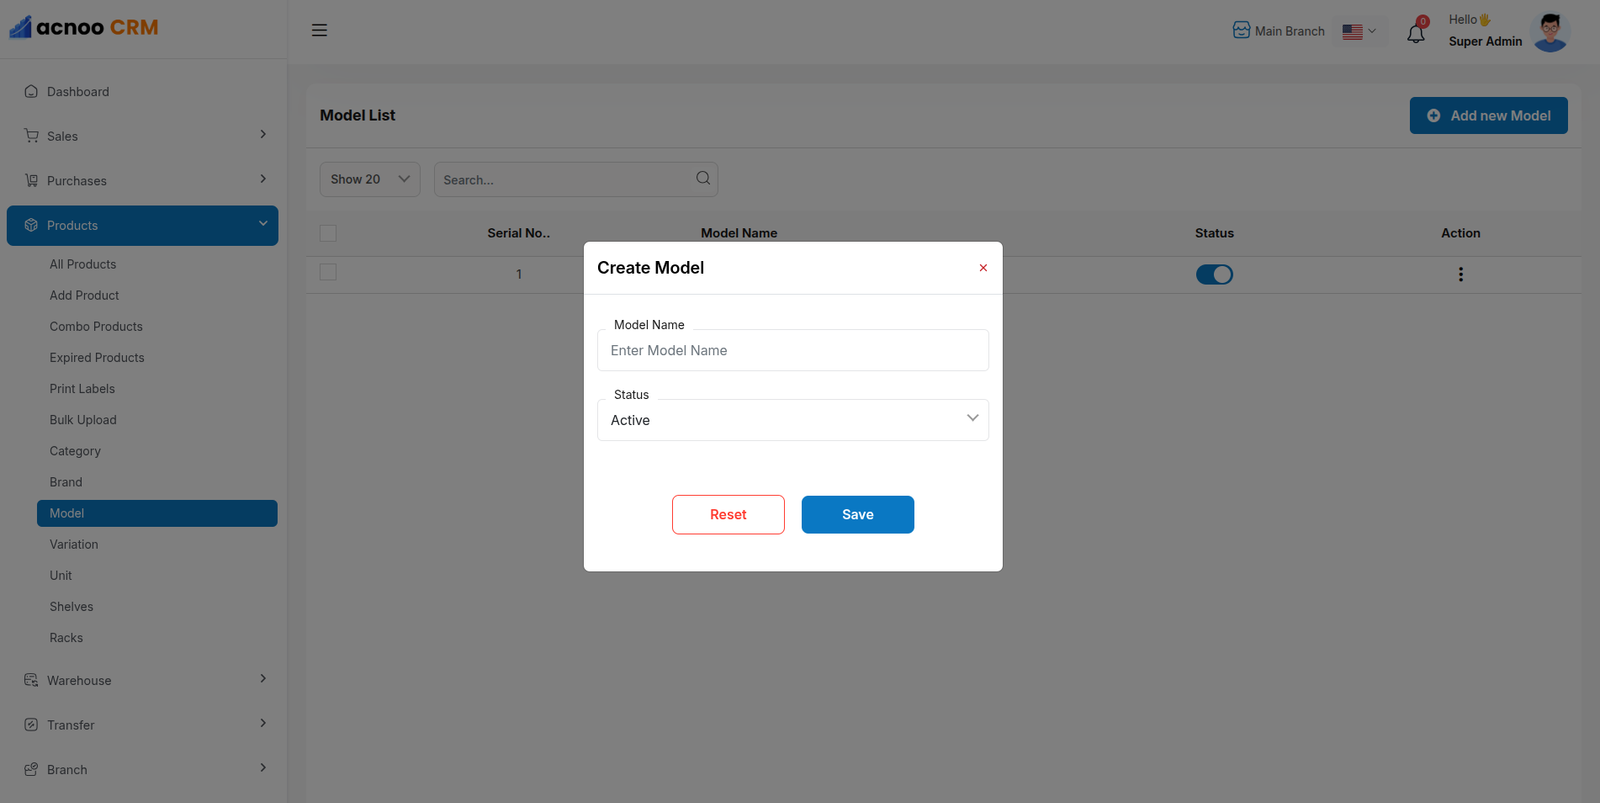
Create Model
You can create a model by filling in the required fields.
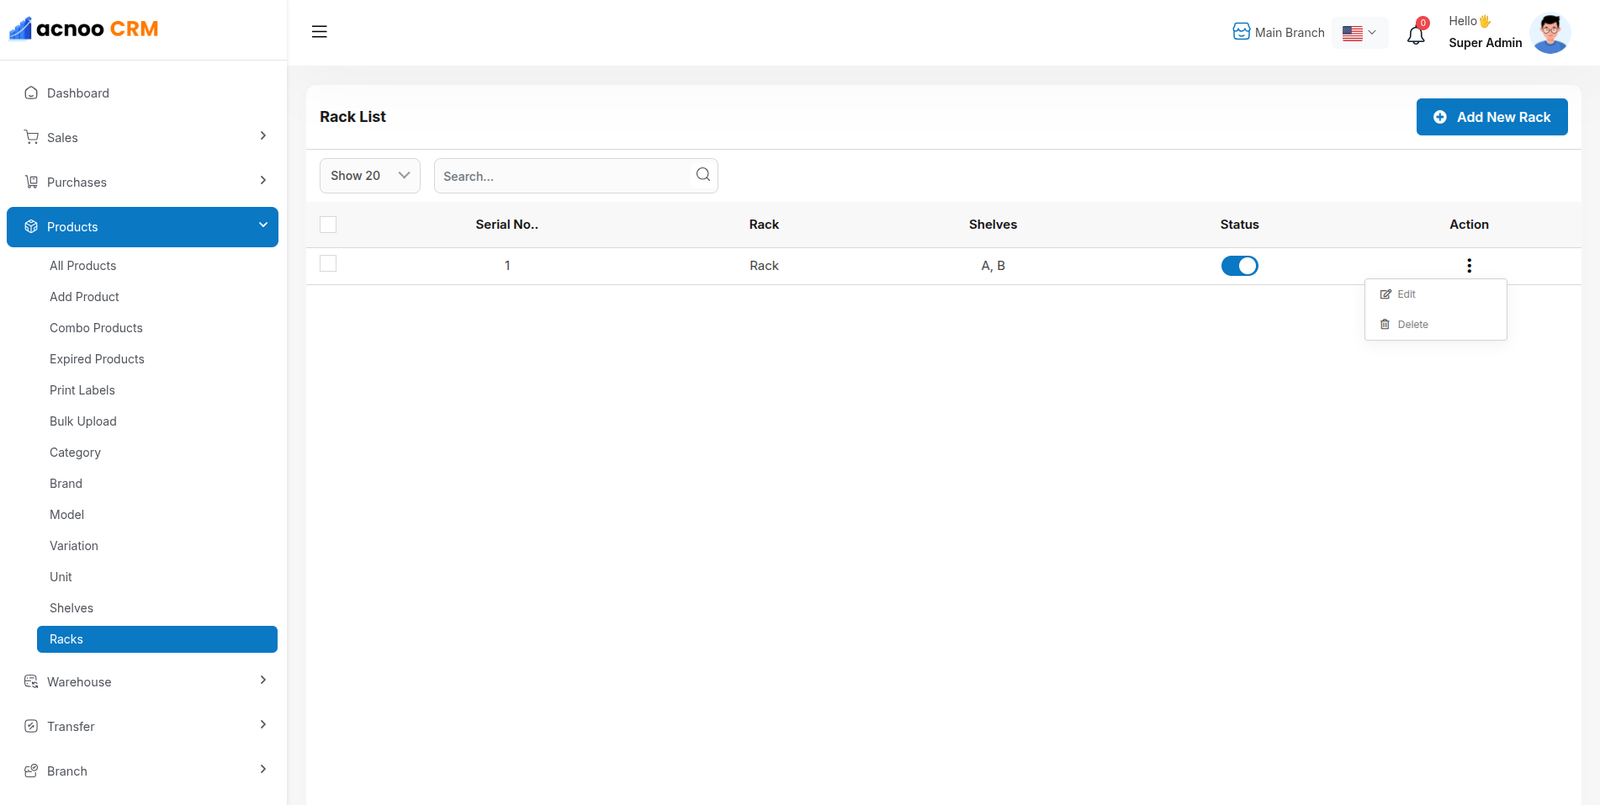
Rack List
You can view the rack list with available filtering options. Furthermore, you have the ability to edit, delete, or use the multi-delete function.
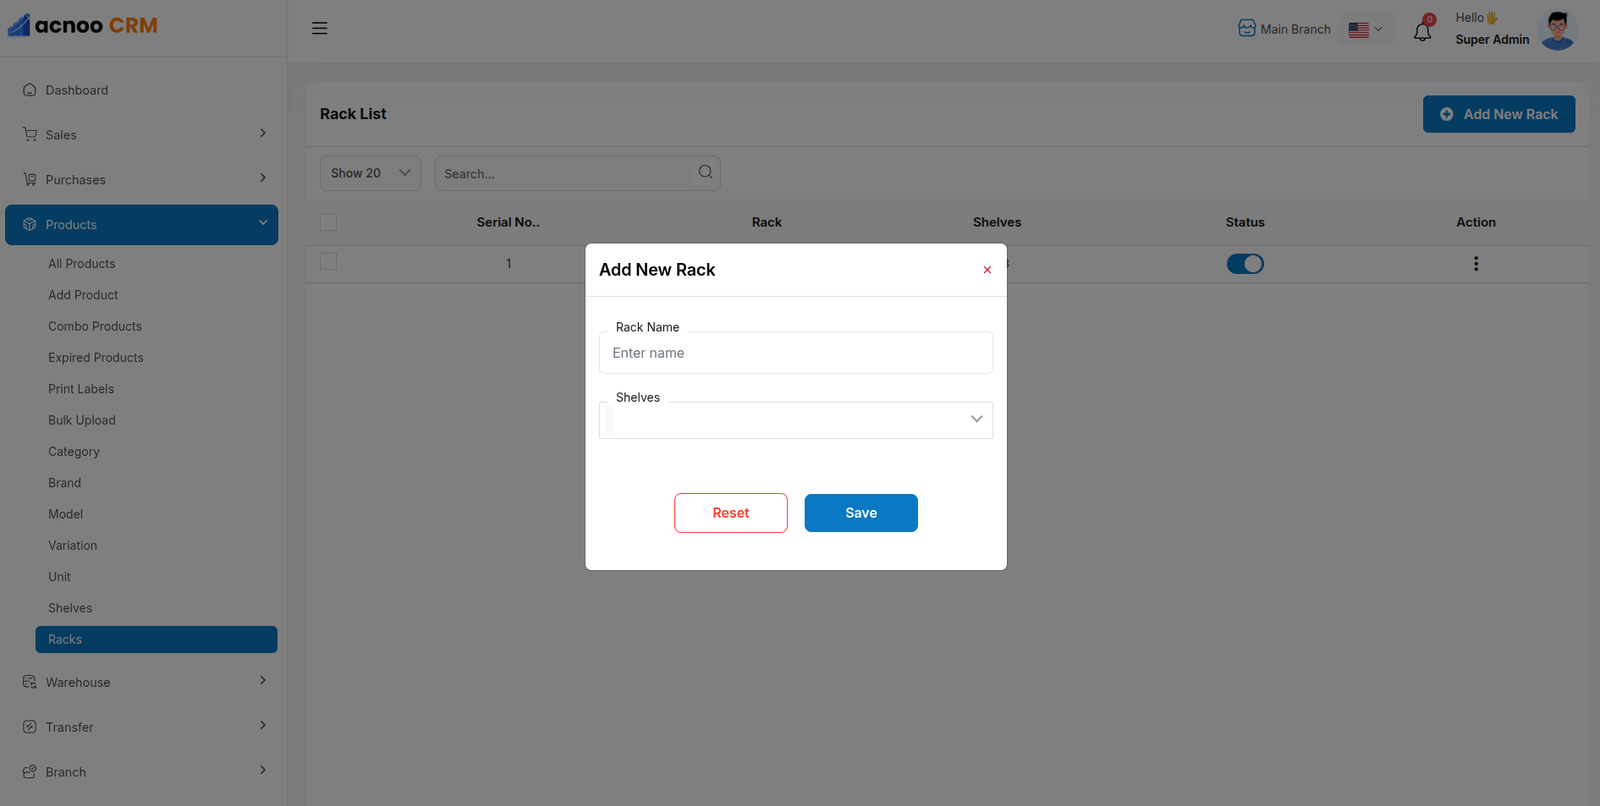
Create Rack
You can create a rack by filling in the required fields.
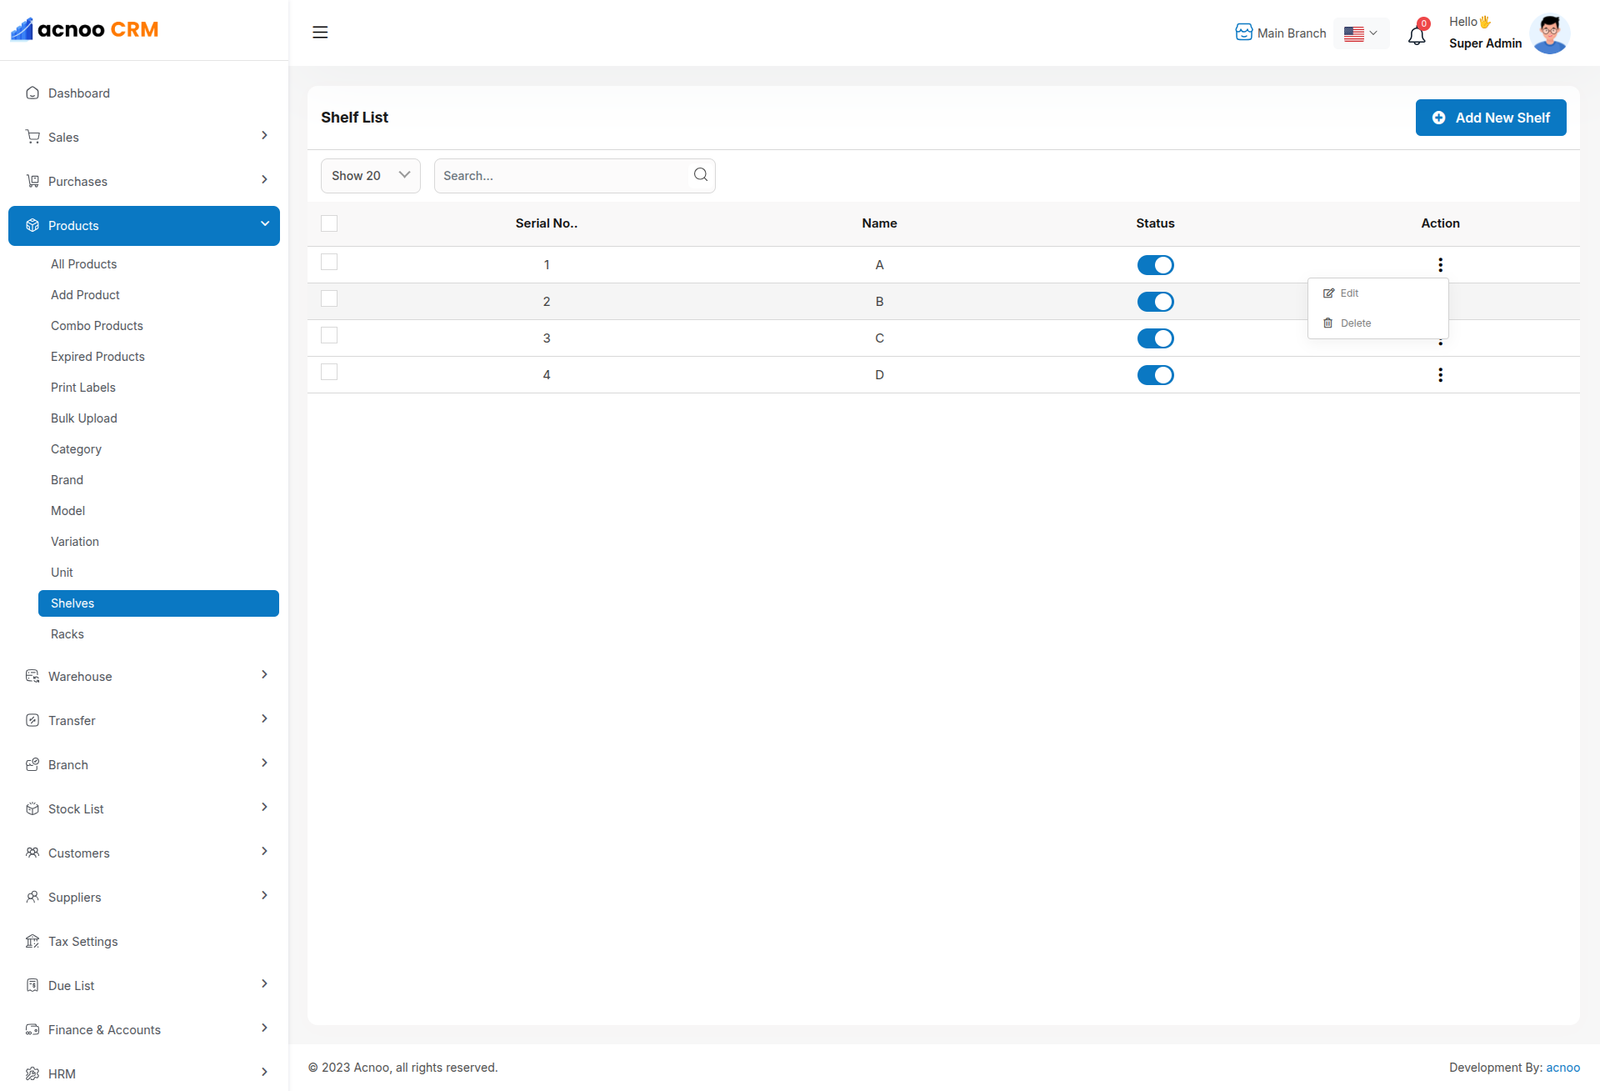
Shelf List
You can view the shelf list with available filtering options. Furthermore, you have the ability to edit, delete, or use the multi-delete function.
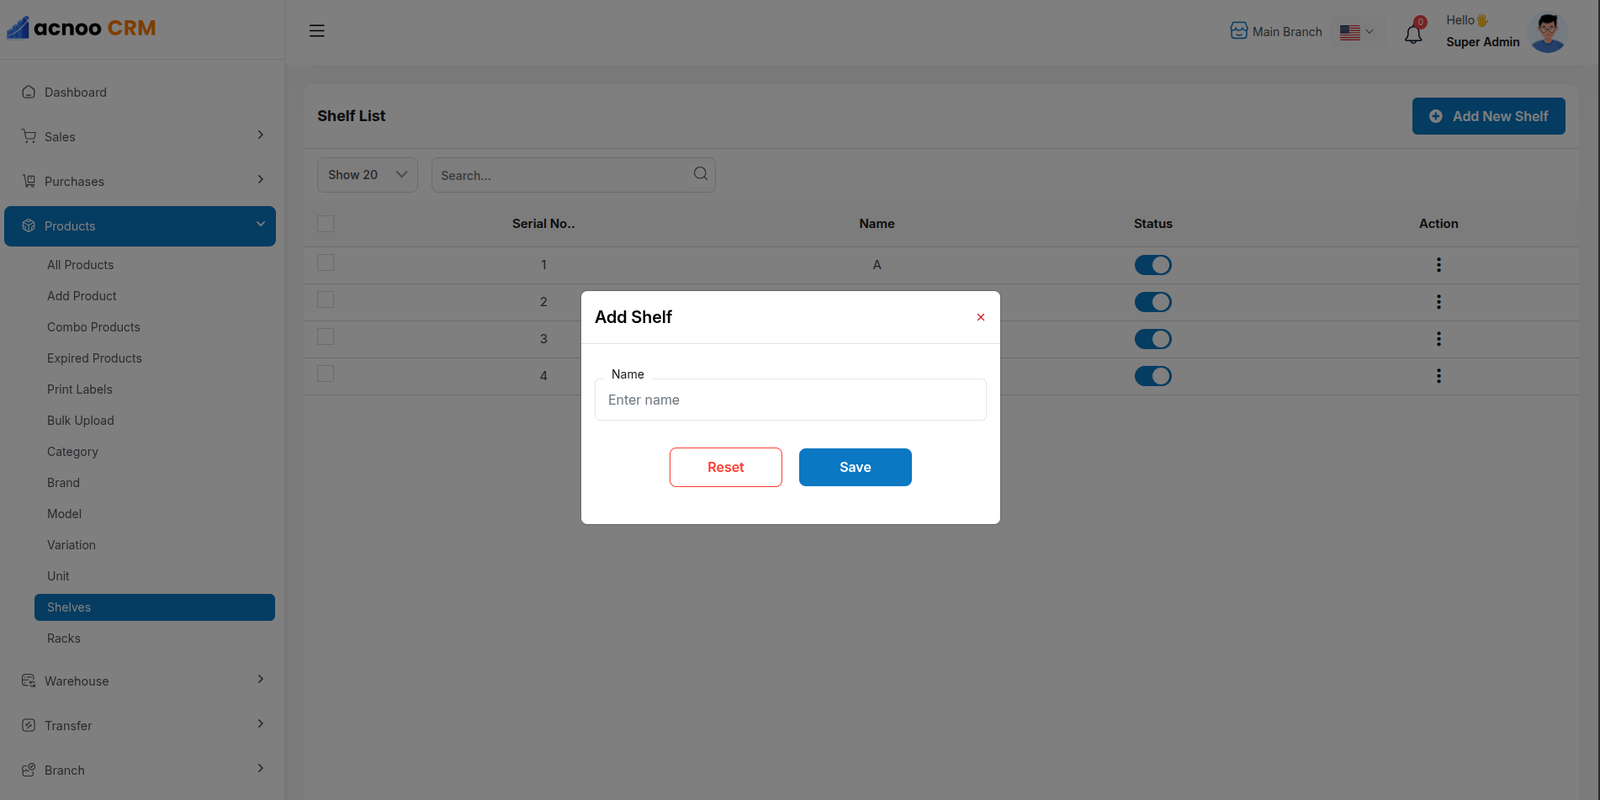
Create Shelf
You can create a shelf by filling in the required fields.
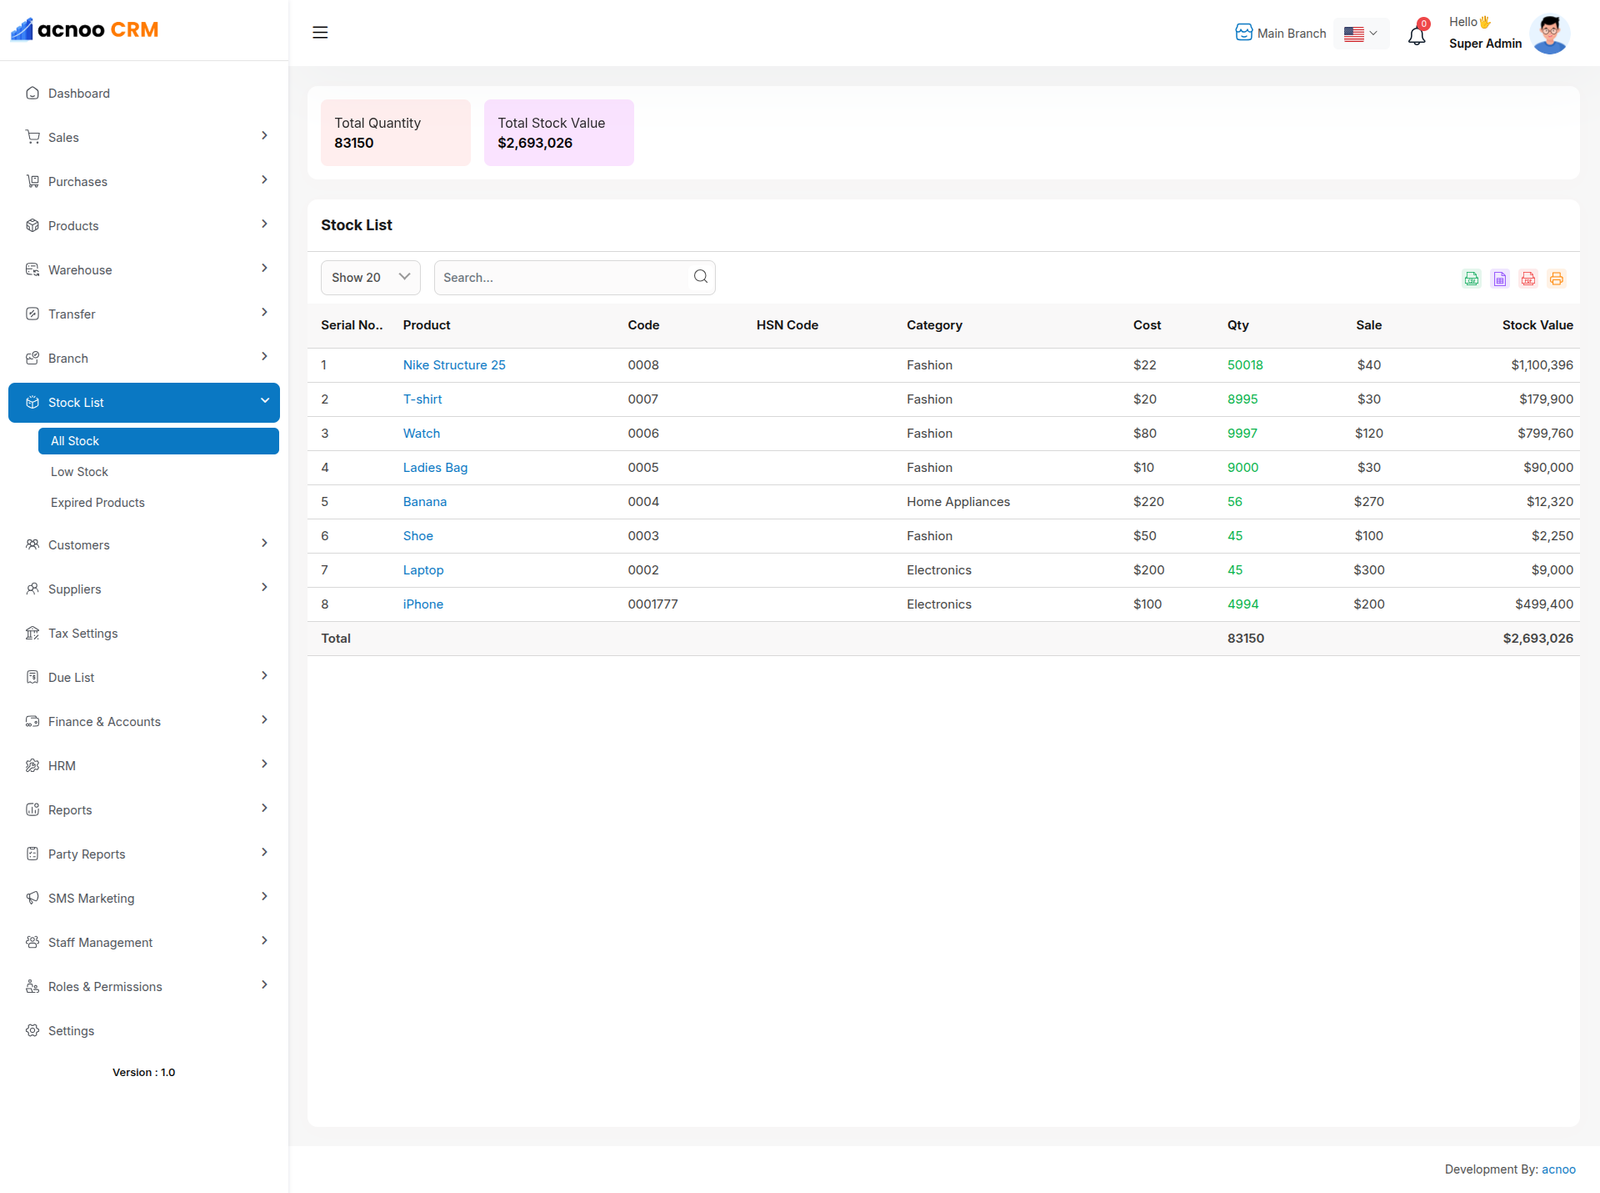
Stock List
In this section, you can view the product list with available filtering options. The list can be exported as Excel or CSV, and there is also a print option. At the top, you can see the total quantity and stock value. You can also view low stock and expired products from the same dropdown, and their respective lists will be displayed.
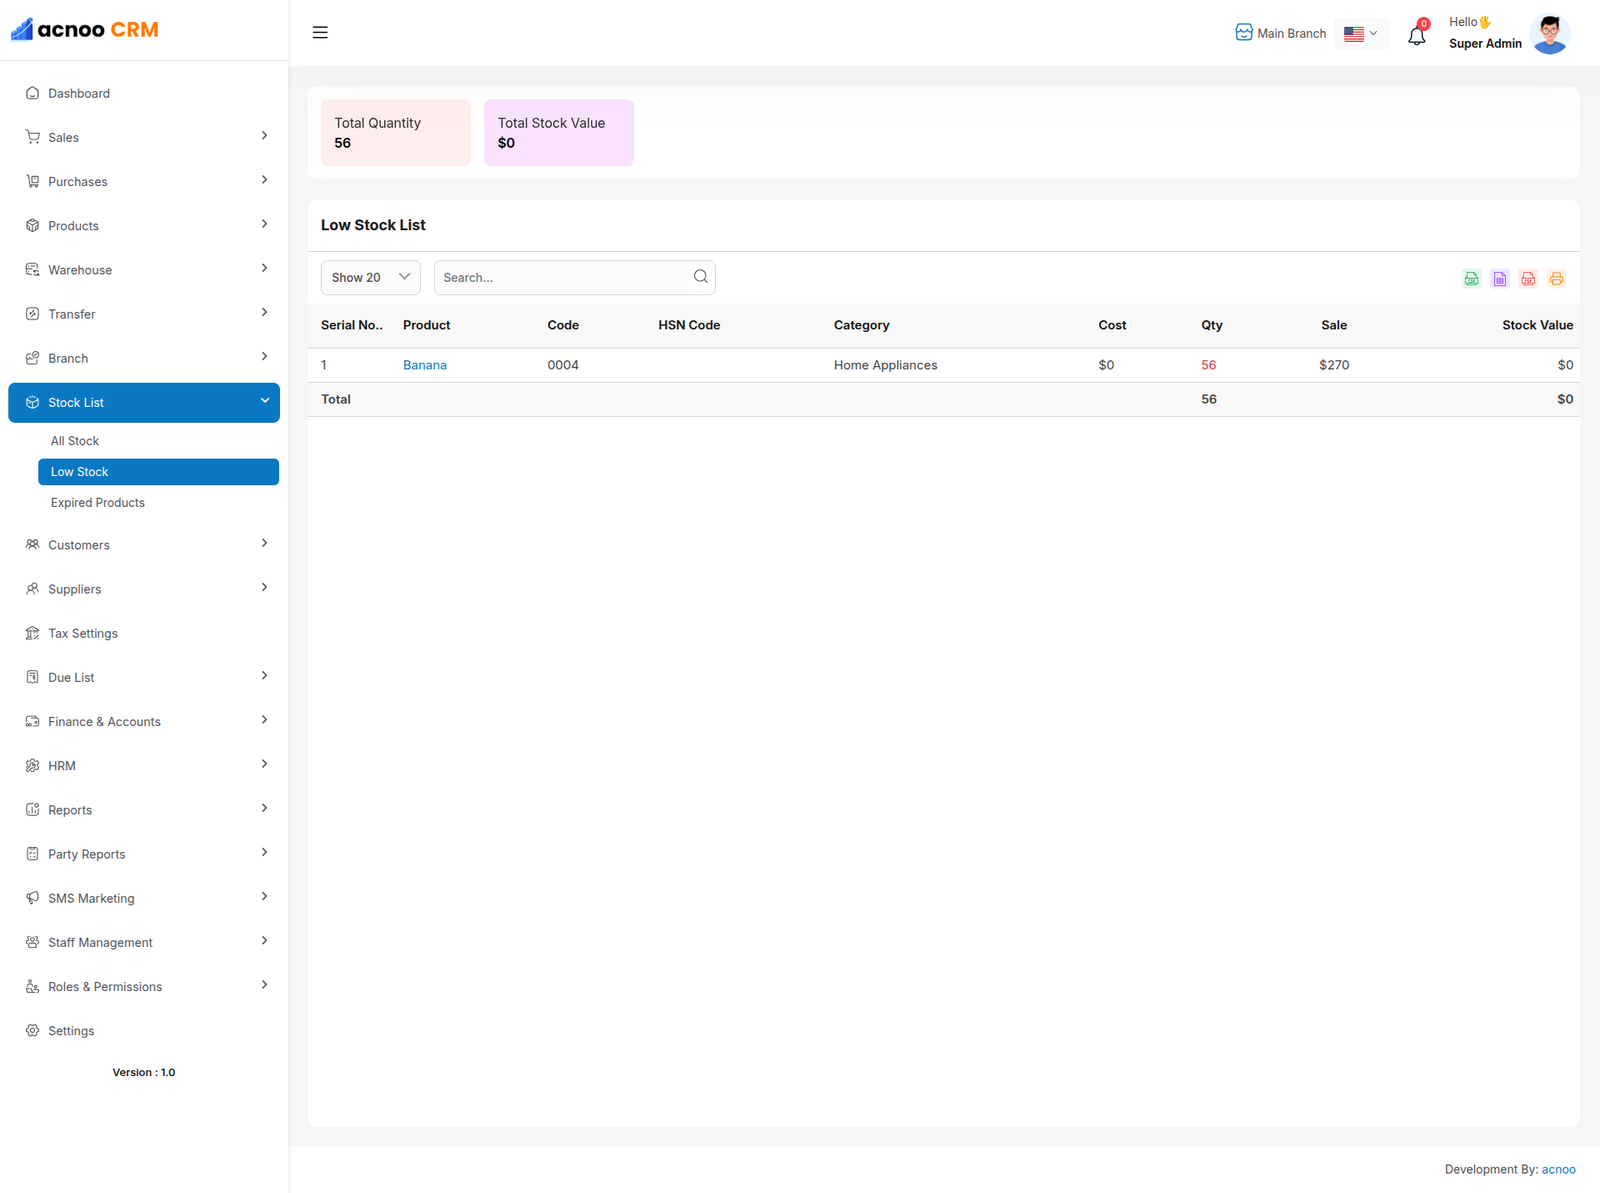
Low Stock List
This section displays a list of products that are low in stock. You can use the available filtering options to refine the list. The data can be exported as Excel or CSV, and a print option is also available. At the top, the total quantity and stock value are displayed for quick reference.
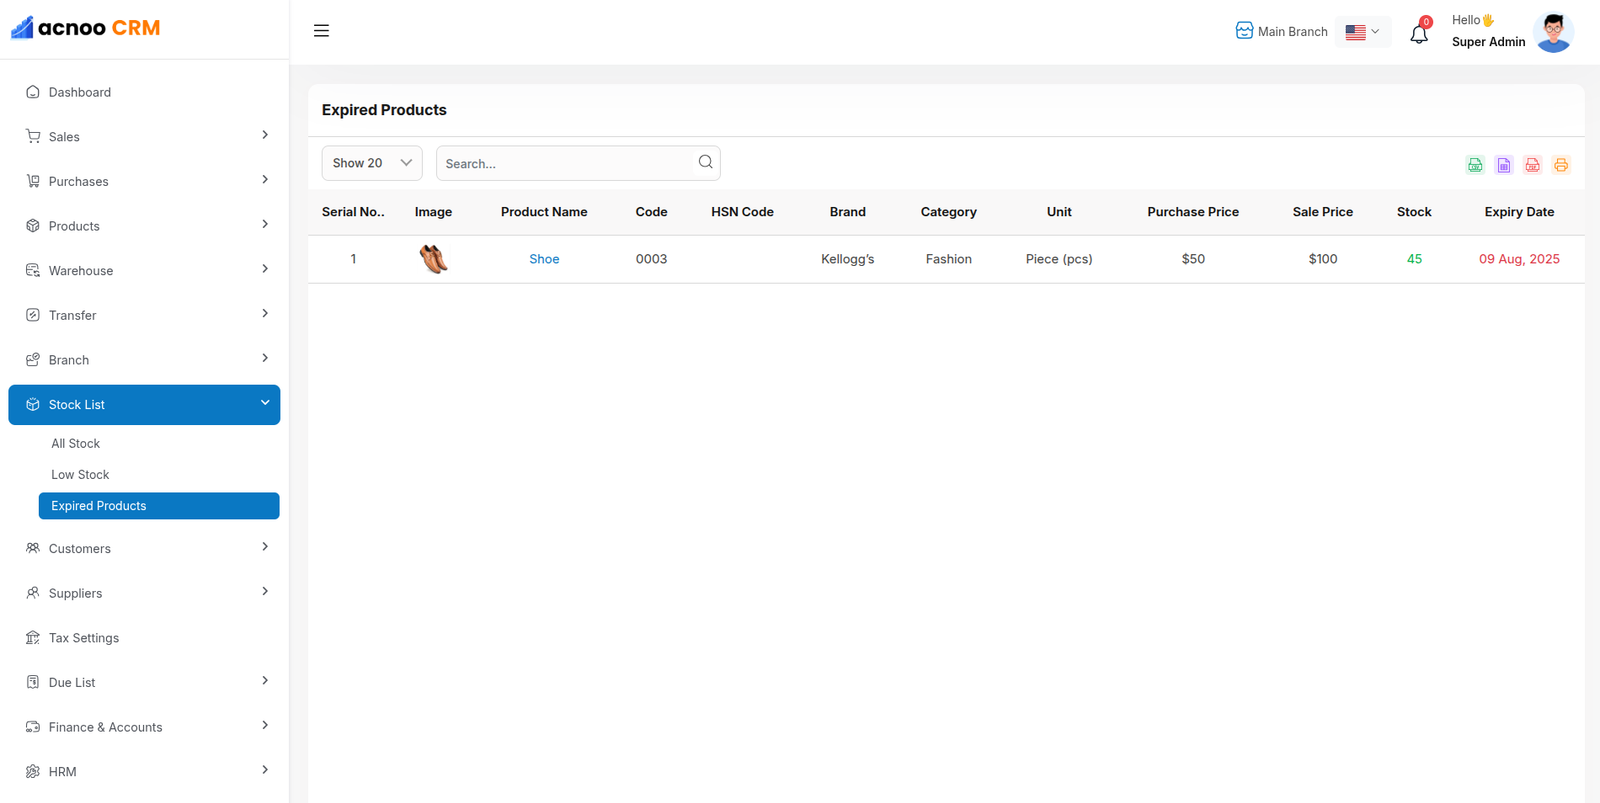
Expired Product List
This section displays a list of expired products. You can use the available filtering options to refine the list. The data can be exported as Excel or CSV, and a print option is also available for convenience.
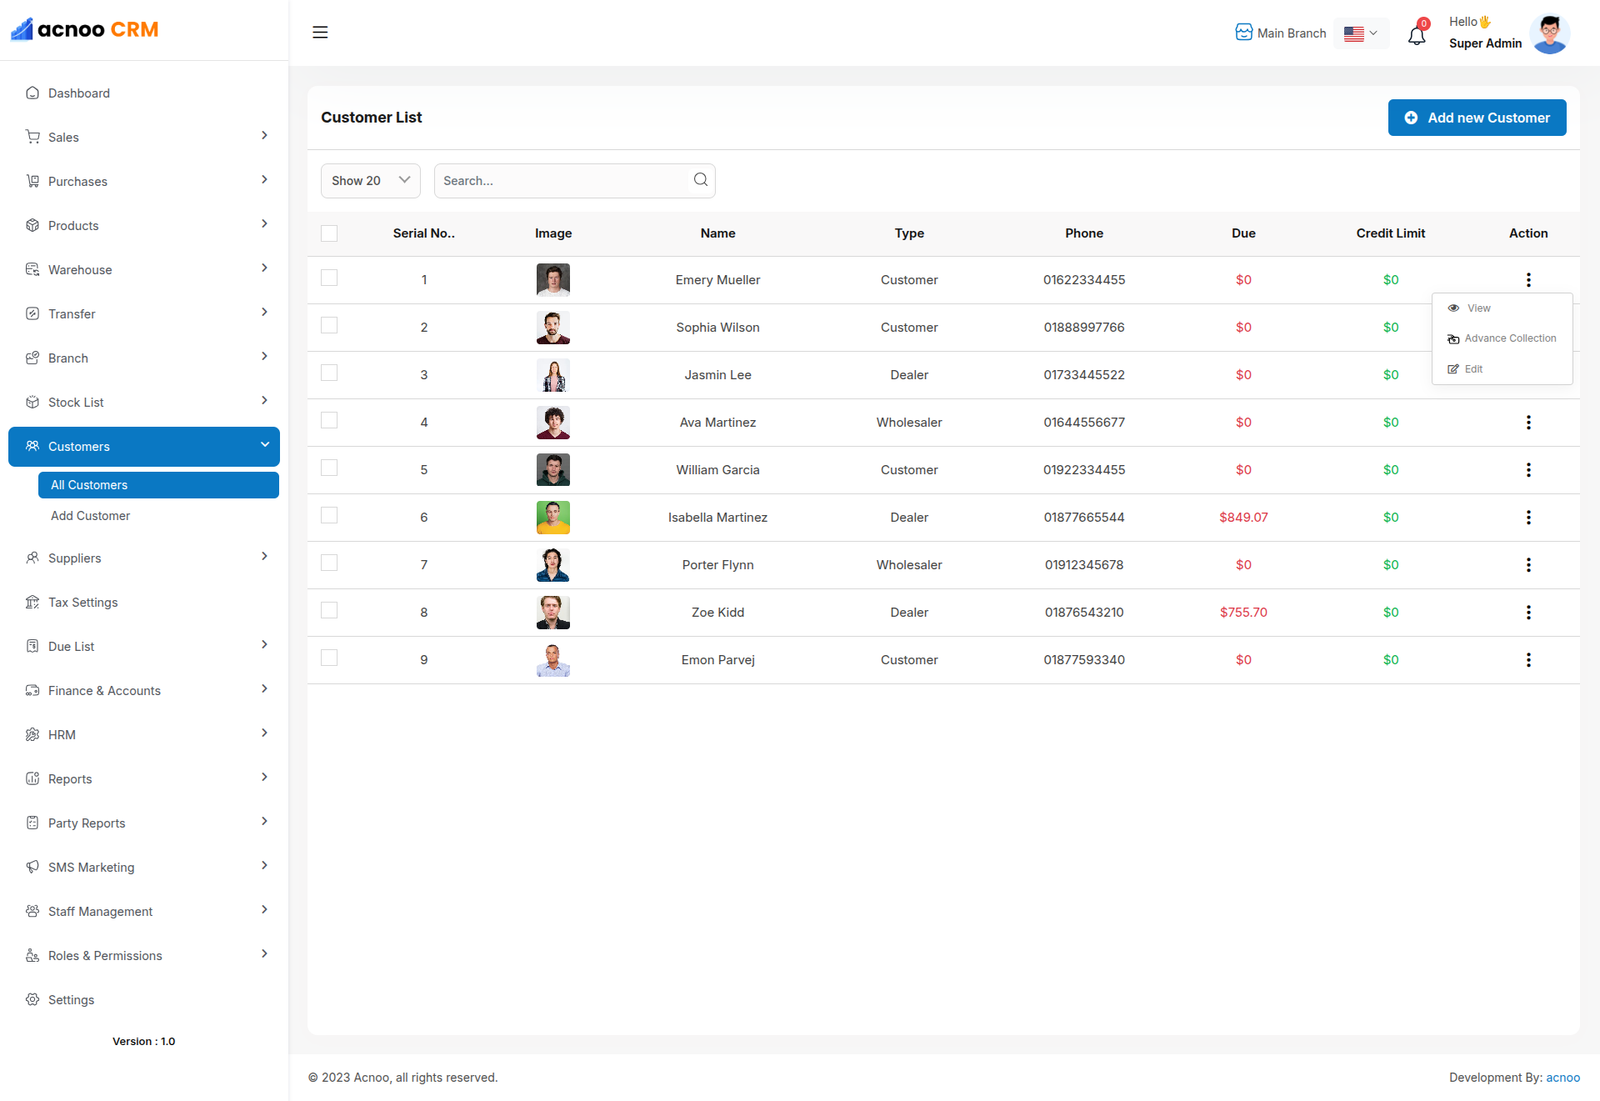
Customer List
Here, you can view the customer list with a search filter. Additionally, you have the option to view, edit, delete, or use the multi-delete function.
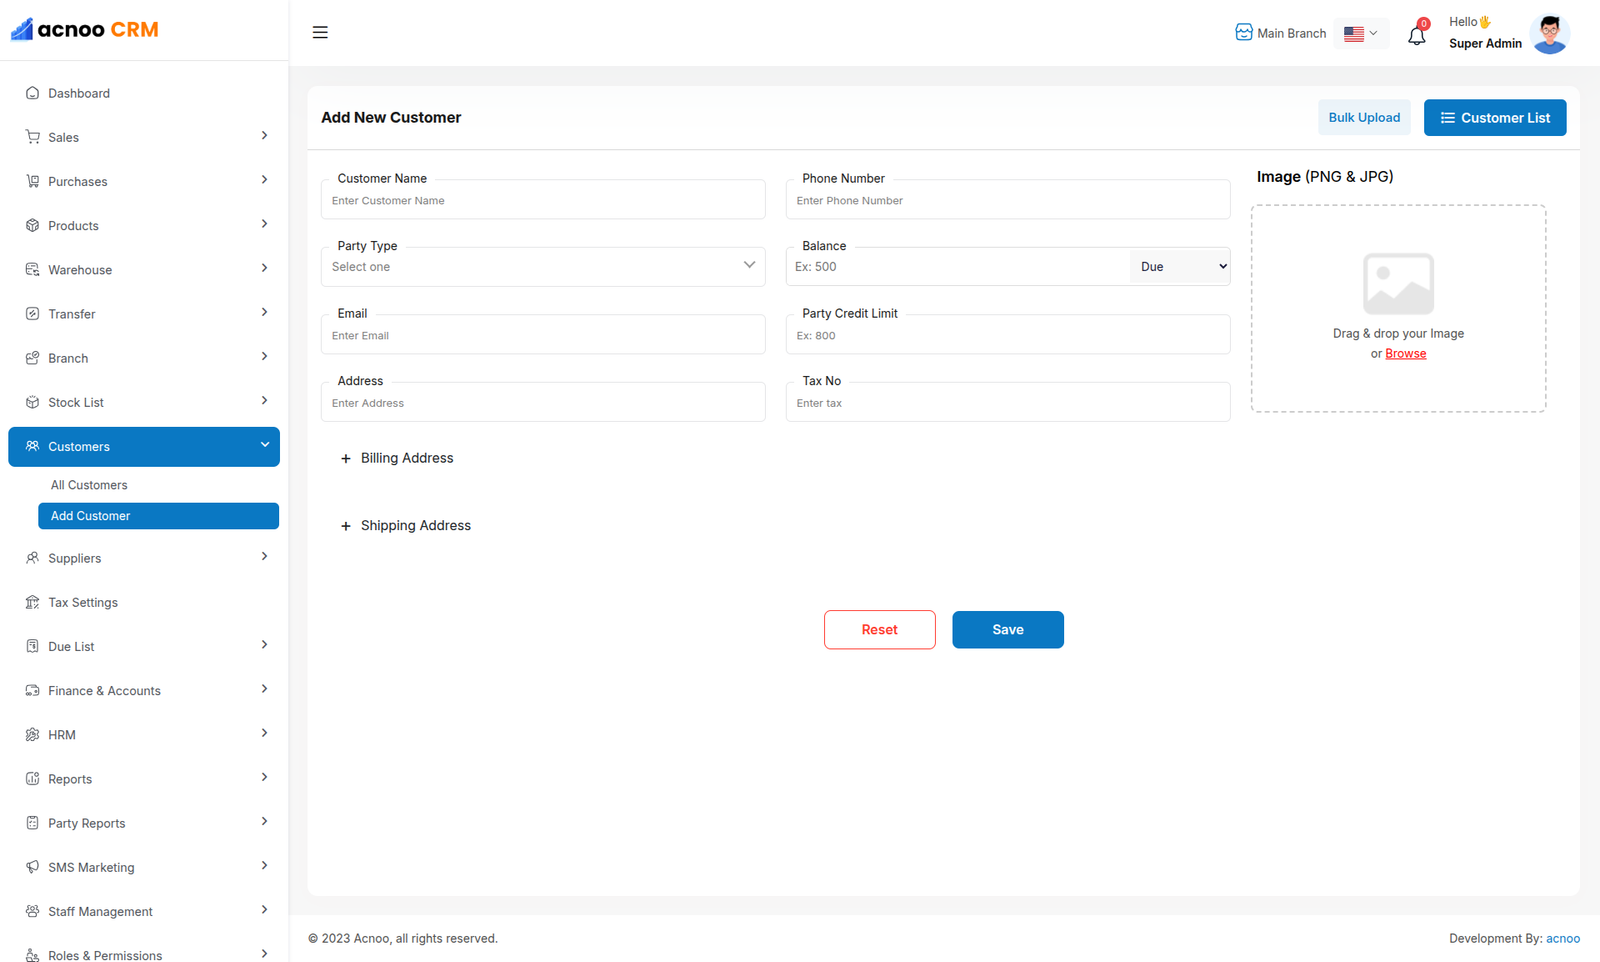
Create Customer
You can create a customer by filling out the required fields. Additionally, you can add an initial due amount to be stored.
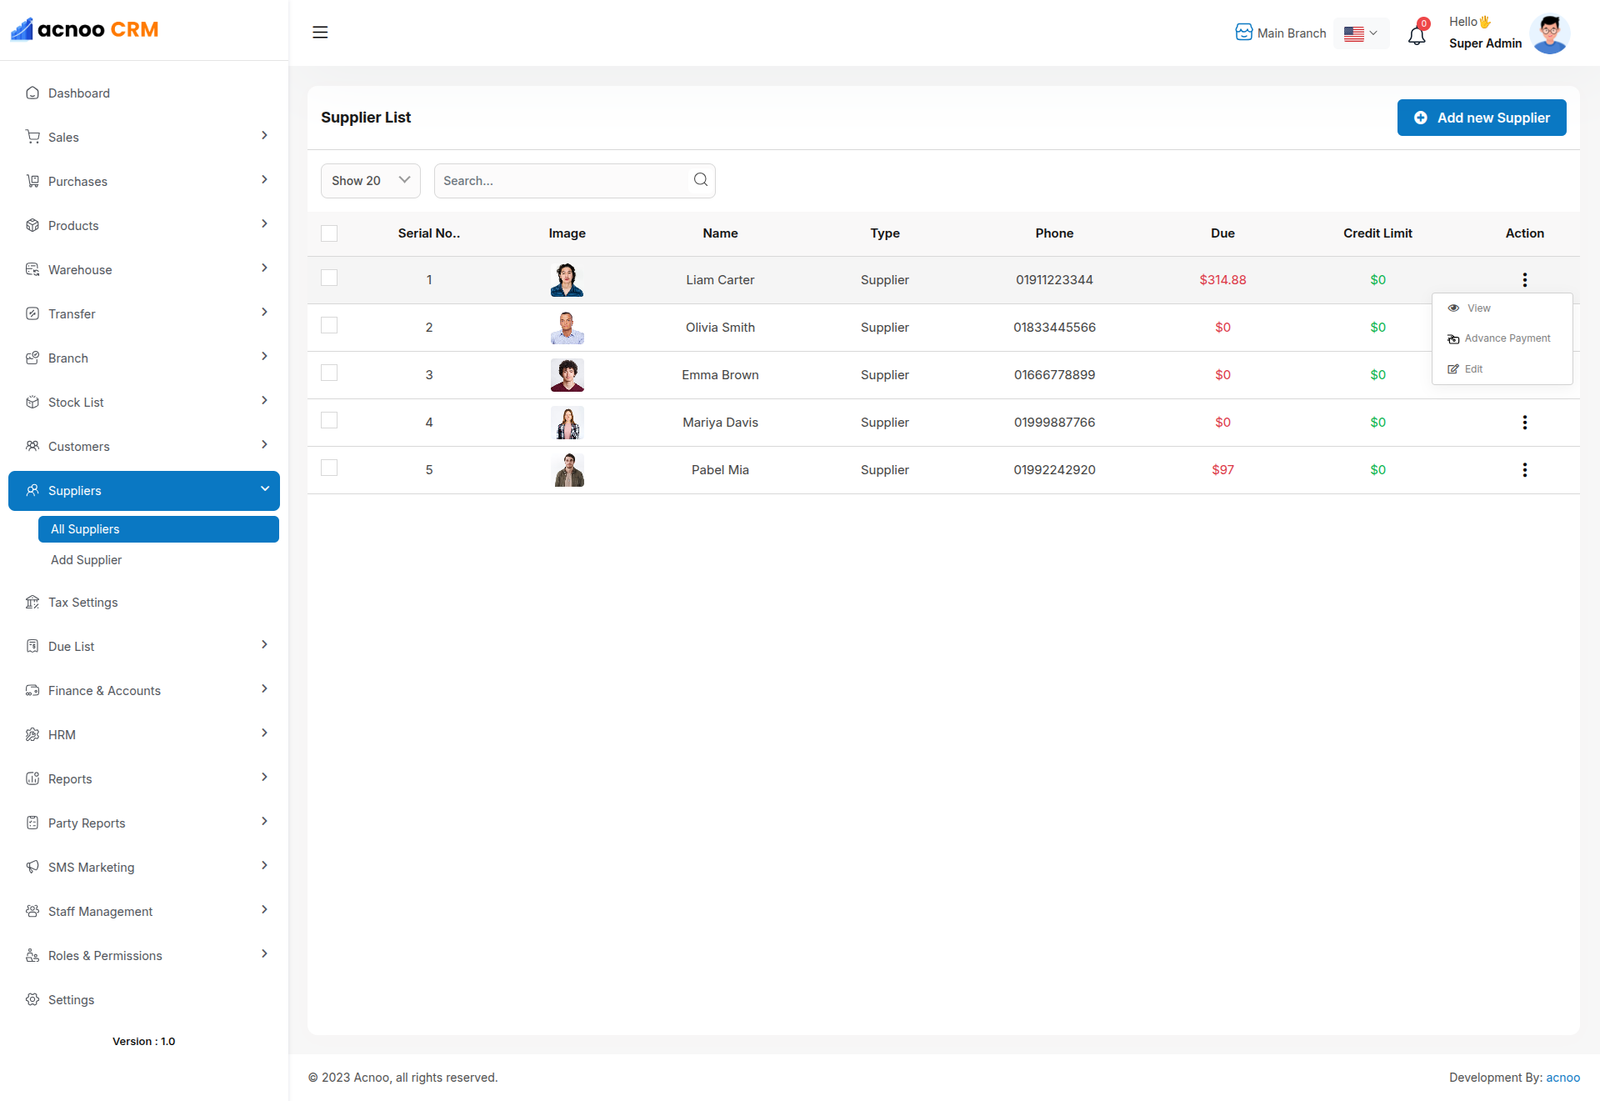
Supplier List
Here, you can view the Supplier list with a search filter. Additionally, you have the option to view, edit, delete, or use the multi-delete function.
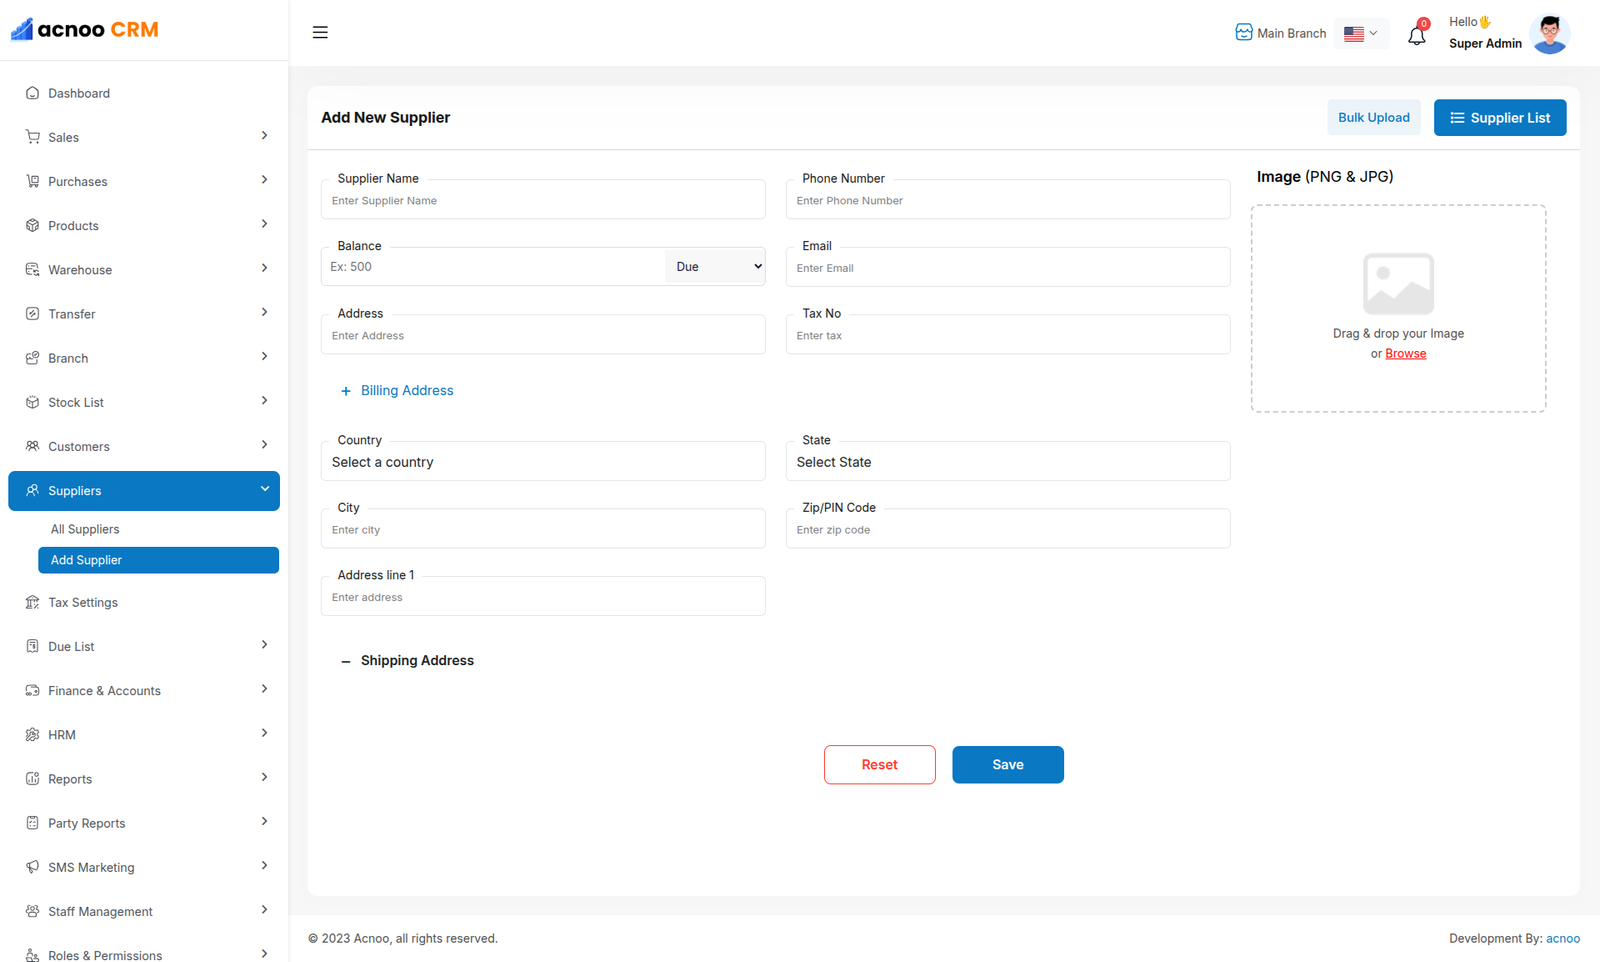
Create Supplier
You can create a Supplier by filling out the required fields. Additionally, you can add an initial due amount to be stored.
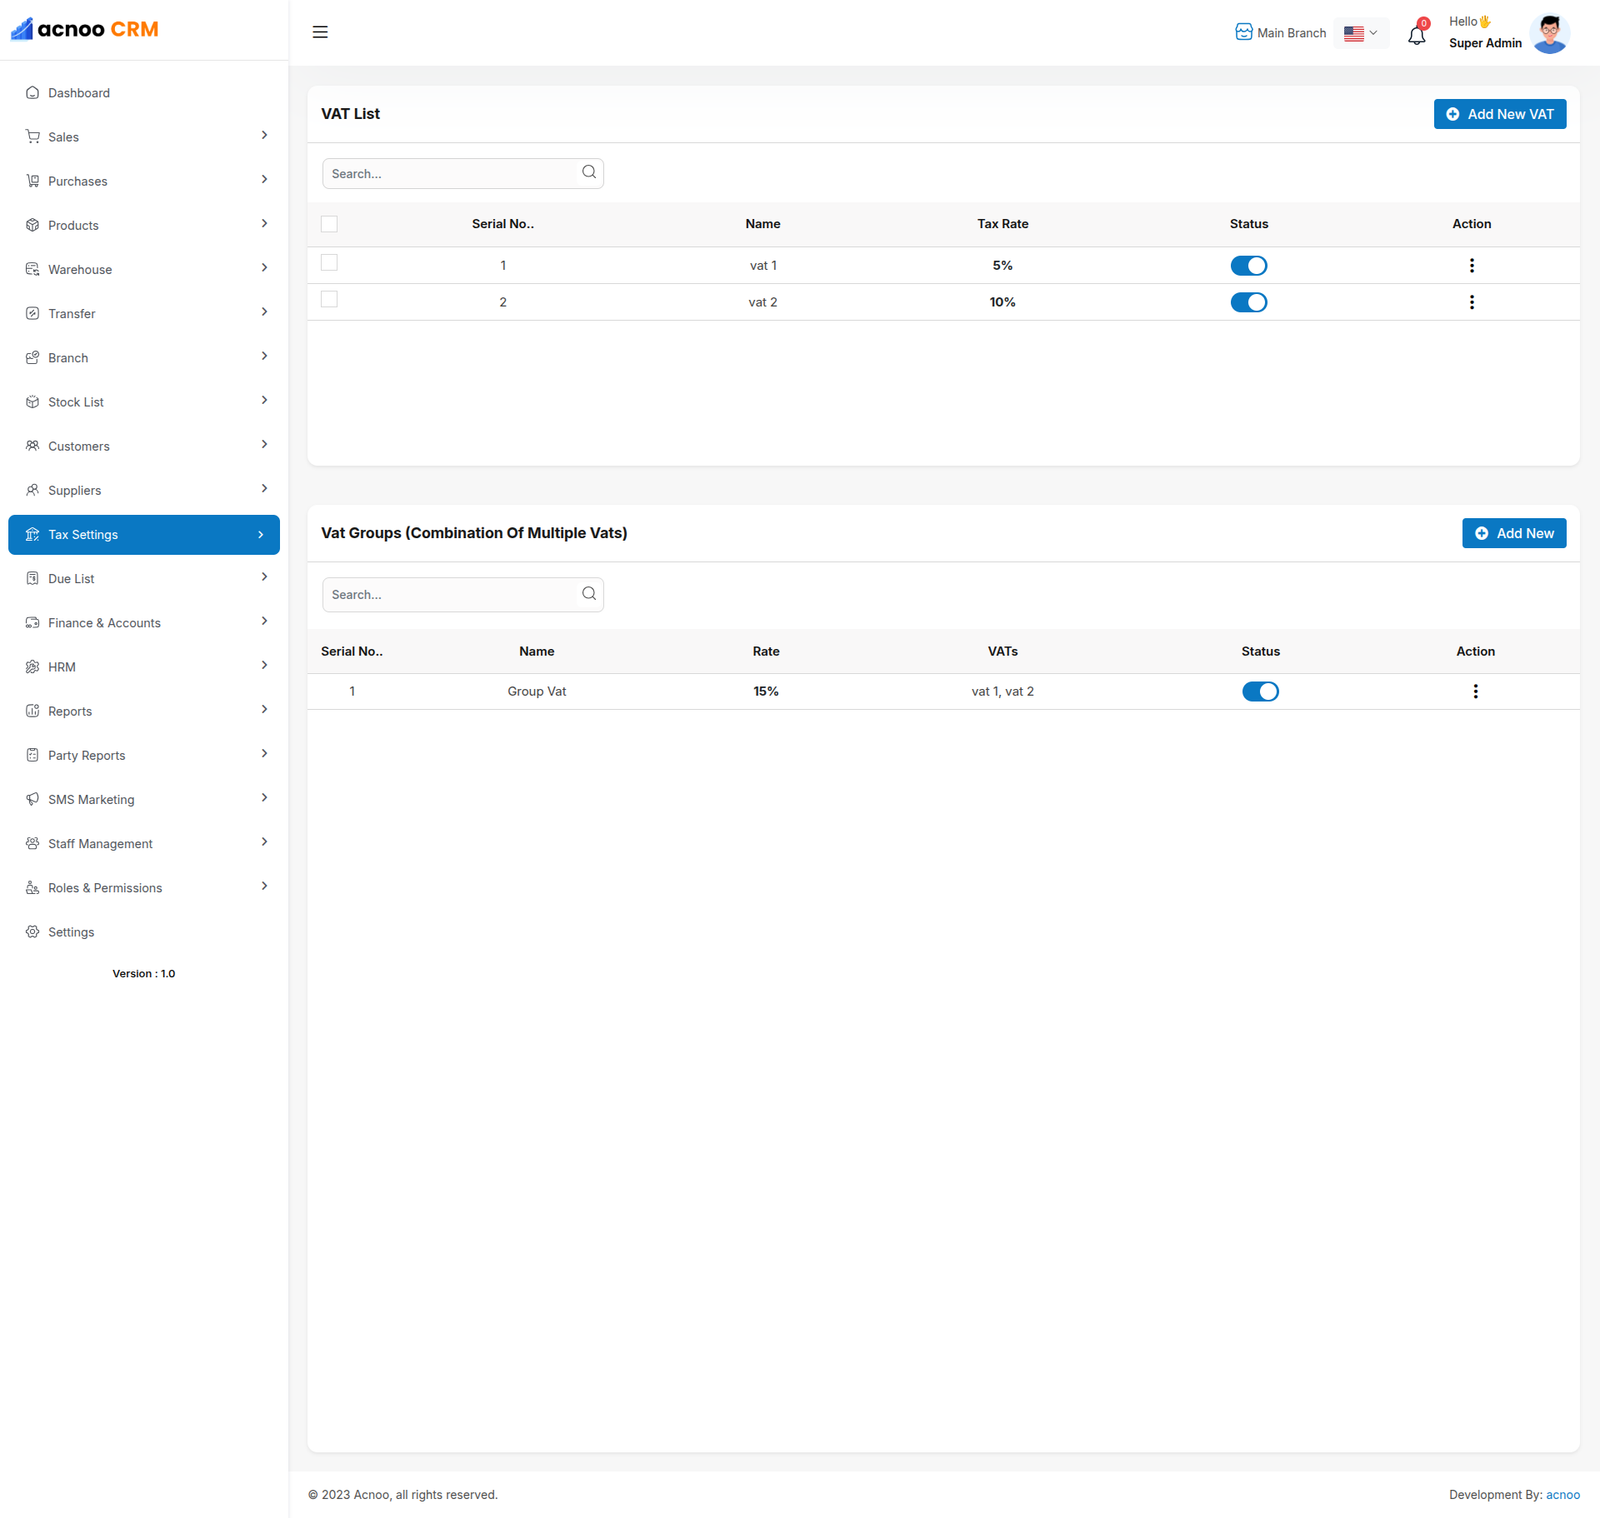
Tax Setting
Here, you can view VAT settings and VAT groups. Two tables are available: one for the list of VAT rates and another for the list of VAT groups. You can apply filtering separately in both tables.
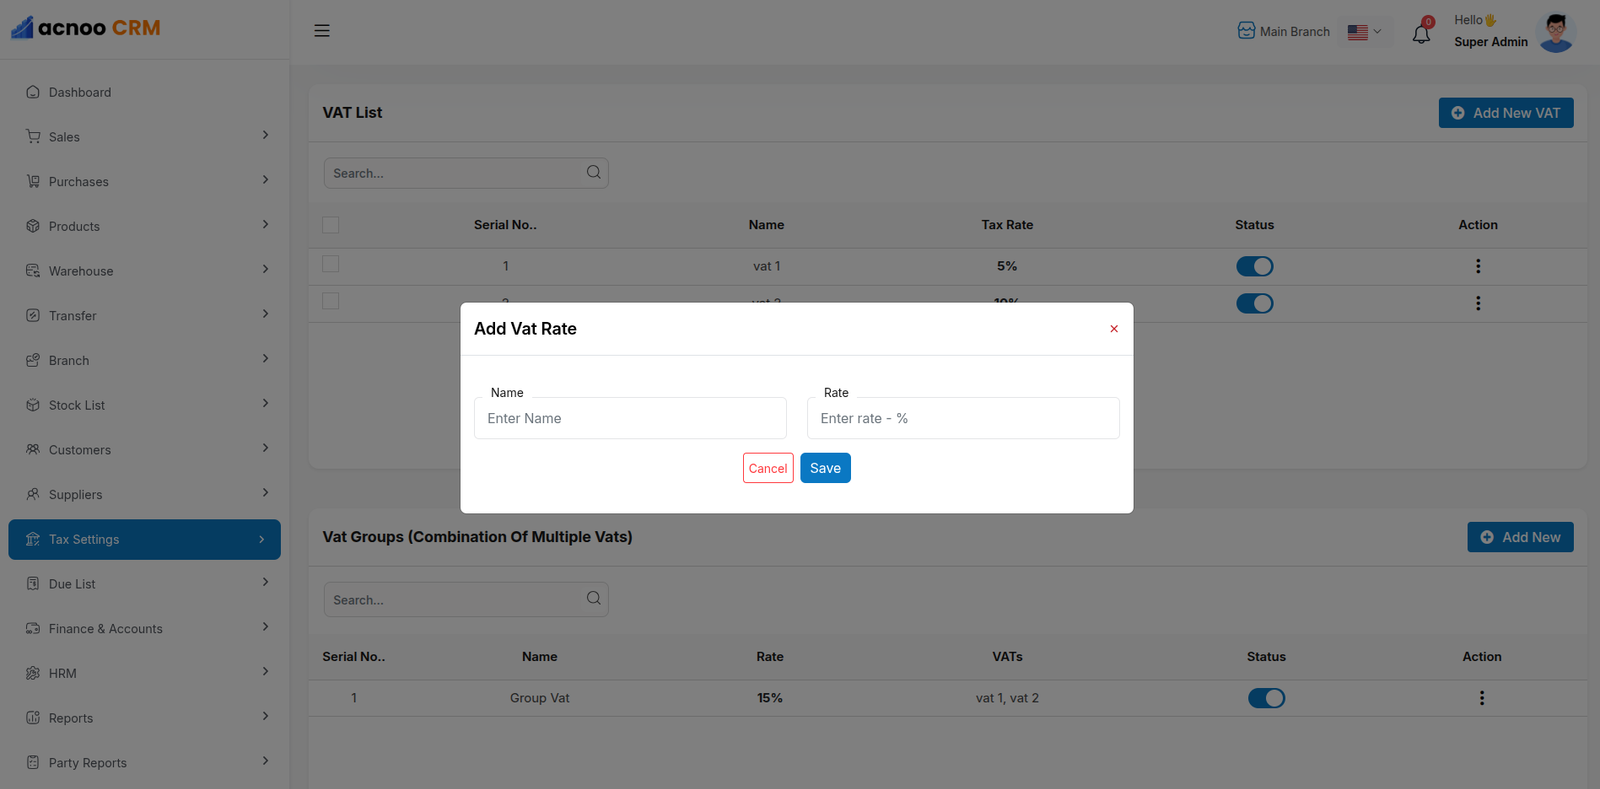
Create Vat
By clicking the Add New VAT button, a modal will appear. Fill in the required input fields and then click the Save button to add a new VAT entry.
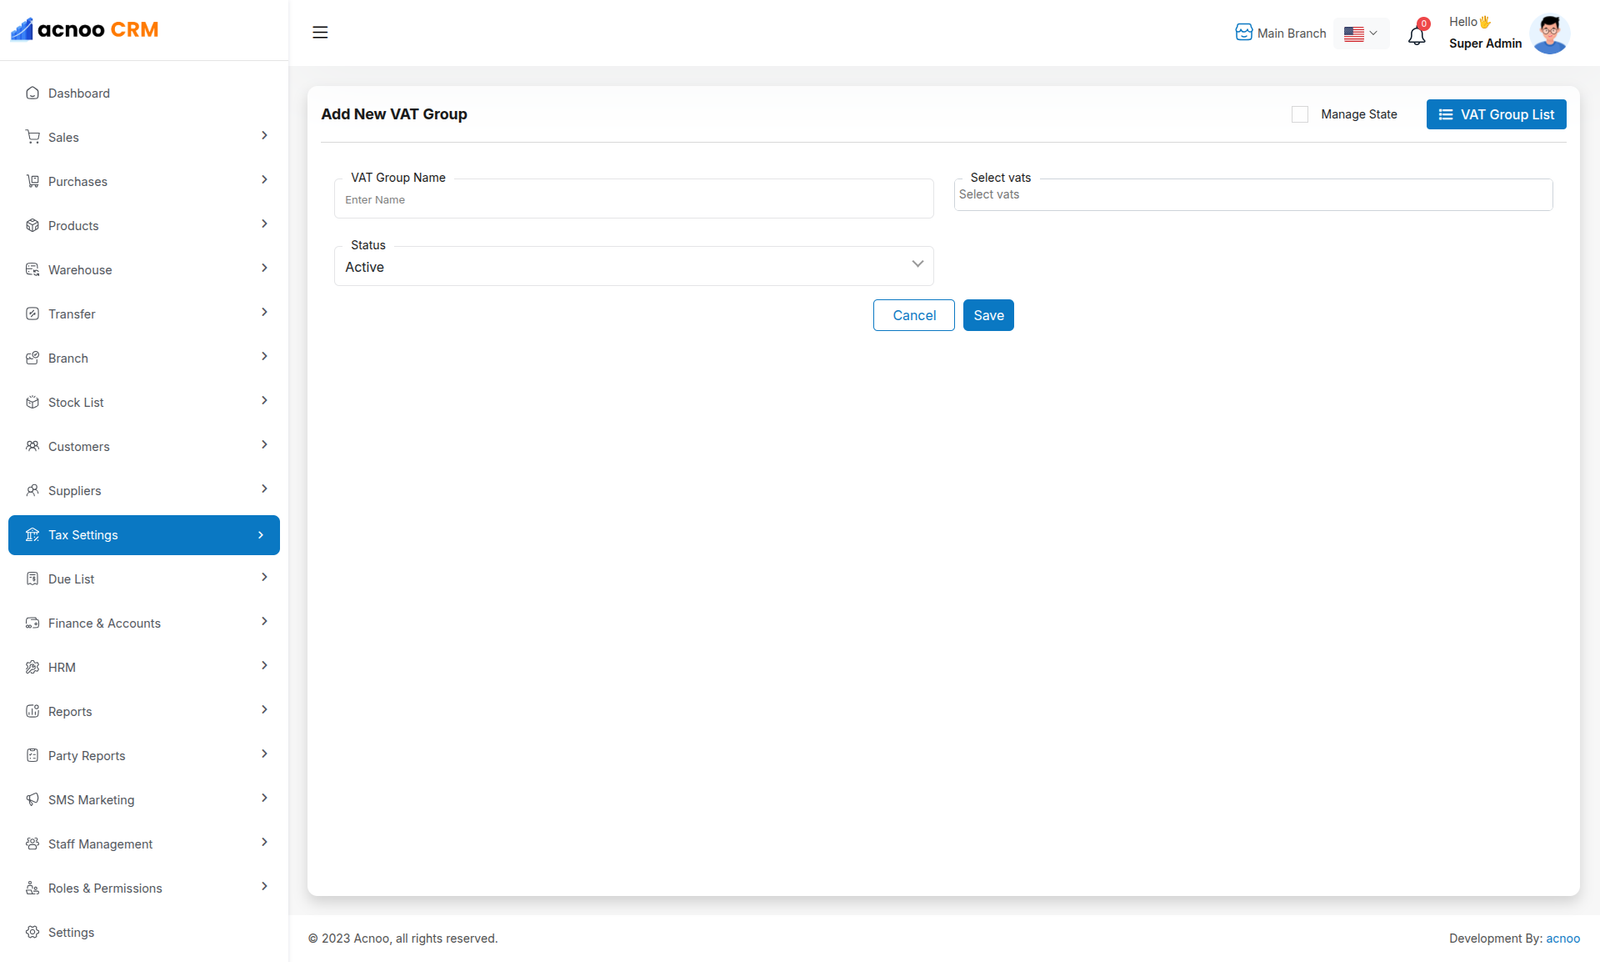
Create Vat Group
By clicking the Add New button, you will be redirected to the VAT Group creation page. Fill in the required input fields and then click the Save button to add a new VAT group.
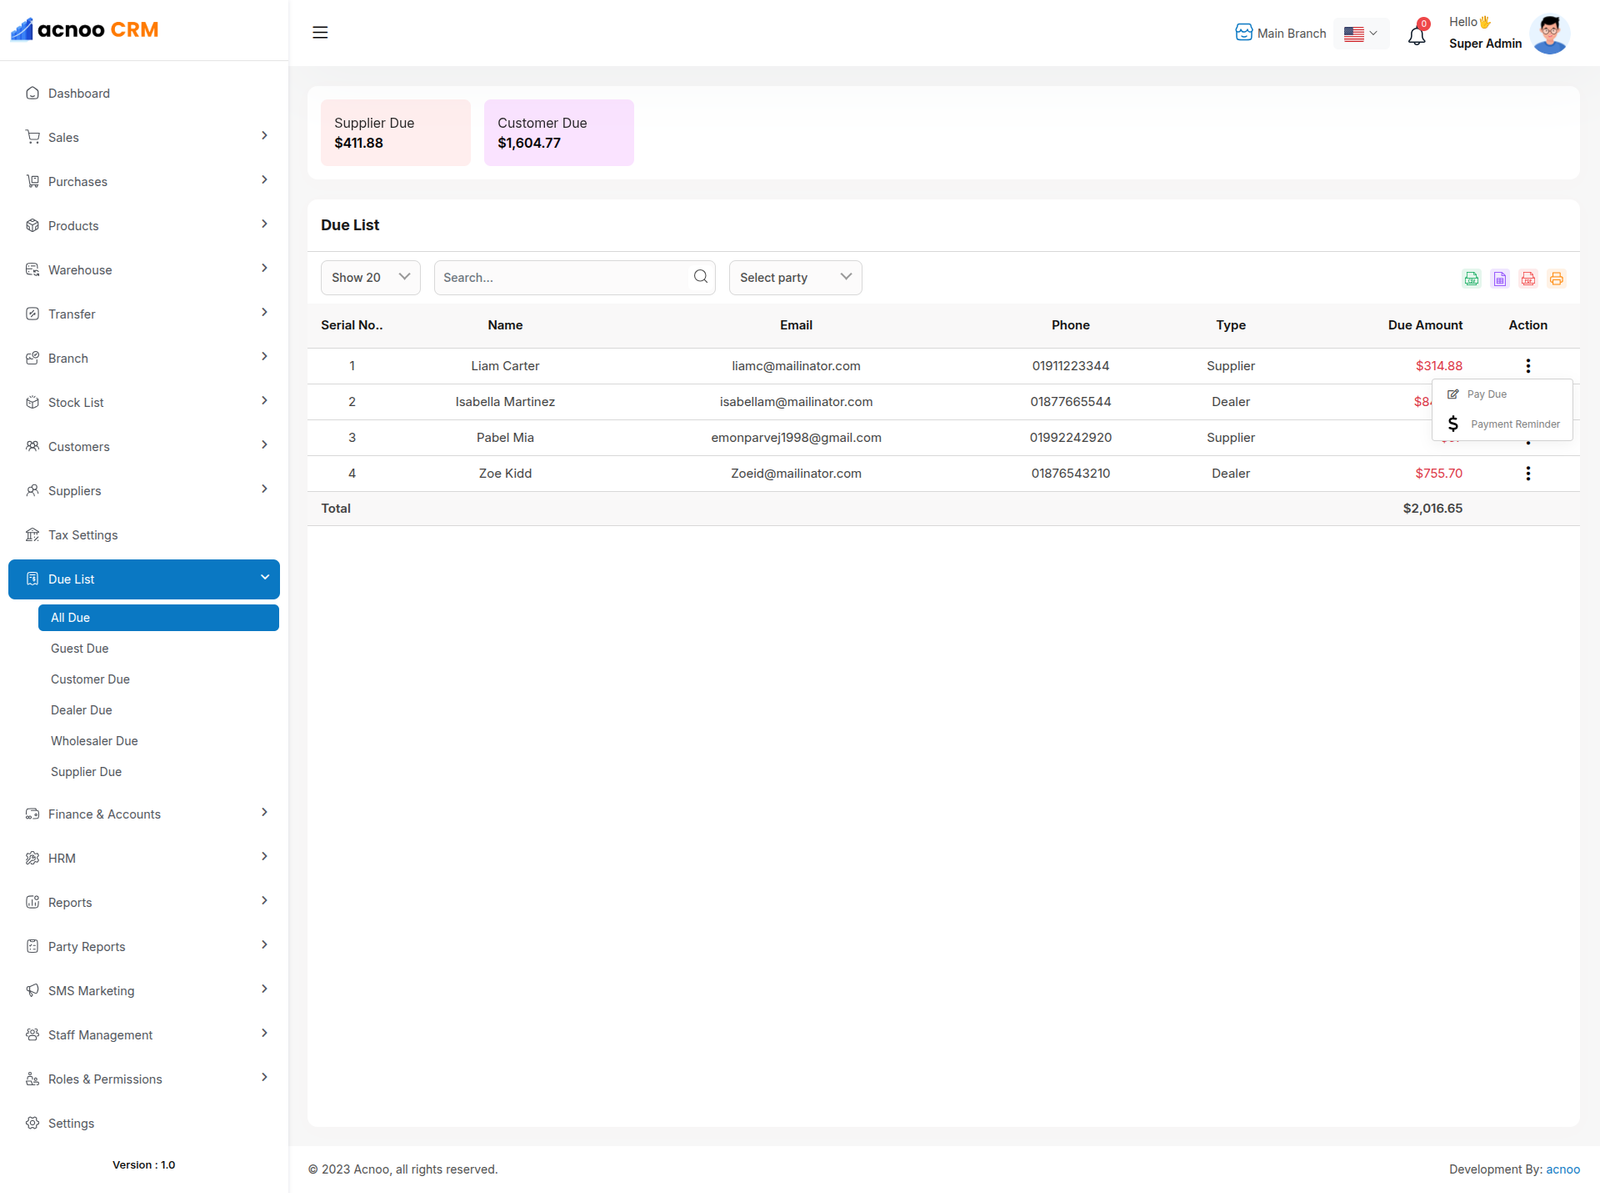
All Due List
This page provides a comprehensive view of the due list, along with search and party-based filtering options. Users can access and review invoices and collect outstanding amounts directly from this page. Additionally, you can view dues for different parties, such as guests, customers, dealers, wholesalers, and suppliers. From each party type, you can collect the corresponding due amounts.
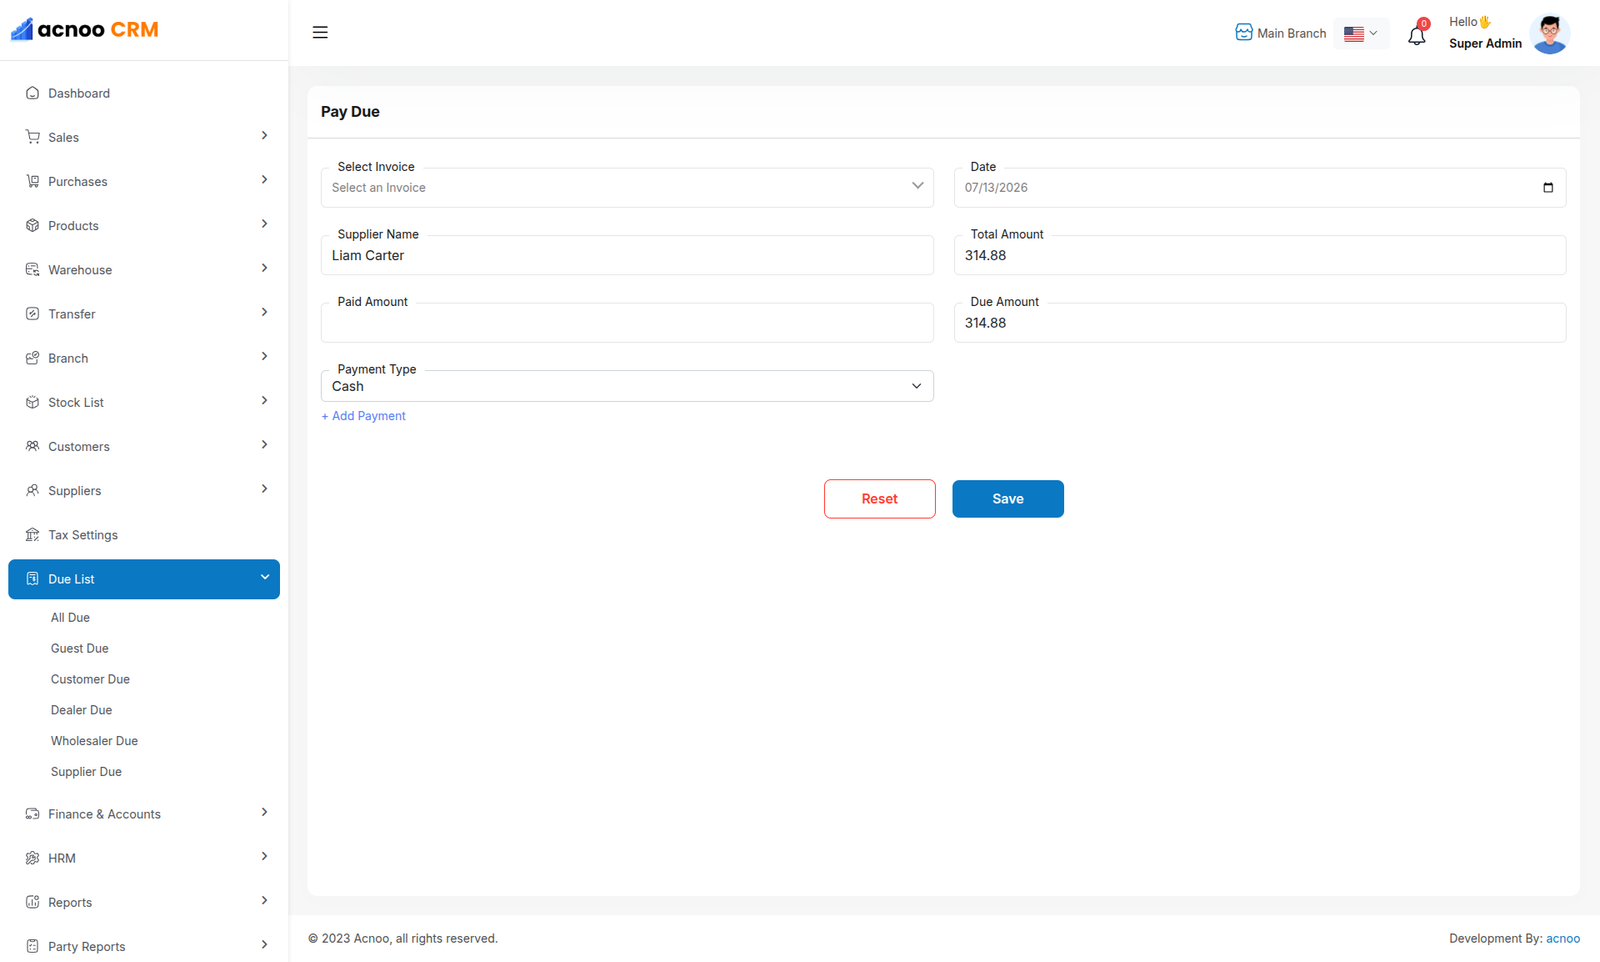
Collect Due
When you click "Collect Due" this page will appear. Here, you can collect the due amount either by invoice or without an invoice if there is any initial due.
Finance & account
In this section, you can view and manage the list of bank accounts, cash in hand, cheques, profit & loss, transactions, day book, bill-wise profit, income, income categories, expenses, and expense categories. I will explain all the functionalities step by step to help you understand and use each module properly.
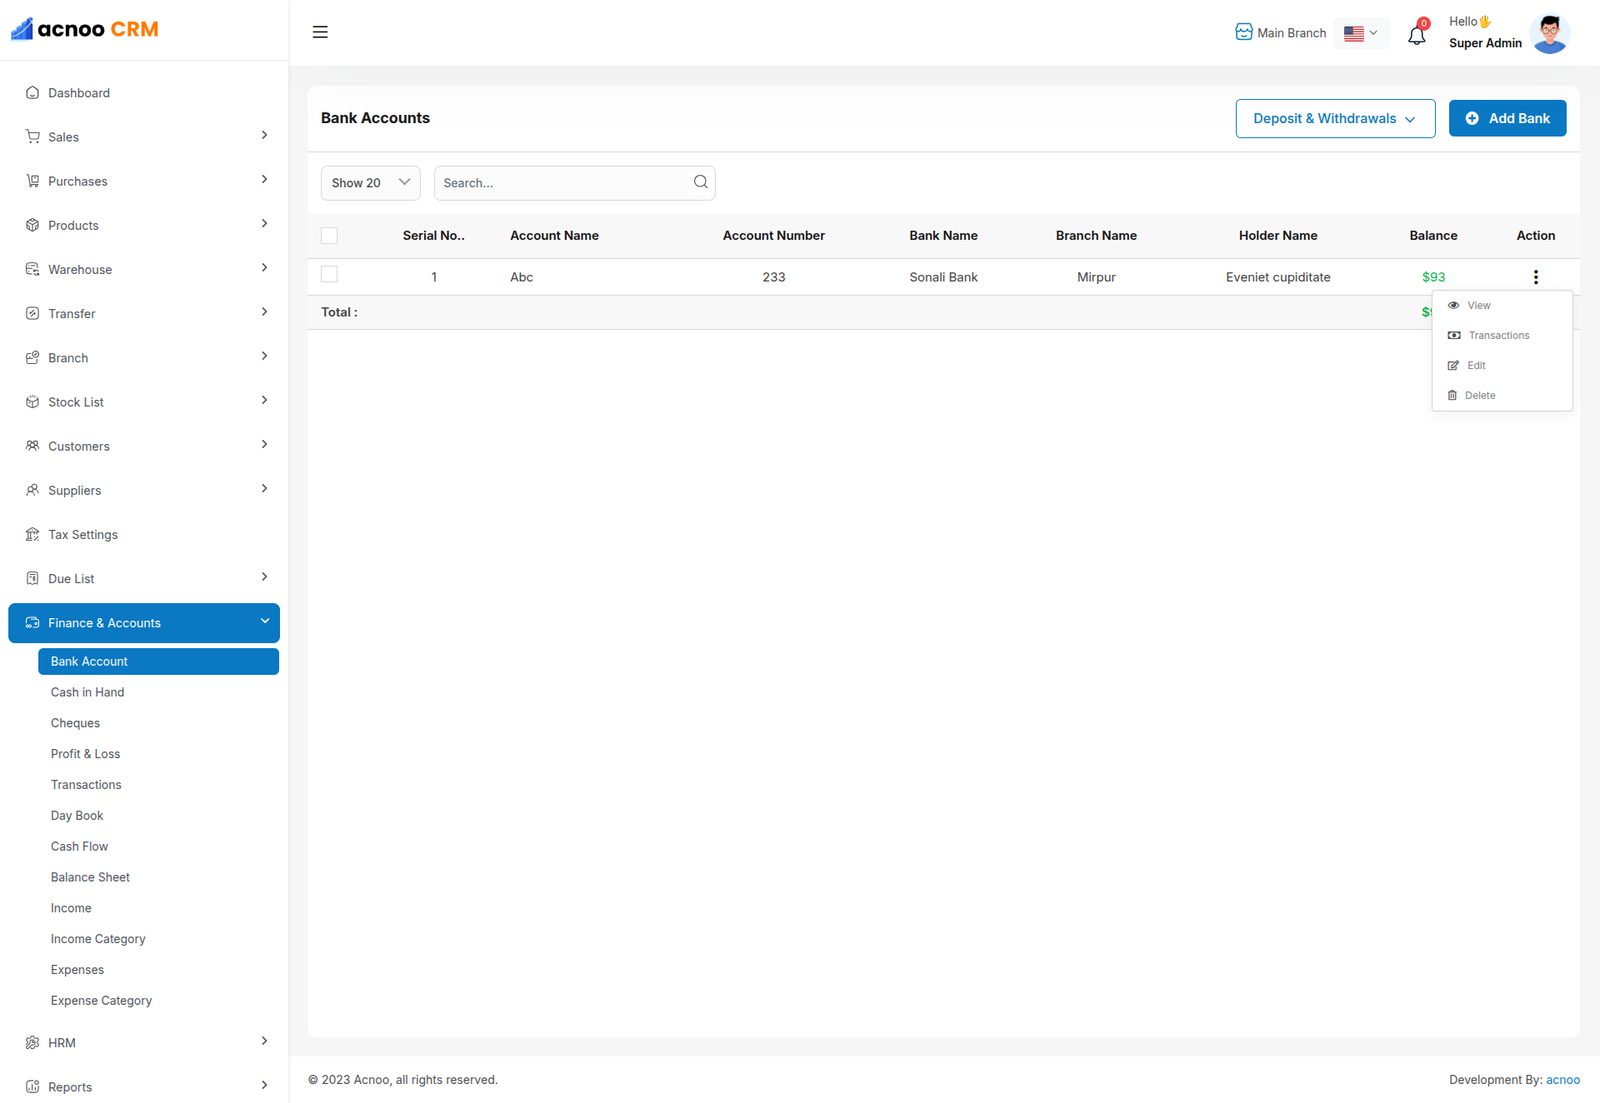
Bank Account
In the Bank module, users can view a list of all banks. By clicking on "Add Bank," a popup form will appear where users can enter the required information to create a new bank. In the action buttons for each bank, users can perform various operations such as edit, view, manage transactions, or delete. Additionally, users can filter the bank list using the search input or the dropdown menu for per-page filtering.
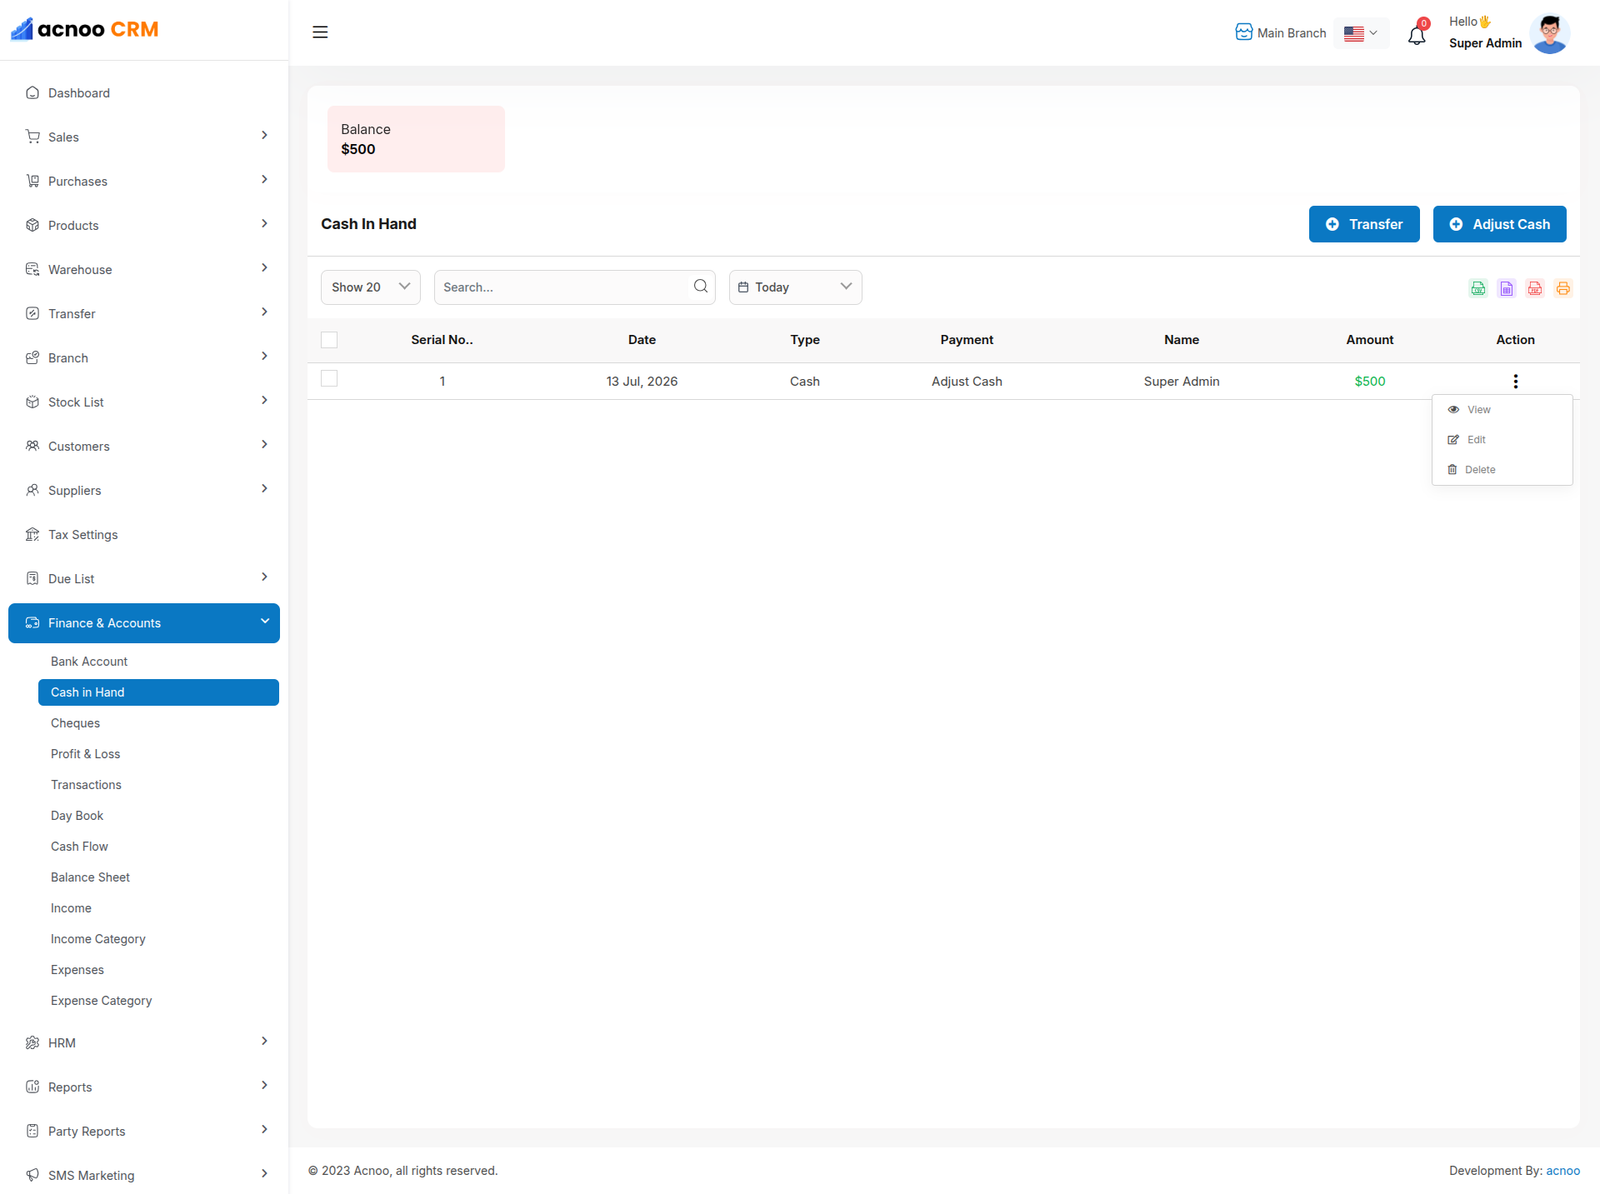
Cash In Hand
The Cash In Hand module allows users to view and manage all cash-in-hand records. By clicking on Adjust Cash, a popup form appears where users can enter the required information to create or update a cash-in-hand entry. When the Transfer option is selected, a popup form is displayed to transfer the amount to a bank account. From the action buttons of each entry, users can perform operations such as viewing details, editing records, or deleting entries. Additionally, the cash-in-hand list can be filtered using the search field or the per-page dropdown for easier navigation.
Cheque
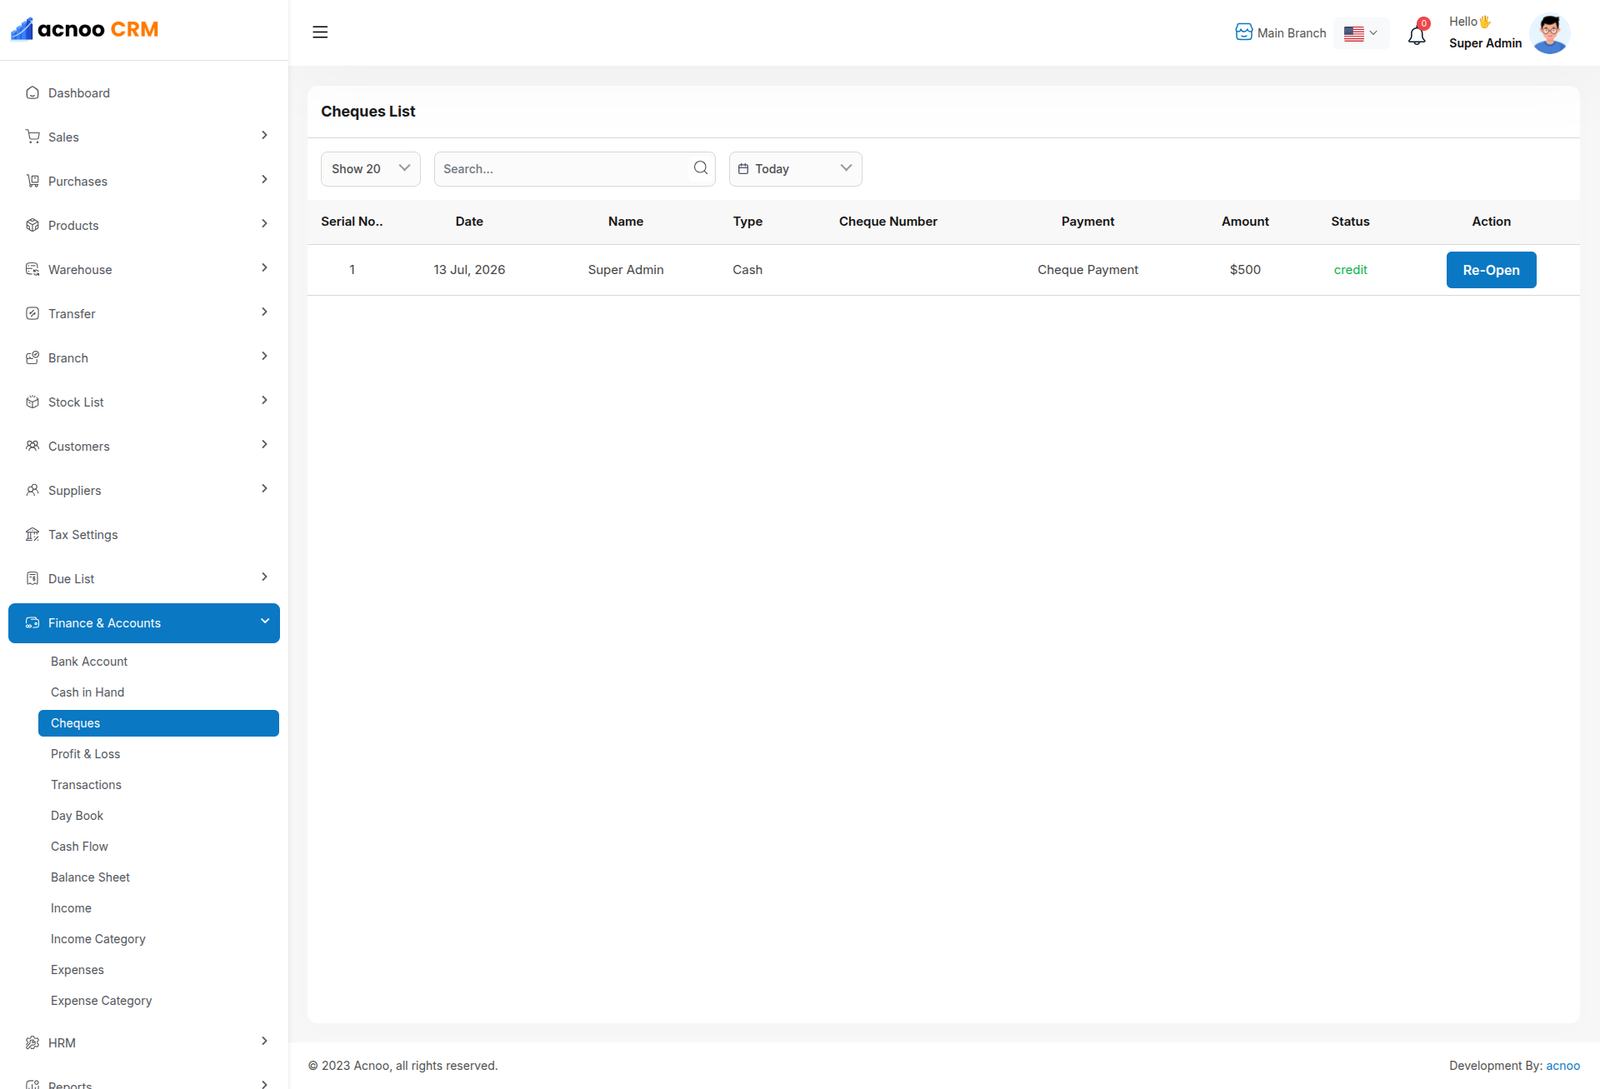
The Cheque module displays all cheque-related transactions from the Sales, Purchase, and other relevant modules where the payment type is set to cheque. This module includes per-page filtering, search functionality, and date-based filtering options for easier data management. From here, users can deposit cheques or re-open them as cash when required.
Profit & Loss
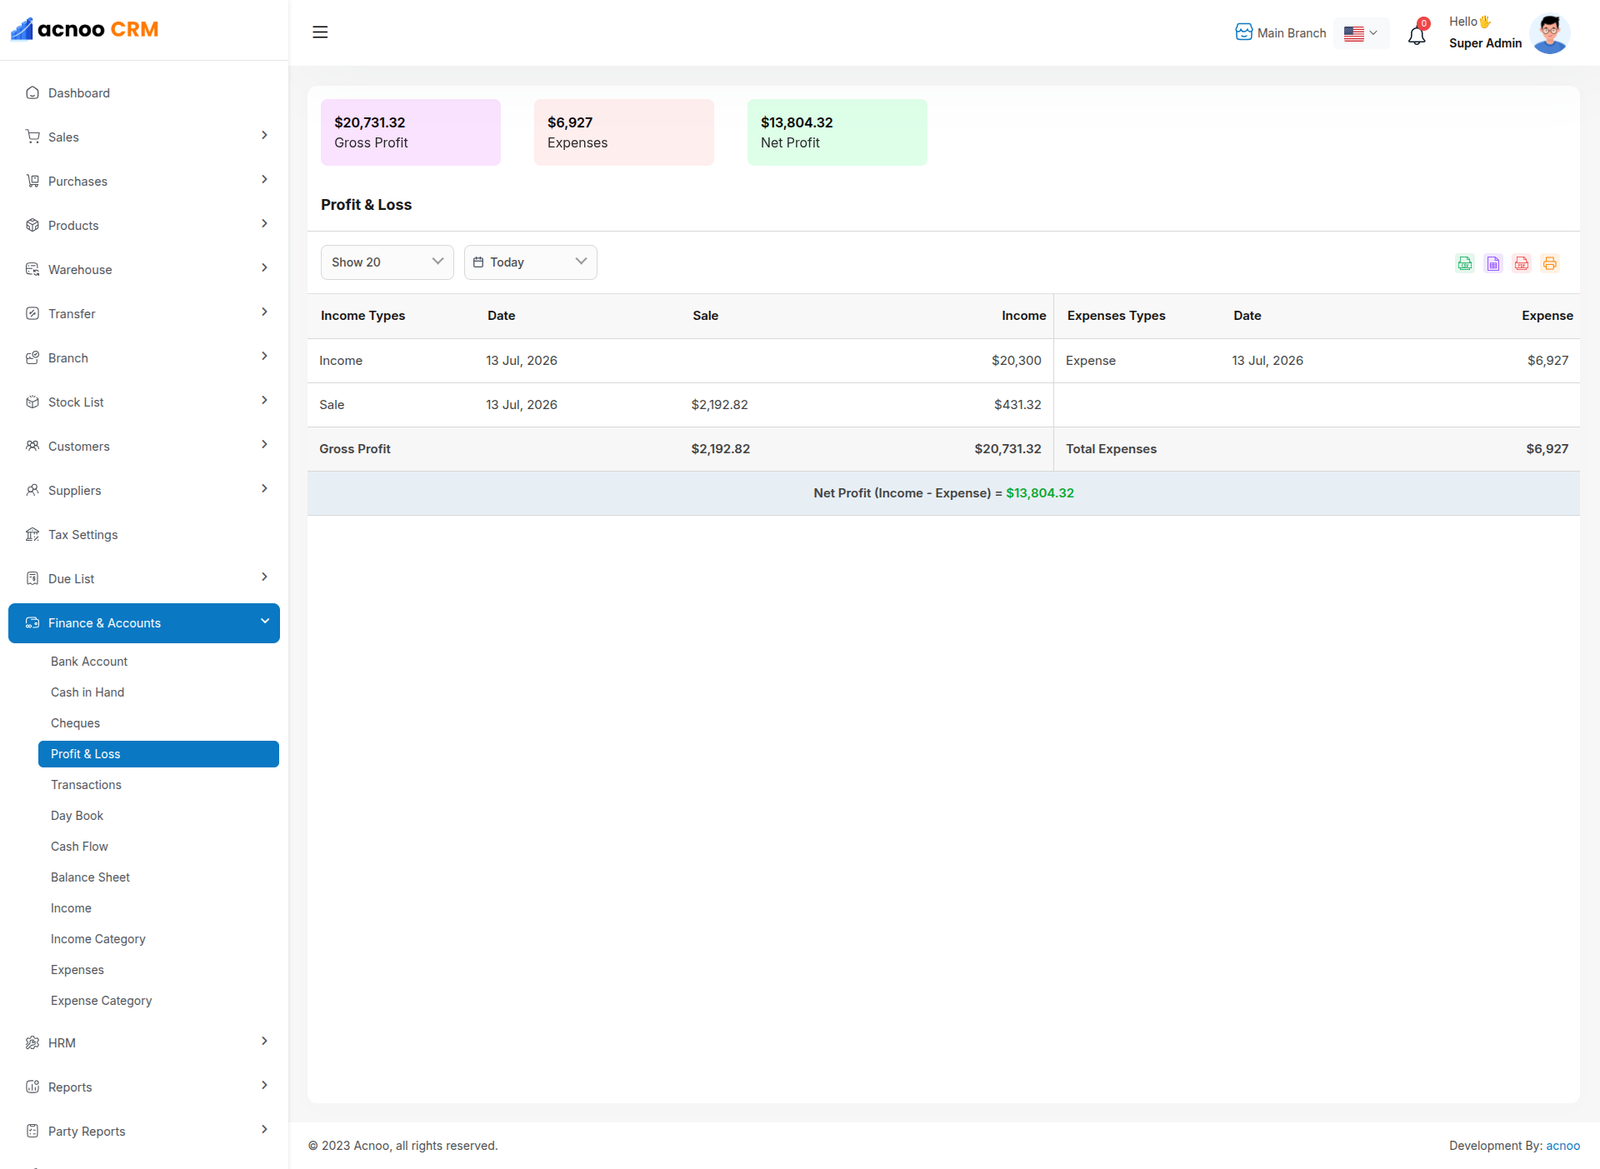
In this module, users are initially presented with three summary cards: Gross Profit, Expenses, and Net Profit. Below the summary section, a detailed table is displayed and divided into two sections—one for income and the other for expenses. Income data is retrieved from the Income and Sales tables, where daily income and daily sales are shown in separate rows. Expense data is retrieved from the Expenses table, displaying daily expenses and daily payroll in separate rows. Additionally, this module provides date-based filtering options, including Today, Yesterday, Last 30 Days, Last Month, and a Custom Date range, allowing users to analyze financial data for specific periods.
Transaction
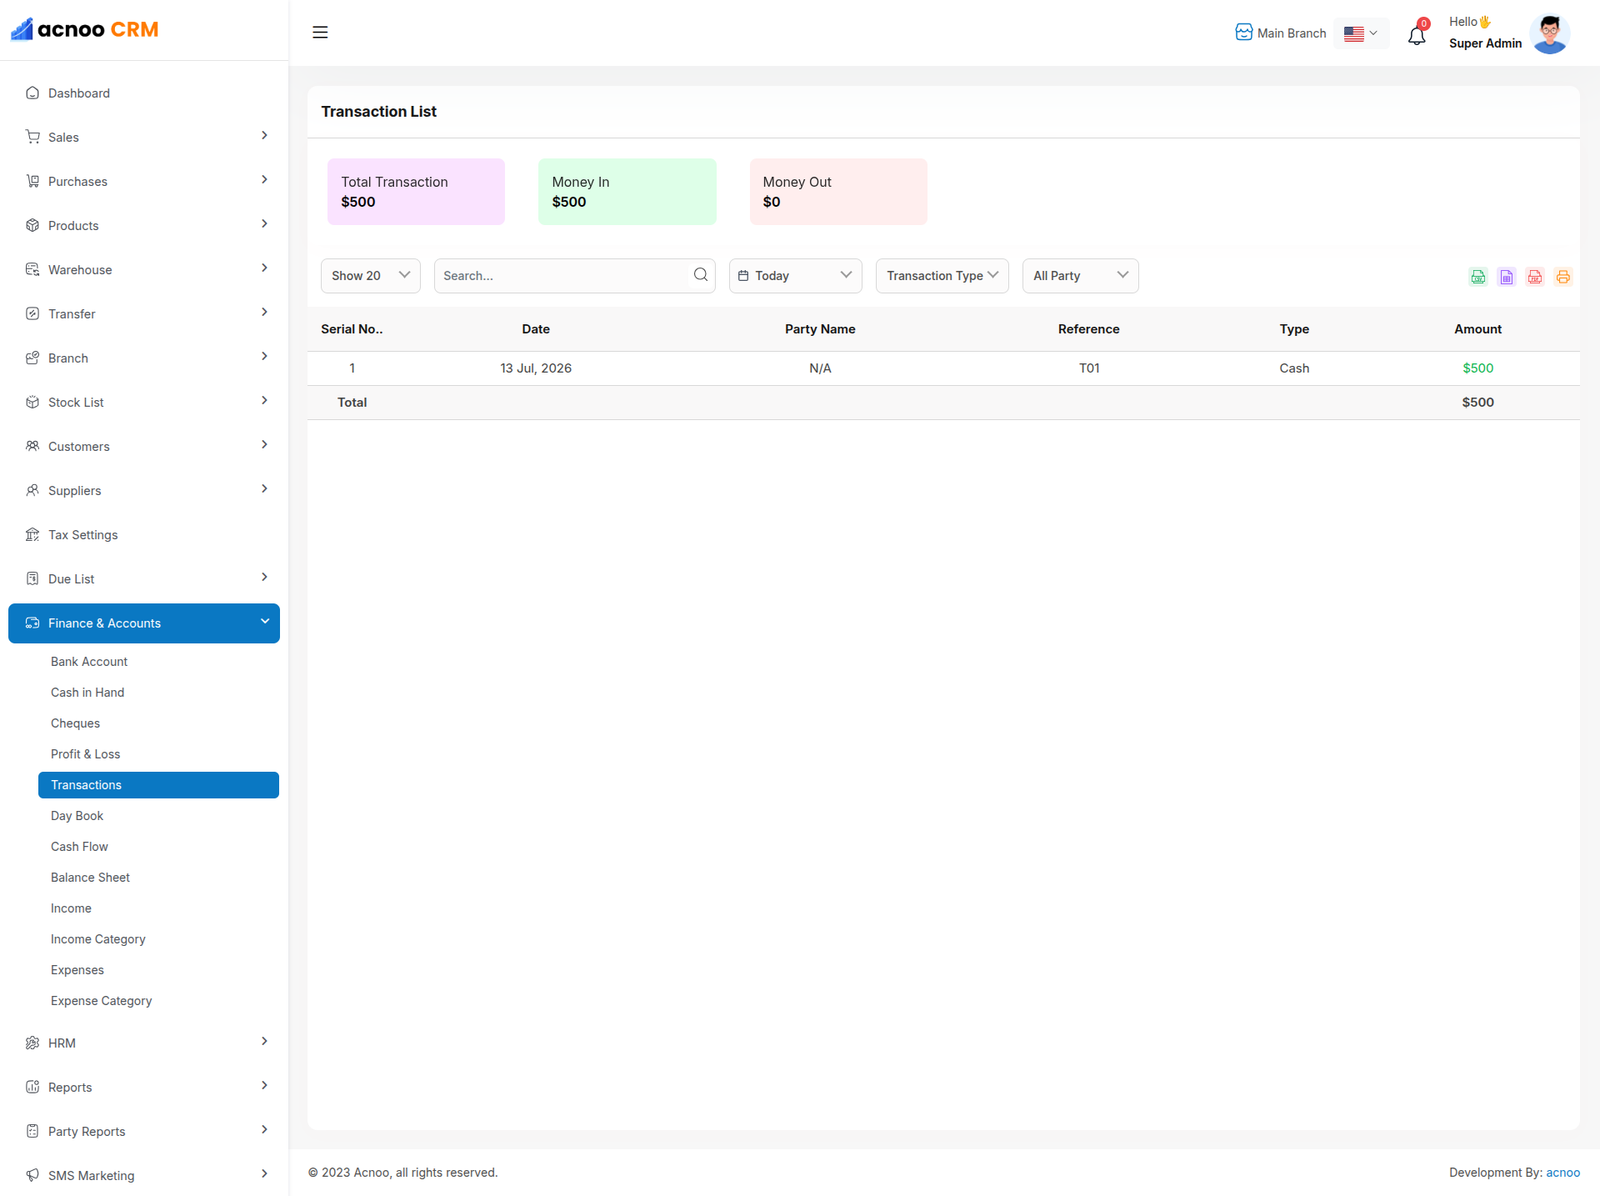
This module provides a complete list of all transactions. Users can view various types of transaction records, including sales, purchase due collections, cheque transactions, cash transactions, and other related activities. At the top of the module, three summary cards are displayed: Total Transactions, Money In, and Money Out. The transaction table includes multiple filtering options such as per-page selection, search input, date-based filtering, transaction type filtering, and party-based filtering to help users easily locate and manage transaction records.
Day Book
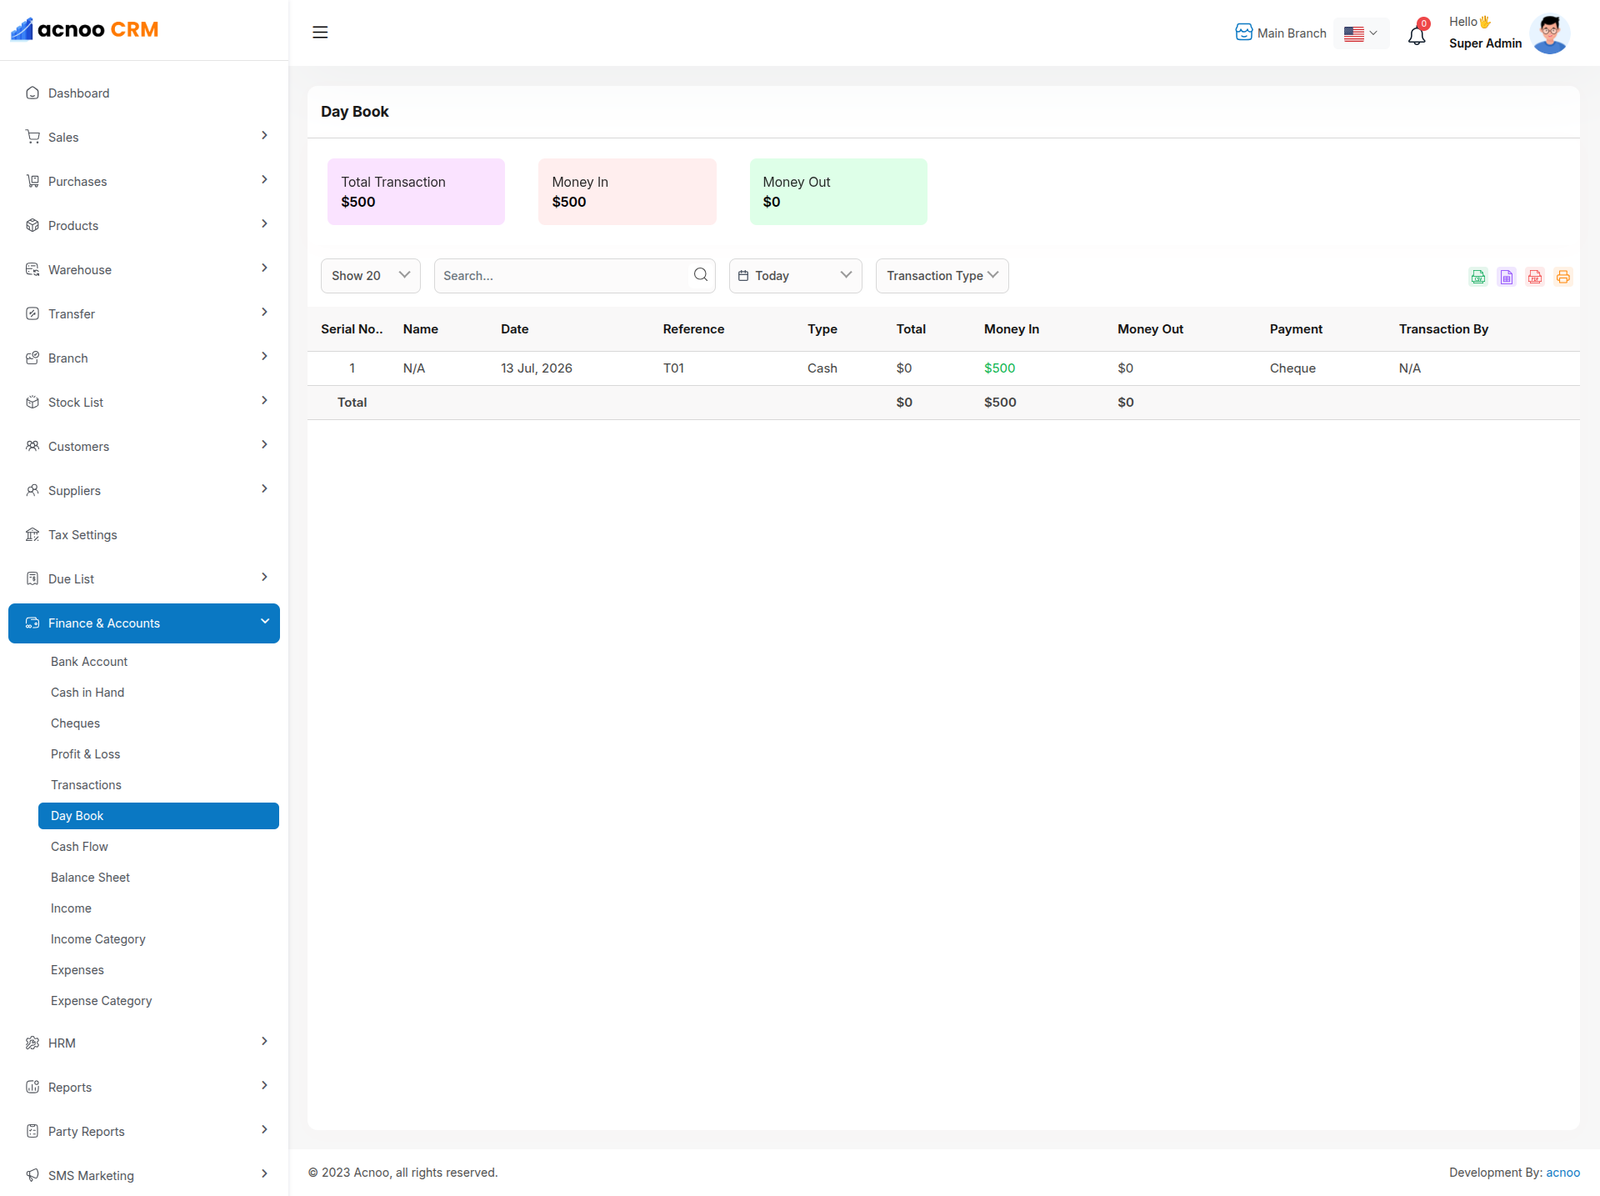
The Day Book report displays all types of transactions related to debit and credit entries. At the top of the report, three summary cards are shown: Total Transactions, Money In, and Money Out. The report also includes filtering options such as per-page selection, search input, date-based filtering, and transaction-type filtering to help users efficiently review and analyze transaction records.
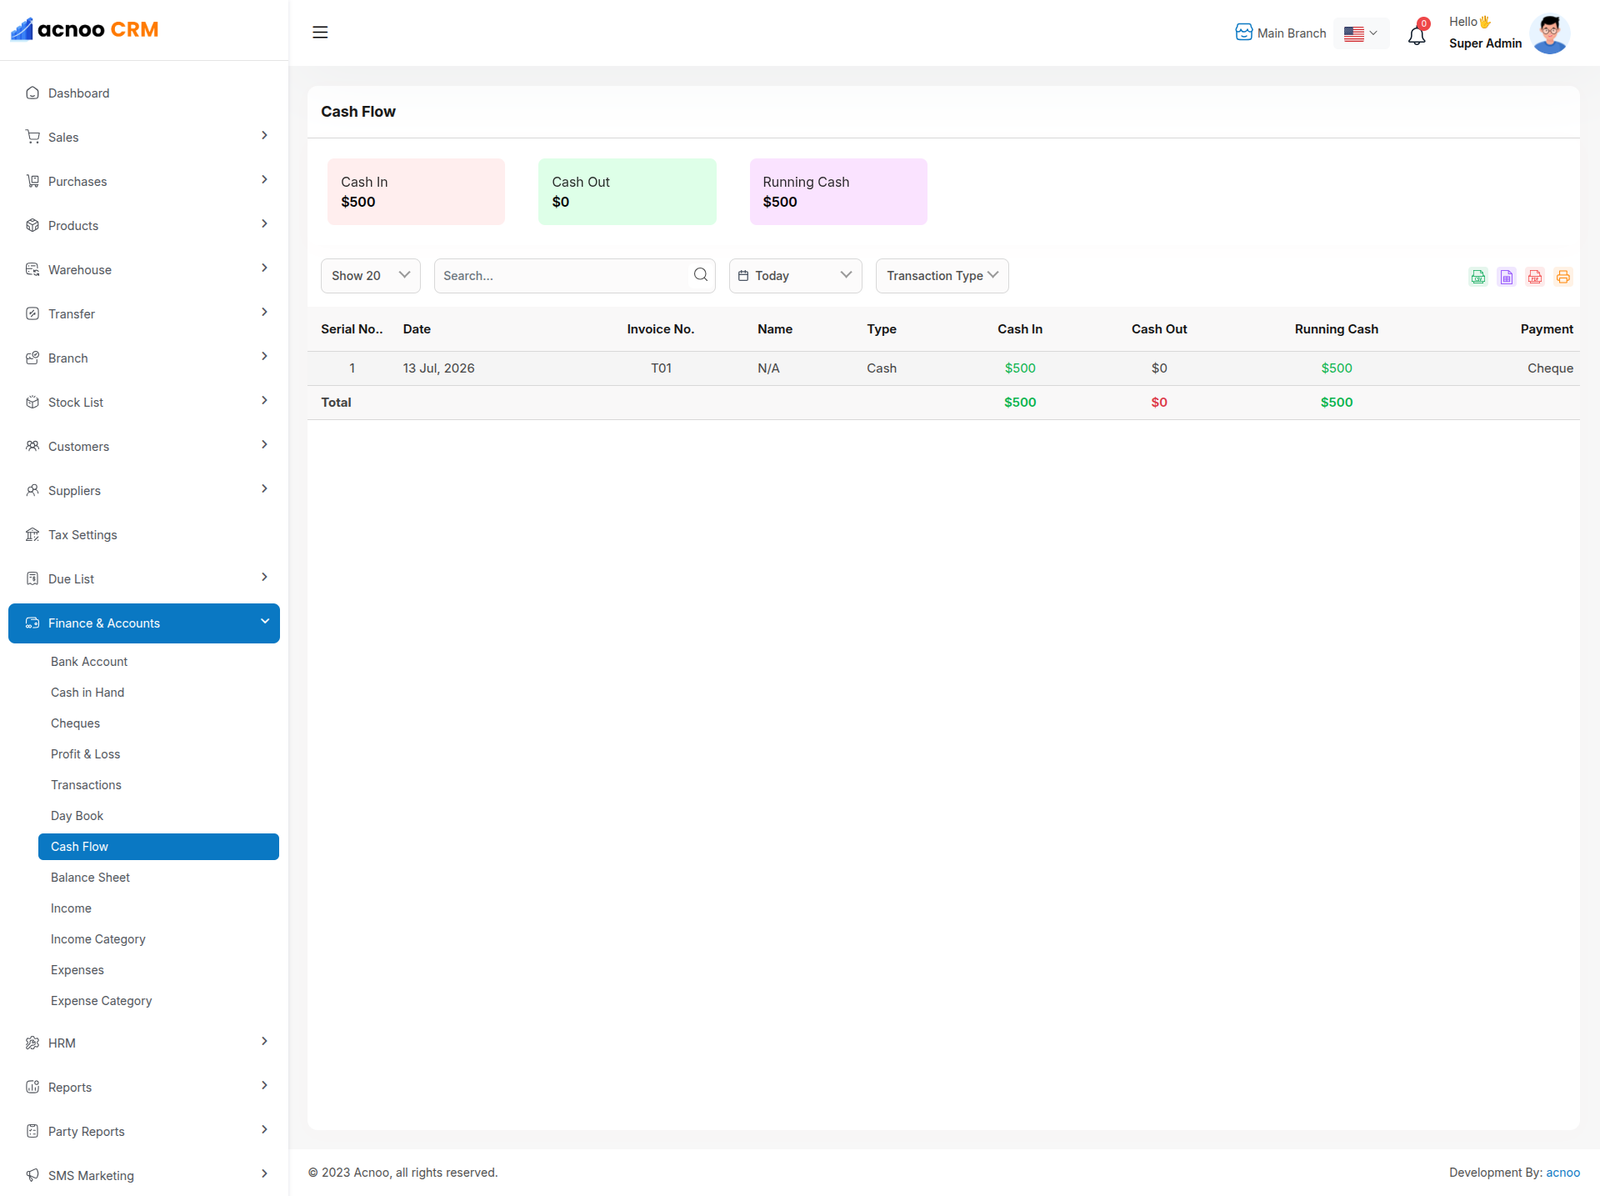
Cash Flow
The Cash Flow module provides a detailed view of all cash inflows and outflows. At the top of the module, three summary cards are displayed: Cash In, Cash Out, and Running Cash. The module also includes filtering options such as per-page selection, search input, date-based filtering, and transaction-type filtering to help users efficiently analyze cash flow records.
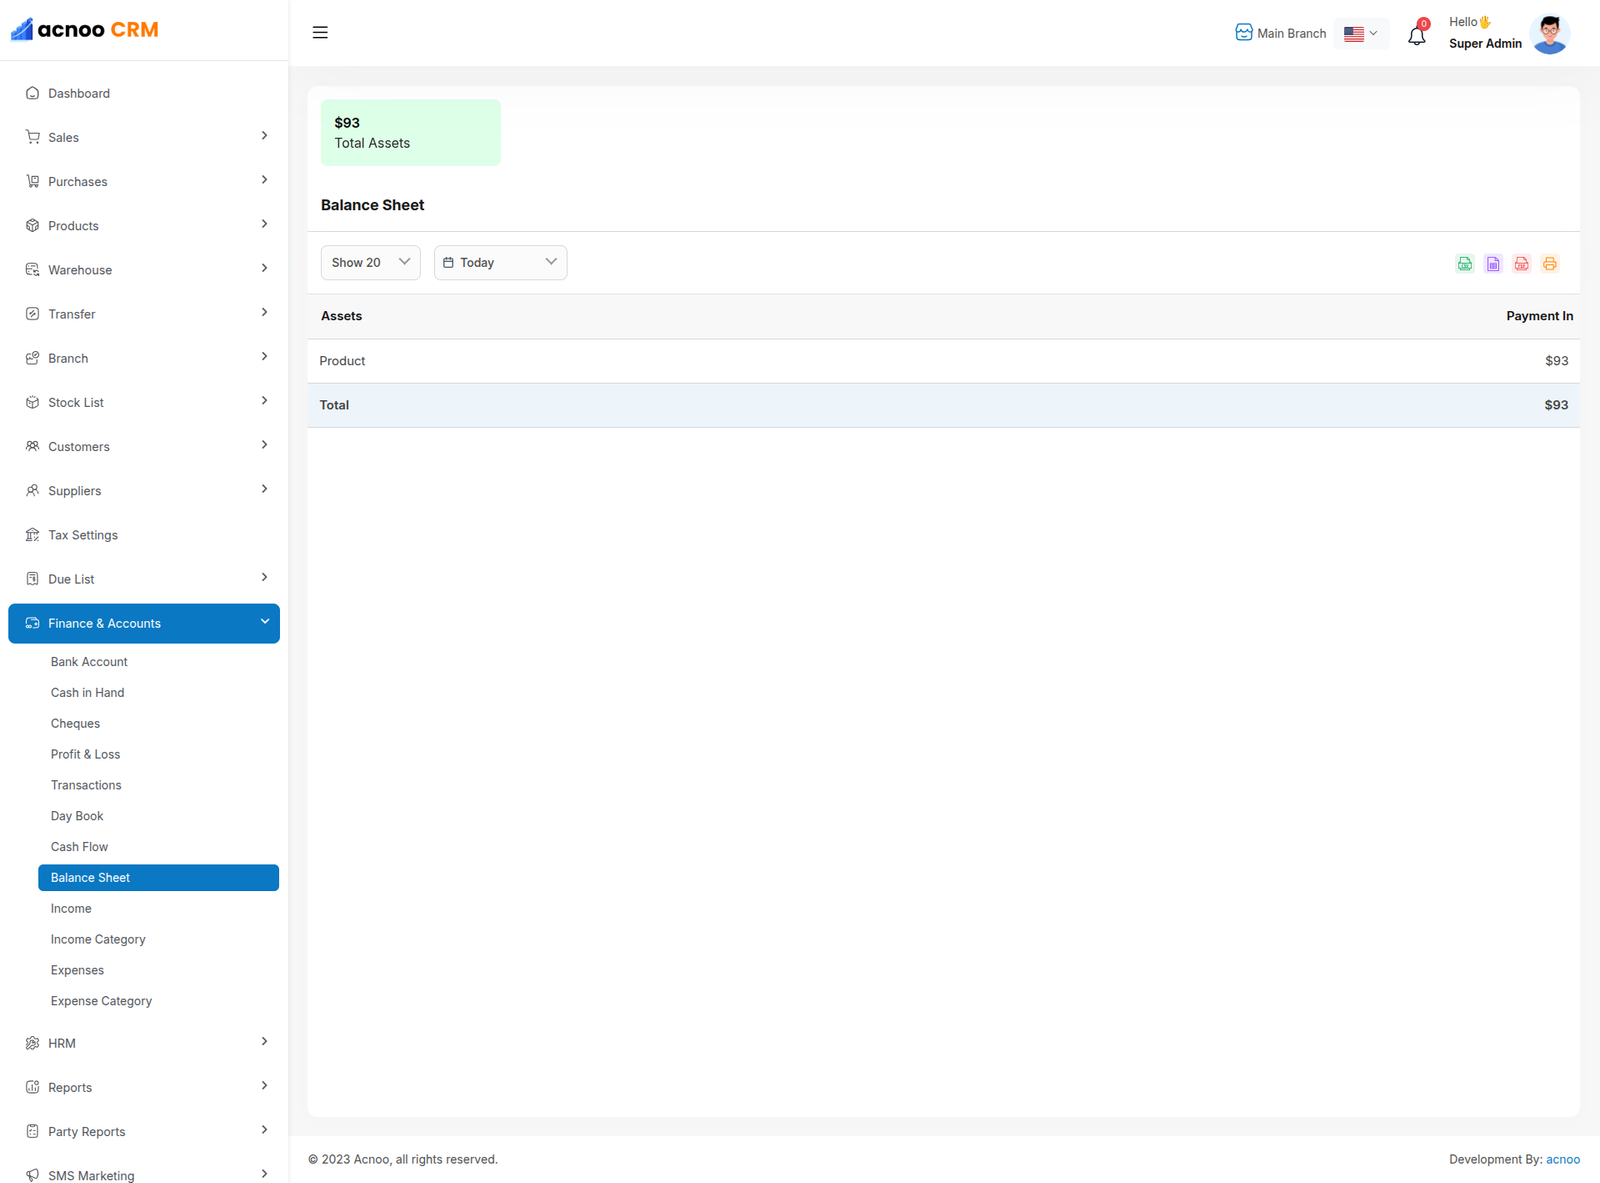
Balance Sheet
The Balance Sheet module provides an overview of all business assets. It displays the total value of assets, including product assets and bank balances. A summary card shows the overall total assets for all time. Additionally, the table includes per-page selection and date-based filtering options to help users review financial data efficiently.
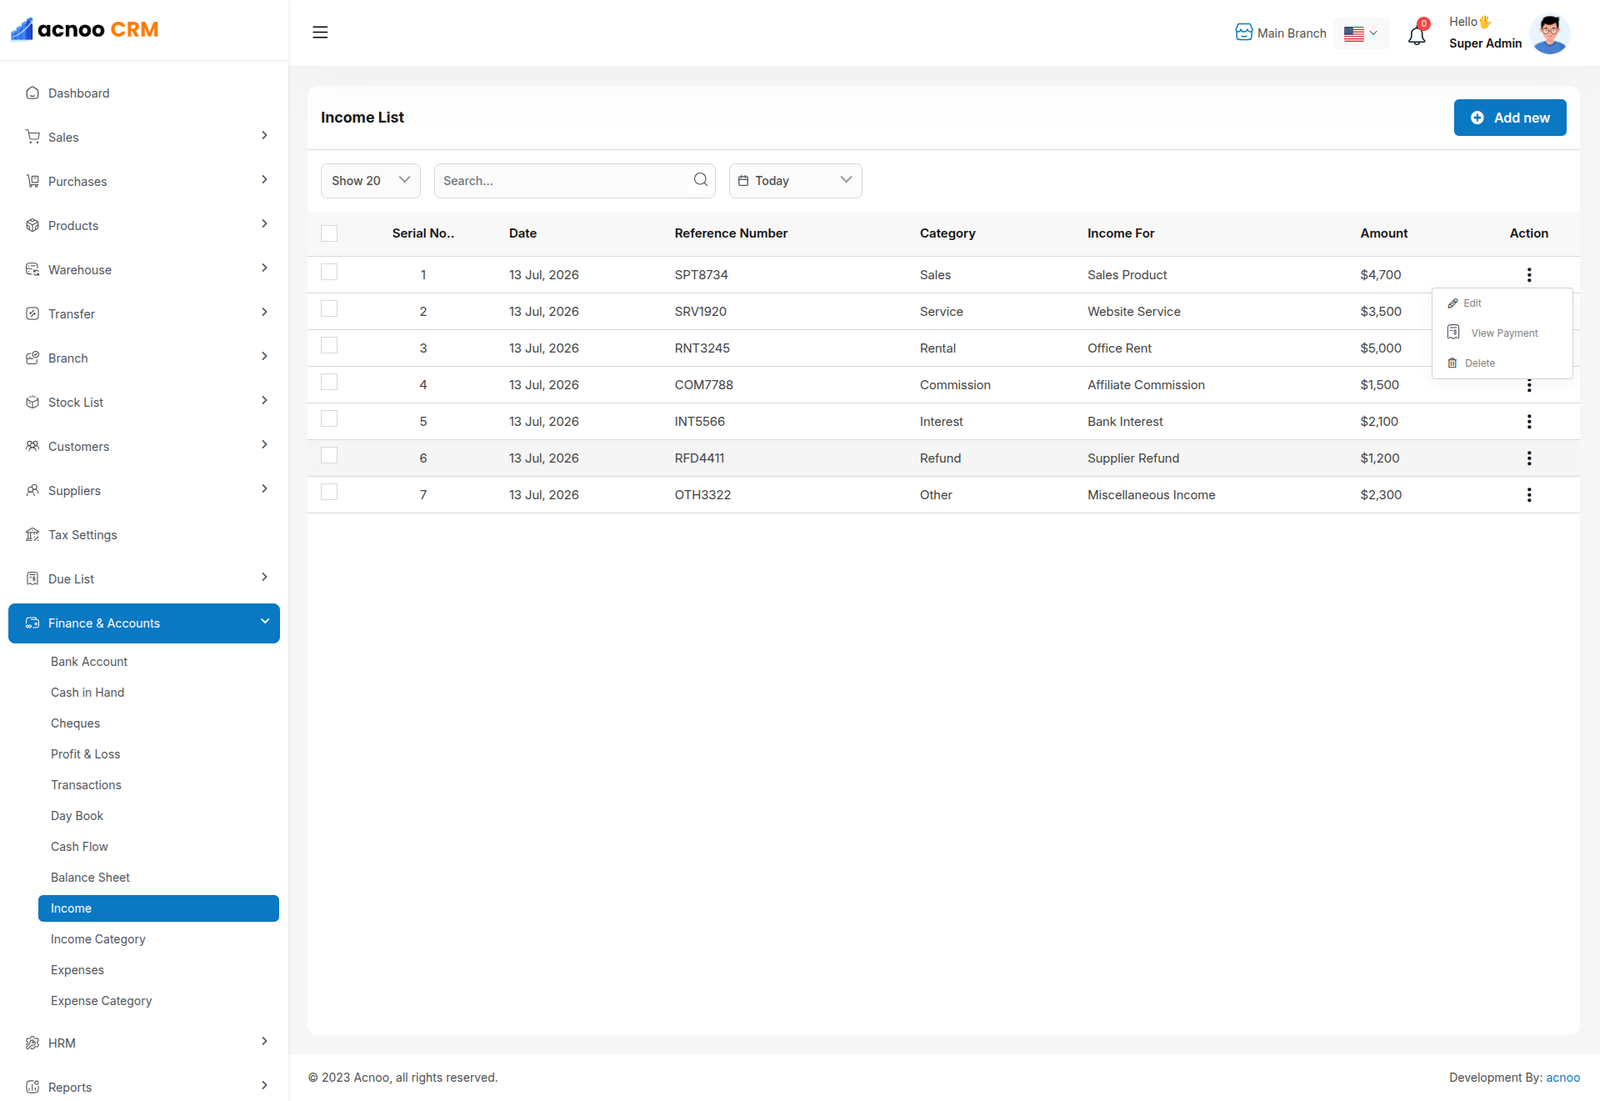
Income List
Here, you can view the Income list with a search filter. Additionally, you have the option to edit, delete, or use the multi-delete function.
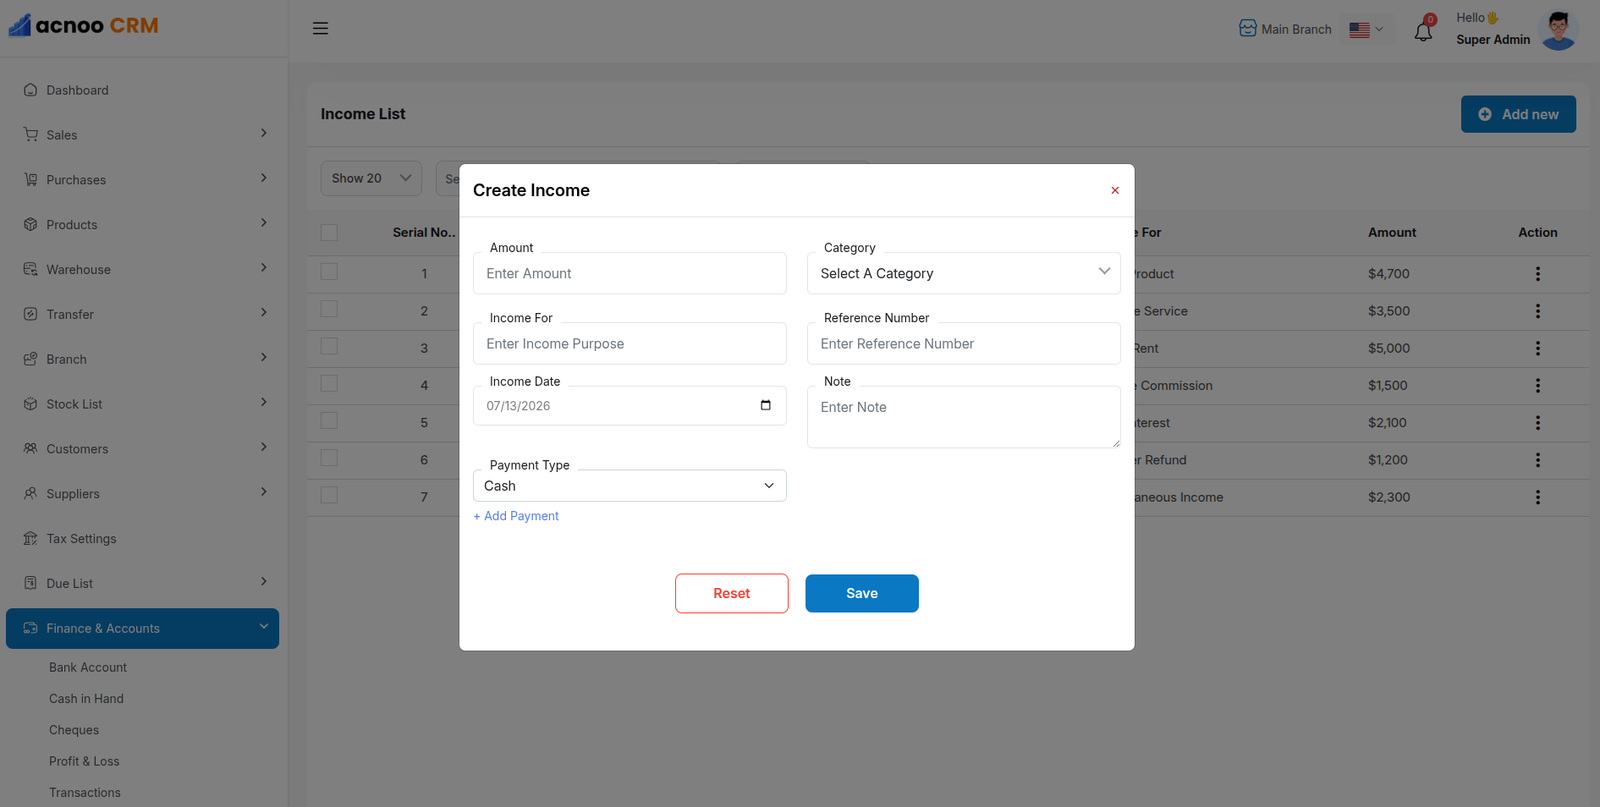
Create Income
You can create an income by filling out the required fields.Here You can also select category and payment type.
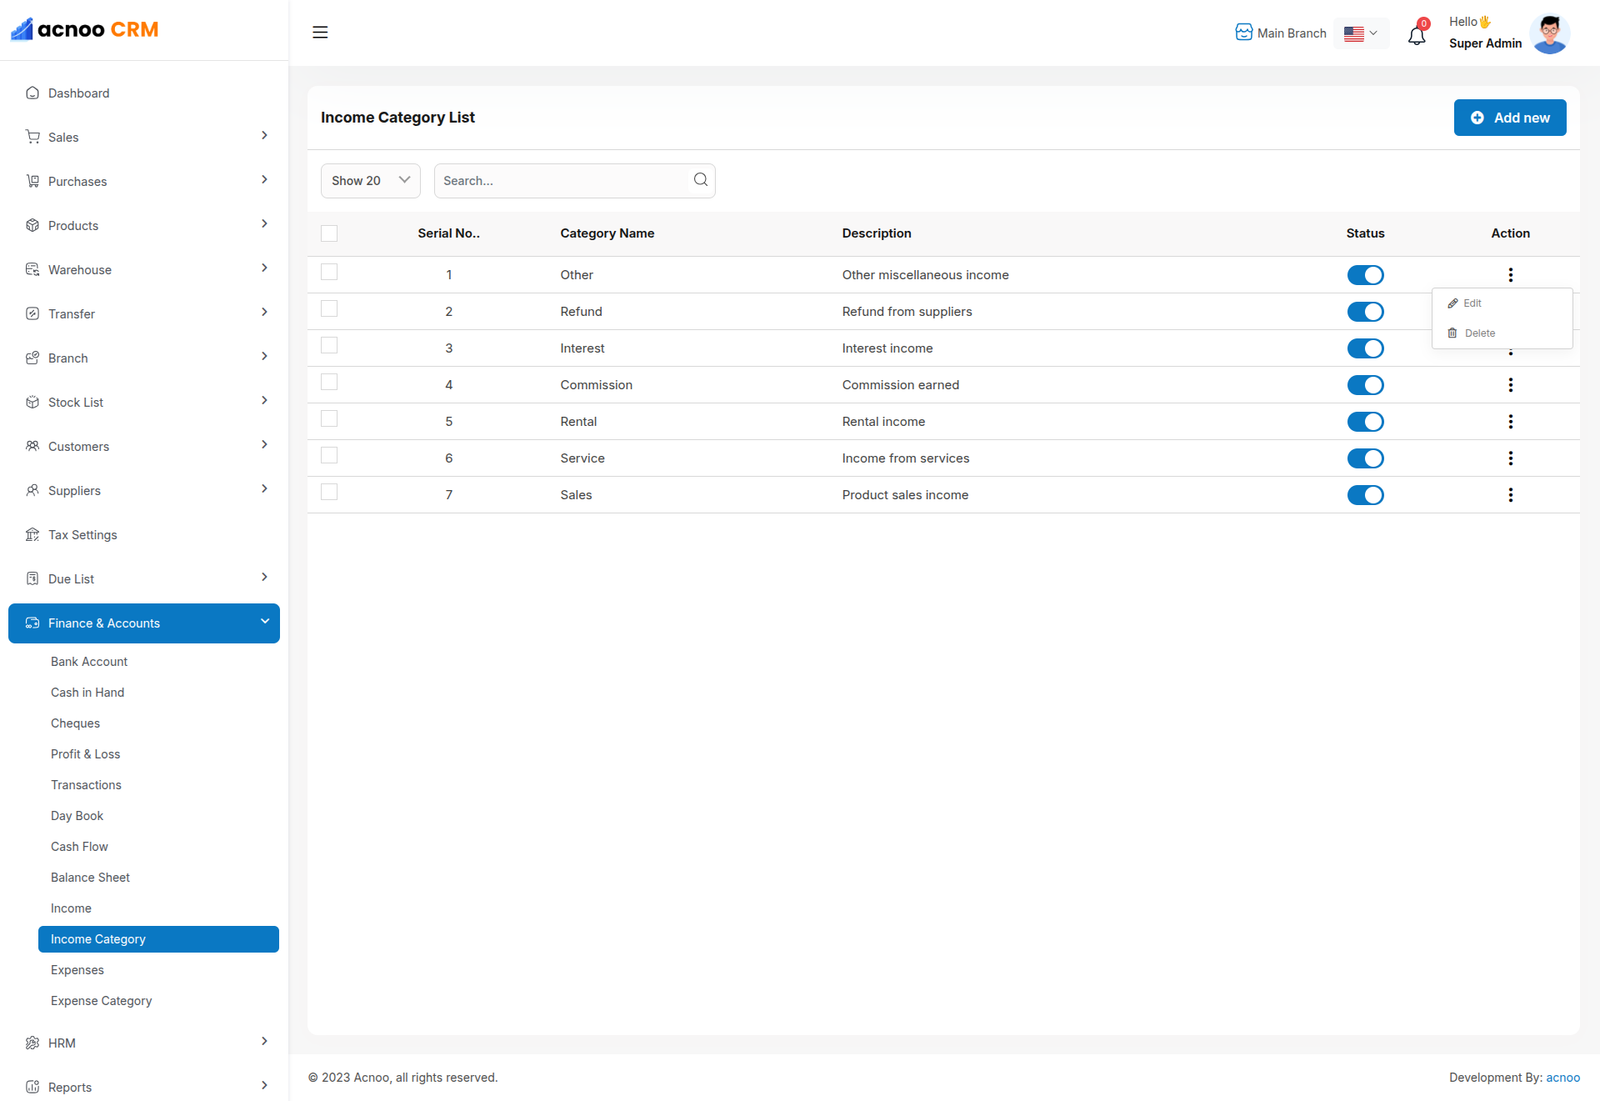
Income Category
Here, you can view the Income Category with a search filter. Additionally, you have the option to edit, delete, or use the multi-delete function. Just put category name and description for create Income Category
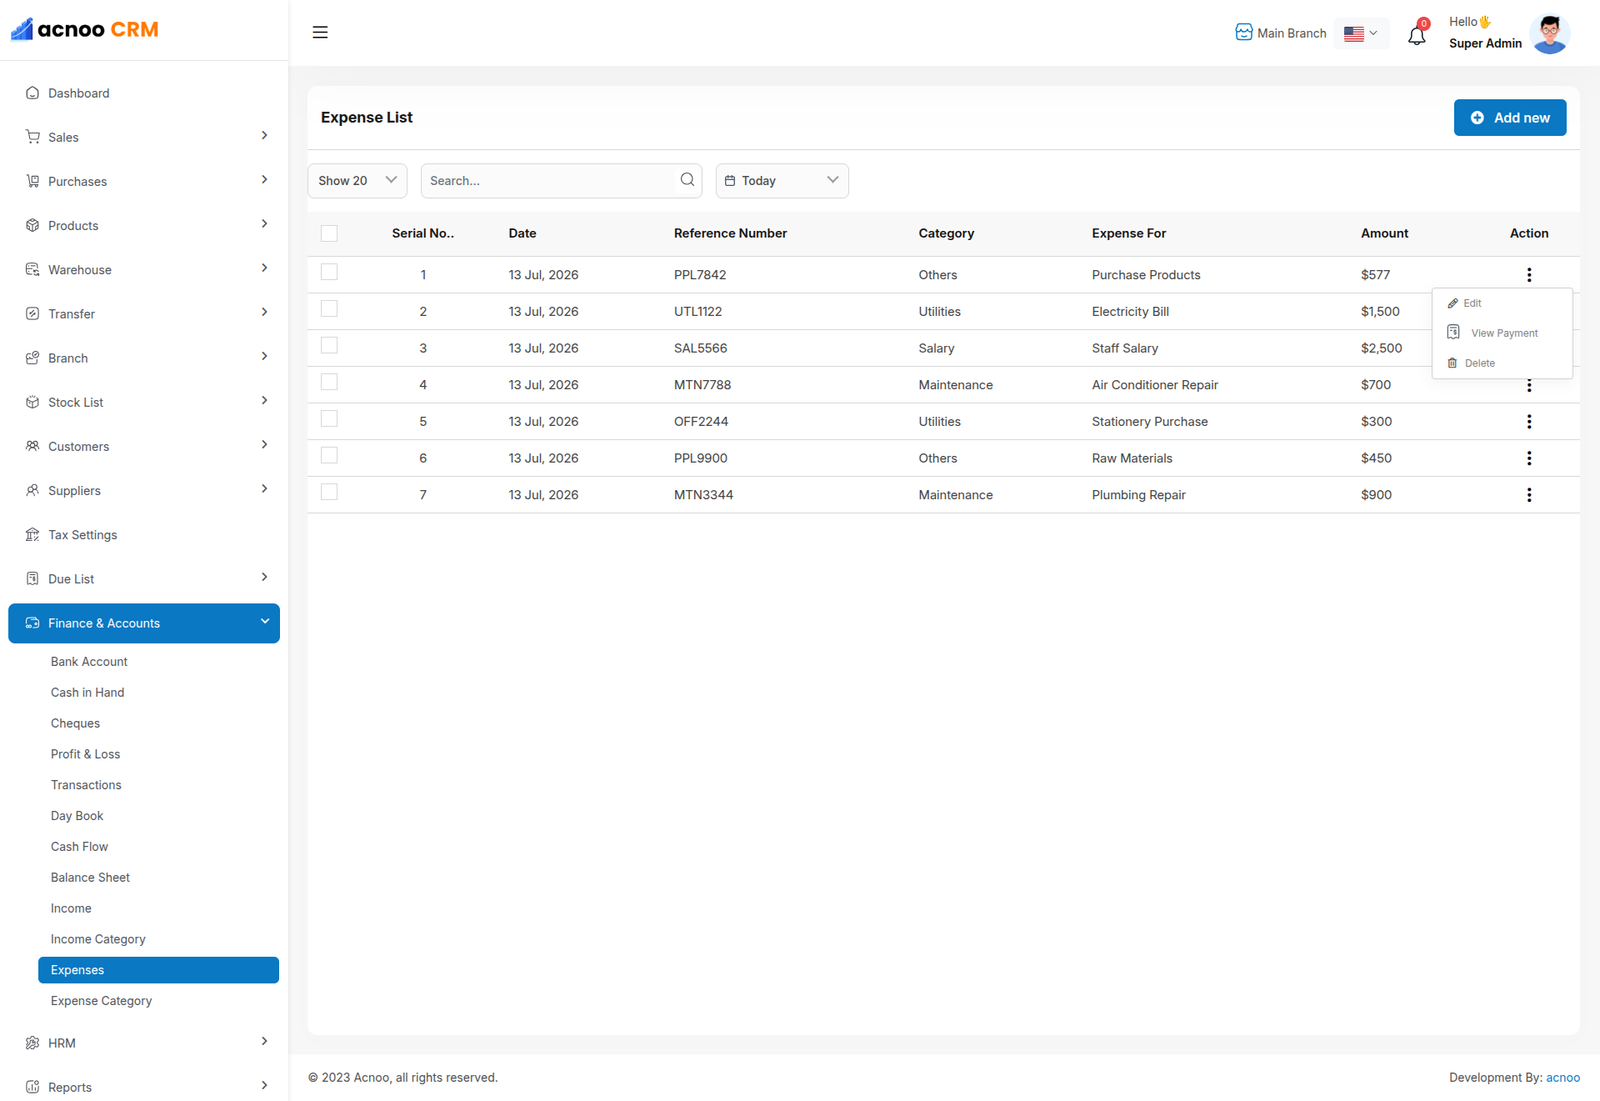
Expense List
Here, you can view the Expense list with a search filter. Additionally, you have the option to edit, delete, or use the multi-delete function.
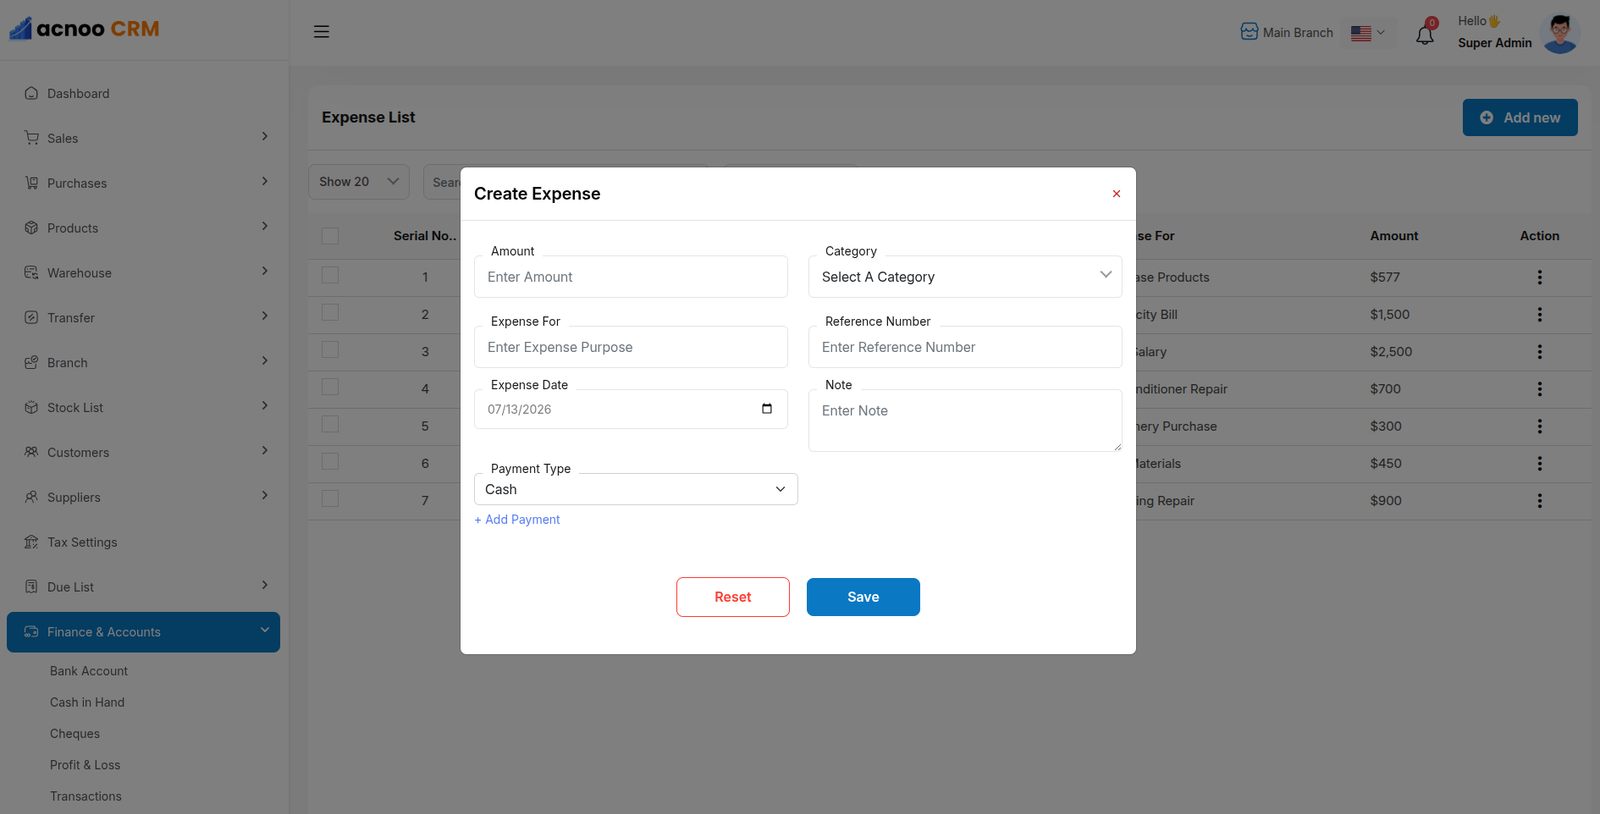
Create Expense
You can create an expense by filling out the required fields.Here You can also select category and payment type.
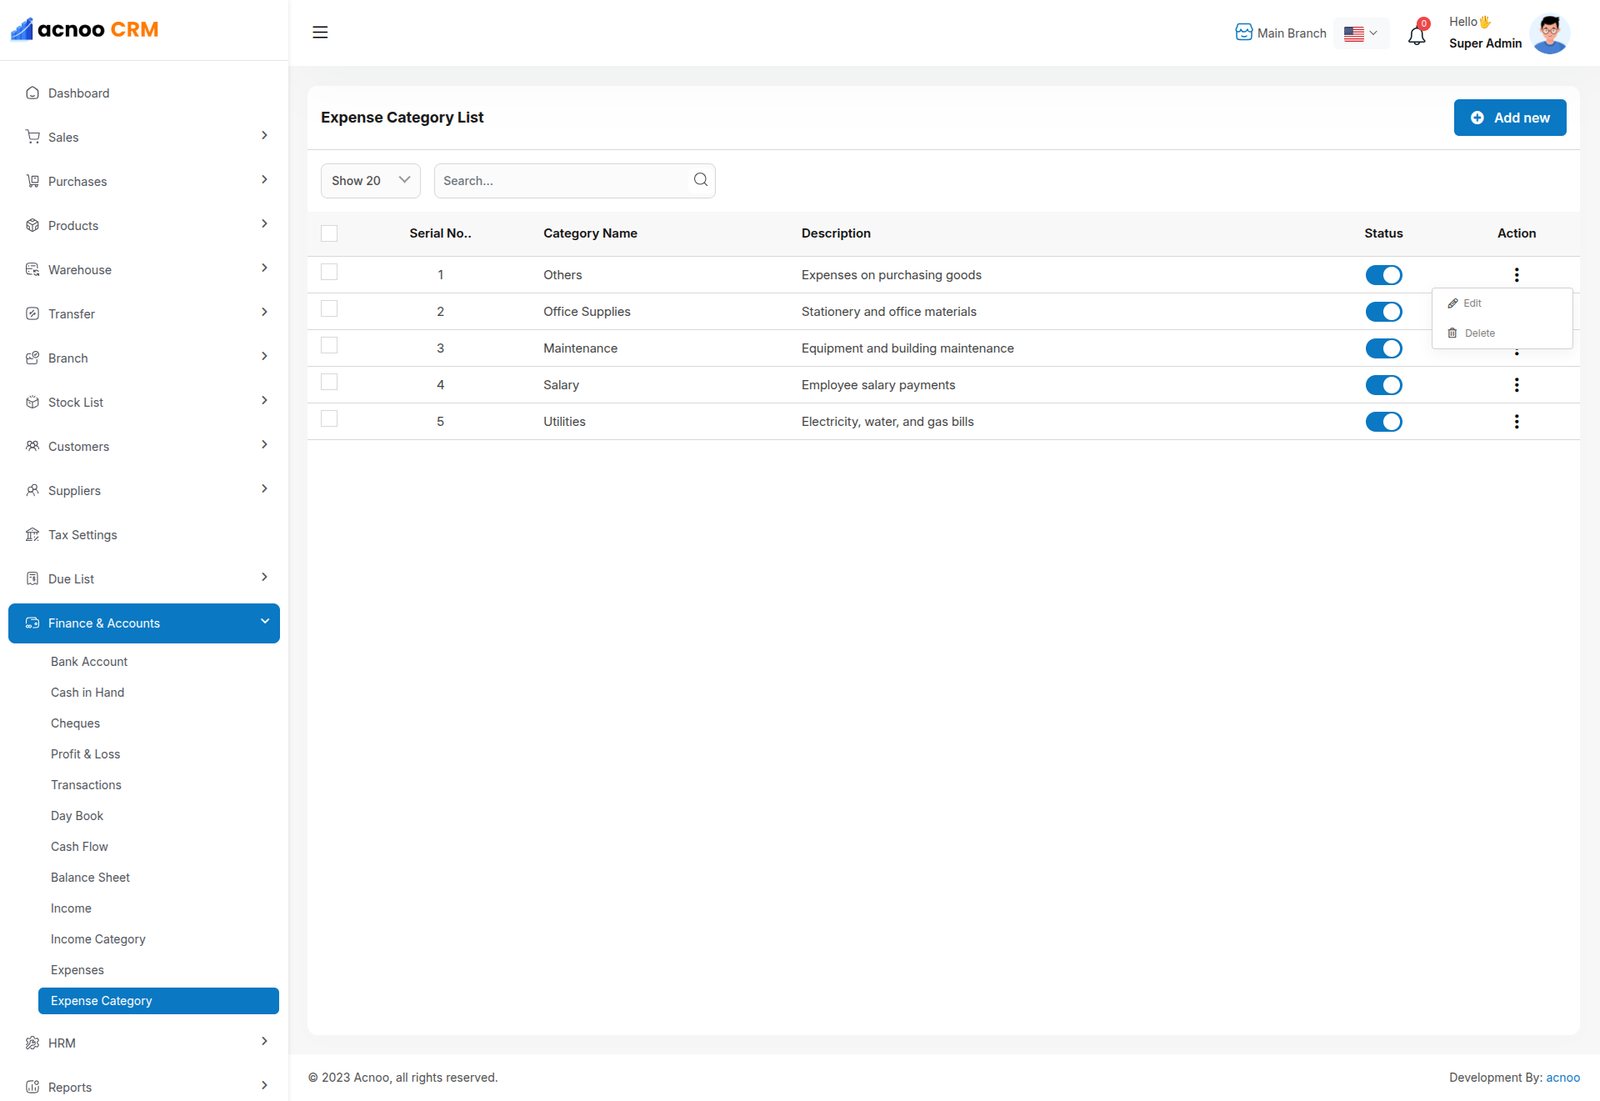
Expense Category
Here, you can view the Expense Category with a search filter. Additionally, you have the option to edit, delete, or use the multi-delete function. Just put category name and description for create Expense Category
Reports
The Reports module provides a comprehensive collection of business insights, including:
- Sales Report
- Sales Return Report
- Purchase Report
- Purchase Return Report
- Sales Tax Report
- Purchase Tax Report
- Income Report
- Expense Report
- Stock Report
- Customer Due Report
- Supplier Due Report
- Profit & Loss (Bill-wise)
- Profit & Loss (Product-wise)
- Profit & Loss History
- Due Collection Transaction Report
- Subscription Report
- Top Customers Report
- Top Suppliers Report
- Top Products Report
- Combo Products Report
- Discounted Products Report
- Product-wise Sales Report
- Product-wise Purchase Report
- Expired Products Report
- Product Sales History Report
- Product Purchase History Report
Each report supports advanced filtering options such as input-based search, per-page control, and date filtering for efficient data analysis. Additionally, all reports allow data export in Excel, CSV, and PDF formats, along with a print option for offline use.
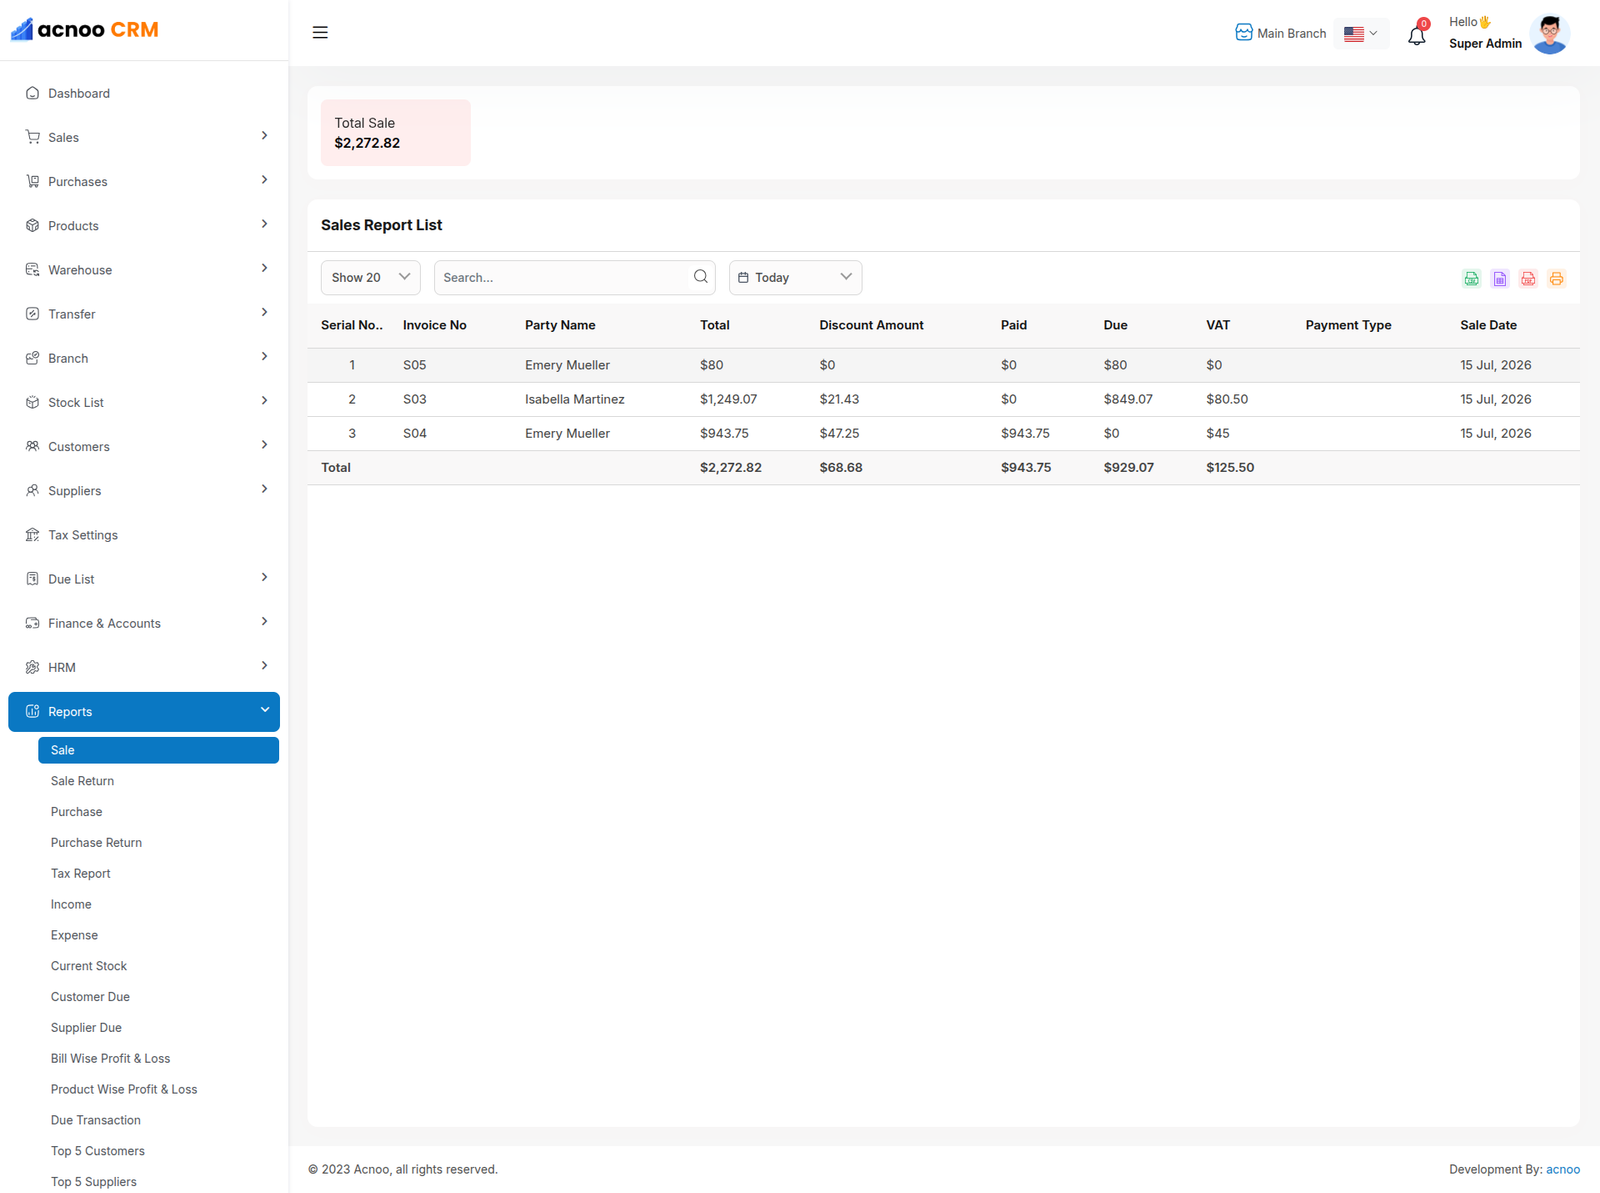
Sale Report
This report displays the Sales List, with a summary card above the table showing the total sales. The total dynamically updates based on the data presented in the table. Users can apply input-based search, per-page control, and date filtering options. The report also allows exporting data in Excel, CSV, or PDF formats, and includes a print option.
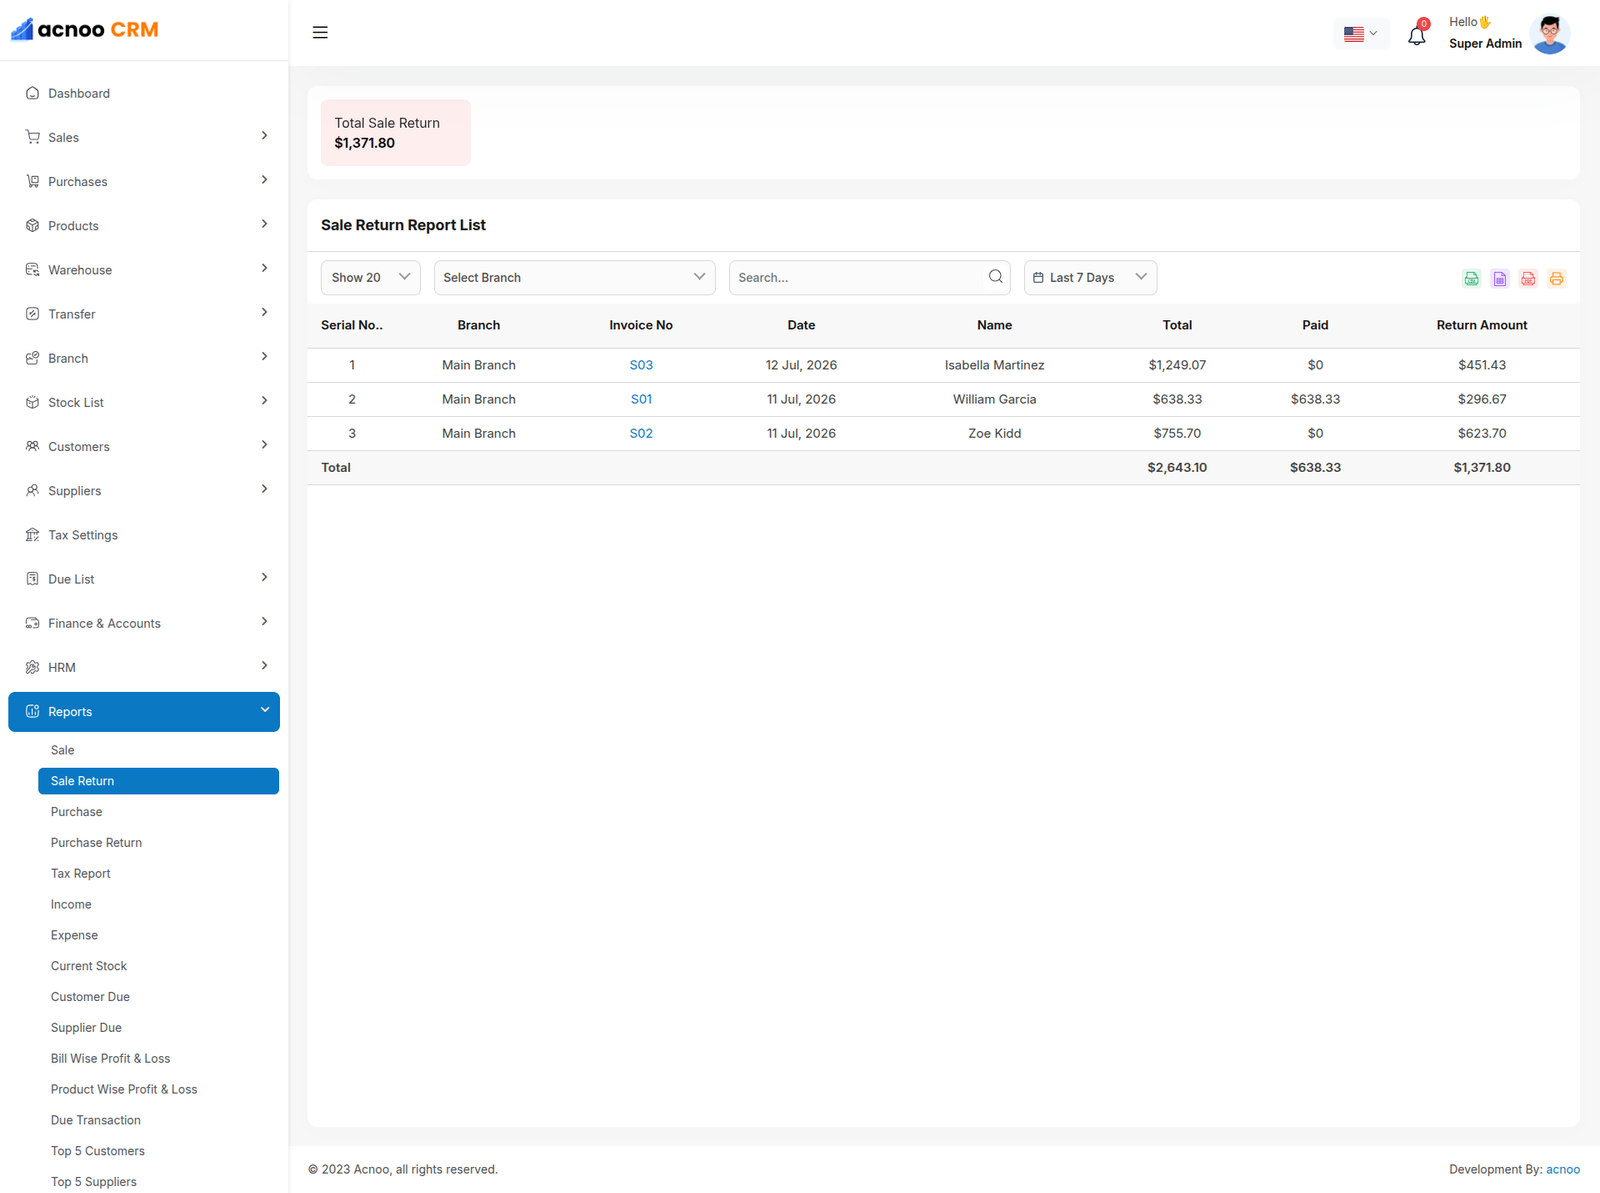
Sale Return Report
This report displays the Sales Return list, with a summary card above the table showing the total sales return amount. Users can apply input-based search, per-page control, and date filtering options. The report also allows exporting data in Excel, CSV, or PDF formats, and includes a print option.
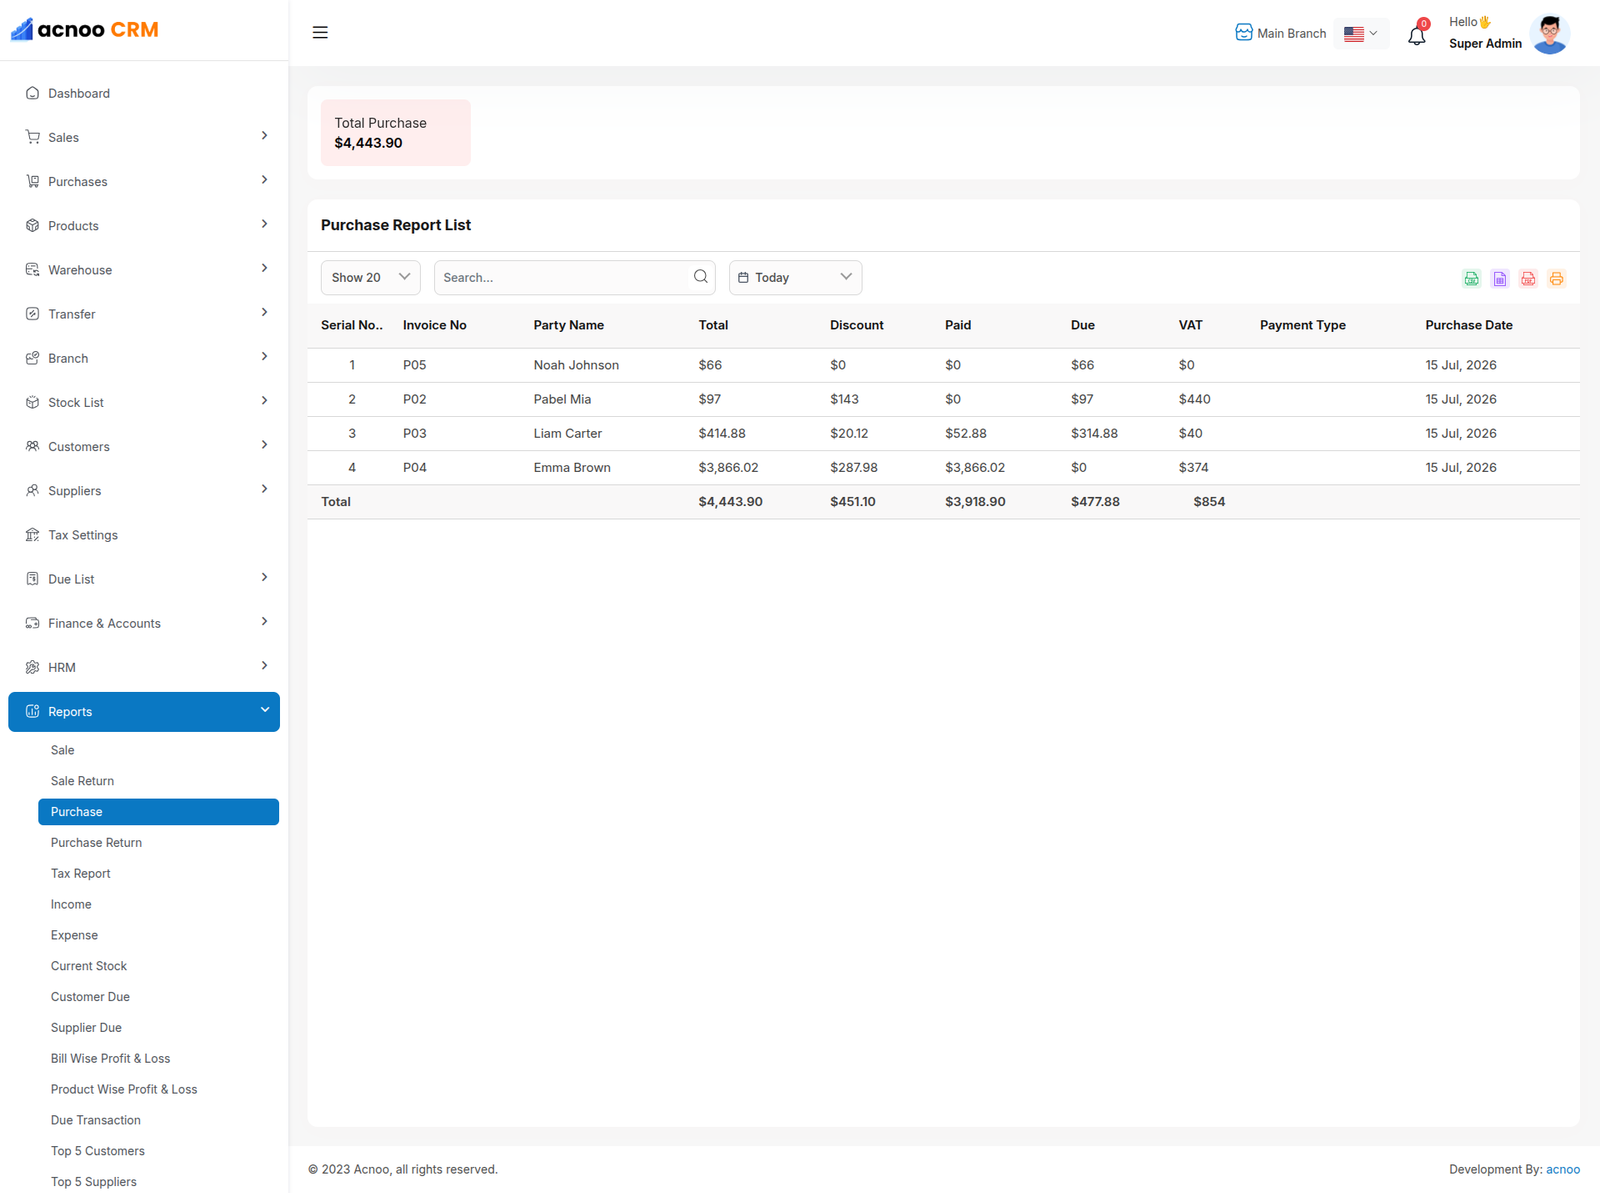
Purchase Report
This report displays the Purchases List, with a summary card above the table showing the Total Purchase. The total dynamically updates based on the data presented in the table. Users can apply input-based search, per-page control, and date filtering options. The report also allows exporting data in Excel, CSV, or PDF formats, and includes a print option.
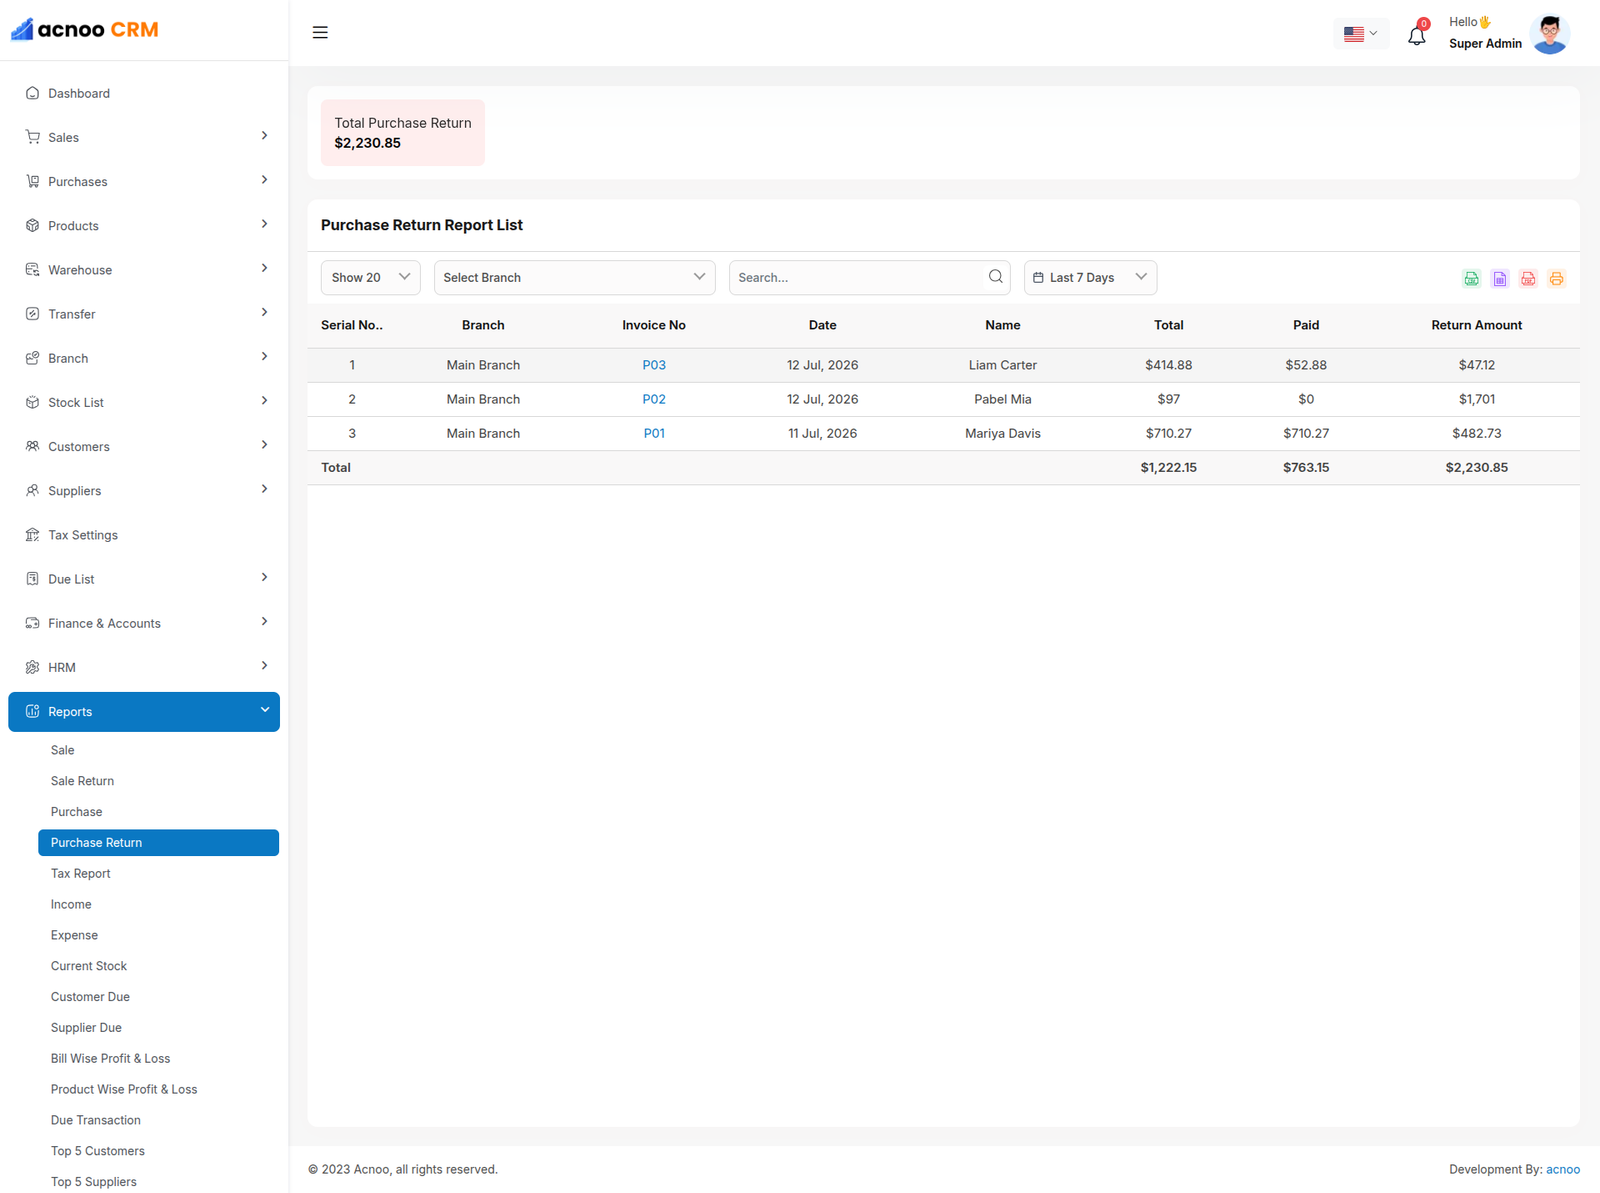
Purchase Return Report
This report displays the purchases return List, with a summary card above the table showing the total purchase retrun. Users can apply input-based search, per-page control, and date filtering options. The report also allows exporting data in Excel, CSV, or PDF formats, and includes a print option.
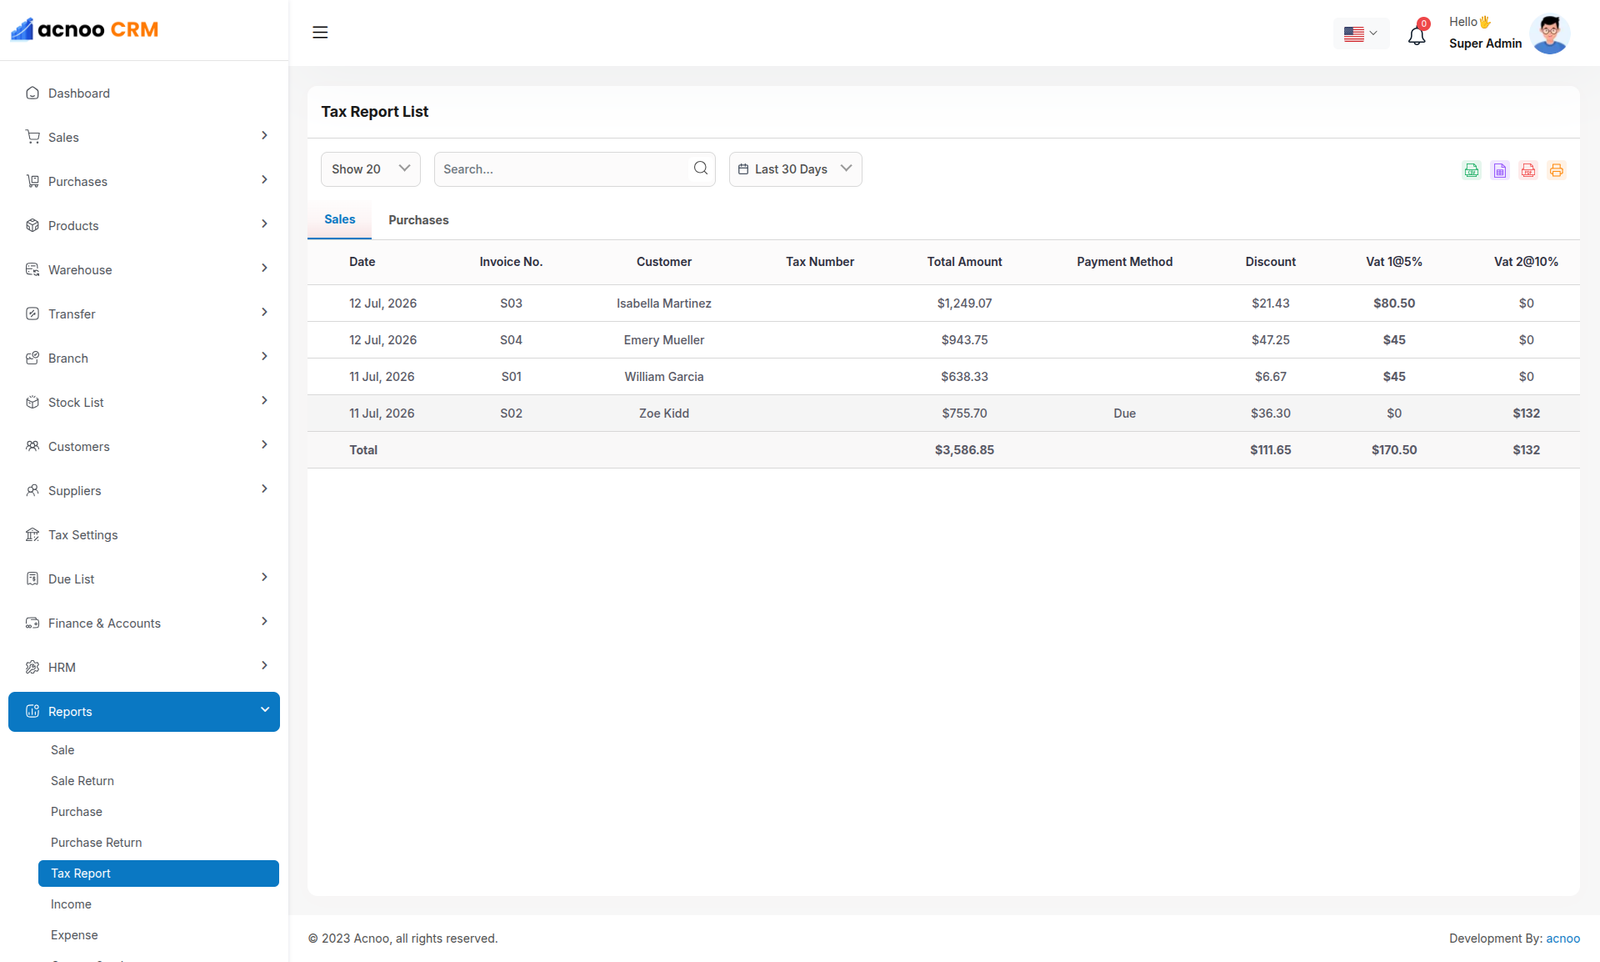
Tax Report (Sales)
This Tax Report displays a detailed list of sales with their associated taxes. Each entry clearly shows the tax applied, and date filtering is available to view reports for specific periods.The report also allows exporting data in Excel, CSV, or PDF formats, and includes a print option.
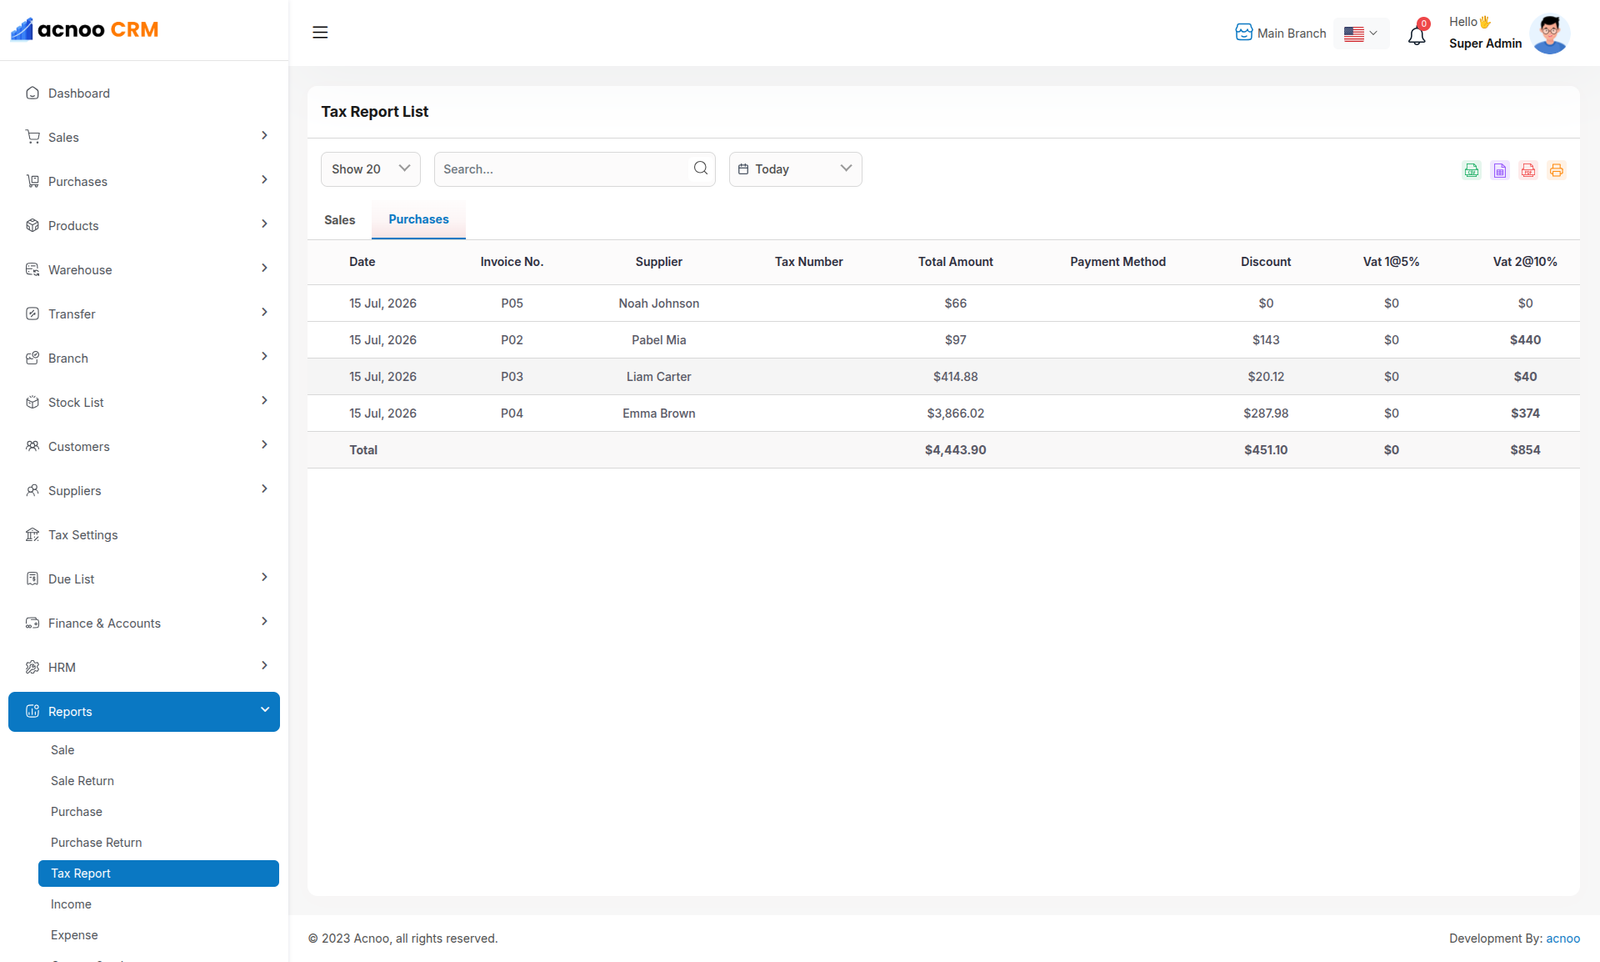
Tax Report (Purchases)
This Tax Report displays a detailed list of purchases with their associated taxes. Each entry clearly shows the tax applied, and date filtering is available to view reports for specific periods.The report also allows exporting data in Excel, CSV, or PDF formats, and includes a print option.
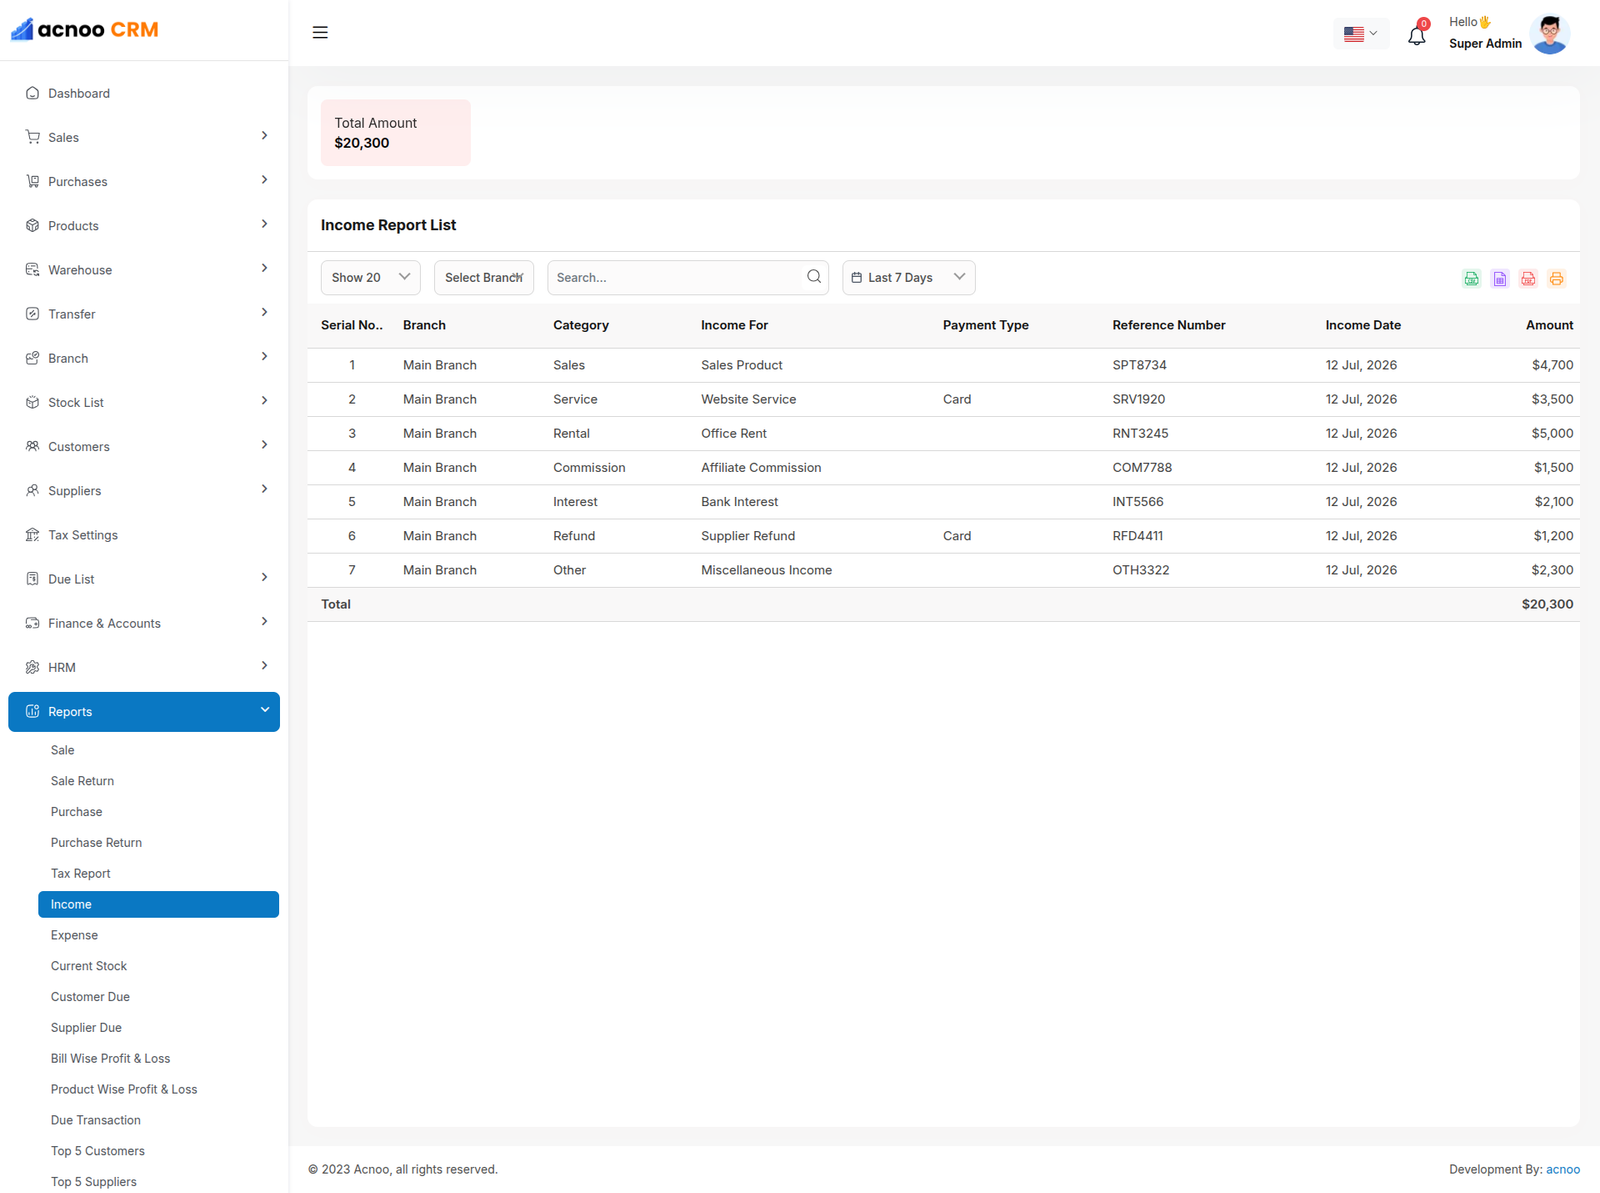
Income Report
This Income Report provides a comprehensive list of all income. A summary card above the table shows the total amount, which is calculated based on the table data. The report includes search functionality, pagination, and date filtering. Additionally, users can export the data in Excel, CSV, or PDF formats, and a print option is also available.
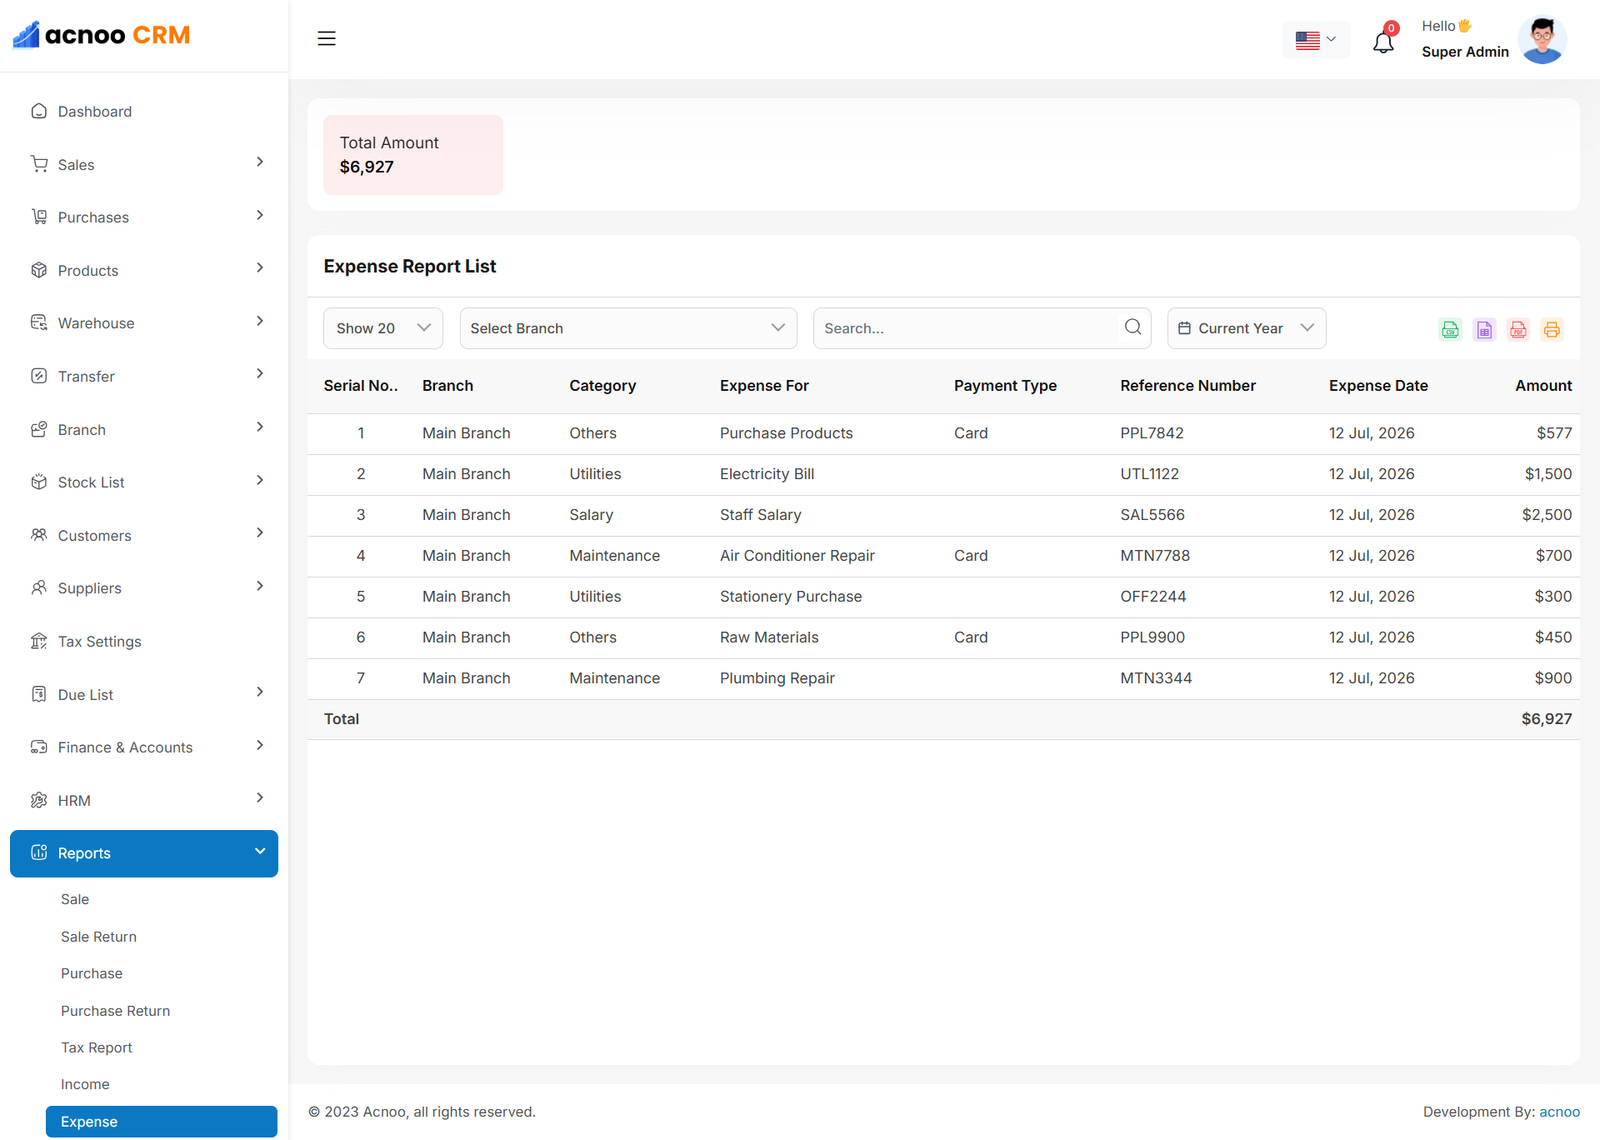
Expense Report
The Expense Report provides a comprehensive list of all expenses. A summary card above the table displays the total amount, dynamically calculated from the table data. The report includes search functionality, pagination, and date filtering. Users can also export the data in Excel, CSV, or PDF formats, and a print option is available for convenience.
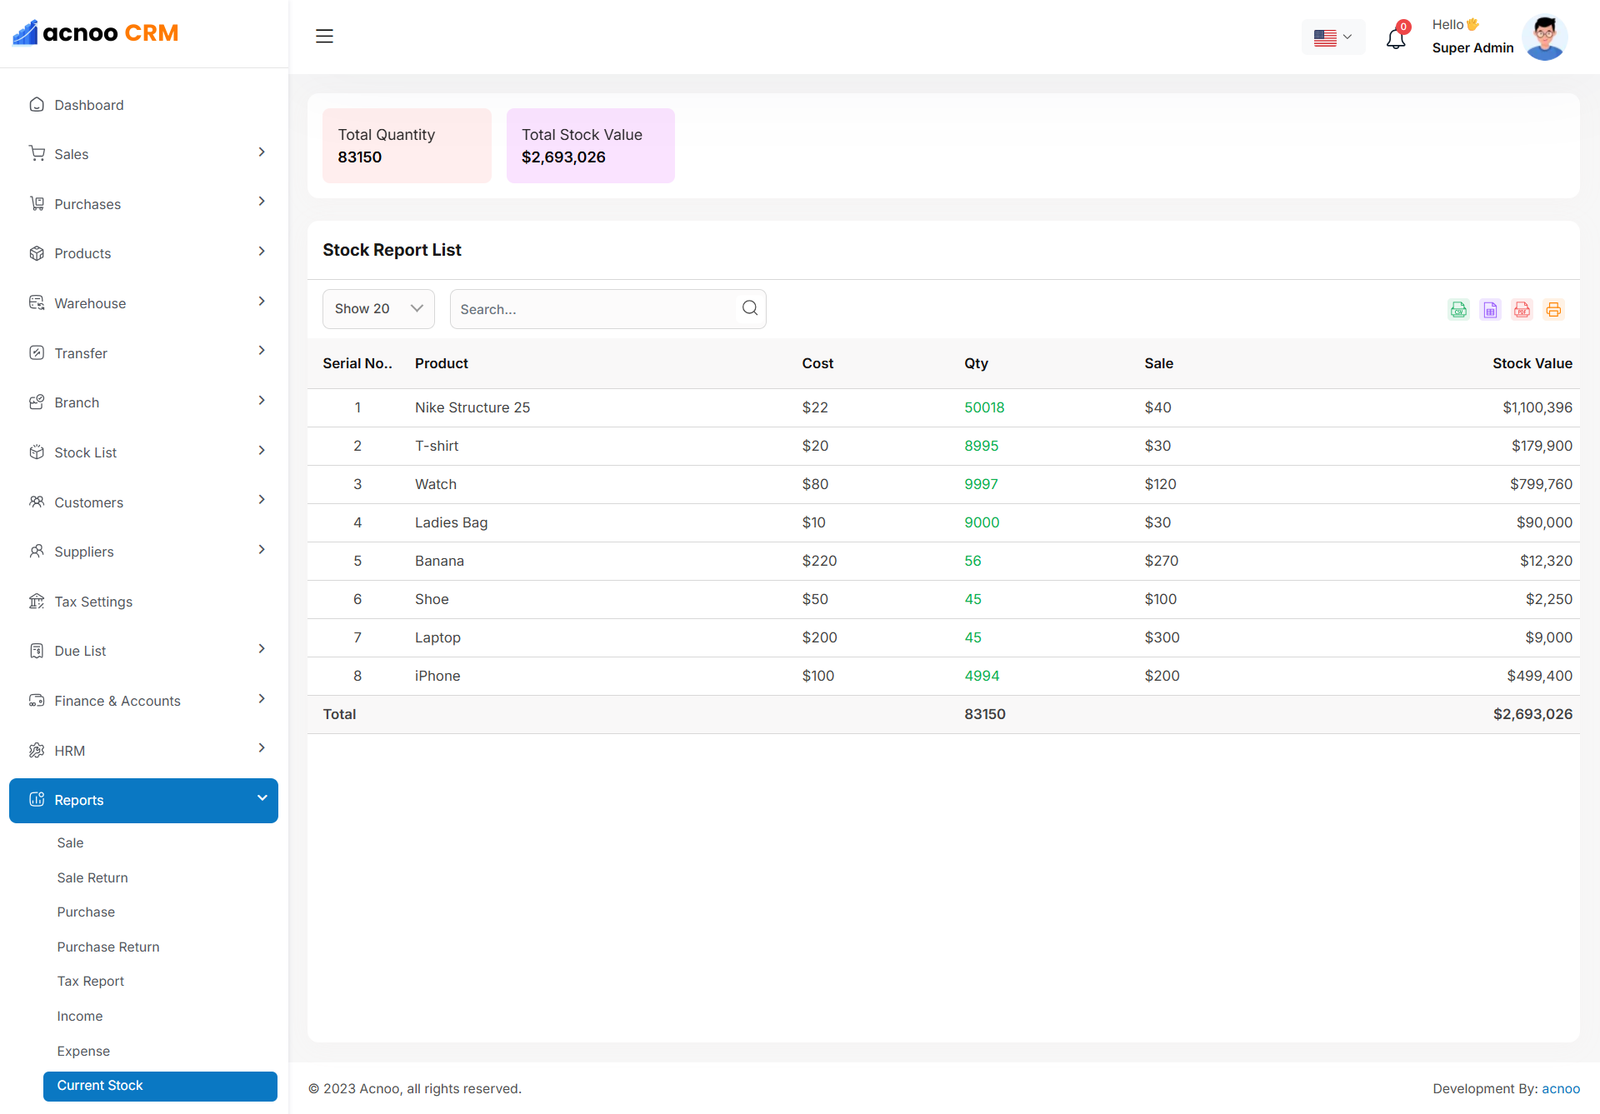
Stock Report
The Stock Report provides a complete list of products, including stock quantities and total stock values. Above the table, two summary cards display the total stock quantity and total stock value. The report includes input-based filtering and a per-page option that allows users to control how many items are displayed on each page for easier navigation. Additionally, users can export the data in Excel, CSV, or PDF formats, and a print option is available.
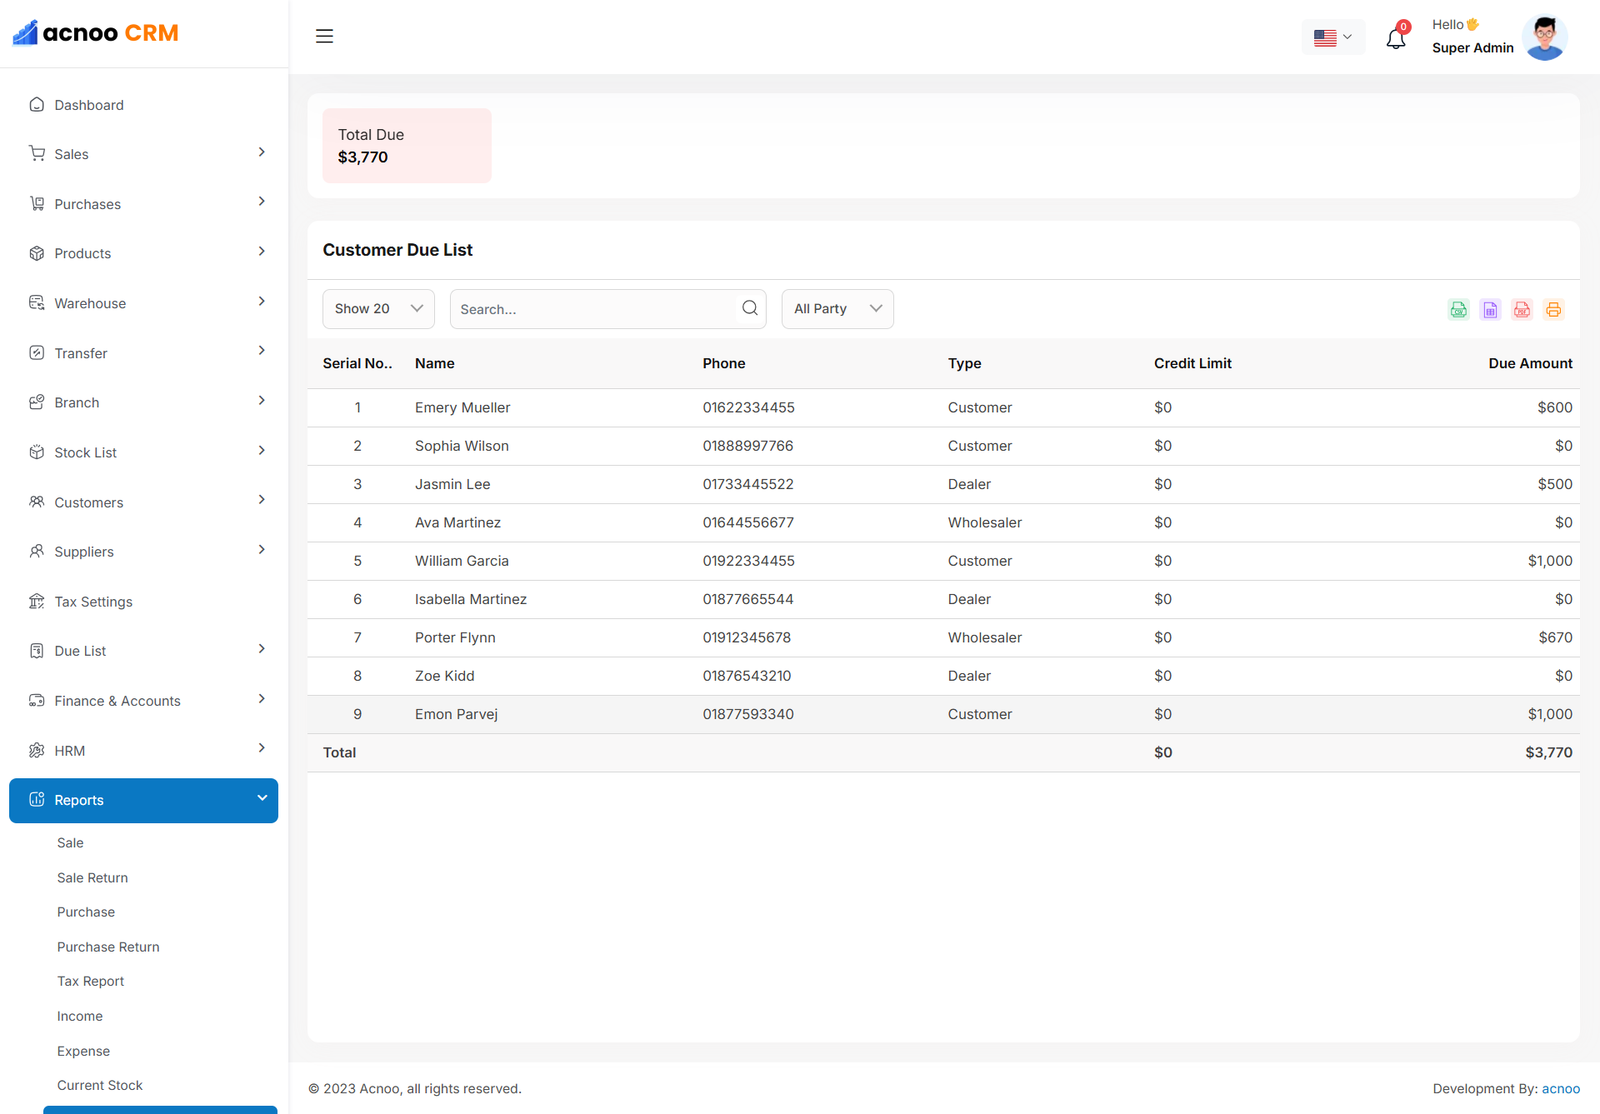
Customer Due Report
The Customer Due Report displays a complete list of customer dues. A summary card above the table shows the total due amount. The table includes input-based filtering, a per-page option for controlling the number of displayed items, and party-wise filtering via a dropdown to view dues for specific customer types, such as retailers, dealers, or wholesalers. Additionally, users can export the data in Excel, CSV, or PDF formats, and a print option is available.
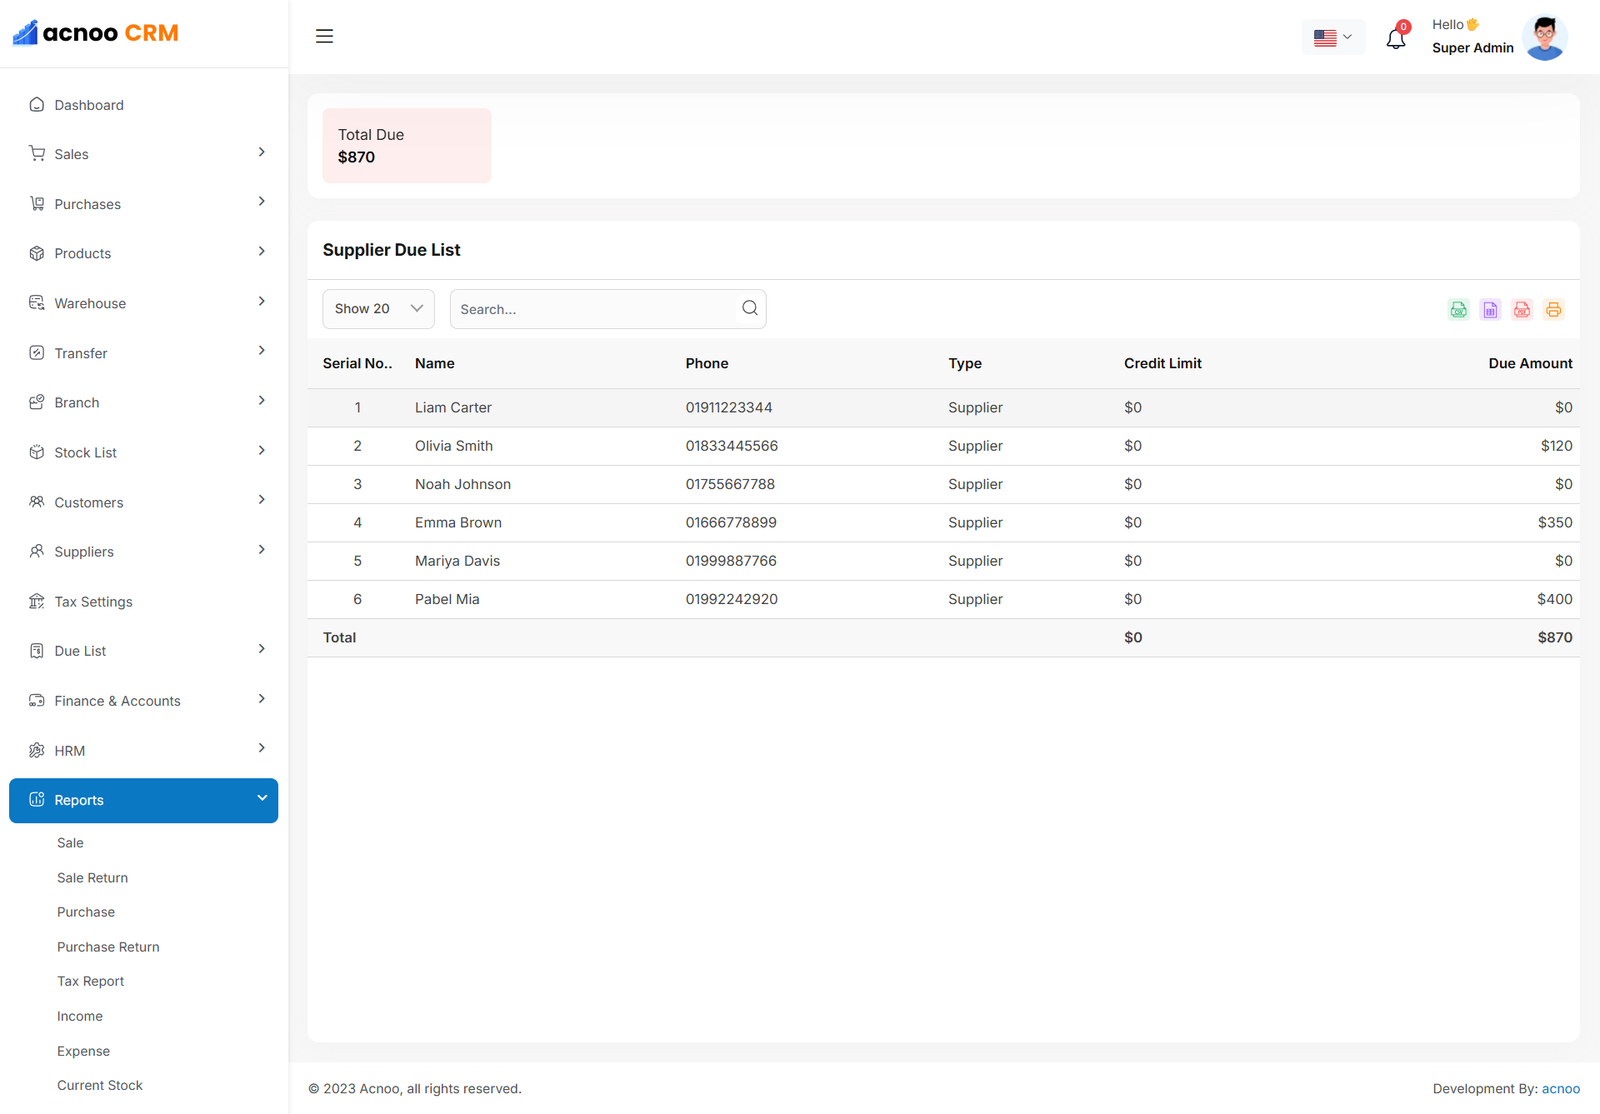
Supplier Due Report
The Supplier Due Report provides a complete list of supplier dues. A summary card above the table displays the total due amount for all suppliers. The table includes input-based filtering and a per-page option for controlling the number of displayed items. Users can also export the data in Excel, CSV, or PDF formats, and a print option is available.
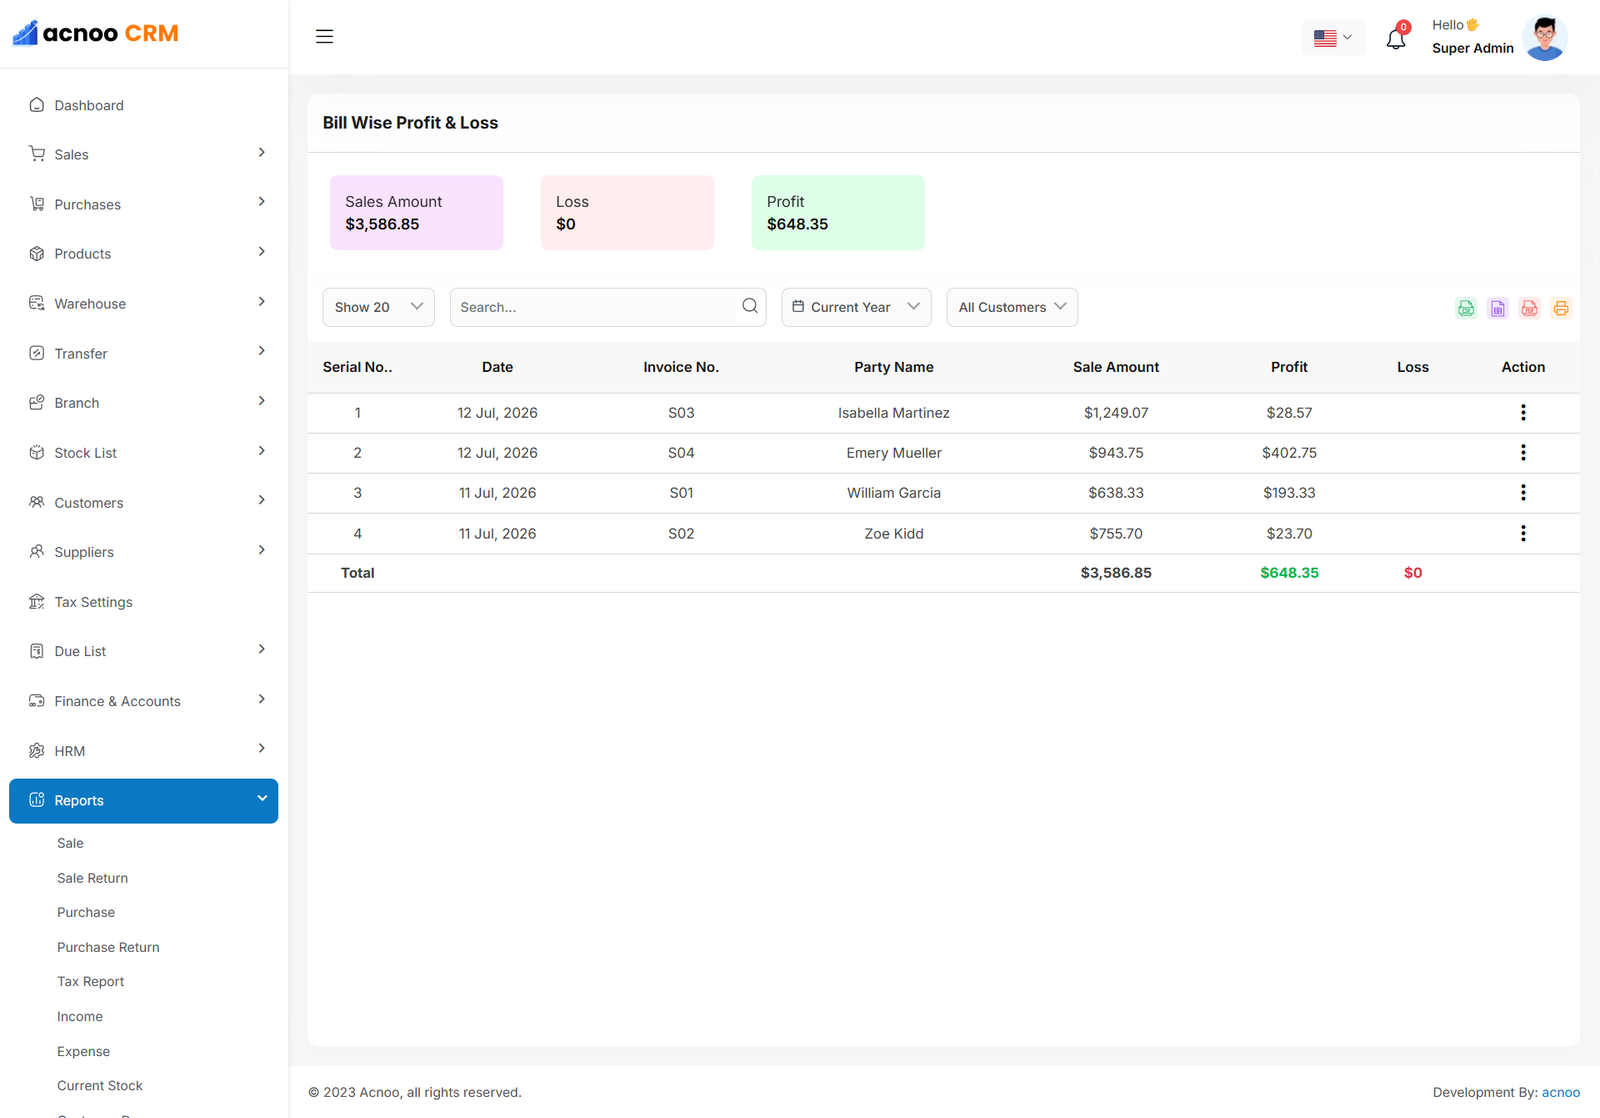
Bill Wise Profit & Loss
The Profit and Loss Report displays a detailed list of transactions on a bill-wise basis. Above the table, three summary cards show the total sales amount, total profit, and total loss. The table includes input-based filtering, per-page control, and date filtering. Users can also export the data in Excel, CSV, or PDF formats, and a print option is available.
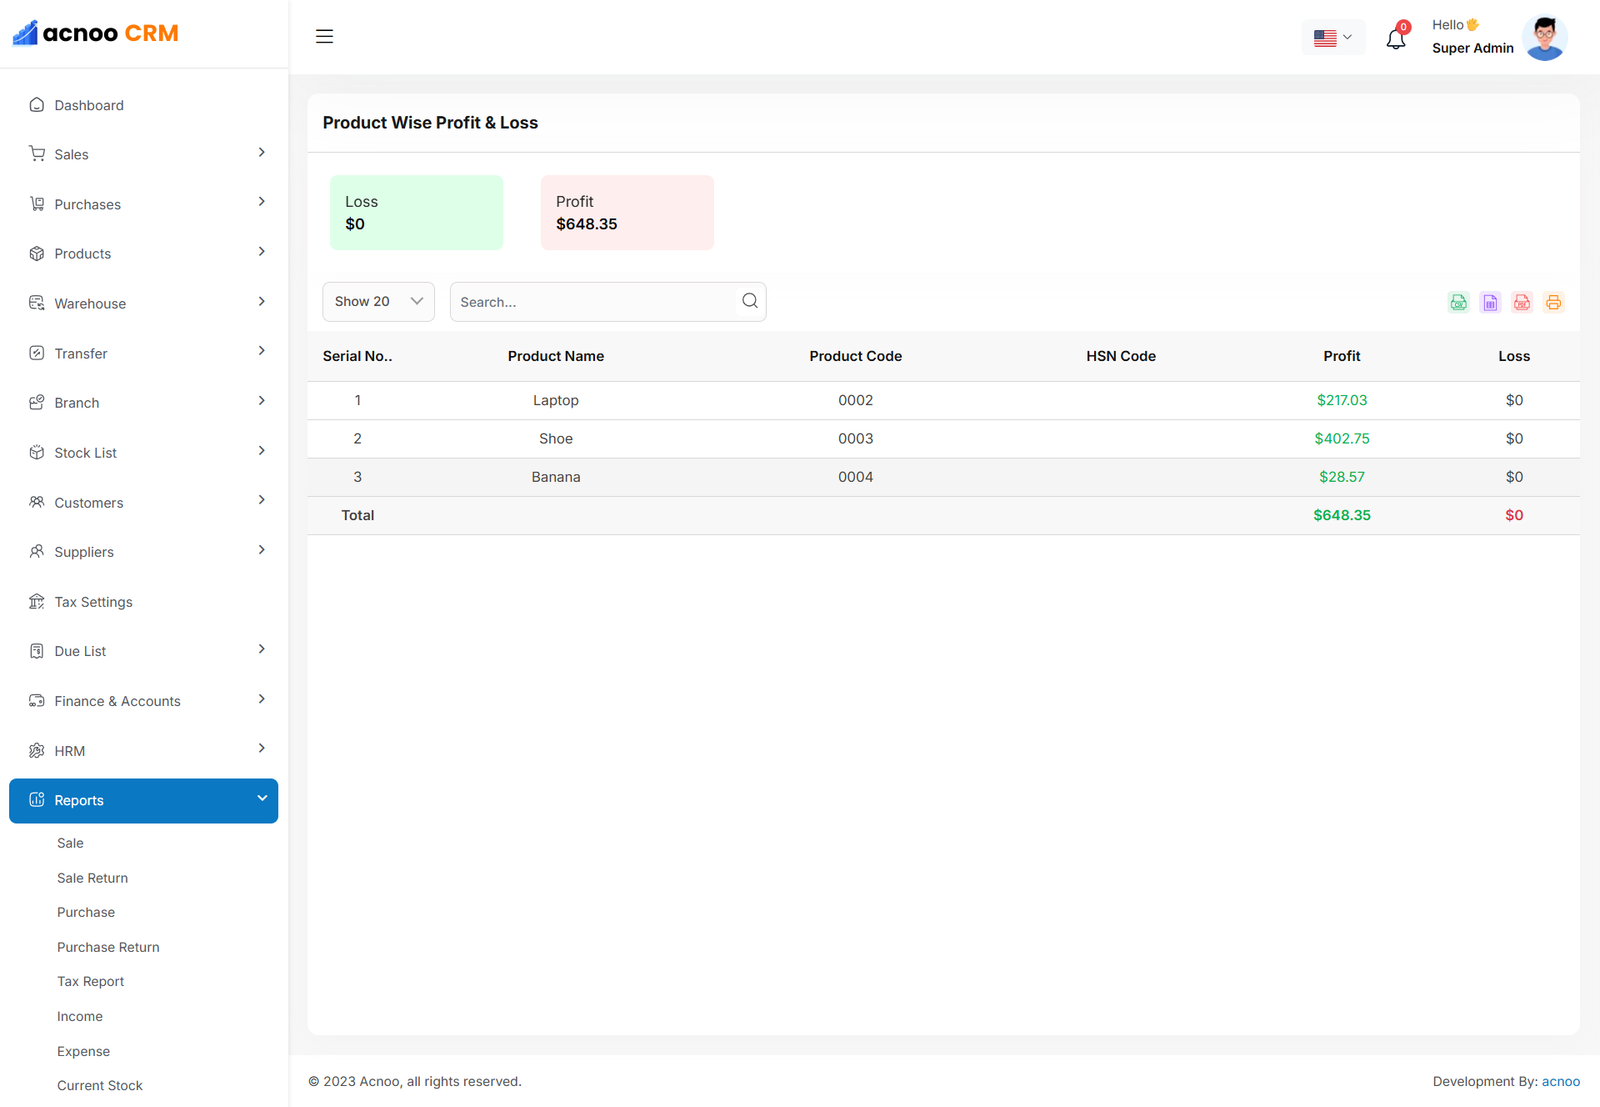
Product Wise Profit & Loss
The Product-wise Profit and Loss Report provides a detailed list of transactions based on each product. Above the table, two summary cards display the total profit and total loss. The table lists all products along with their respective profit and loss columns. The report includes input-based search and a per-page option for controlling the number of displayed items. Additionally, users can export the data in Excel, CSV, or PDF formats, and a print option is available.
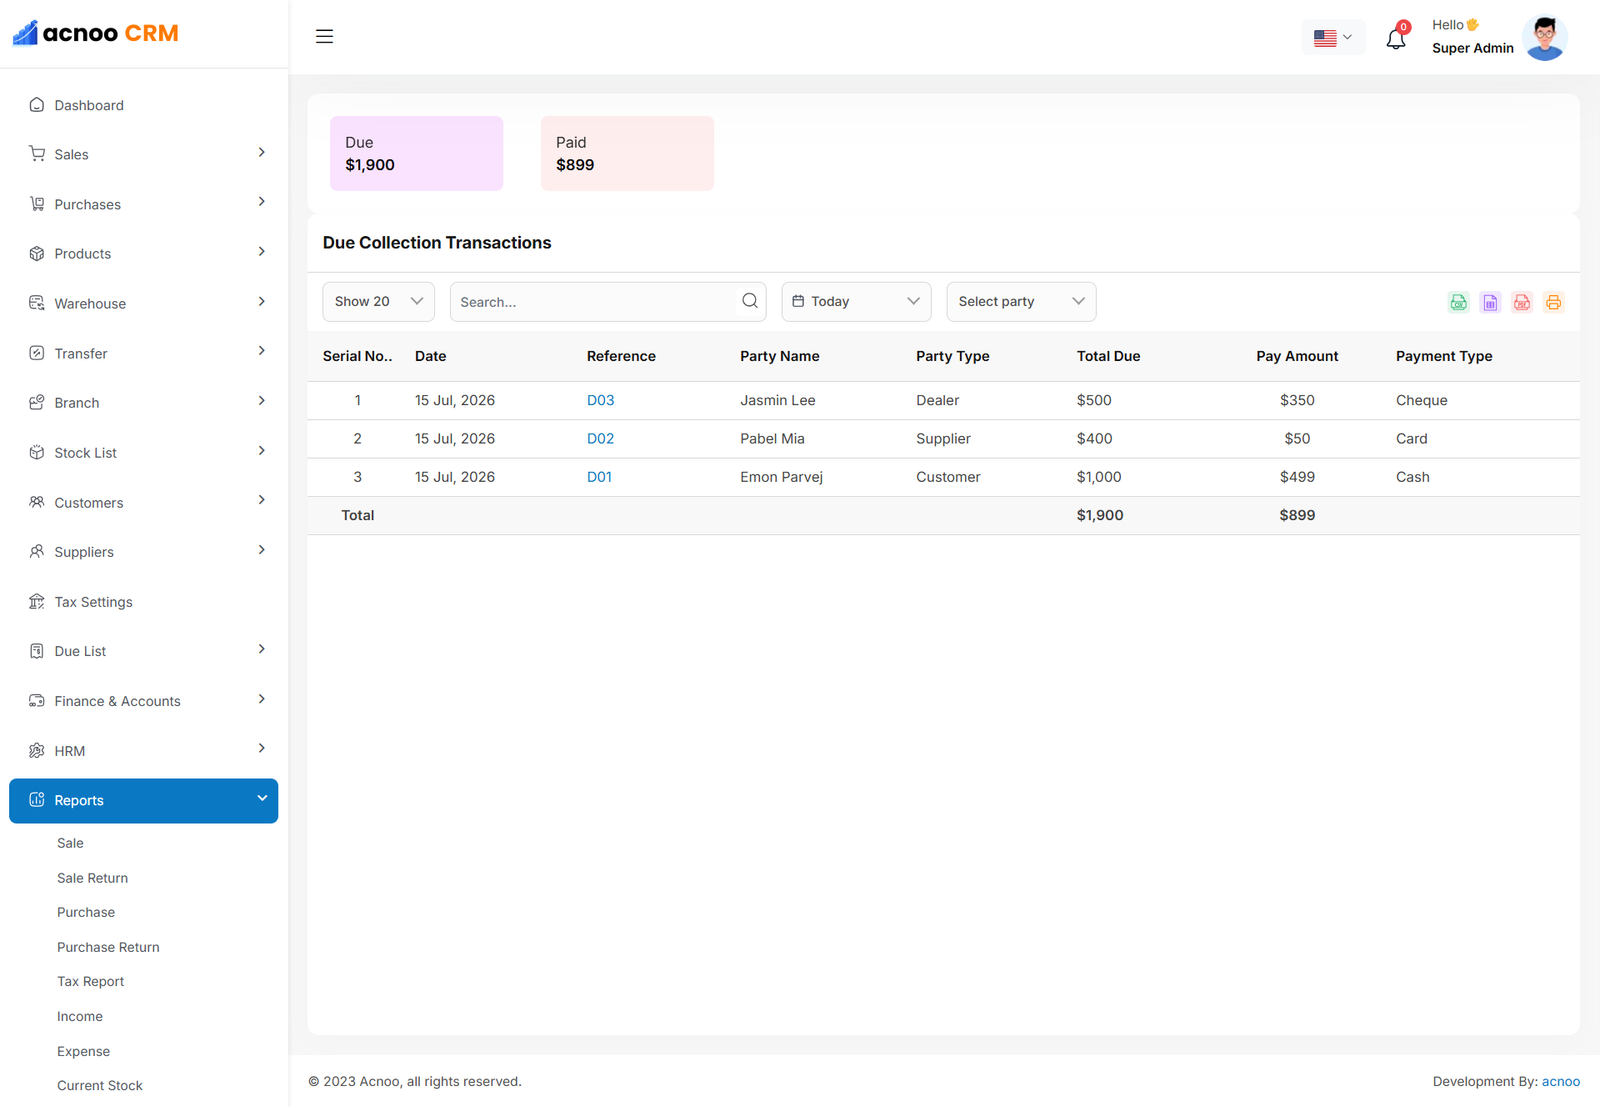
Due Transactions
The Due Collection Transactions report provides a detailed list of all collected dues.Above the table, two summary cards display the total due amount and the total paid amount. The table includes input-based search, per-page control, and date filtering for easier navigation. Additionally, users can export the data in Excel, CSV, or PDF formats, and a print option is available.
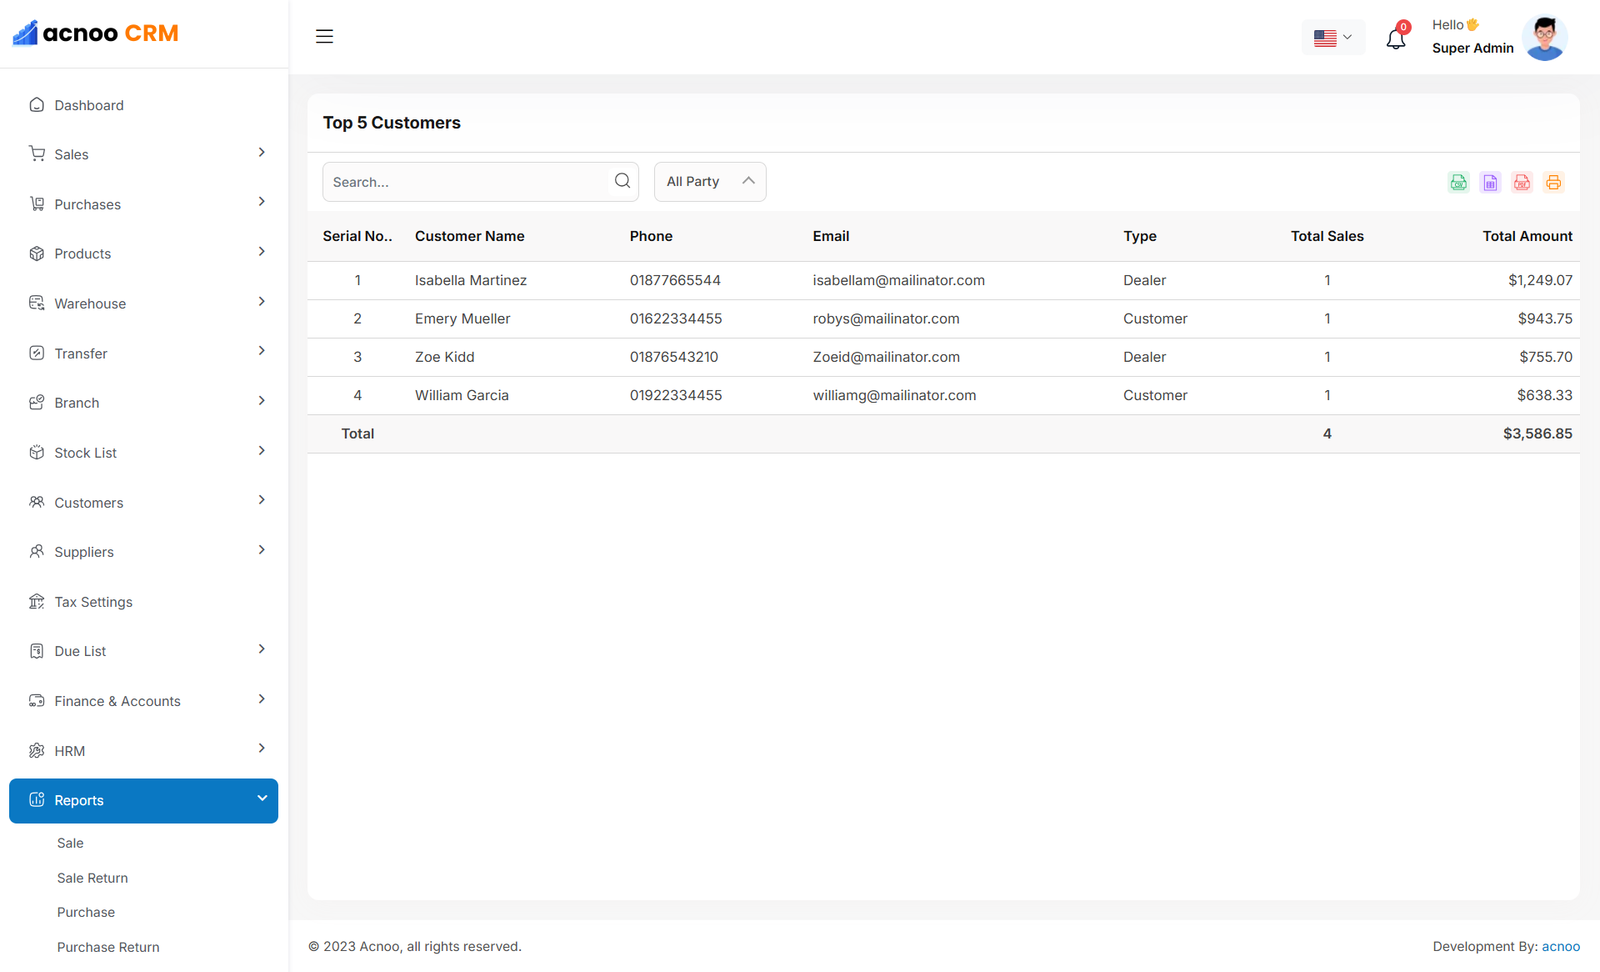
Top 5 Customer
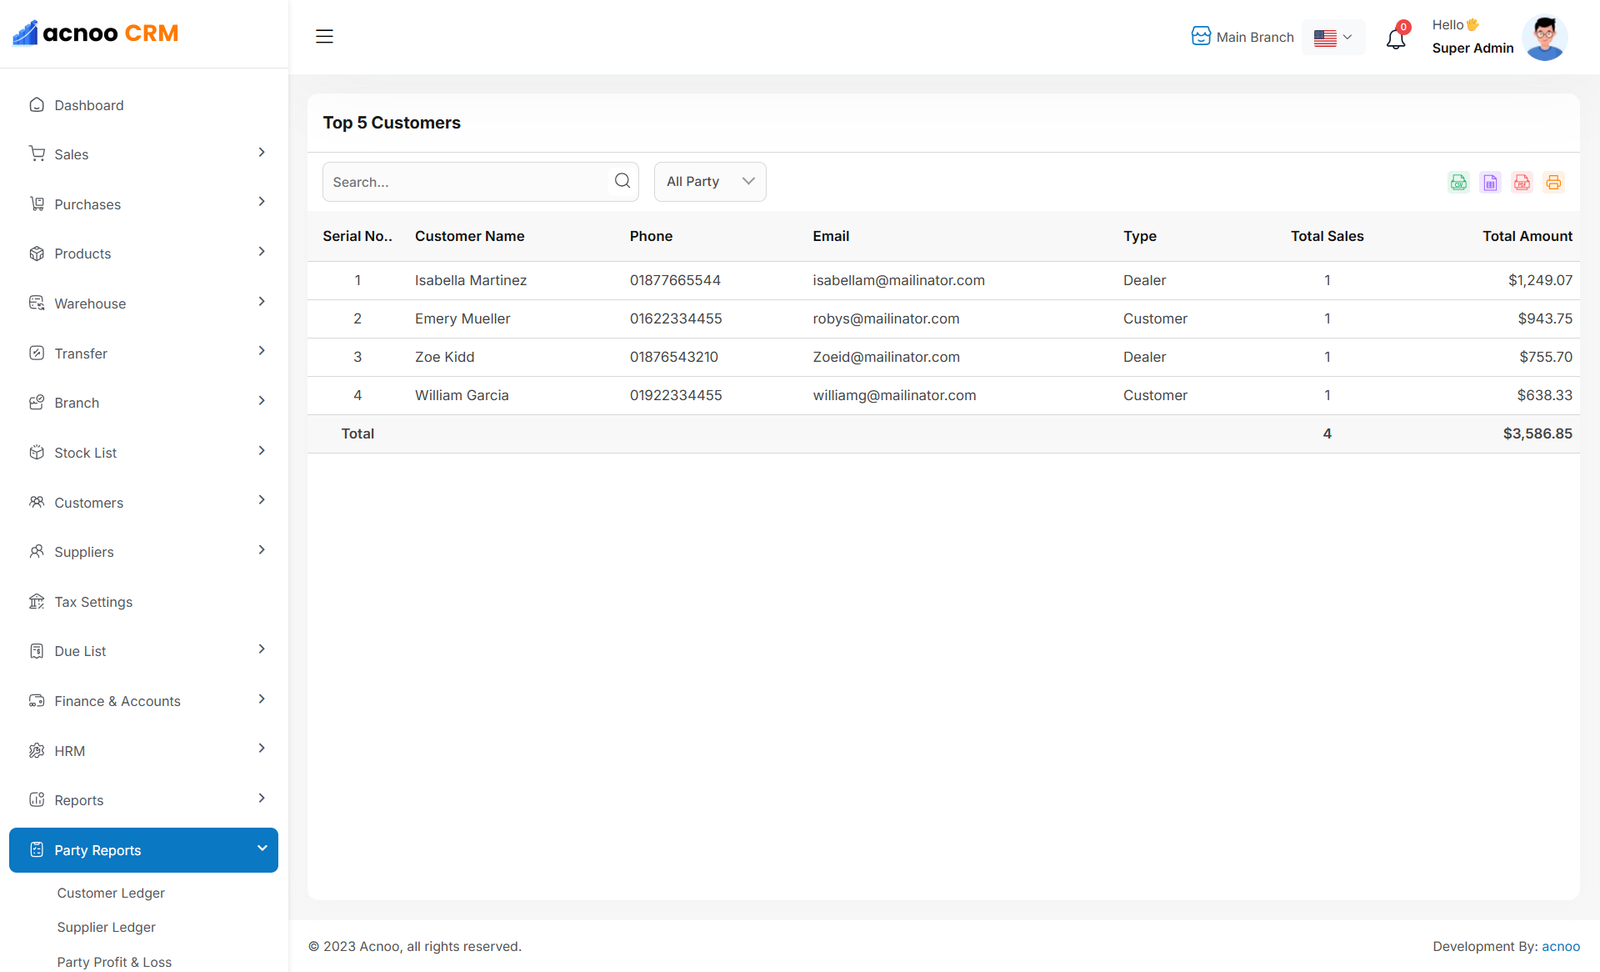
The Top 5 Customers Report displays the customers who have purchased the highest quantity of products. Users can easily view the top five customers from this list. The table includes input-based filtering, and users can export the data in Excel, CSV, or PDF formats. A print option is also available.
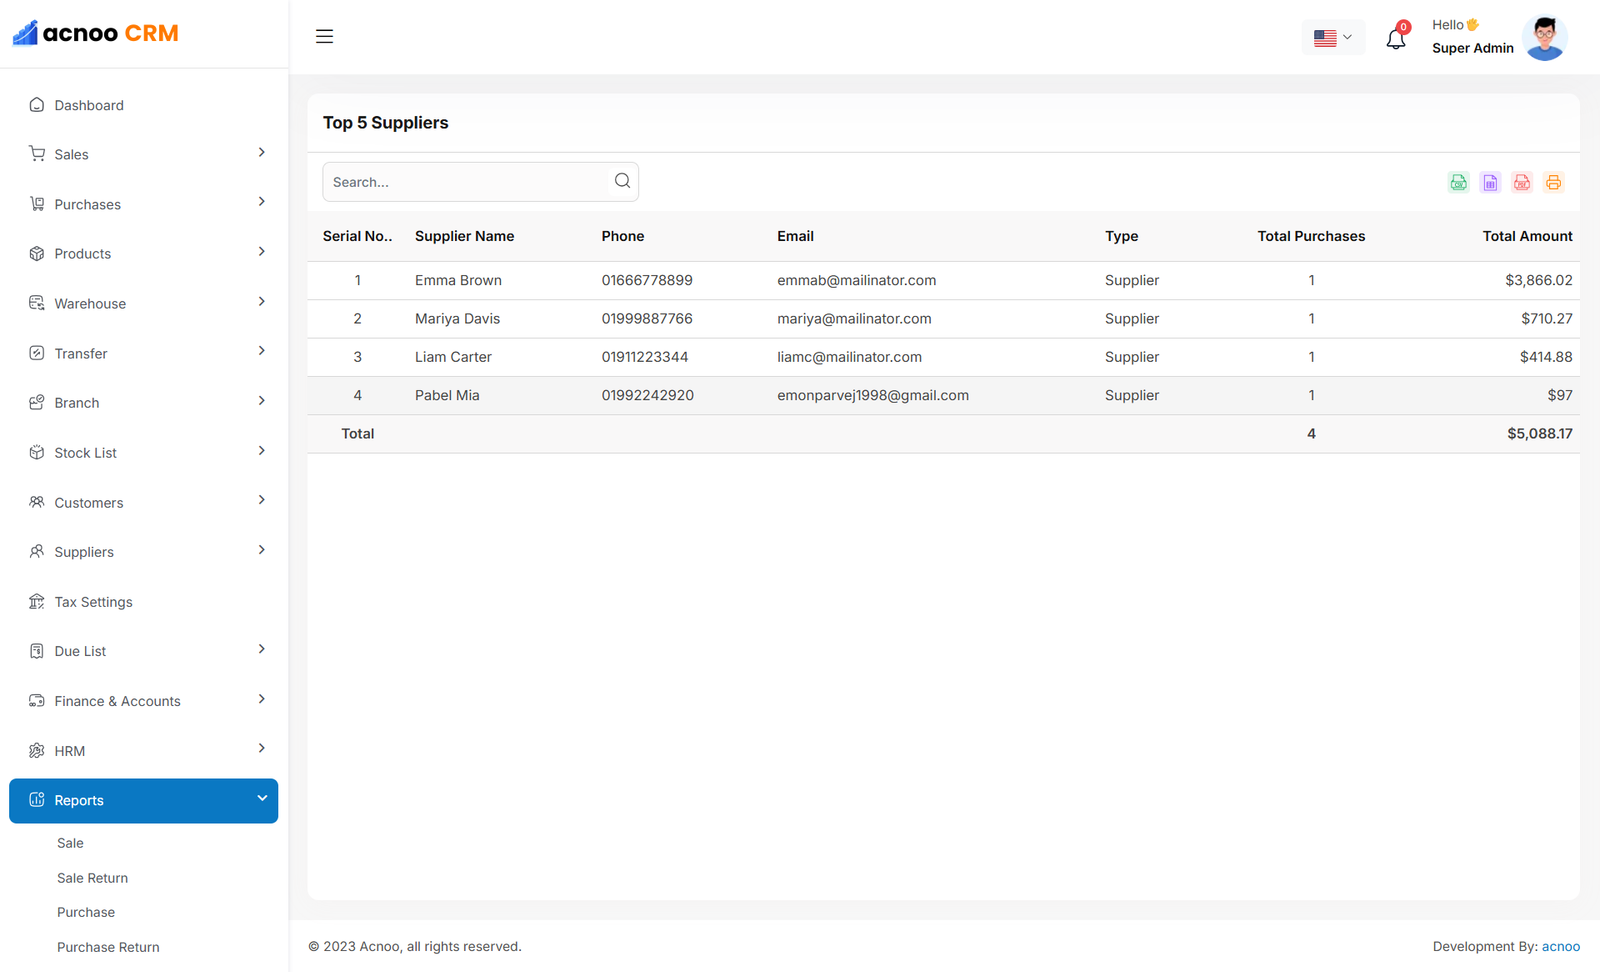
Top 5 Supplier
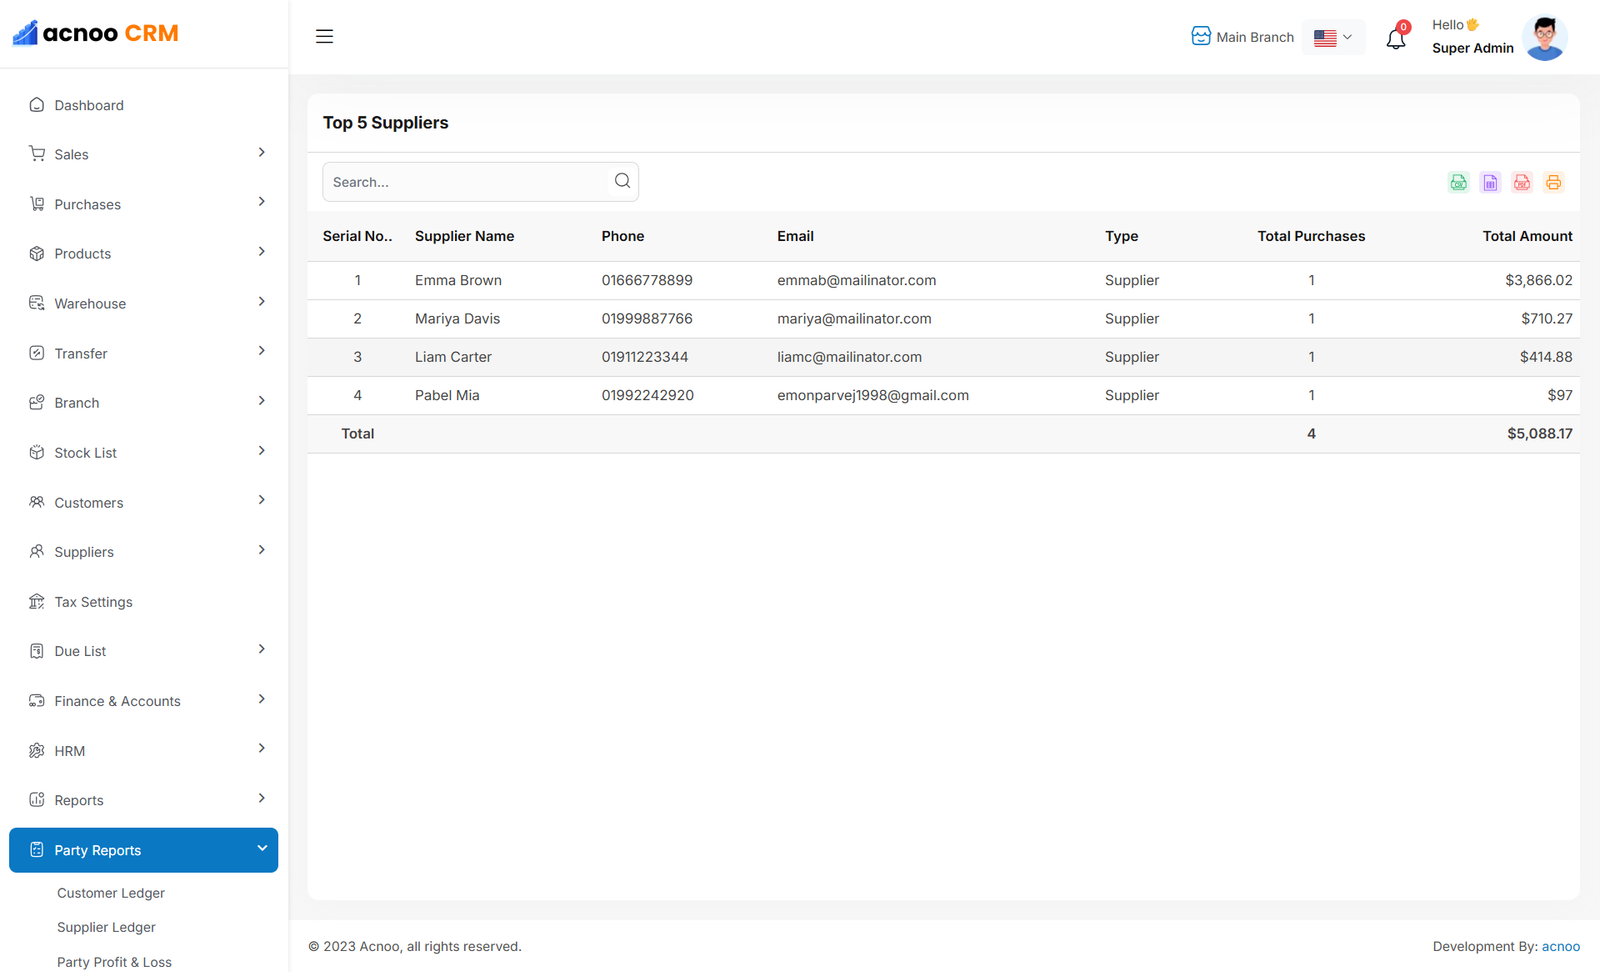
The Top 5 Suppliers Report displays the suppliers from whom the highest quantity of products has been purchased. The table includes input-based filtering, and users can export the data in Excel, CSV, or PDF formats. A print option is also available.
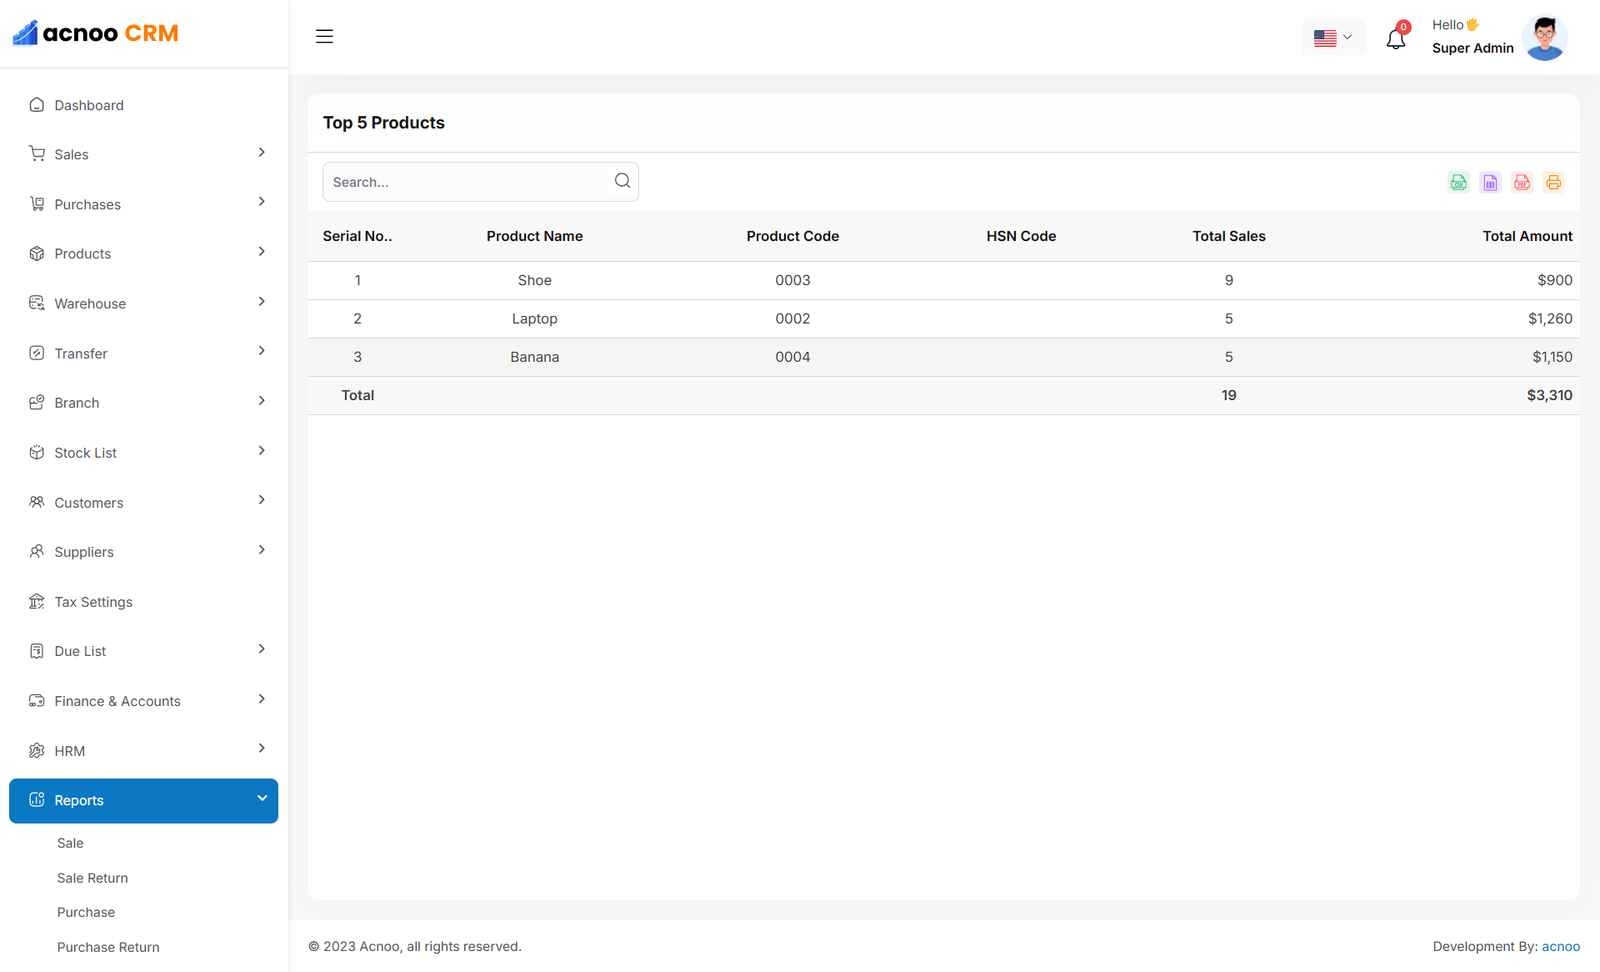
Top 5 Product
The Top 5 Products Report displays the products with the highest sales quantity. Users can easily identify the most sold products based on quantity from this list. The table includes input-based filtering, and users can export the data in Excel, CSV, or PDF formats. A print option is also available.
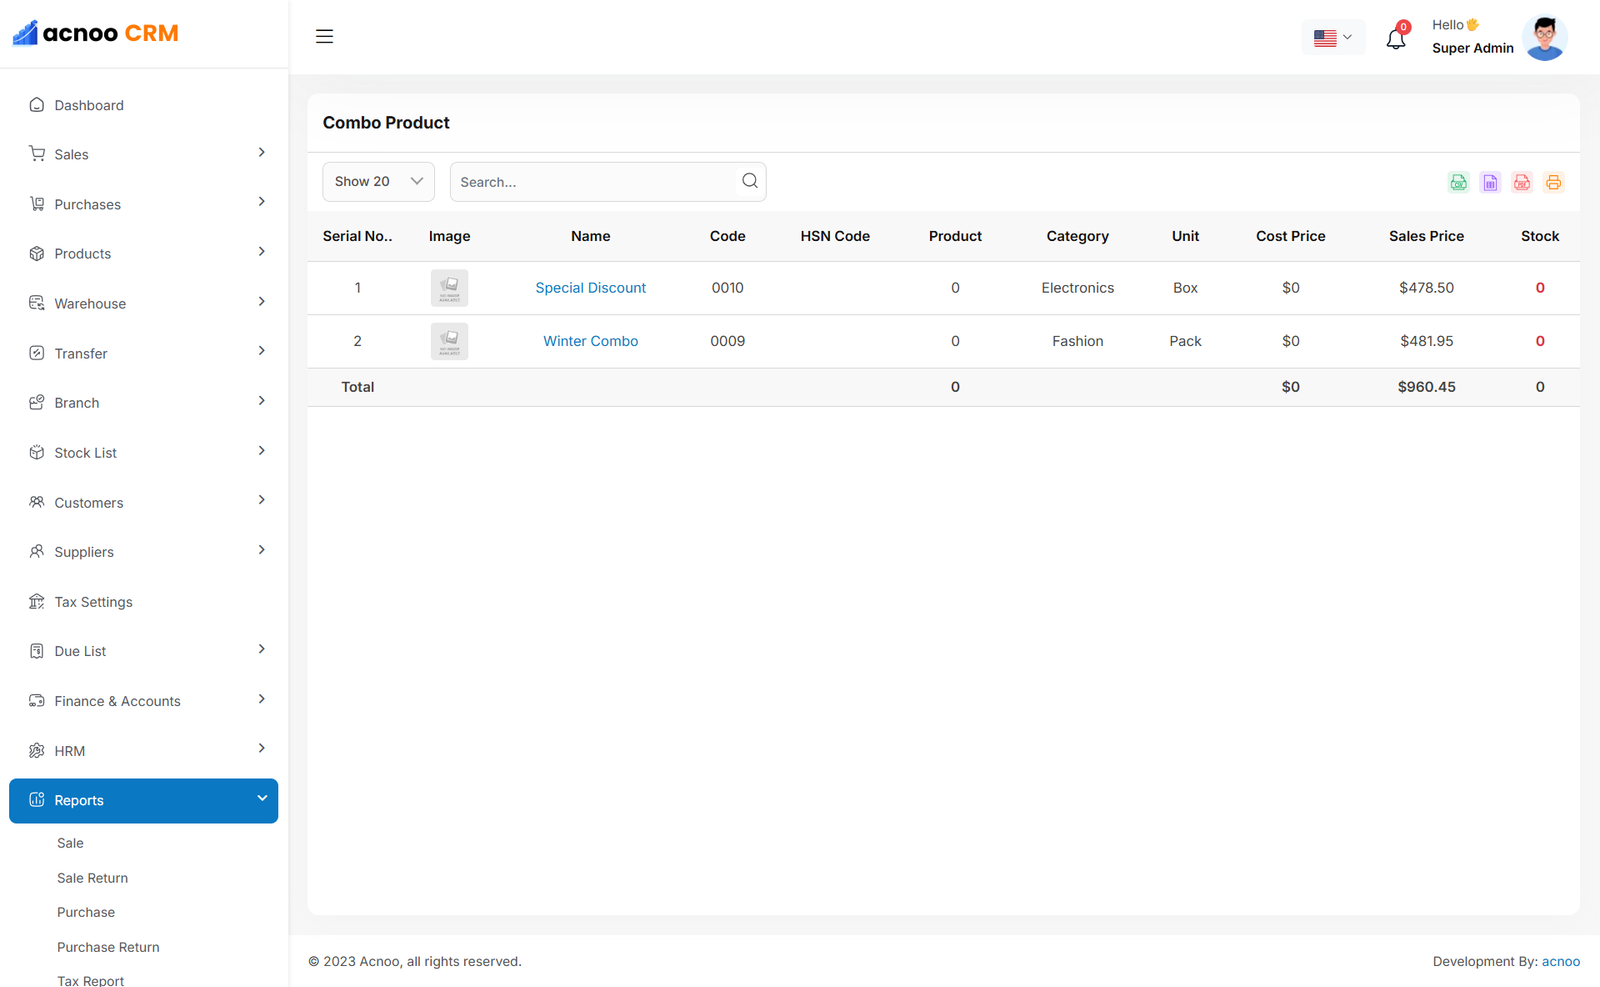
Combo Product
The Combo Products Report provides a list of all combo products. The table includes input-based filtering and a per-page option for controlling the number of displayed items. Users can also export the data in Excel, CSV, or PDF formats, and a print option is available.
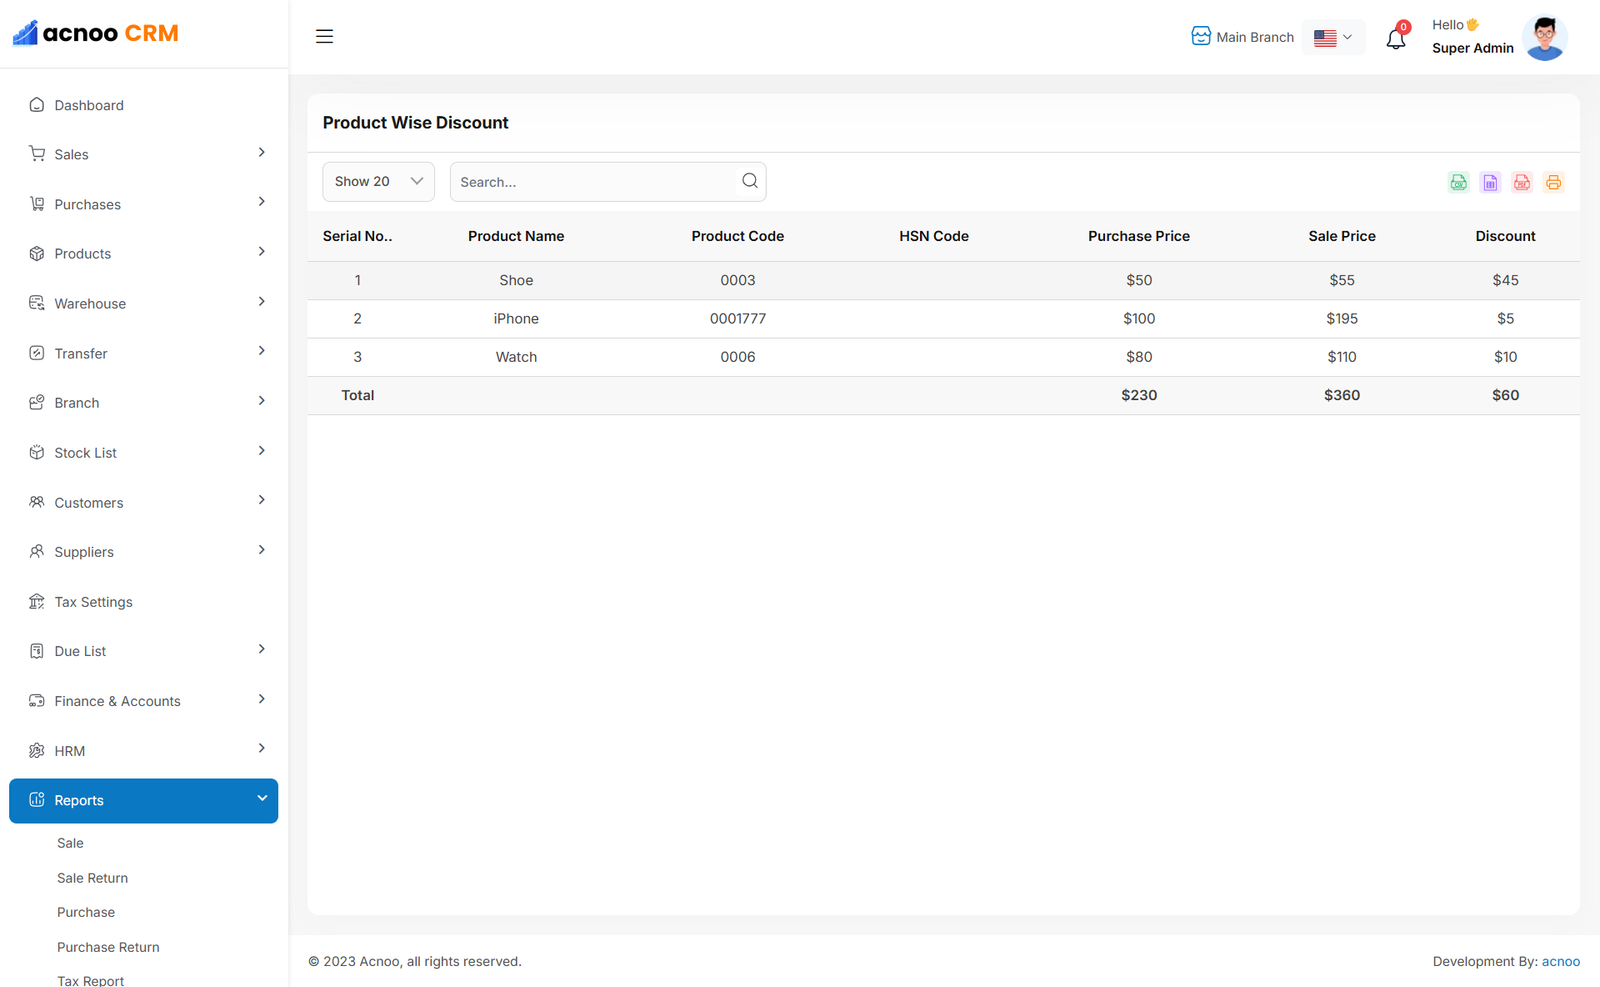
Discount Product
The Discounted Products Report displays a list of products sold at discounted prices. Discounts are applied in the Sales section using the quantity increase/decrease buttons, and the corresponding discount column reflects these changes. The table includes input-based search and a per-page option for controlling the number of displayed items. Users can also export the data in Excel, CSV, or PDF formats, and a print option is available.
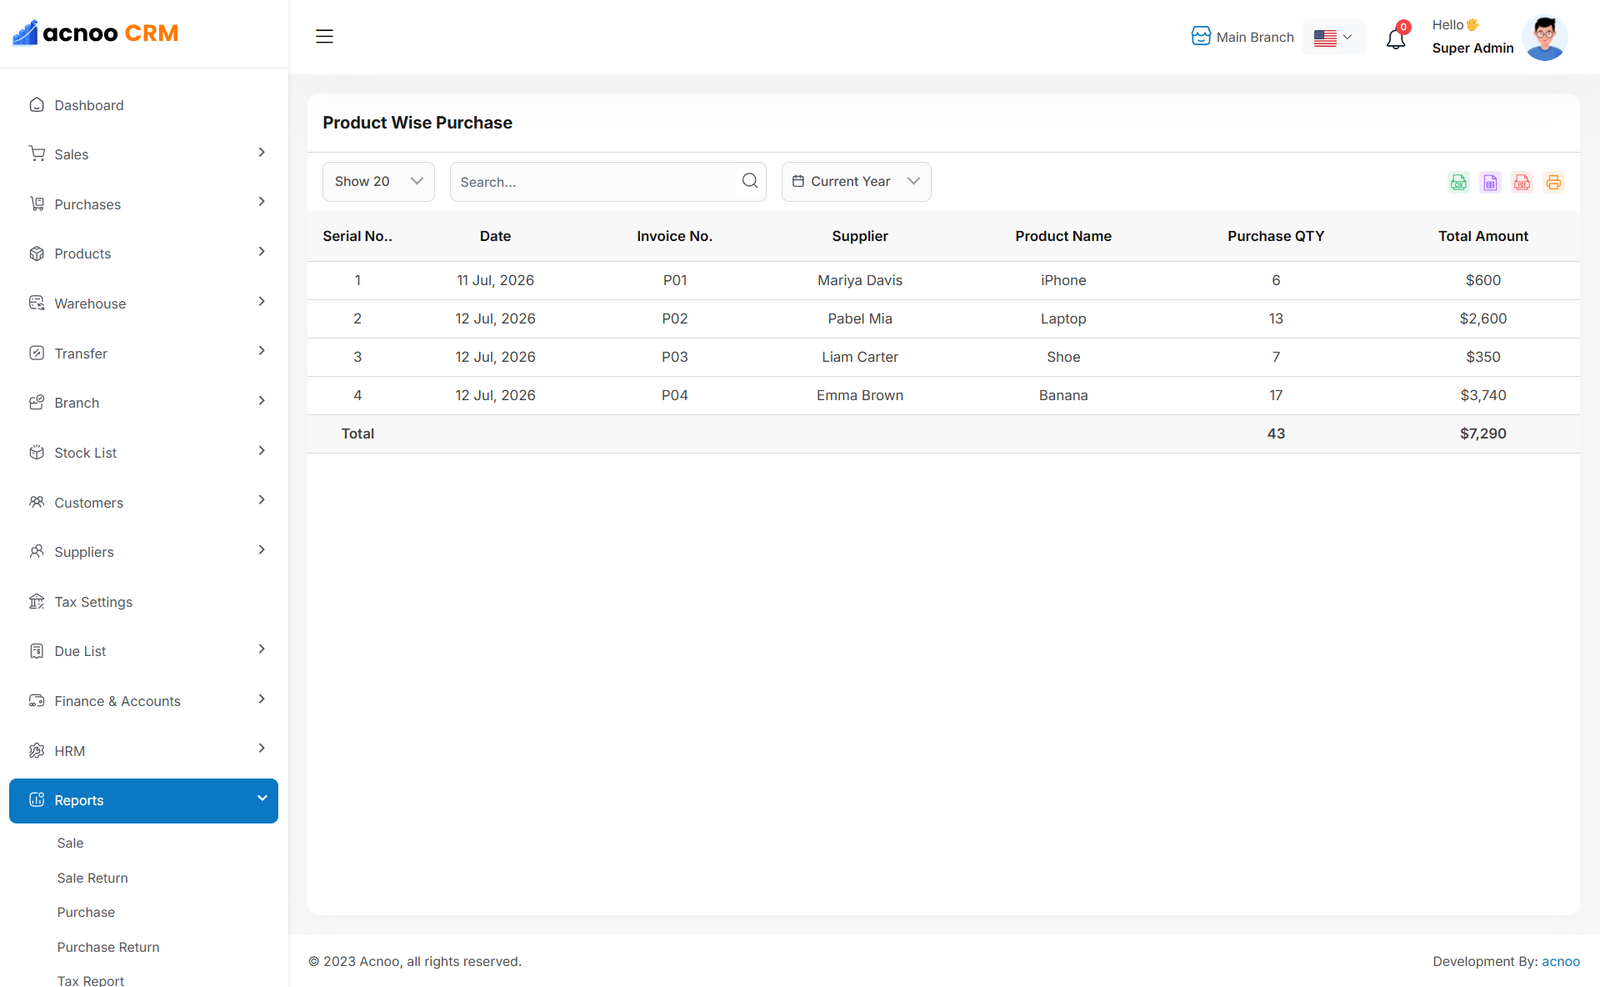
Product Wise Purchase
The Product-wise Purchase Report provides a detailed list of purchased products. Users can view the purchase date and quantity for each product. The table includes input-based search, per-page control, and date filtering. Additionally, users can export the data in Excel, CSV, or PDF formats, and a print option is available.
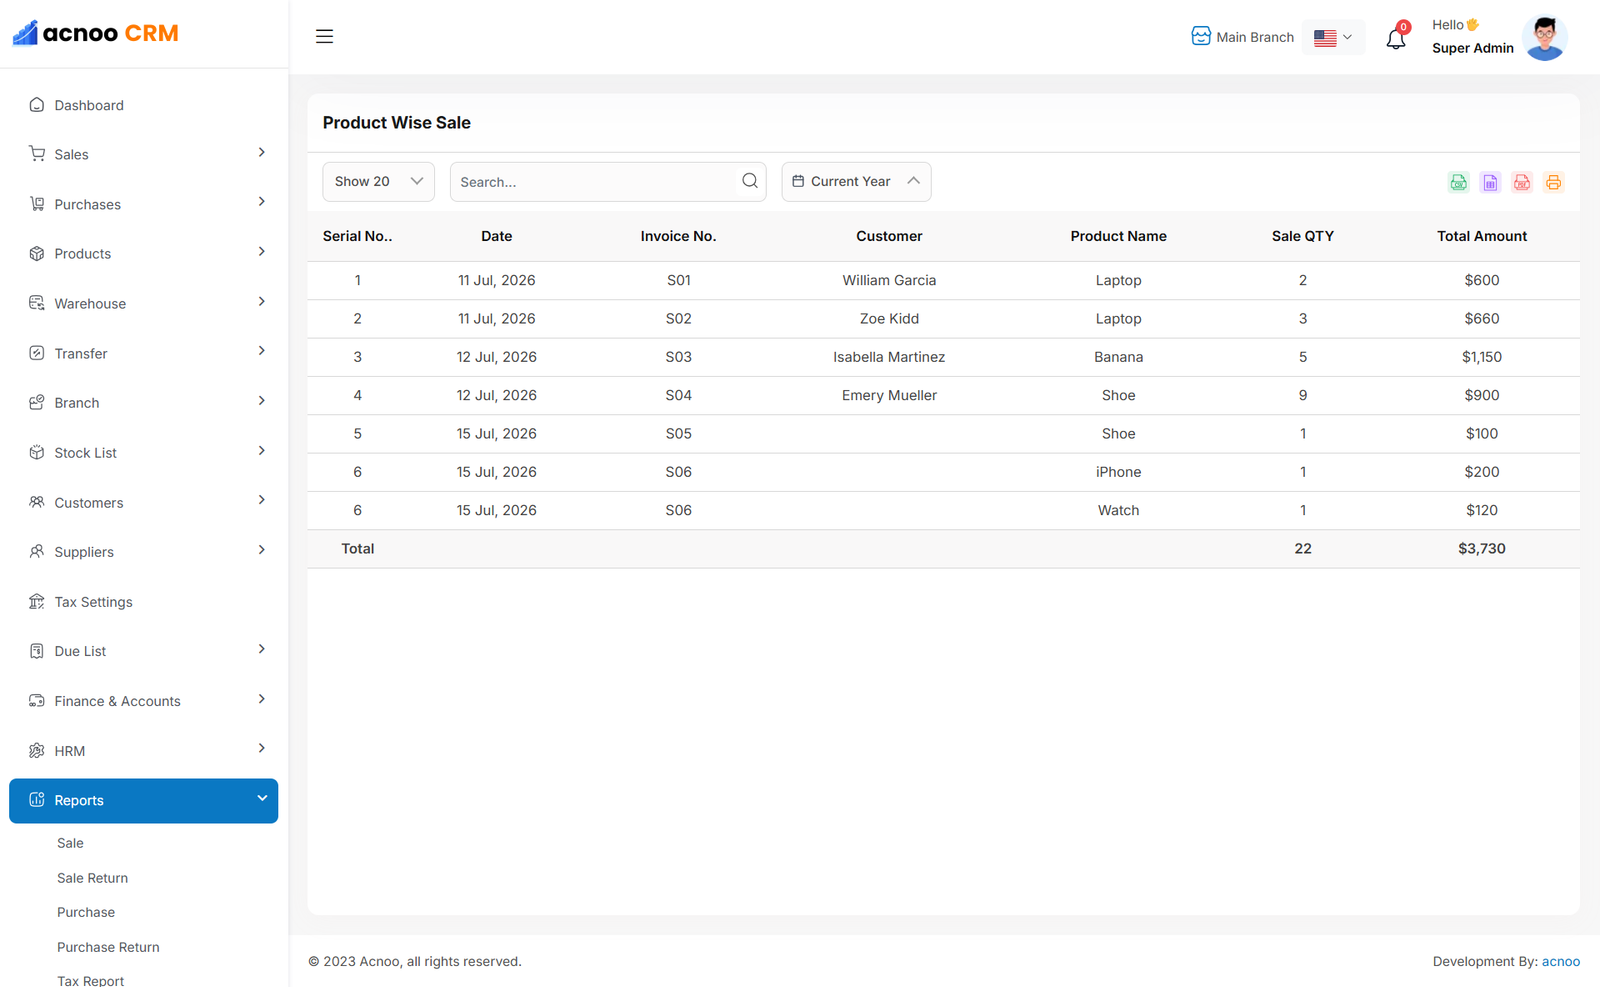
Product Wise Sale
The Product-wise Sales Report provides a detailed list of sold products. Users can view the sales date and quantity for each product. The table includes input-based search, per-page control, and date filtering. Additionally, users can export the data in Excel, CSV, or PDF formats, and a print option is available.
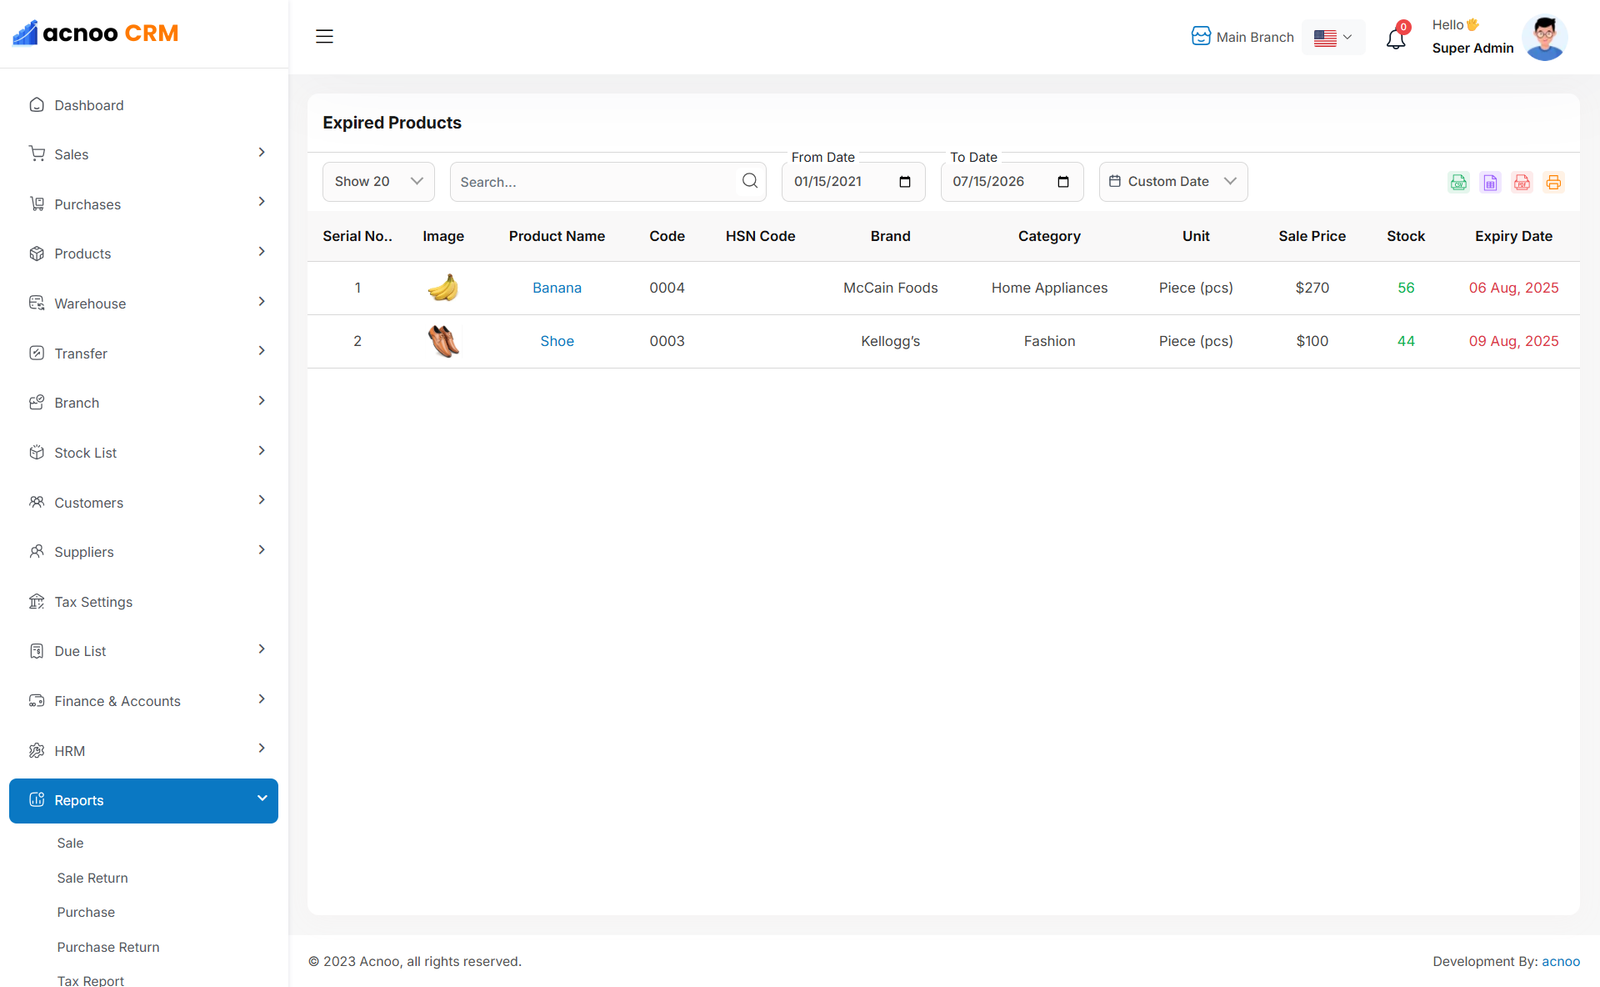
Expired Product Report
The Expired Products Report displays a list of all expired products. Users can filter the data using input-based search, per-page control, and date filtering options. Additionally, the report allows exporting data in Excel, CSV, or PDF formats, and includes a print option.
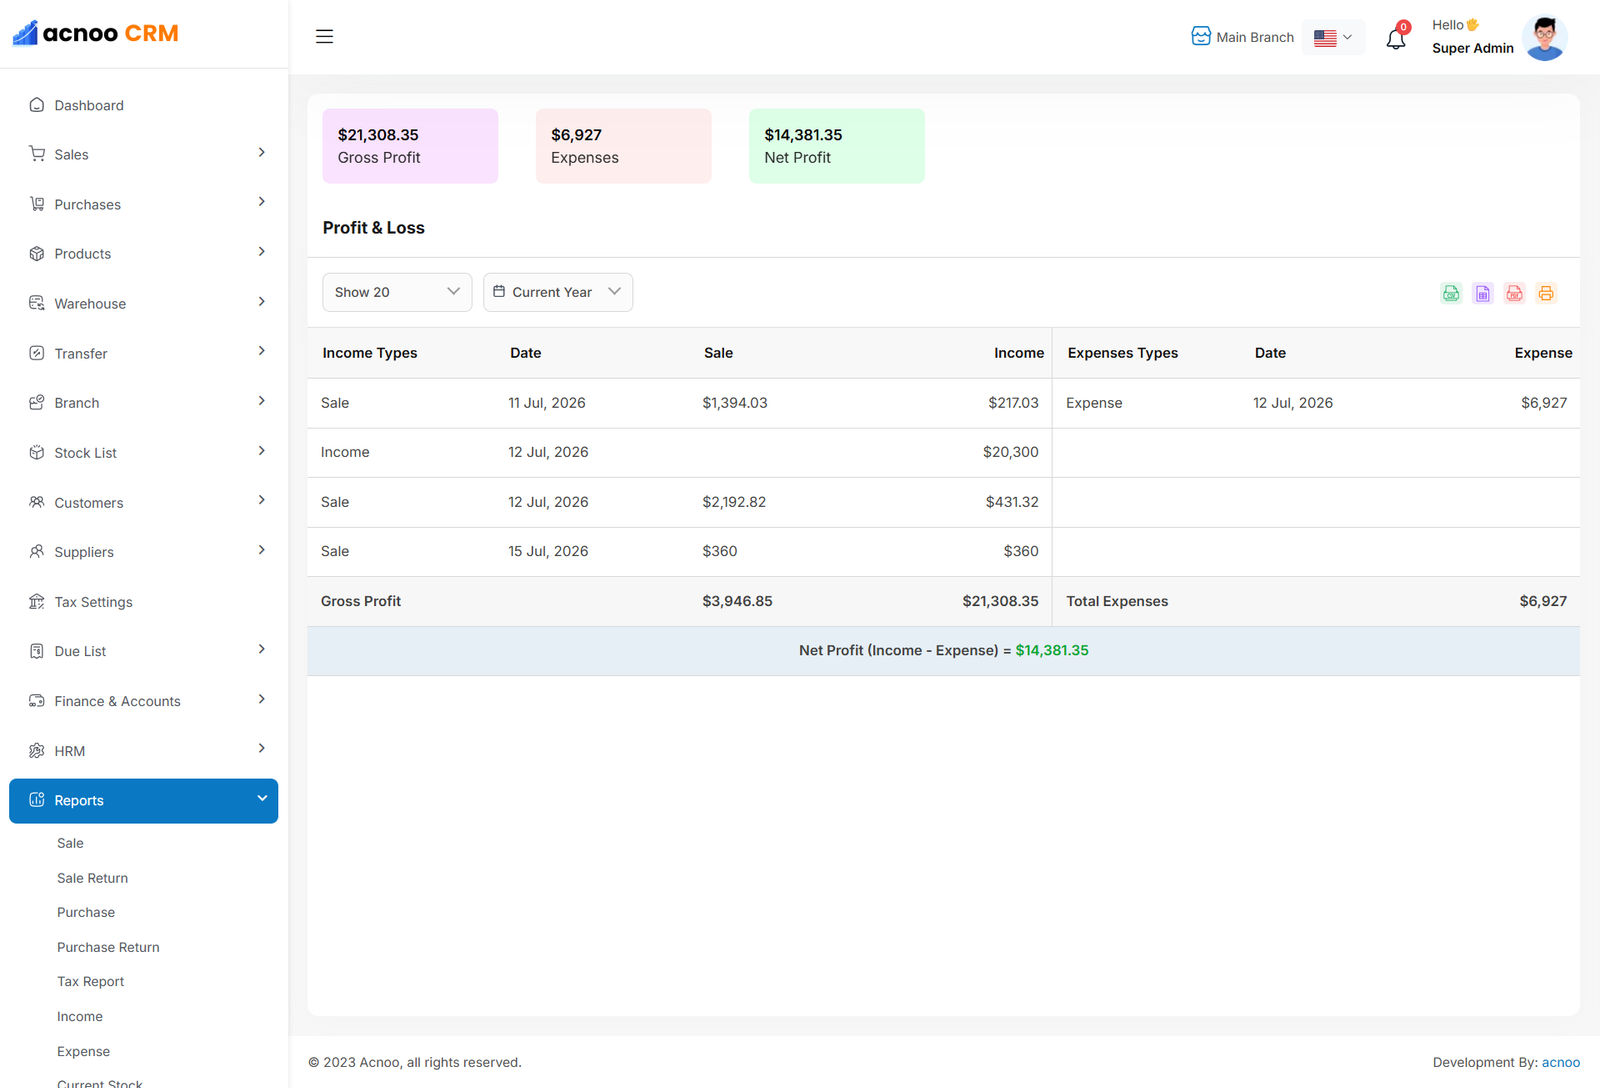
Profit & Loss History Report
The Profit and Loss Report provides a comprehensive overview of business performance. The report table is divided into two sections: income and expenses. The income section includes data from sales and income records, while the expense section includes data from expense and payroll records. At the top, summary cards display Gross Profit, Total Expenses, and Net Profit, calculated from all-time data. Date filtering is available for the table, and users can export the report in Excel, CSV, or PDF formats. A print option is also provided.
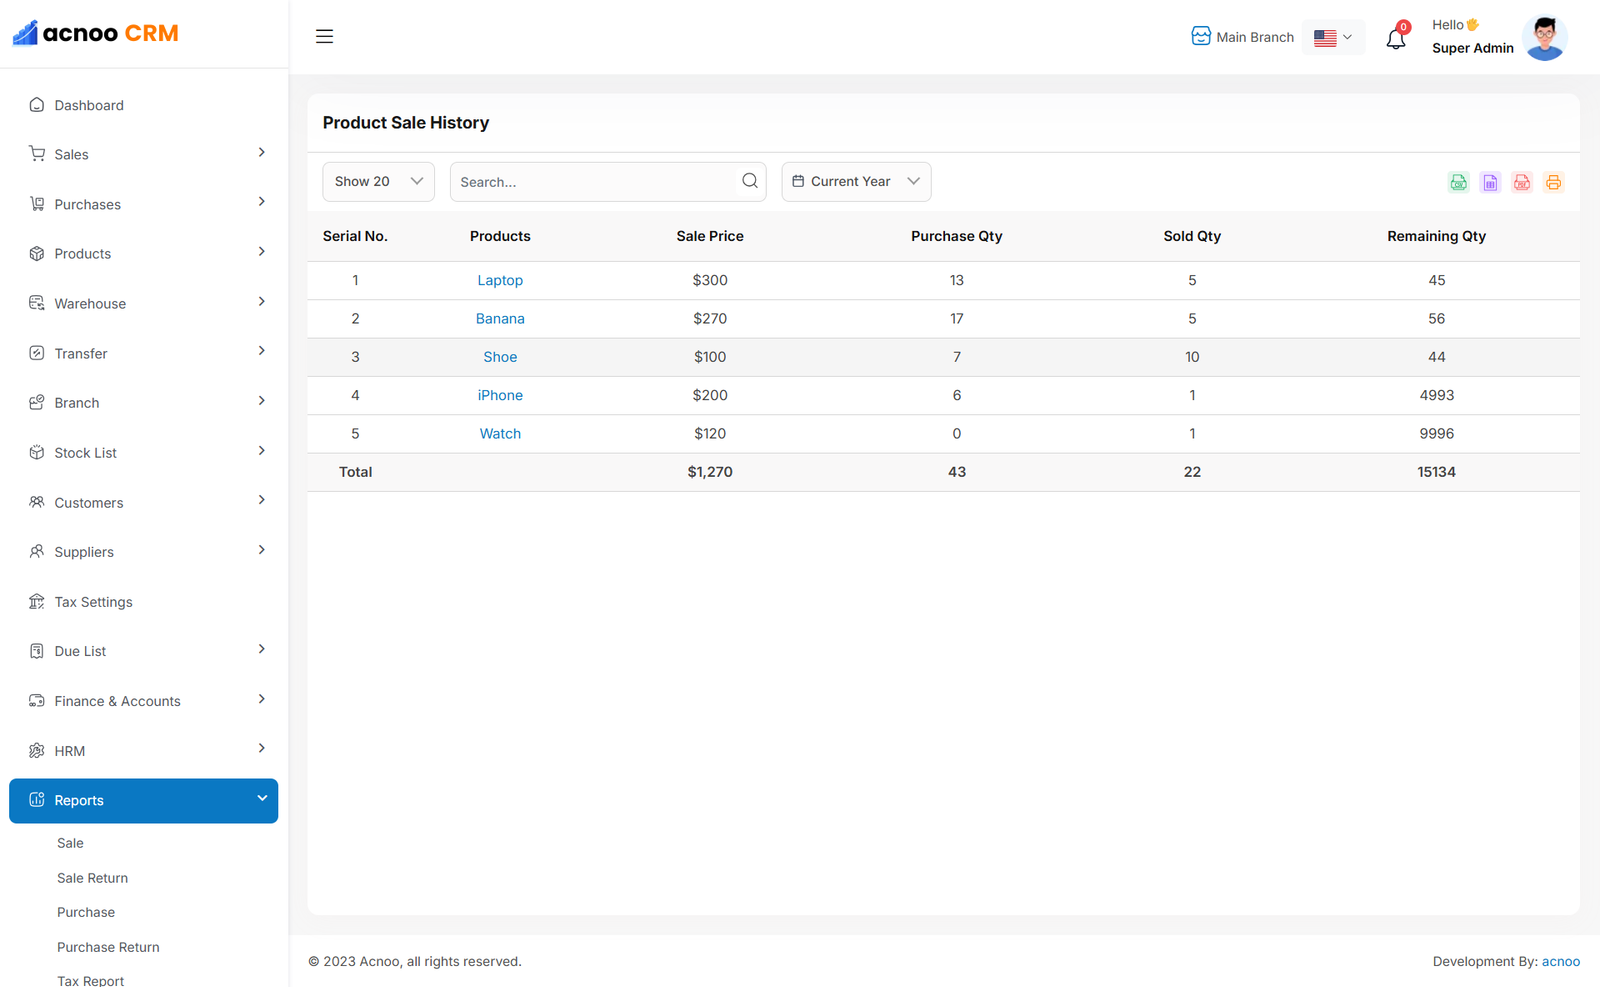
Product Sale History Report
This report displays a list of products along with the total quantity sold for each item. Users can filter the data using per-page control, input-based search, and date filtering options. The report also supports exporting data in Excel, CSV, or PDF formats, and includes a print option.
Product Purchase History Report
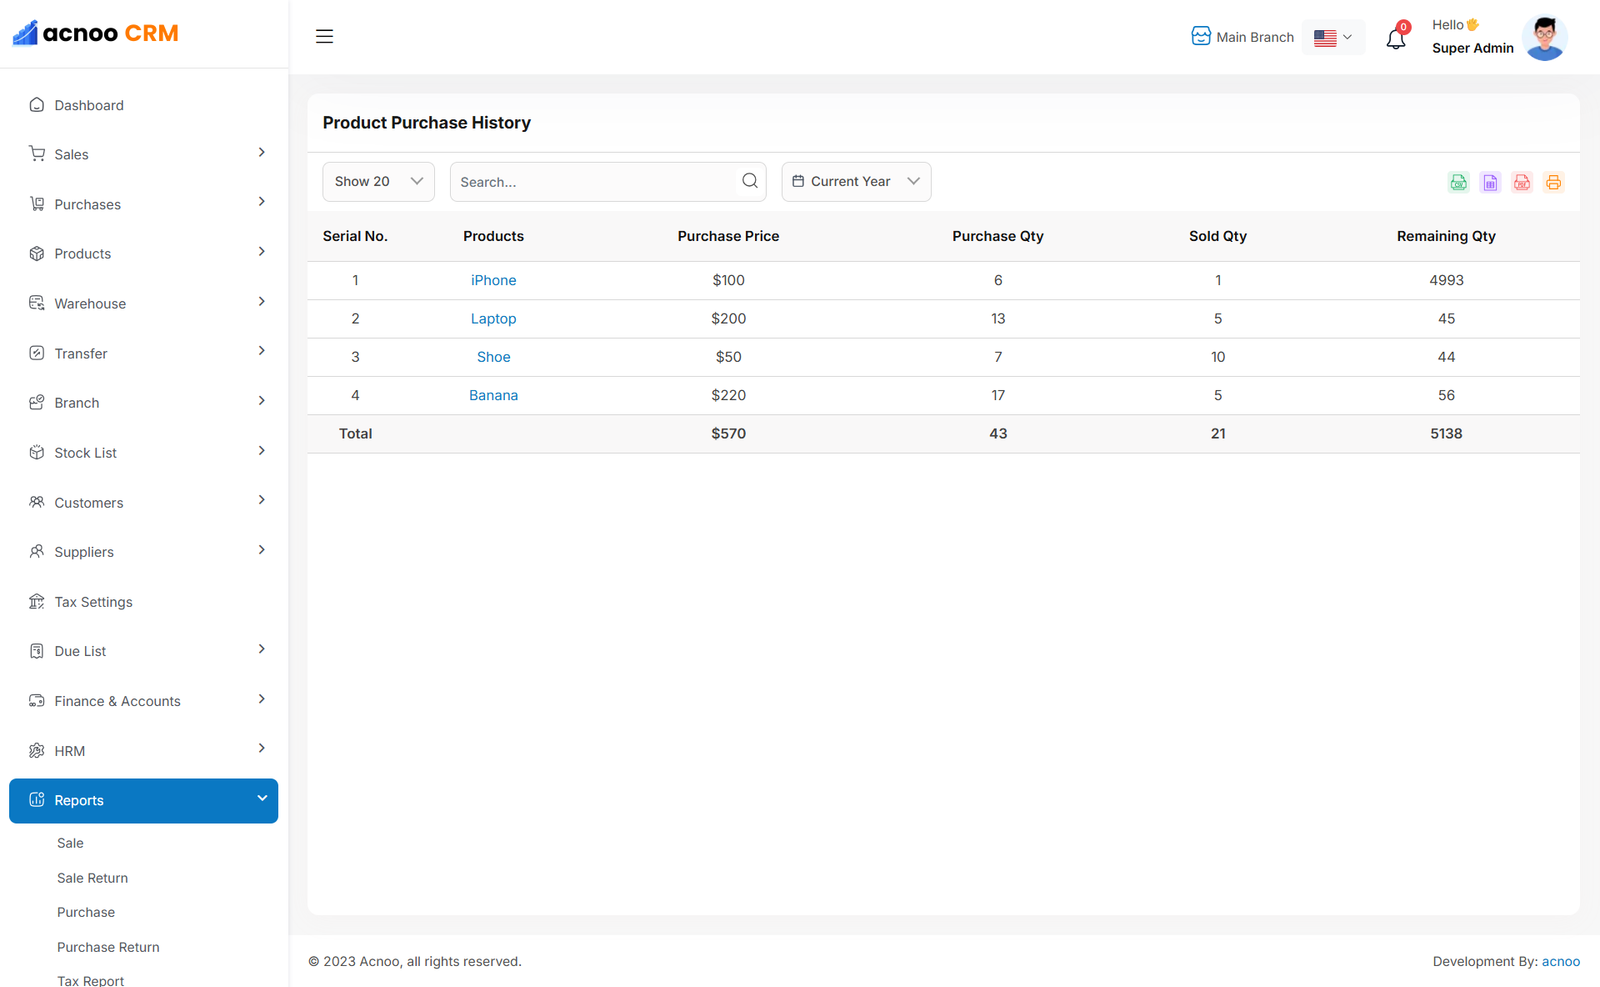
This report displays a list of purchased products along with the total quantity purchased. Users can filter the data using input-based search, per-page control, and date filtering options. The report also allows exporting data in Excel, CSV, or PDF formats, and includes a print option.
Party Reports
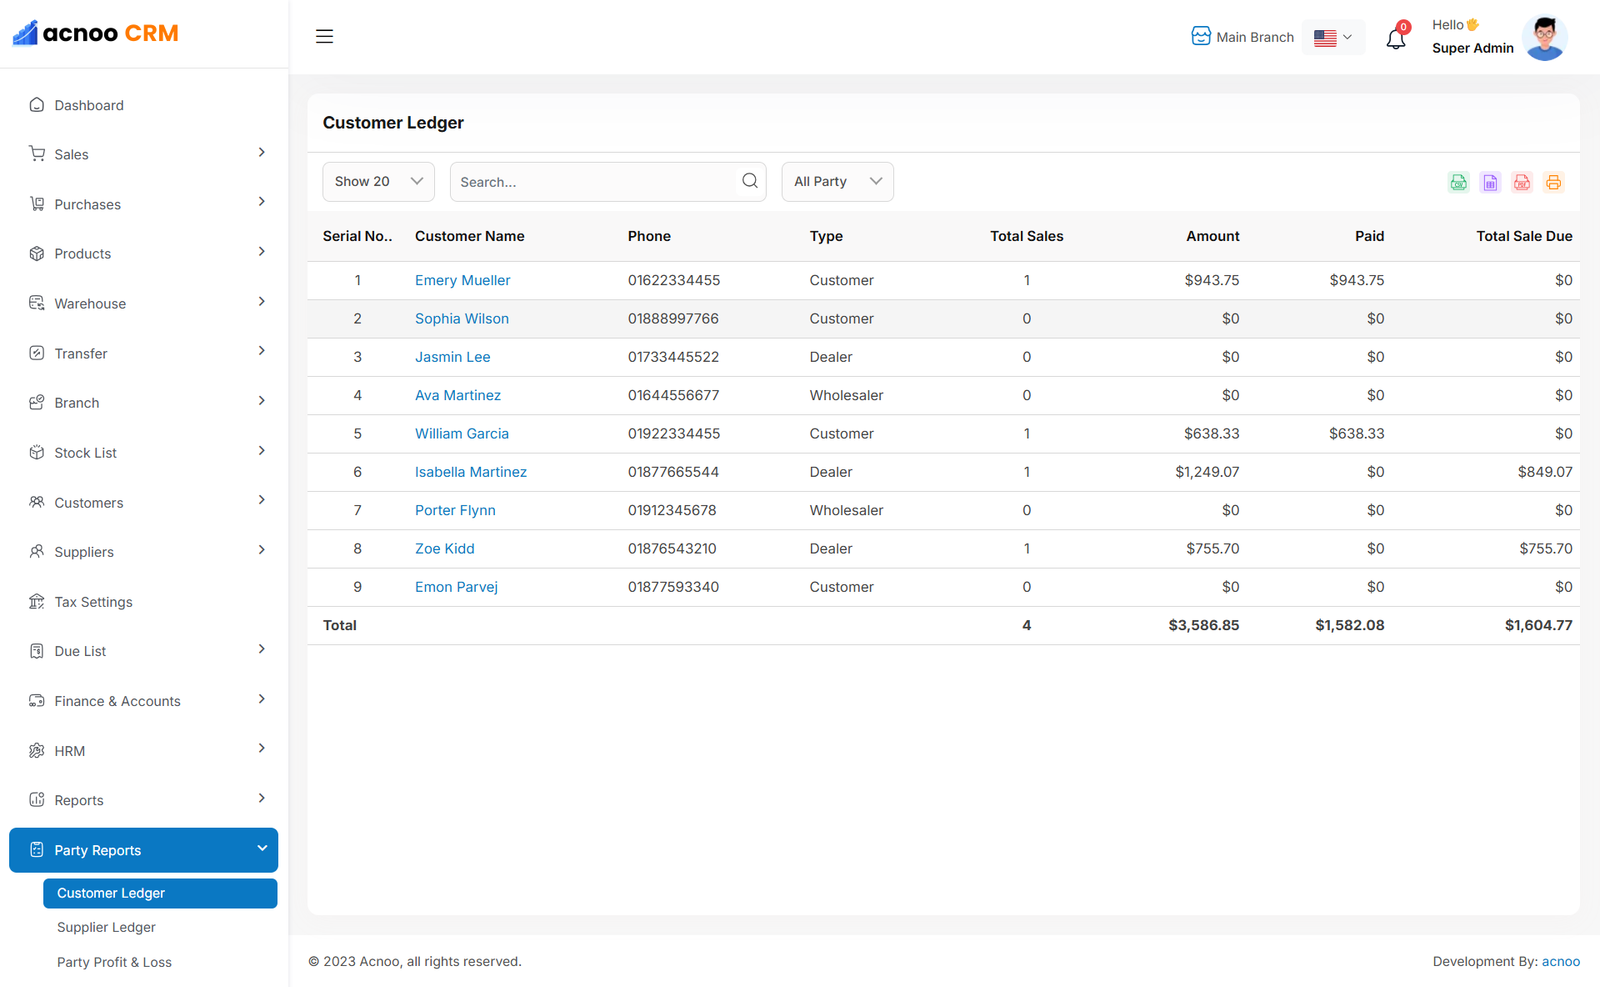
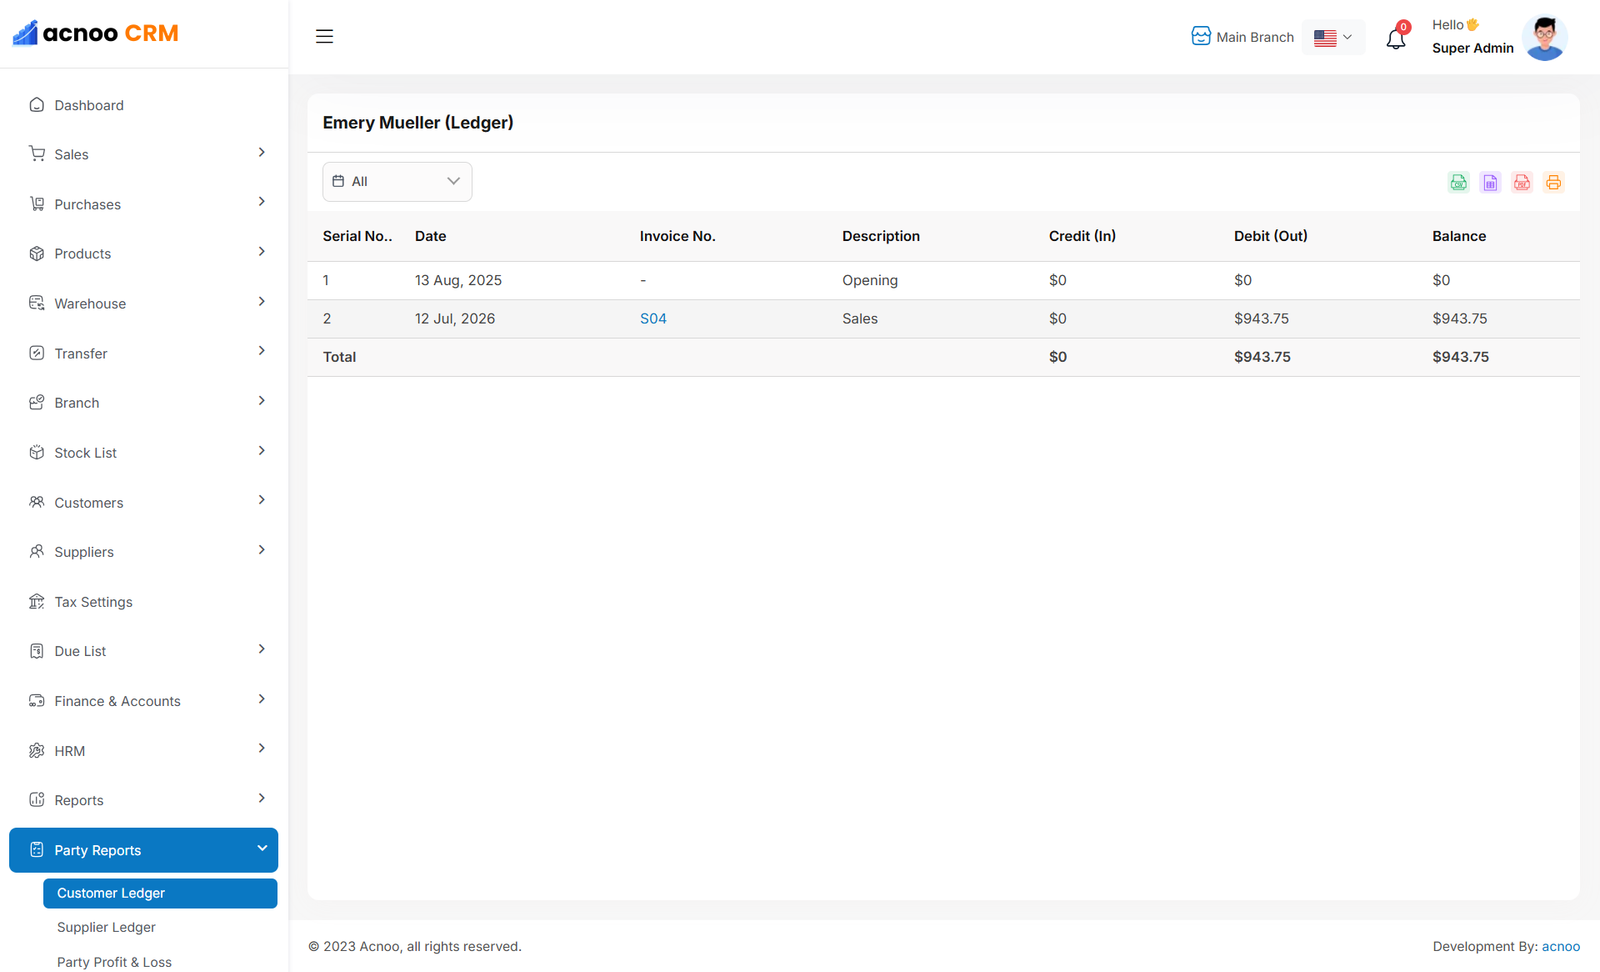
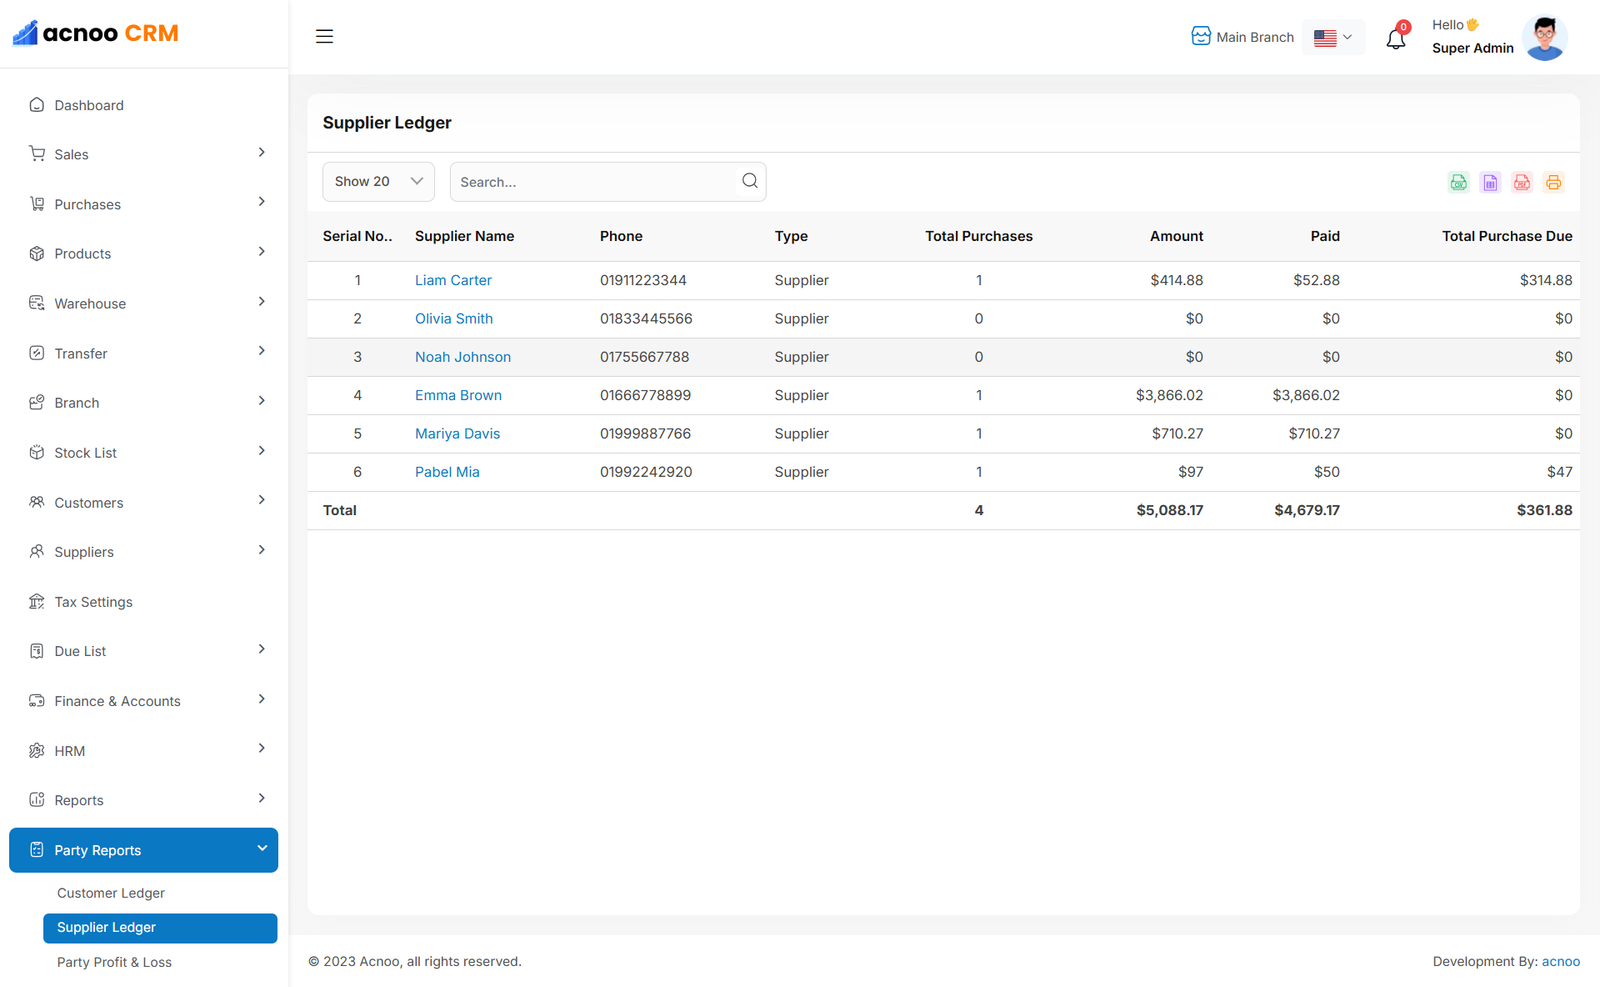
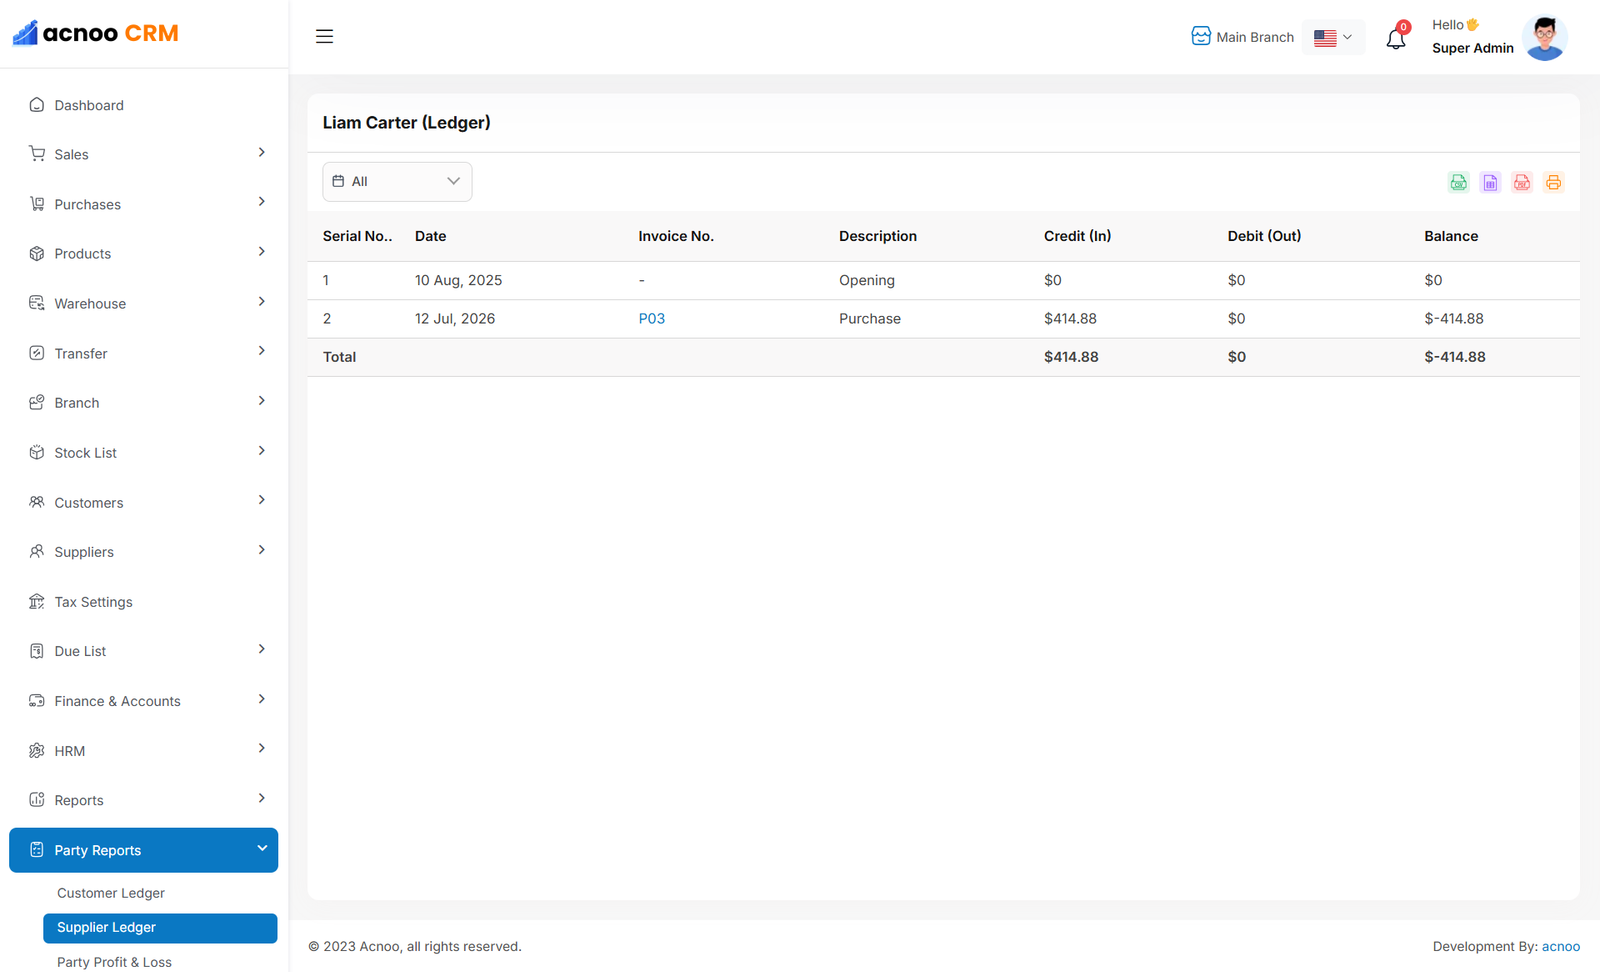
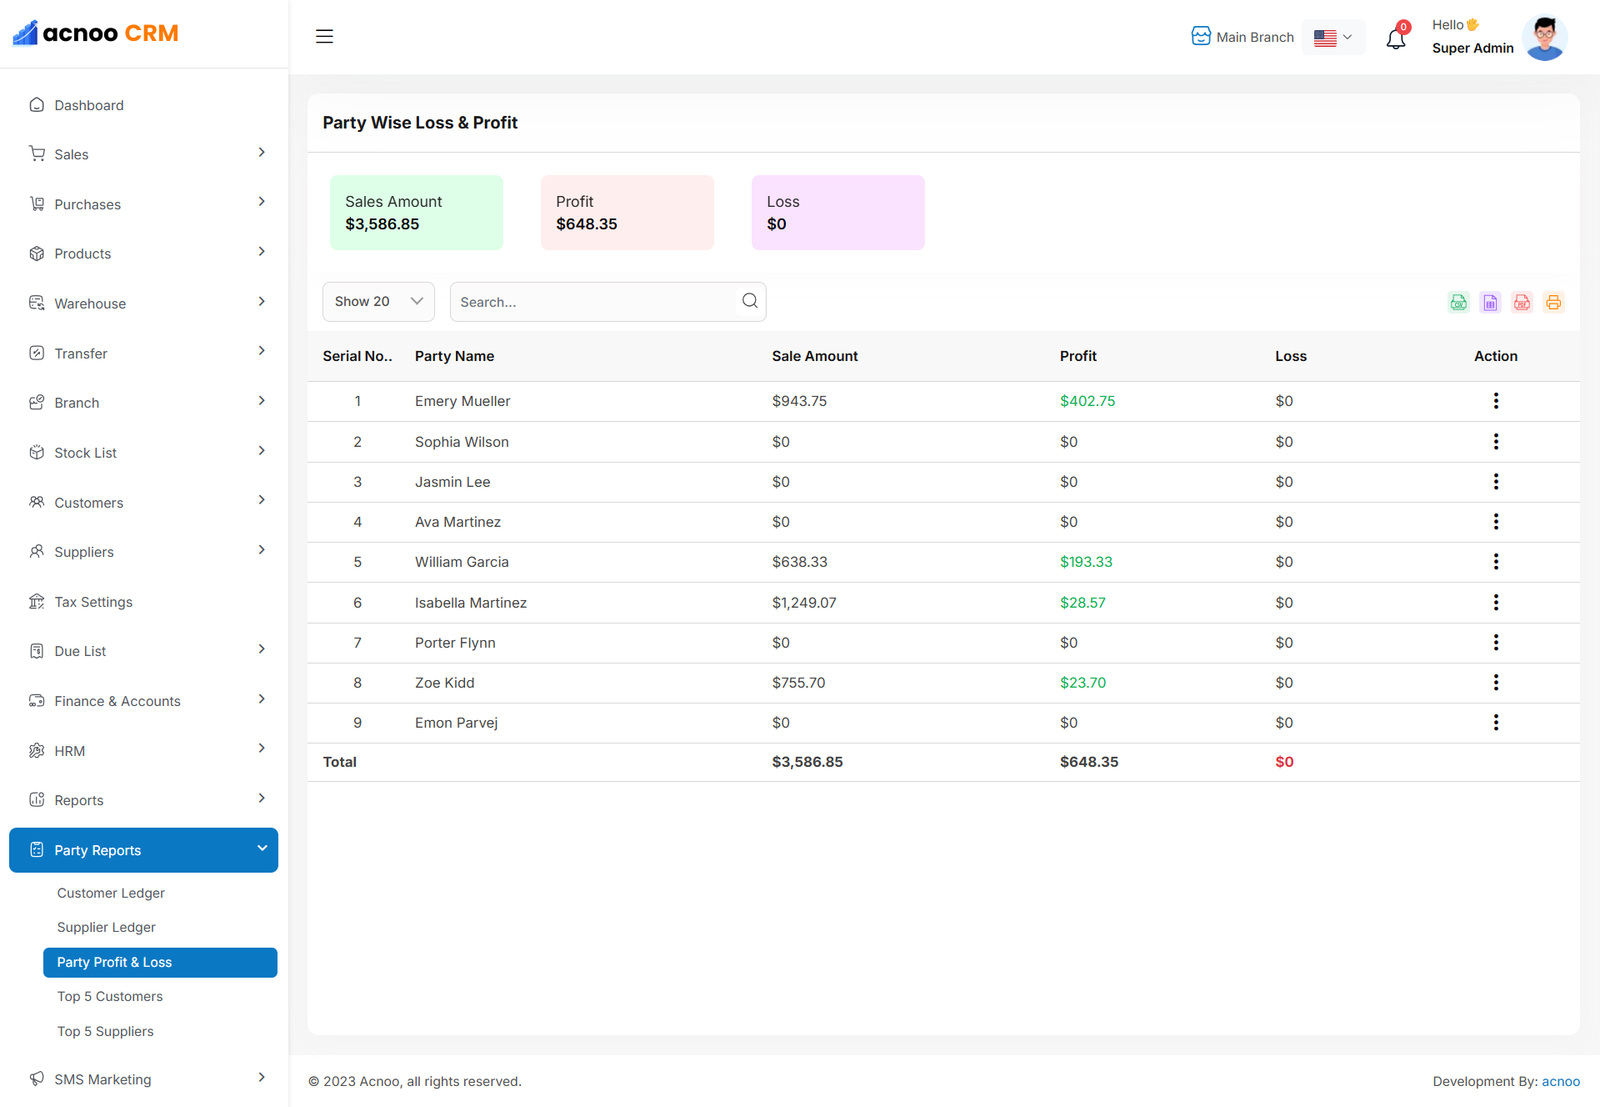
This section provides access to various party-related reports, including Customer Ledger, Supplier Ledger, Party Profit & Loss, Top Customers, and Top Suppliers. Each report includes filtering options to help refine and analyze data. Additionally, users can export reports in CSV and Excel formats, and a Print option is also available.
Customer Ledger
Supplier Ledger
Party Profit & Loss
Top 5 Customer
Top 5 Supplier
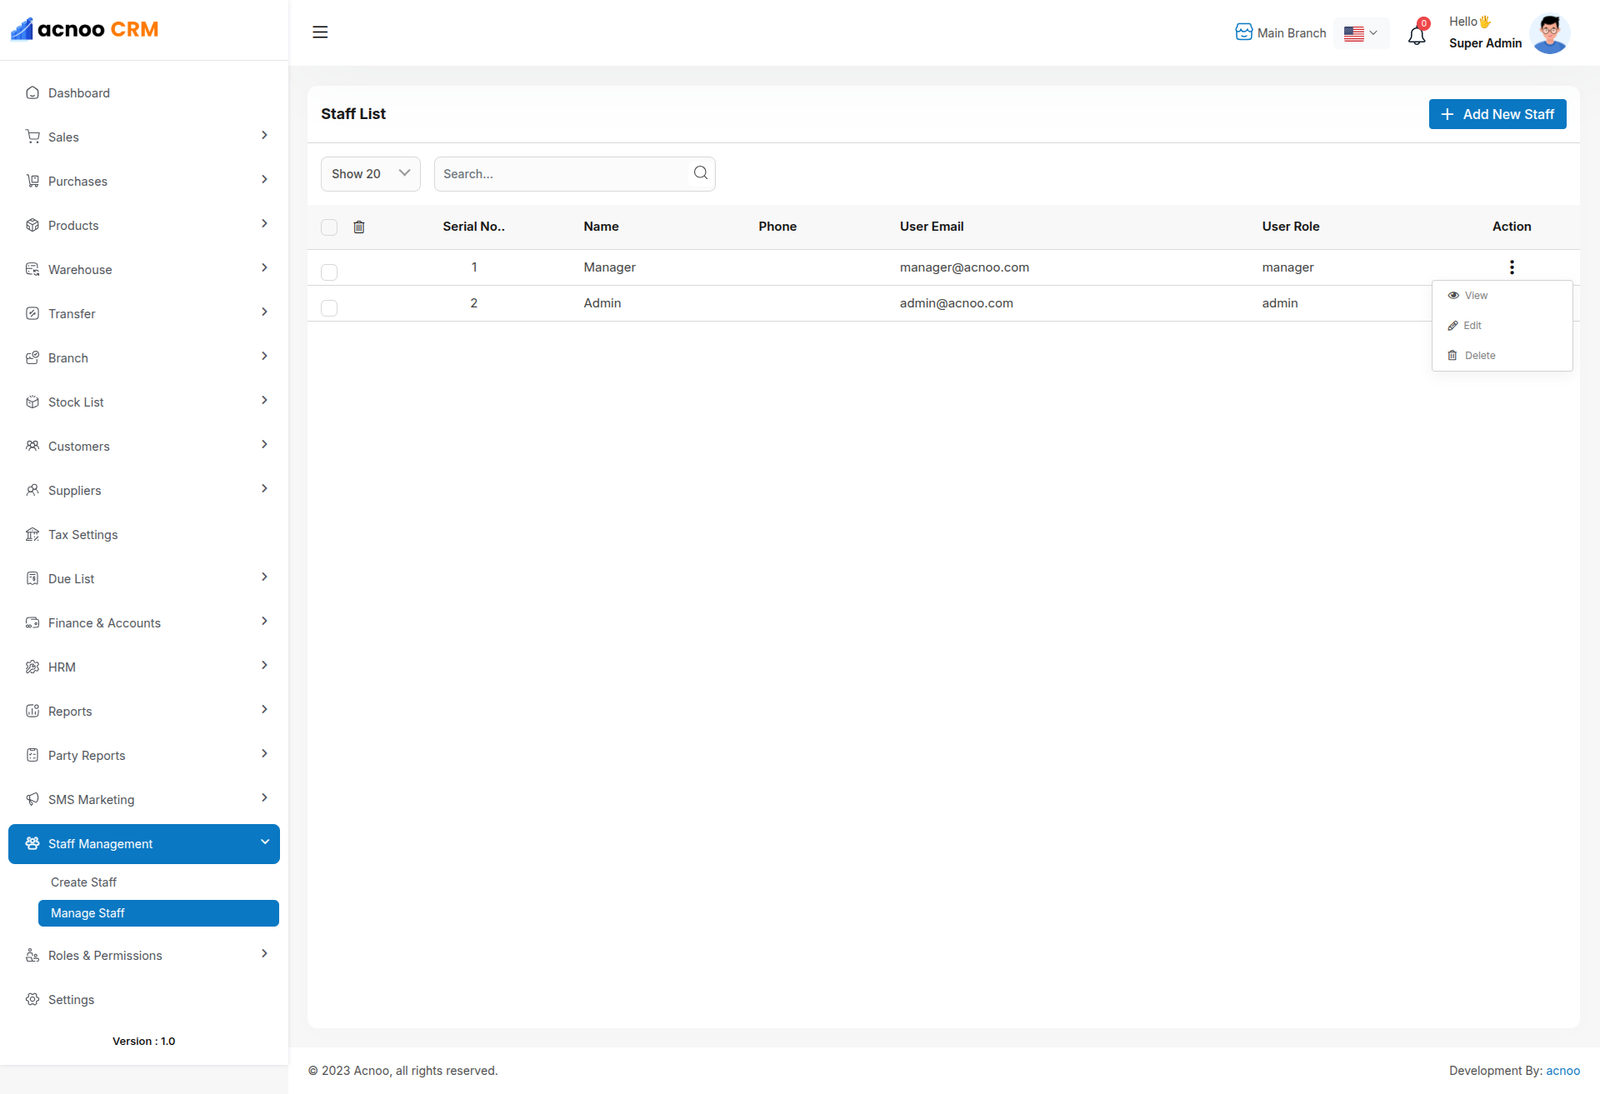
Staff List
Here, you can view the list of staff members along with a search filter. Additionally, you have the option to edit, delete individual entries, and perform multi-delete operations.
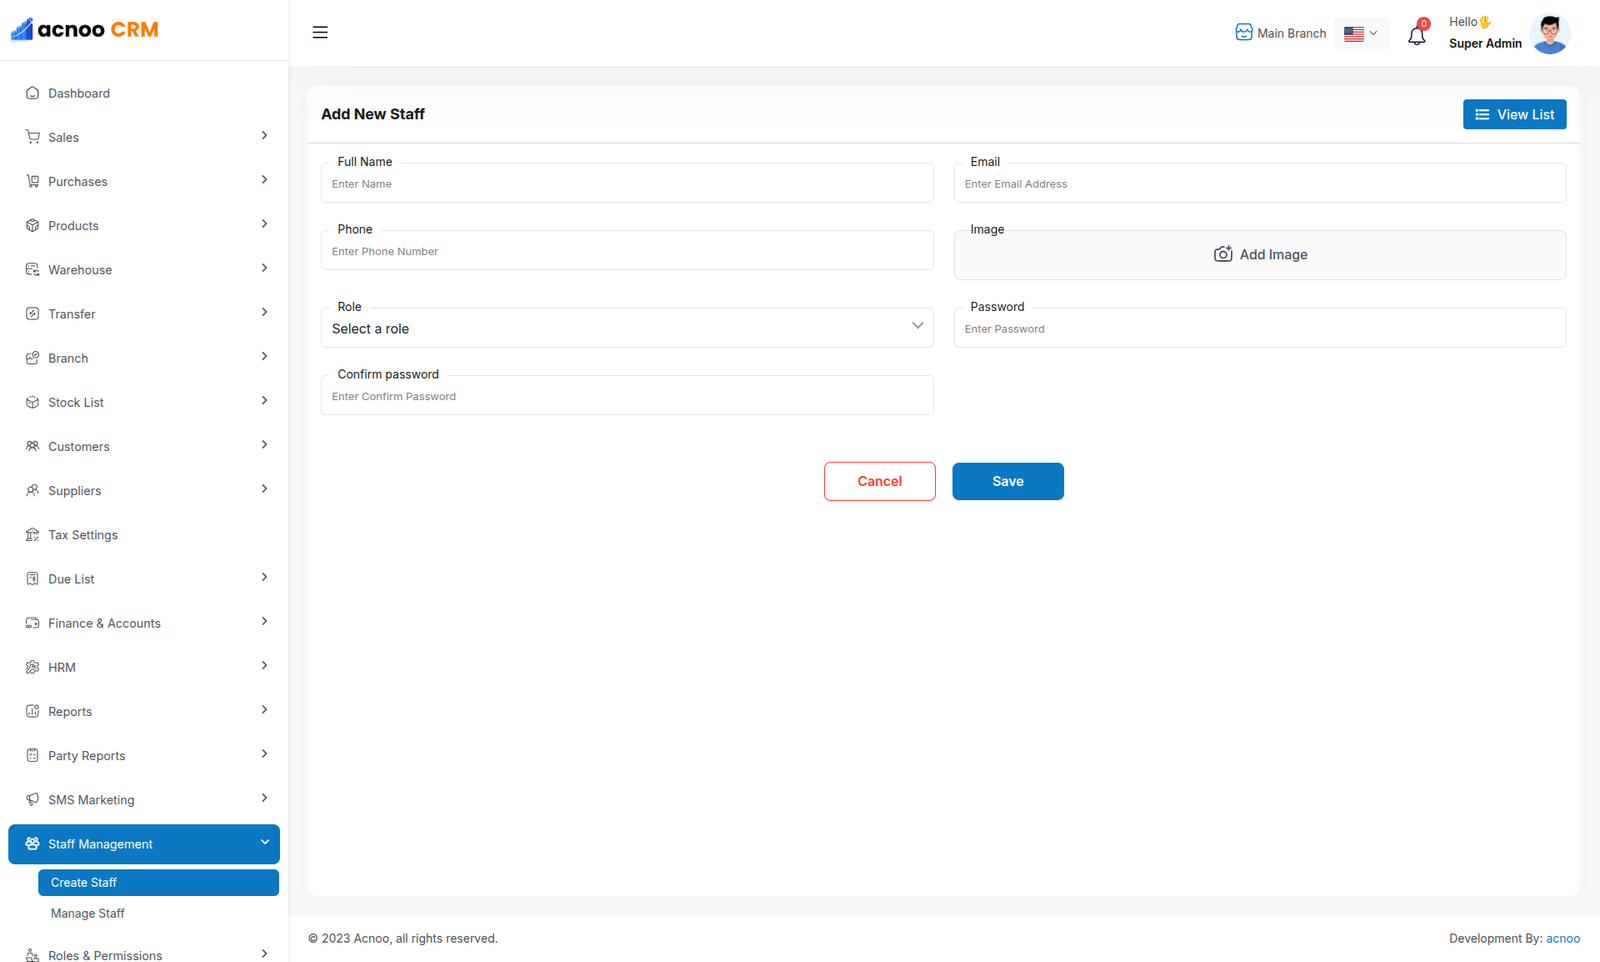
Create Staff
You can create a staff member here by completing the necessary fields.
Roles & Permissions
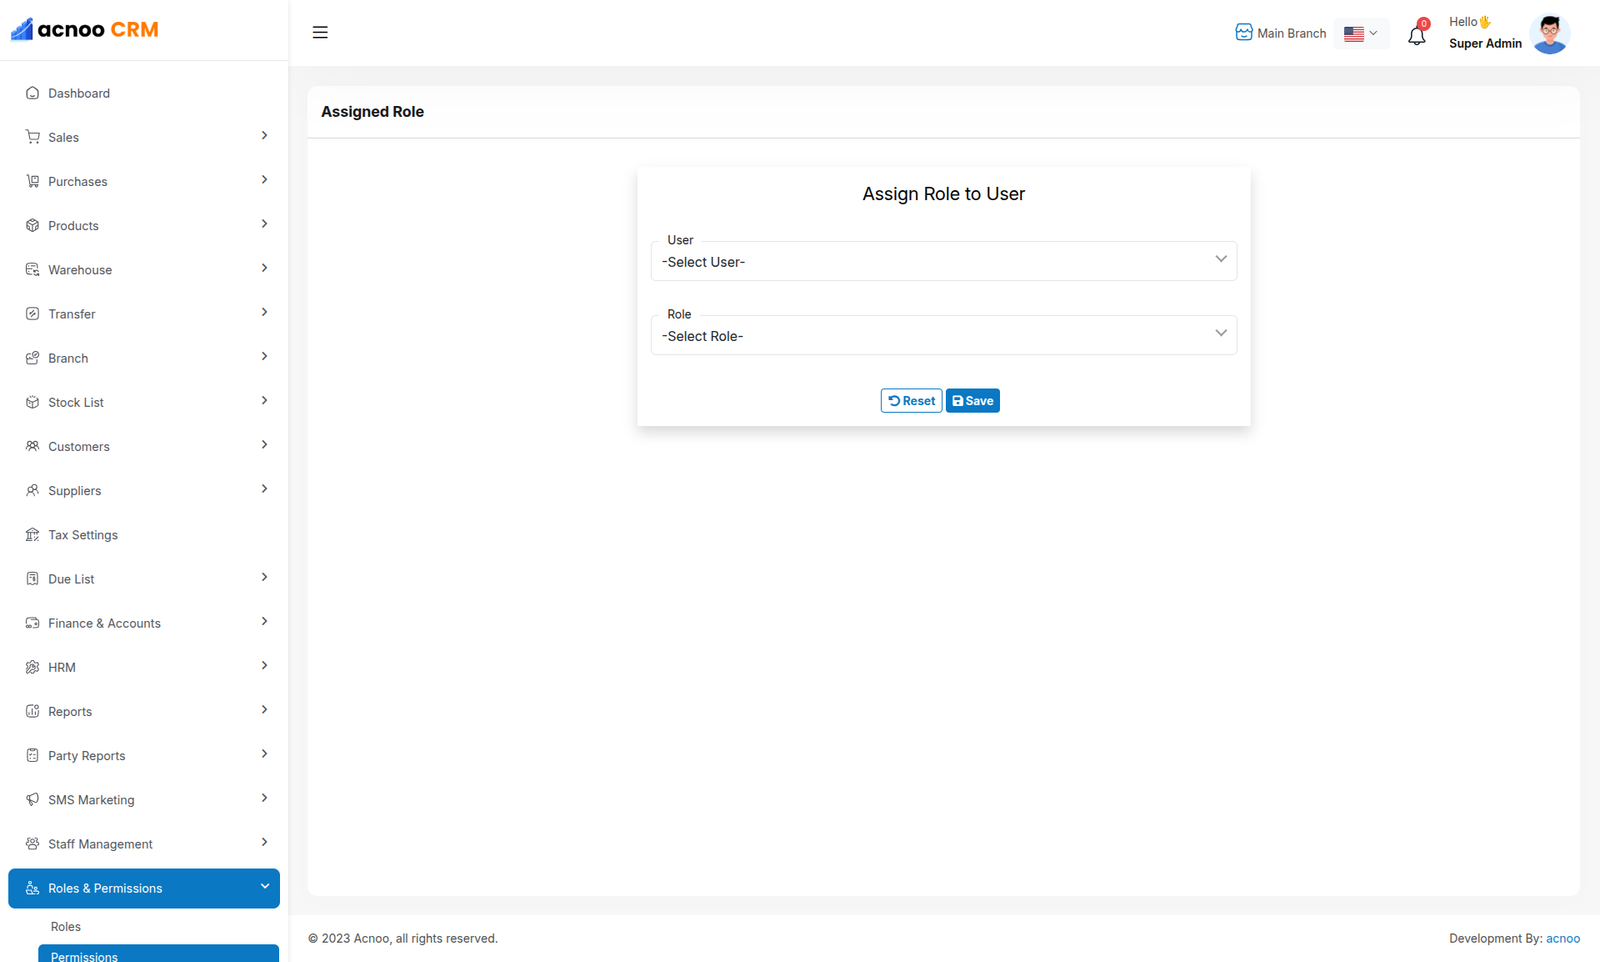
In this section, you have the ability to define roles and allocate specific permissions to different users as needed.
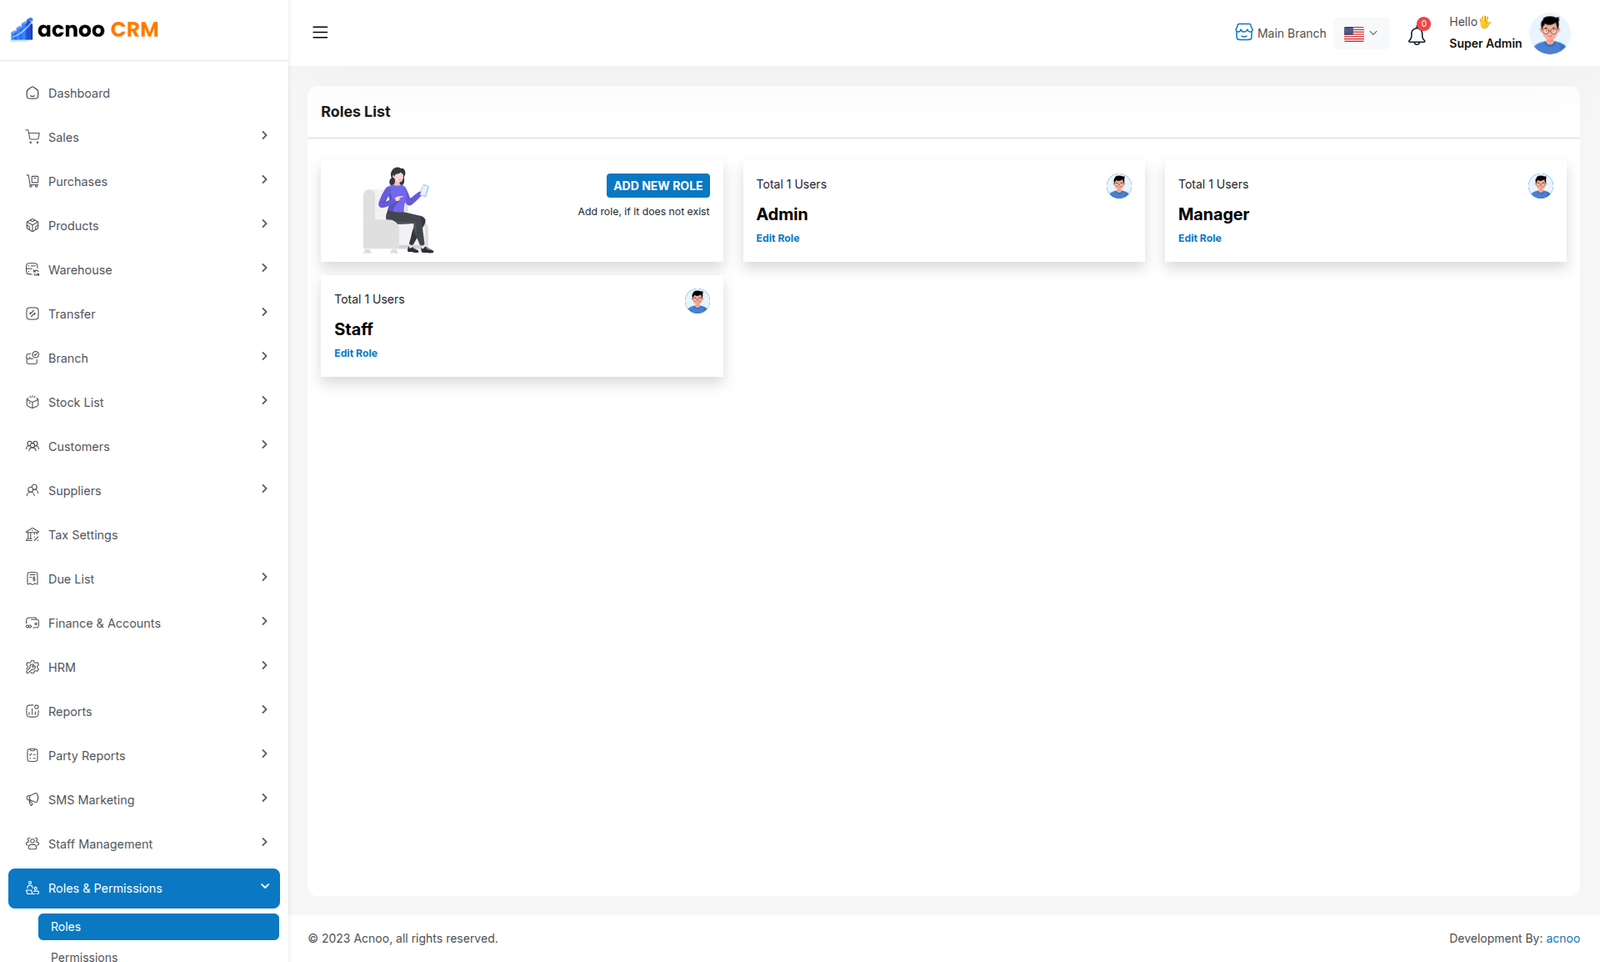
Roles
In this section, you have the capability to create new roles and update existing ones. When updating roles, you can configure their specific role permissions, granting or restricting access to various features and functionalities as required. This allows you to tailor user roles to your organizational needs and security requirements.
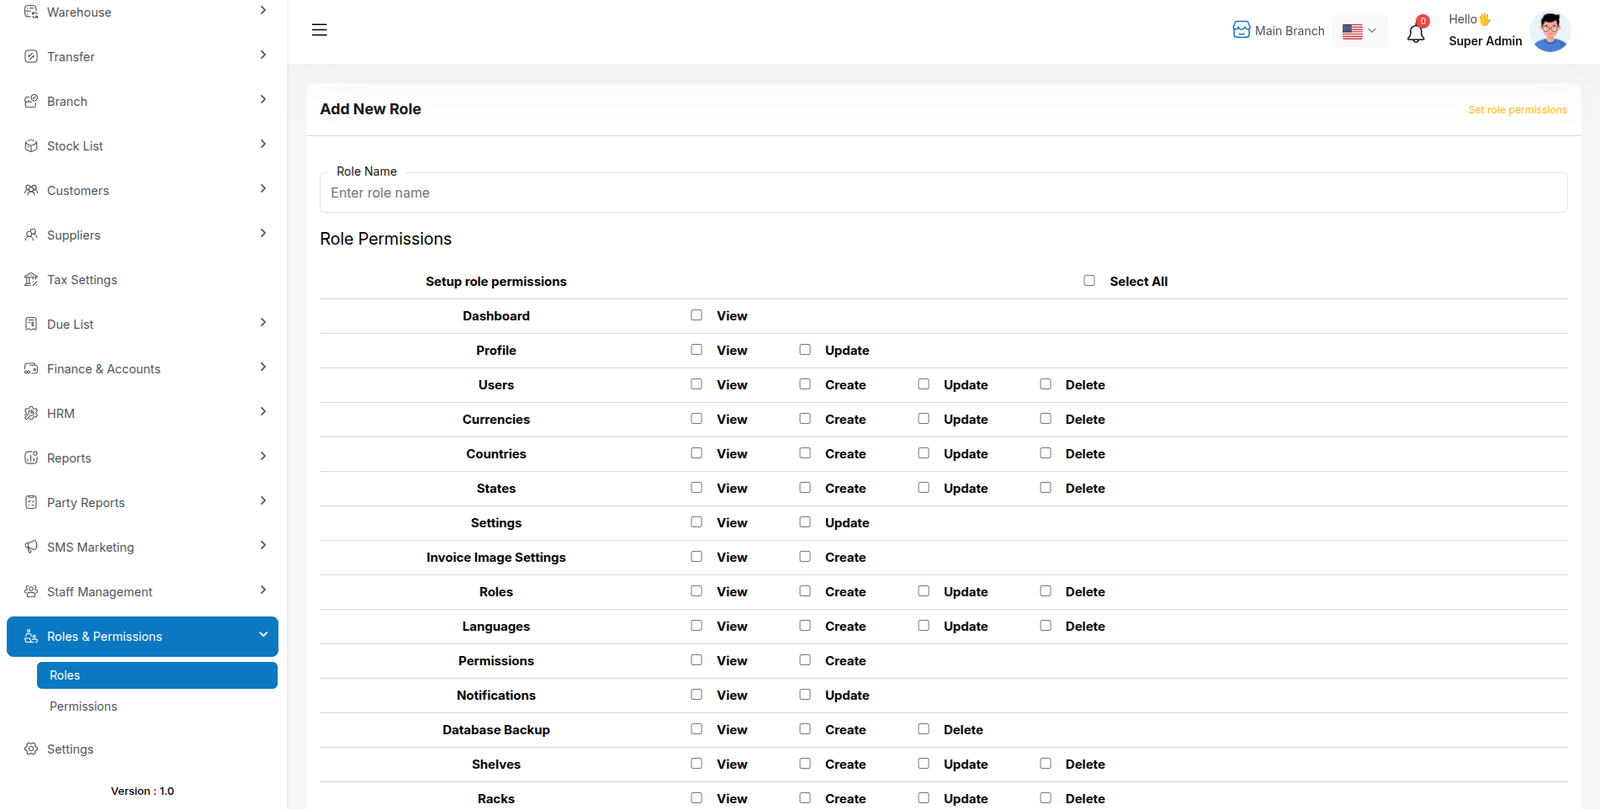
Permissions
In this section, you have the capability to set role-specific permissions, allowing you to fine-tune and control access rights for each role according to your organization's needs and security requirements.
Mail Configuration / SMTP Setup
Cpanel
To create and configure an SMTP email account using cPanel, follow below steps:
Step 1: Log in to cPanel
Step 2: Create an Email Account
1. In cPanel, go to "Email Accounts".
2. Click “Create”.
3. Fill in:
a. Username: e.g., info, test, or hr
b. Domain: Select the correct domain (if multiple are available)
c. Password: Set a strong password or use the generator
4. Click Create.
📌 This creates an email like test@yourdomain.com
Step 3: Get SMTP Settings
Once the email is created:
1. Go to "Email Accounts" again.
2. Find your new email and click “Connect Devices”.
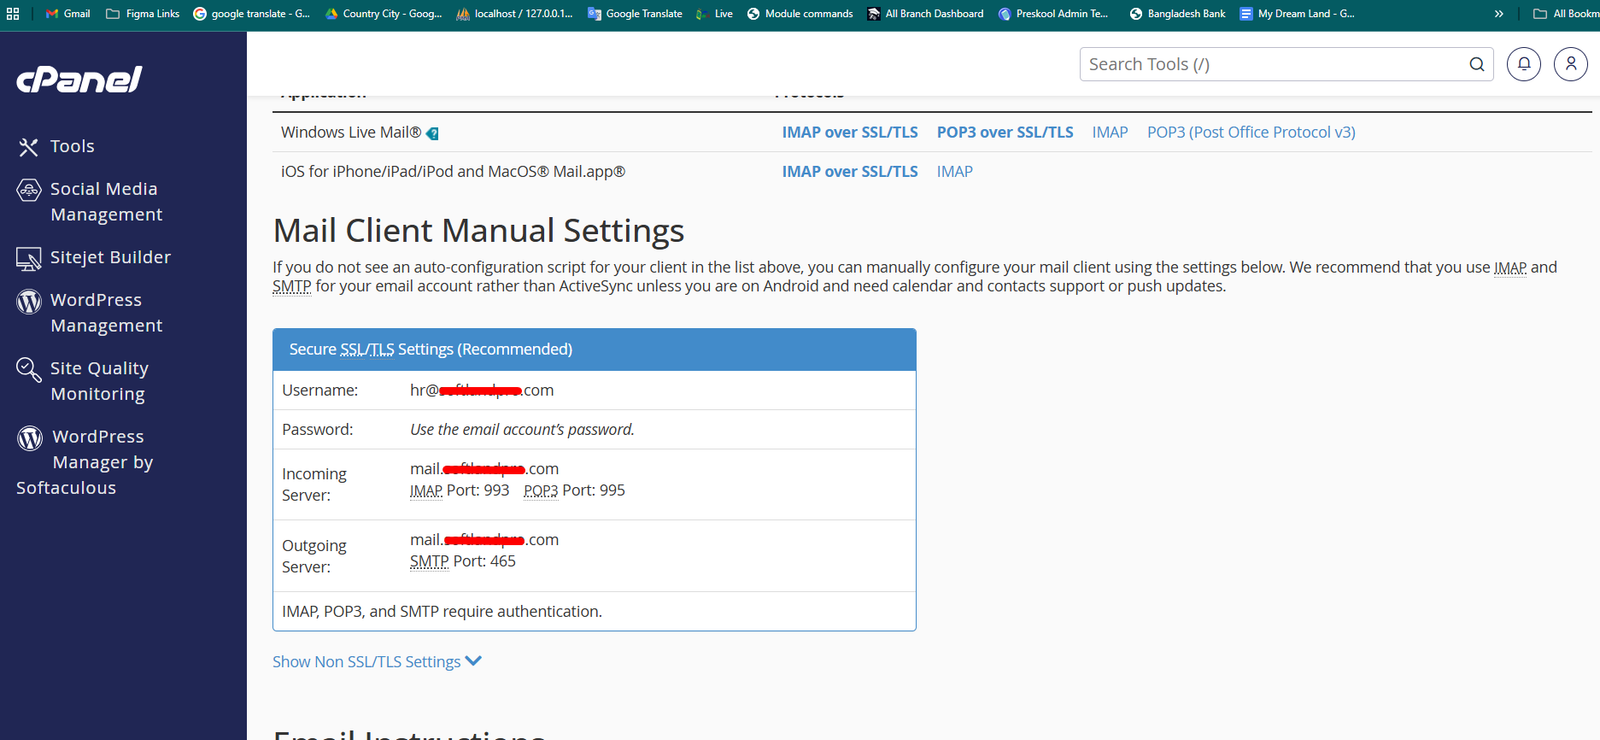
3. You’ll see the SMTP settings under the Mail Client Manual Settings section like below image:
Example:
| Input | Value |
|---|---|
| QUEUE_MAIL | Select true / false, (If you select true, you need to run the following command: php artisan queue:work on server) |
| MAIL_DRIVER_TYPE | Select MAIL MAILER / MAIL DRIVER |
| MAIL_DRIVER |
Use sendmail if your server has a local mail server installed (like Postfix
or Exim).
Use smtp when sending emails through an external mail service (like Gmail, Mailgun, or your hosting provider's SMTP server). |
| MAIL_HOST | mail.yourdomain.com |
| MAIL_PORT | 587 |
| MAIL_USERNAME | test@yourdomain.com |
| MAIL_PASSWORD | The one you set |
| MAIL_ENCRYPTION | tls |
| MAIL_FROM_ADDRESS | yourmail@gmail.com |
| MAIL_FROM_NAME | Your project/app name |
Set the values to System Settings → Mail Configuration
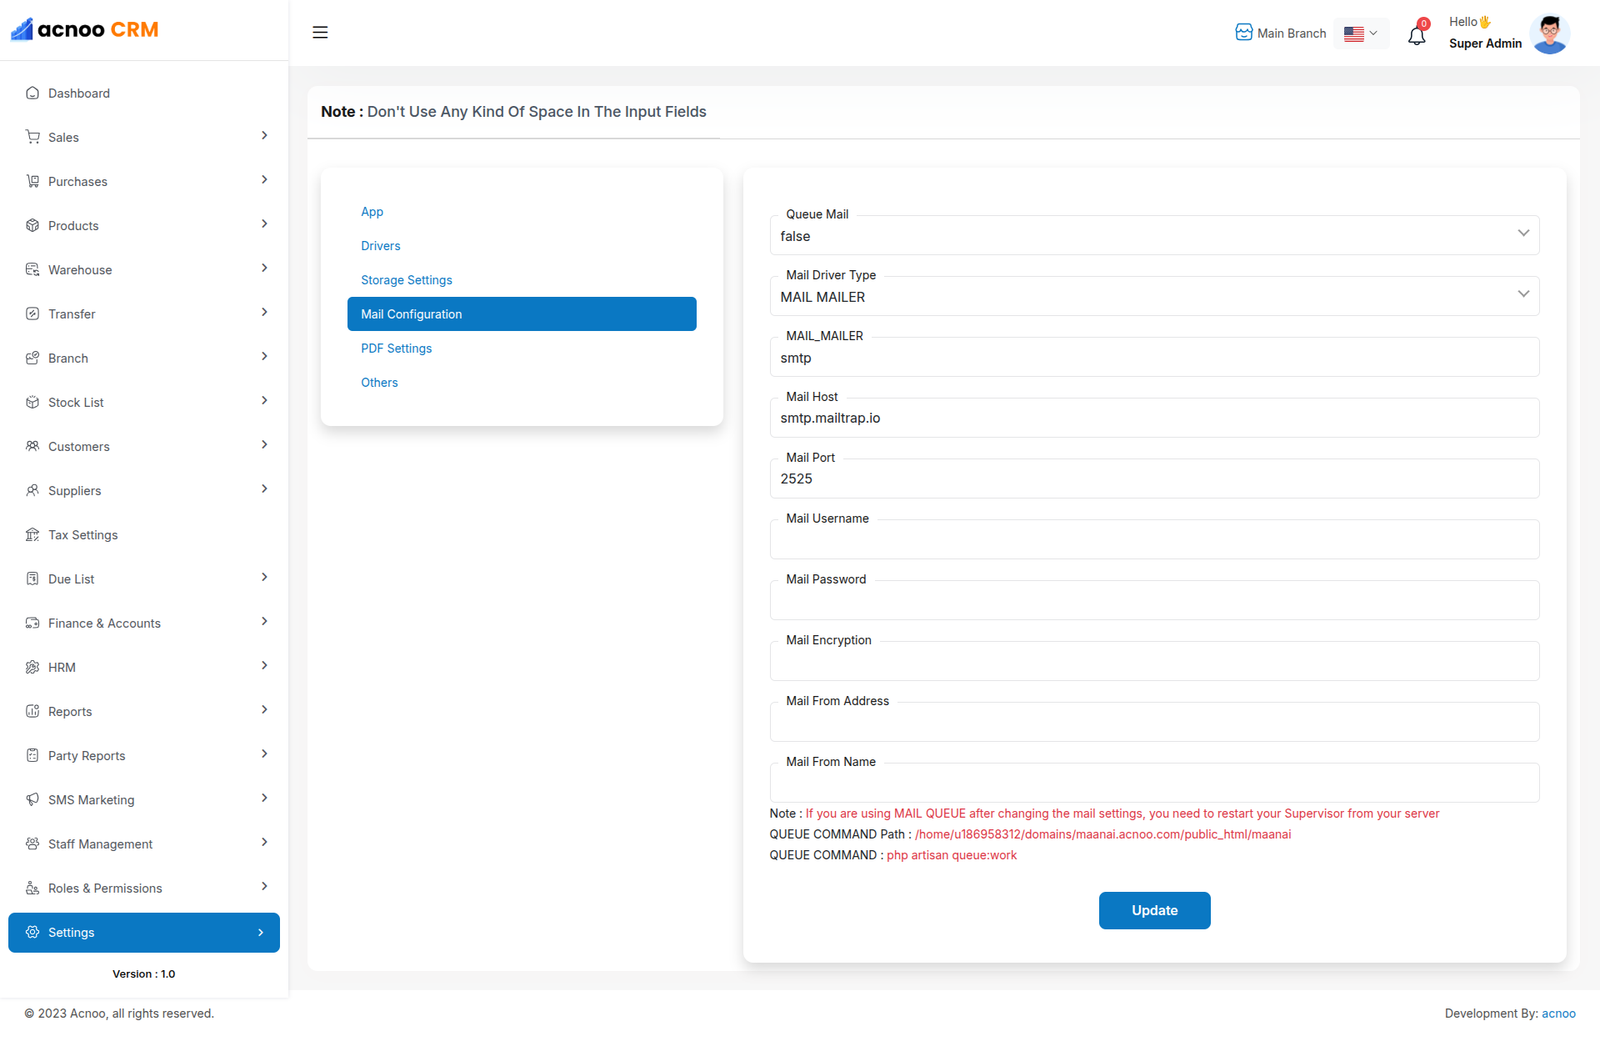
If you want to know more details please follow their, Official documentation. Here is also a youtube video link for reference.
Hostinger Panel
To create and configure an SMTP email account using hostinger, follow below steps:
Step 1: Log In to Hostinger hPanel https://hpanel.hostinger.com
Step 2: Create an Email Account
1. Go to Emails from the top menu.
2. Select your domain name.
3. Click "Create New Email Account".
4. Fill in:
a. Email address (e.g., info, test, or hr)
b. Password
5. Click "Create".
📌 This creates an email like test@yourdomain.com
Step 3: Get SMTP Settings
1. After creating the email, go back to the Email Accounts section.
2. Find your email and click “Connect App & Devices” or “Set Up Devices”.
3. Look for the Manual Configuration or SMTP Settings.
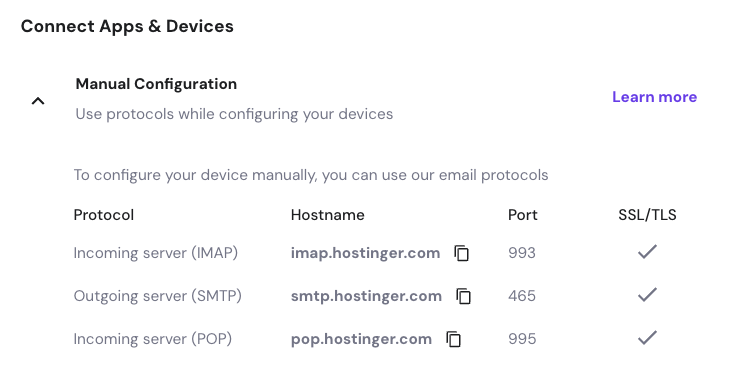
Example:
| Input | Value |
|---|---|
| QUEUE_MAIL | Select true / false, (If you select true, you need to run the following command: php artisan queue:work on server) |
| MAIL_DRIVER_TYPE | Select MAIL MAILER / MAIL DRIVER |
| MAIL_DRIVER |
Use sendmail if your server has a local mail server installed (like Postfix
or Exim).
Use smtp when sending emails through an external mail service (like Gmail, Mailgun, or your hosting provider's SMTP server). |
| MAIL_HOST | mail.yourdomain.com |
| MAIL_PORT | 465 |
| MAIL_USERNAME | test@yourdomain.com |
| MAIL_PASSWORD | The one you set |
| MAIL_ENCRYPTION | ssl |
| MAIL_FROM_ADDRESS | yourmail@gmail.com |
| MAIL_FROM_NAME | Your project/app name |
Set the values to System Settings → Mail Configuration
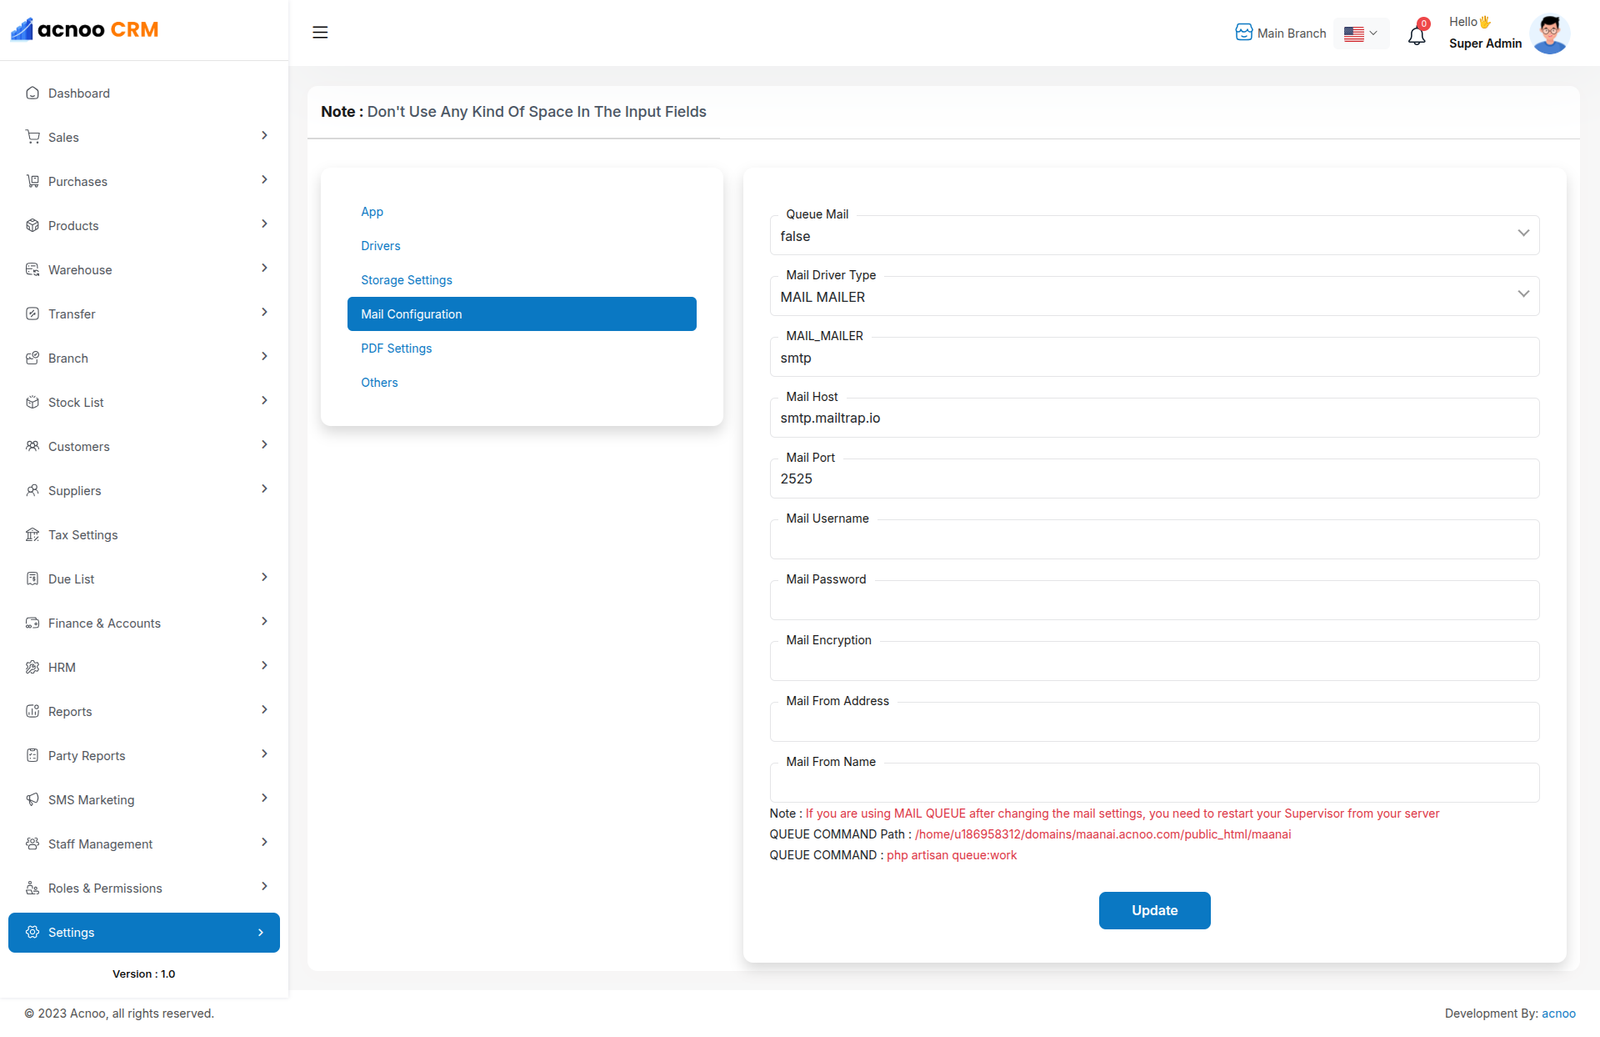
If you want to know more details please follow their, Official documentation. Here is also a youtube video link for reference.
Note: Please note that if you change QUEUE_MAIL from false to true,
you need to run the following command: php artisan queue:work.
Remember: The command path should be:
/home/u186958312/domains/yourdomain.com/public_html. Make sure you're in the
correct path.
Note: If you're not familiar with running the command, there's
another option. Simply visit yourdomain.com/queue-work and it will be executed
automatically.
Note: If you select QUEUE_MAIL as true but do not run the command or visit the URL, email functionality will not work properly.
Gmail
To create and configure an SMTP email account using Gmail, follow below steps:
Step 1: Enable 2-Step Verification on Google Account
1. Go to https://myaccount.google.com
2. Click "Security" from the left menu.
3. Under "Signing in to Google", enable 2-Step Verification.
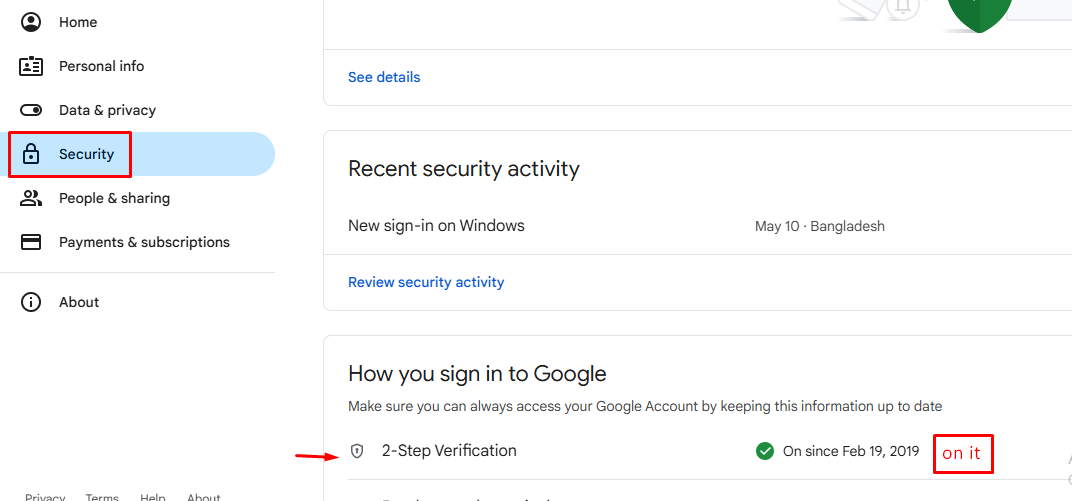
4. Complete the setup with your phone or other options.
Step 2: Create an App Password
After enabling 2-Step Verification:
1. Visit: https://myaccount.google.com/apppasswords
2. Sign in if asked.
3. Under "Select the app", choose Other (Custom name).
4. Give it a name like "SMTP App" and click Generate.
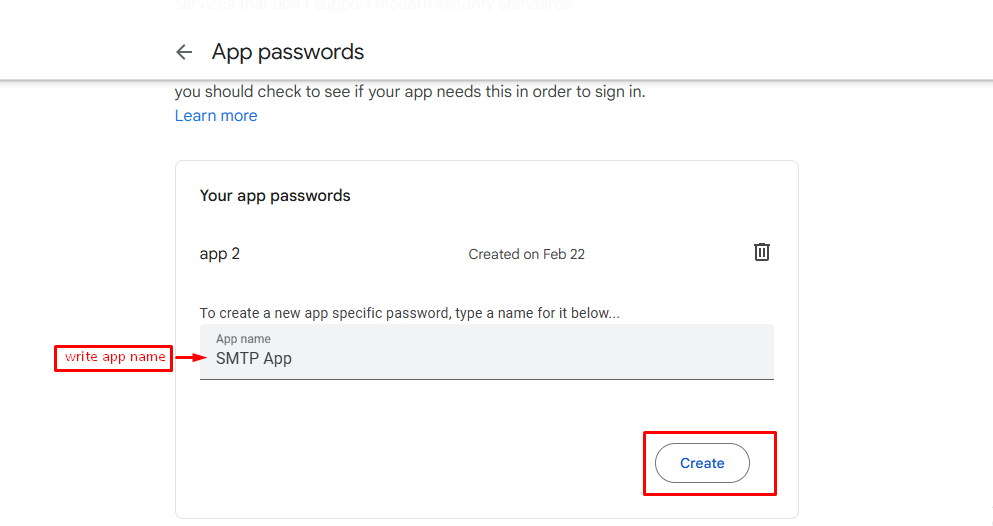
5. Google will show you a 16-character password — copy it. You’ll use this as your SMTP password
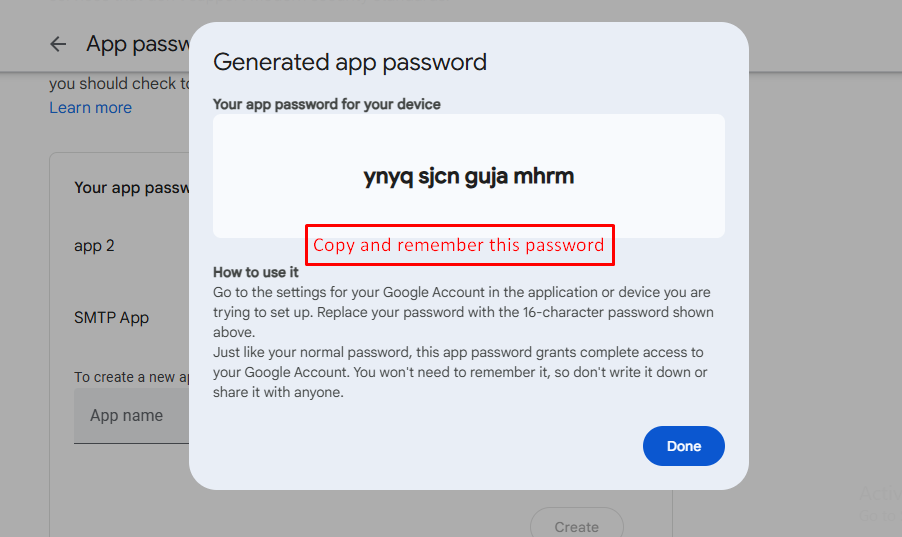
Example:
| Input | Value |
|---|---|
| QUEUE_MAIL | Select true / false, (If you select true, you need to run the following command: php artisan queue:work on server) |
| MAIL_DRIVER_TYPE | Select MAIL MAILER / MAIL DRIVER |
| MAIL_DRIVER | smtp |
| MAIL_HOST | smtp.gmail.com |
| MAIL_PORT | 587 |
| MAIL_USERNAME | your_email@gmail.com |
| MAIL_PASSWORD | your_app_password |
| MAIL_ENCRYPTION | tls |
| MAIL_FROM_ADDRESS | your_email@gmail.com |
| MAIL_FROM_NAME | Your project/app name |
Set the values to System Settings → Mail Configuration
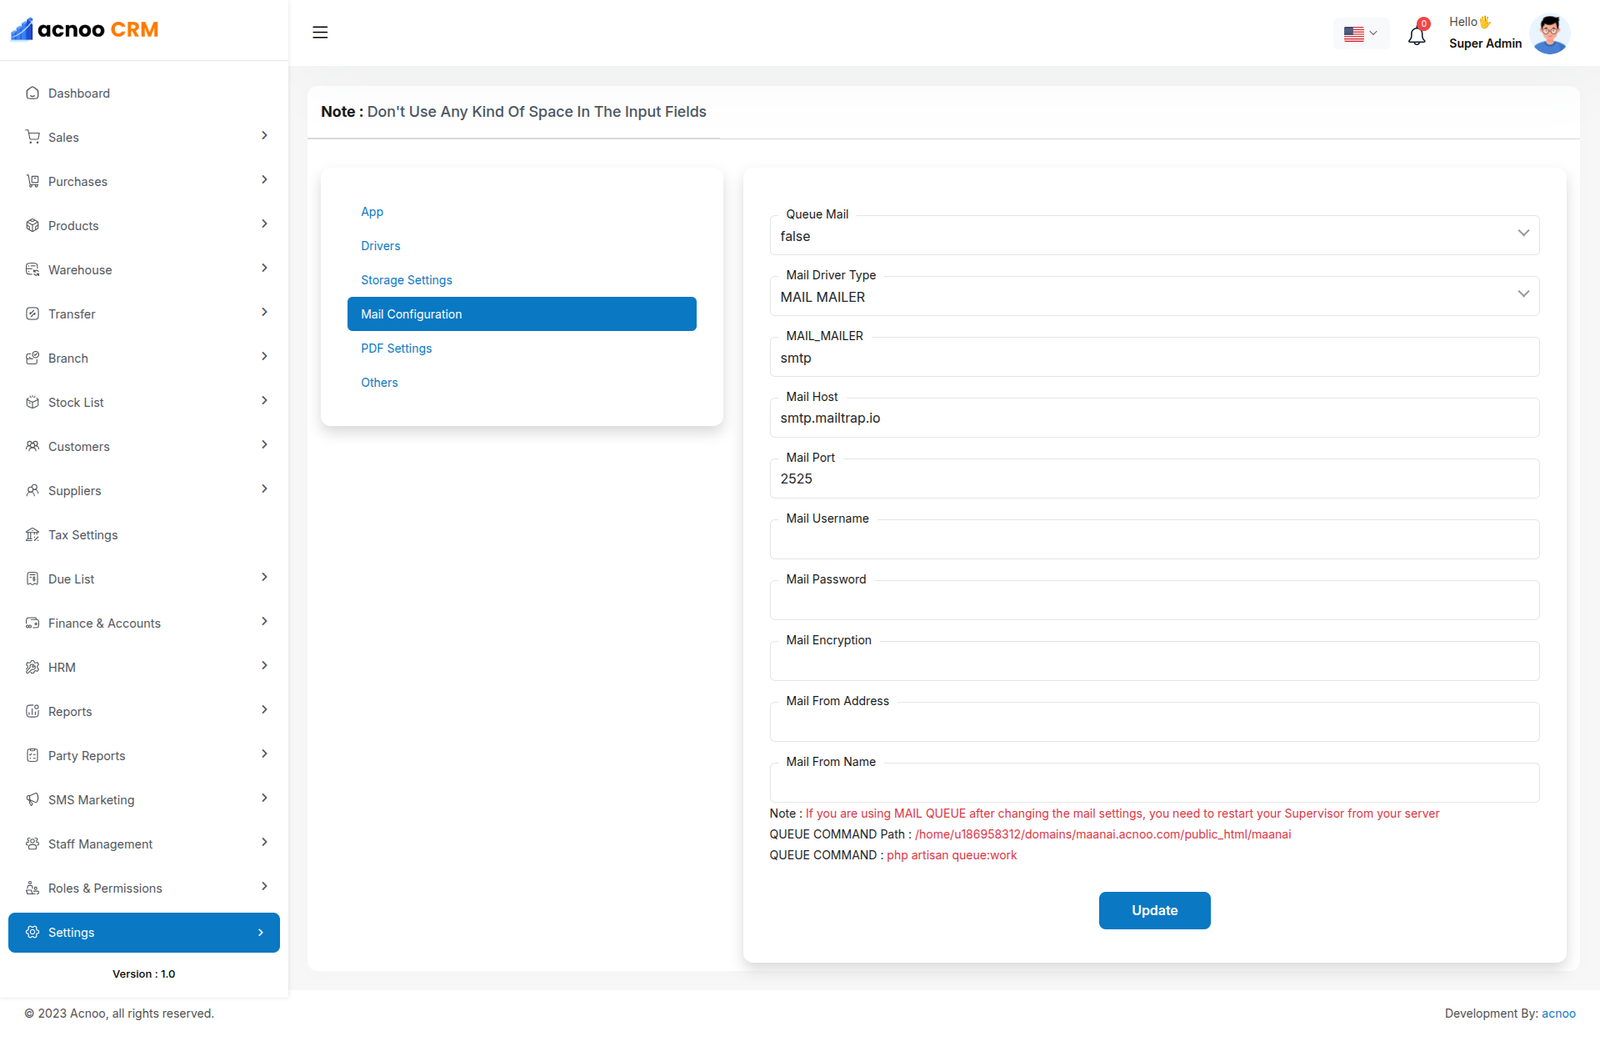
If you want to know more details please follow their, Official documentation. Here is also a youtube video link for reference.
Language Settings
Using the Language Settings feature, you can easily customize and update application translations directly from the admin panel.
For example, if you want to change the text: "Vat Groups (Combination of multiple vats)" to "Tax Groups (Combination of multiple Taxes)", follow the steps below.
Step 1: Open Language Settings
Go to the Admin Panel and navigate to the Language Settings section. Here you will see the list of available languages.
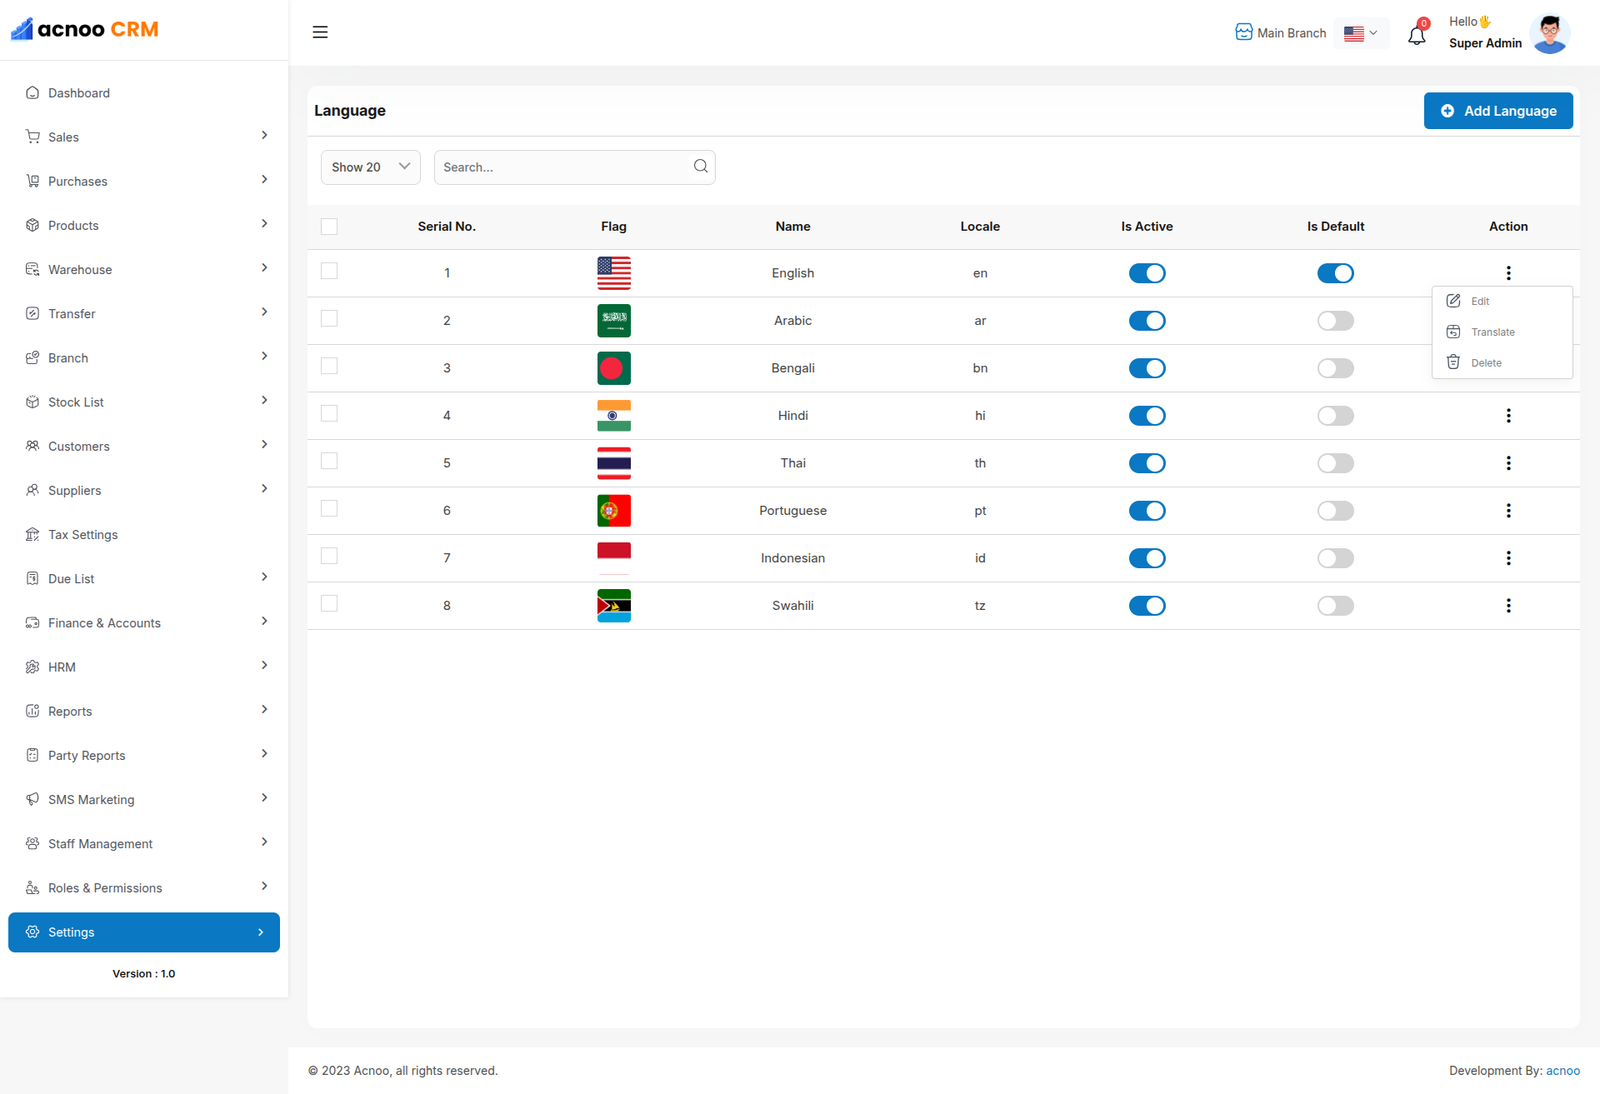
Step 2: Open Translation Page
Select your preferred language (for example: English), click on the three-dot action menu, and then click on Translate.
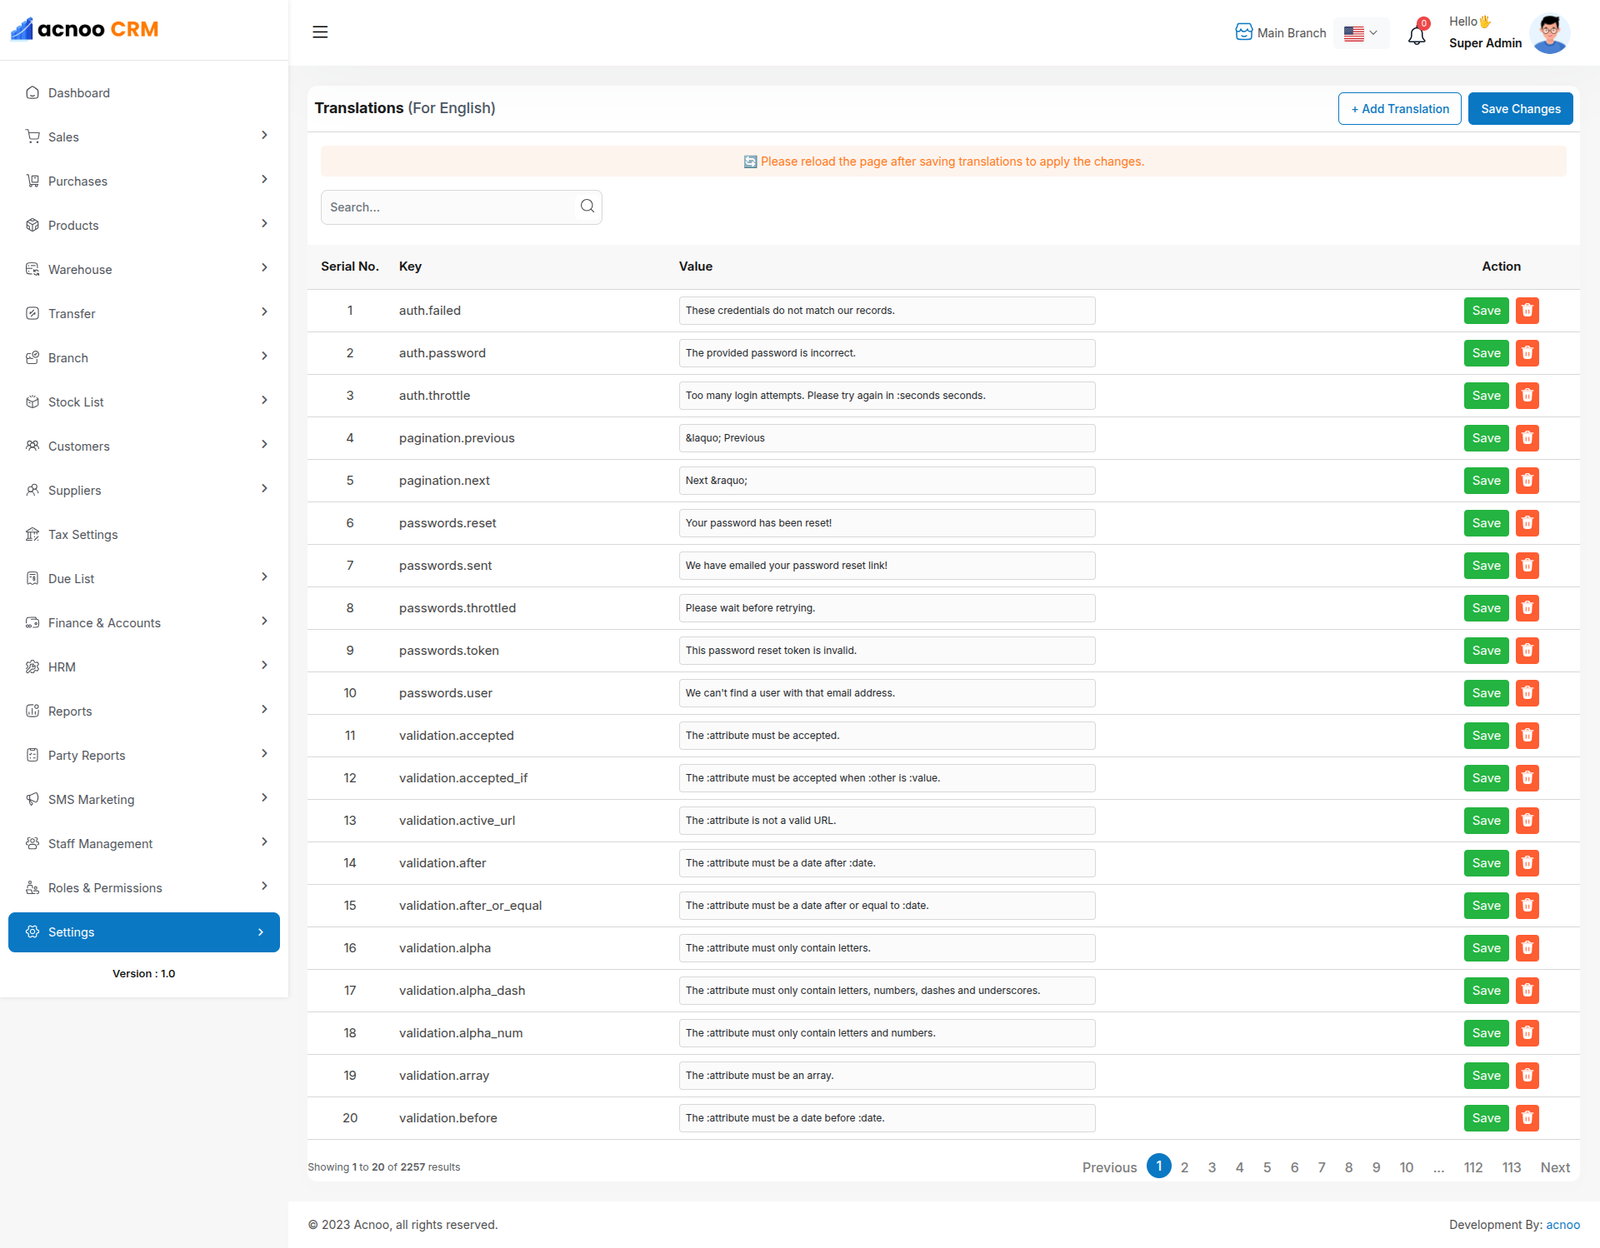
Step 3: Search and Update Translation
On the translation page, use the search box to search for: "Vat Groups (Combination of multiple vats)".
Once you find the translation key, update the value with your preferred text, such as: "Tax Groups (Combination of multiple Taxes)".
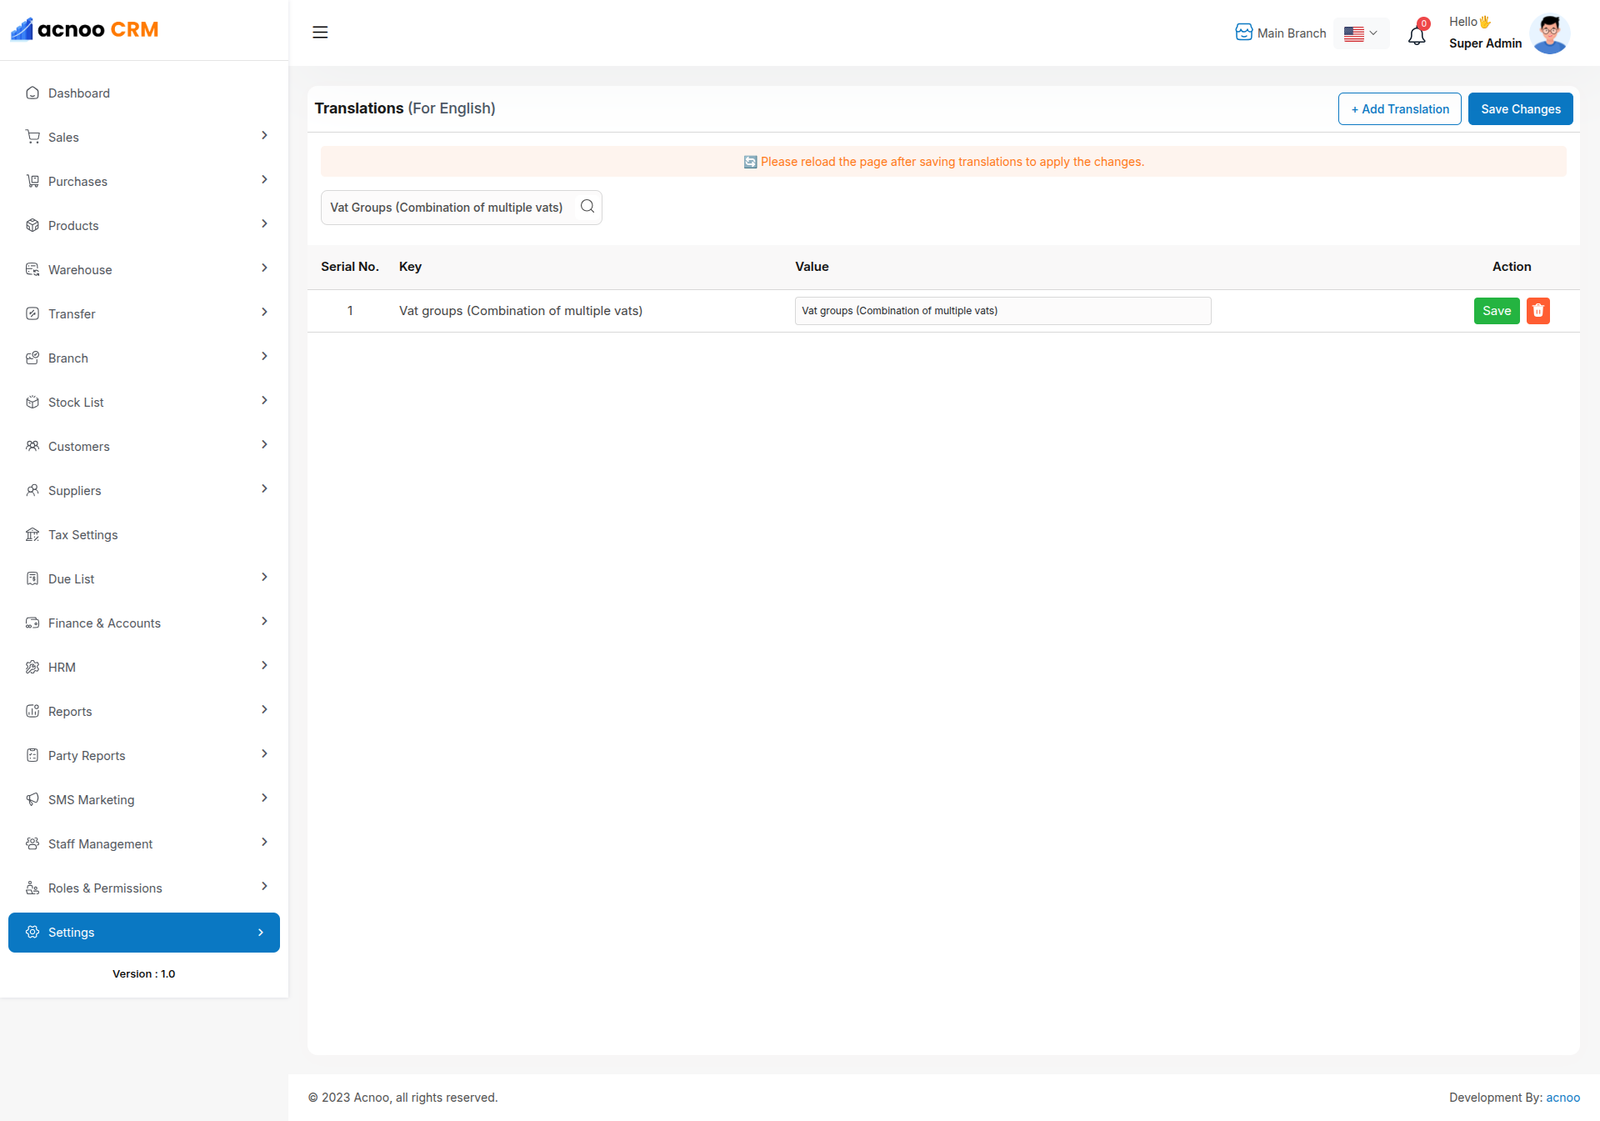
Step 4: Verify the Changes
After updating the translation, navigate to the relevant page in the application to confirm that the text has been successfully updated.
If the update is applied correctly, you will see the new translated text reflecting immediately in the interface.
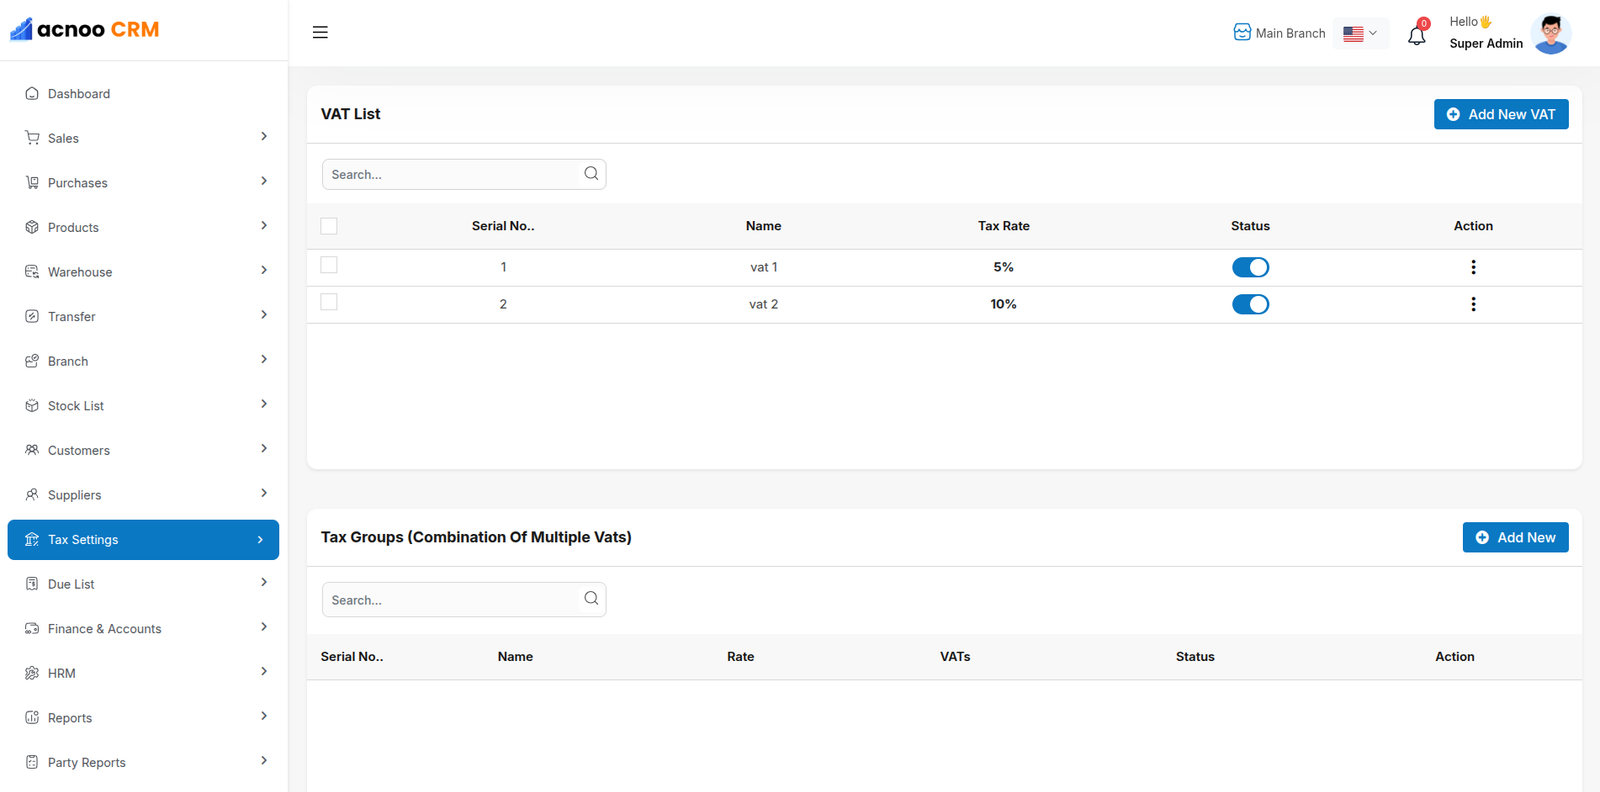
Department
The "Department List" page displays a list of all defined department,
including
their names, descriptions, and status. It provides options to manage these
department.
Use the search bar to find specific department by name or description.Click the "Add New
department" button to navigate to a page or modal where you can add a new
department.Clicking the three dots in the "Action" where you can edit,delete and view.
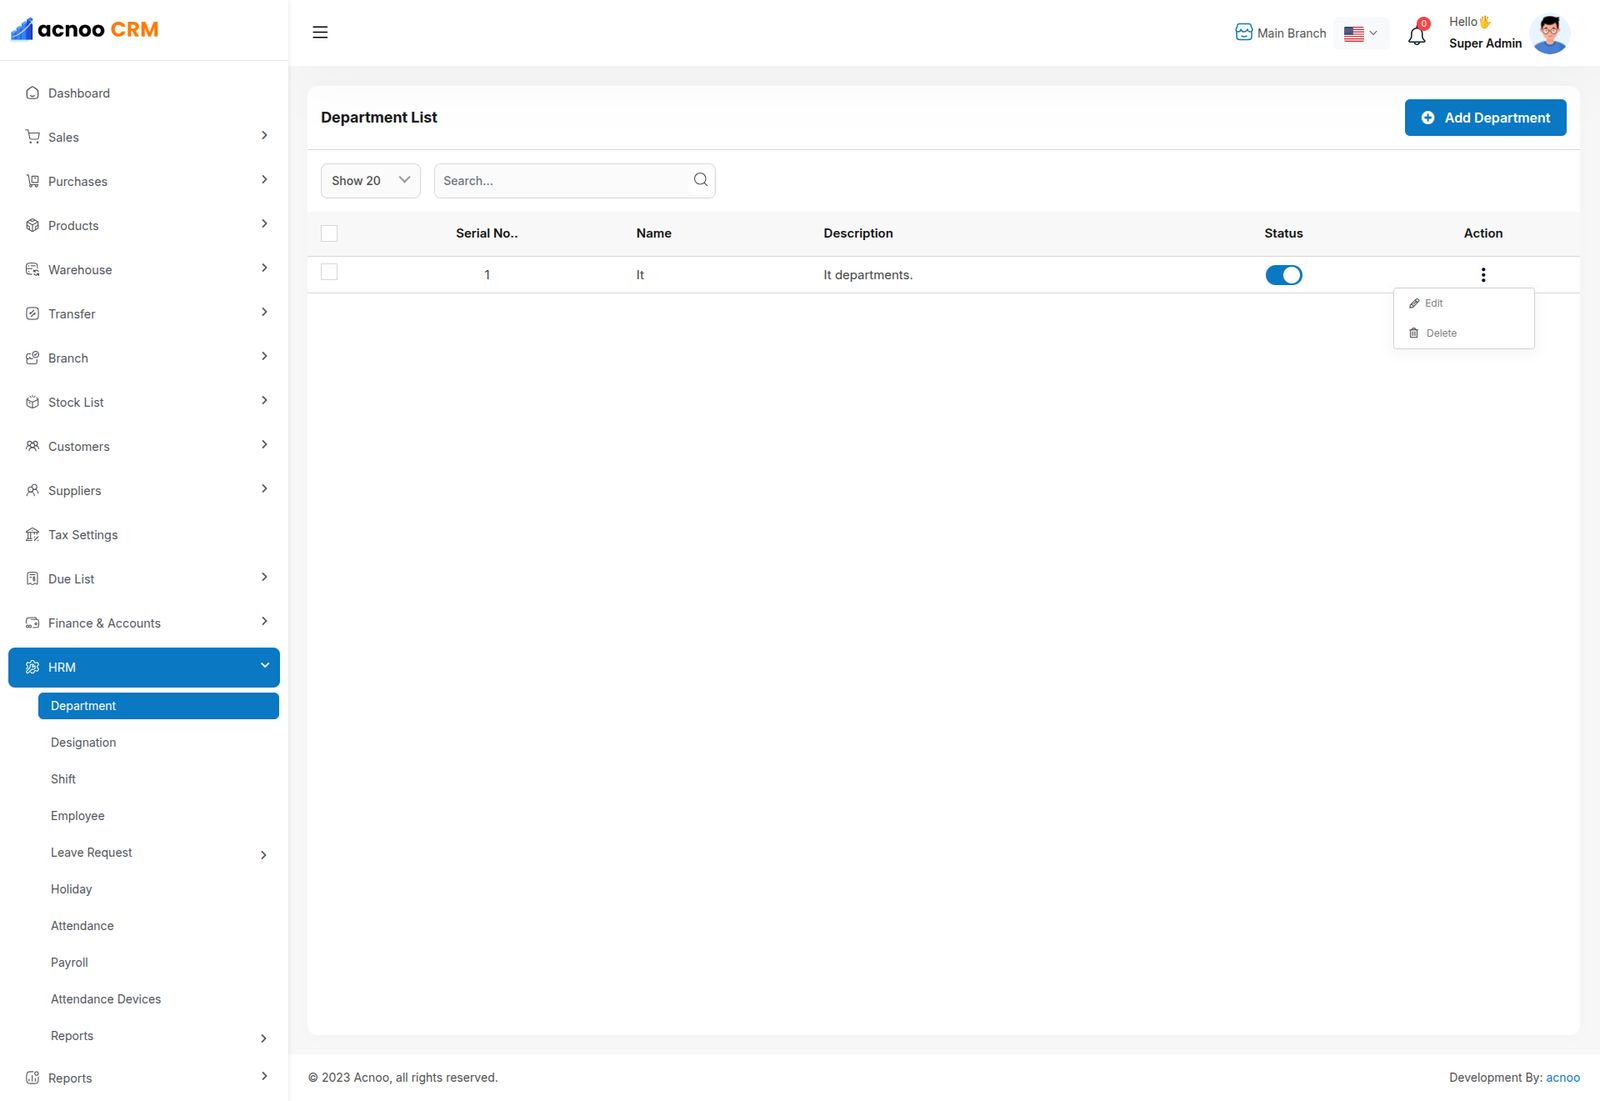
Add New Department
The "Department" form appears as a pop-up or overlay on the "Department List" page. It contains the following fields:
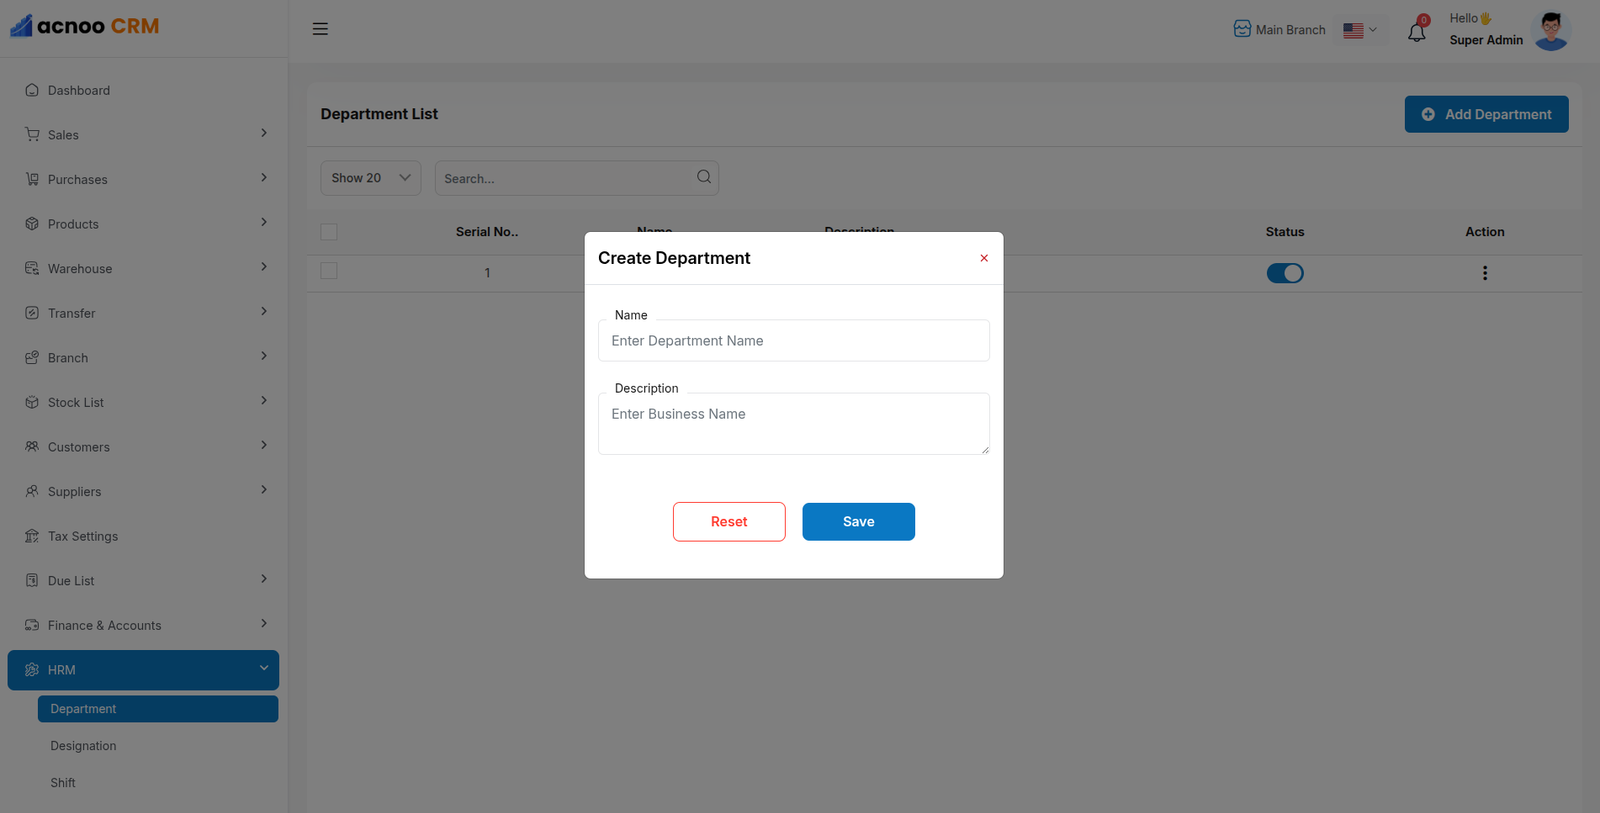
Designation
The "Designation List" page displays a list of all defined designations,
including their names, descriptions, and status. It provides options to manage these
designations.
Use the search bar to find specific designations by name or description.Click the "Add New
designation" button to navigate to a page or modal where you can add a new
designation.Clicking the three dots in the "Action" where you can edit,delete and view.
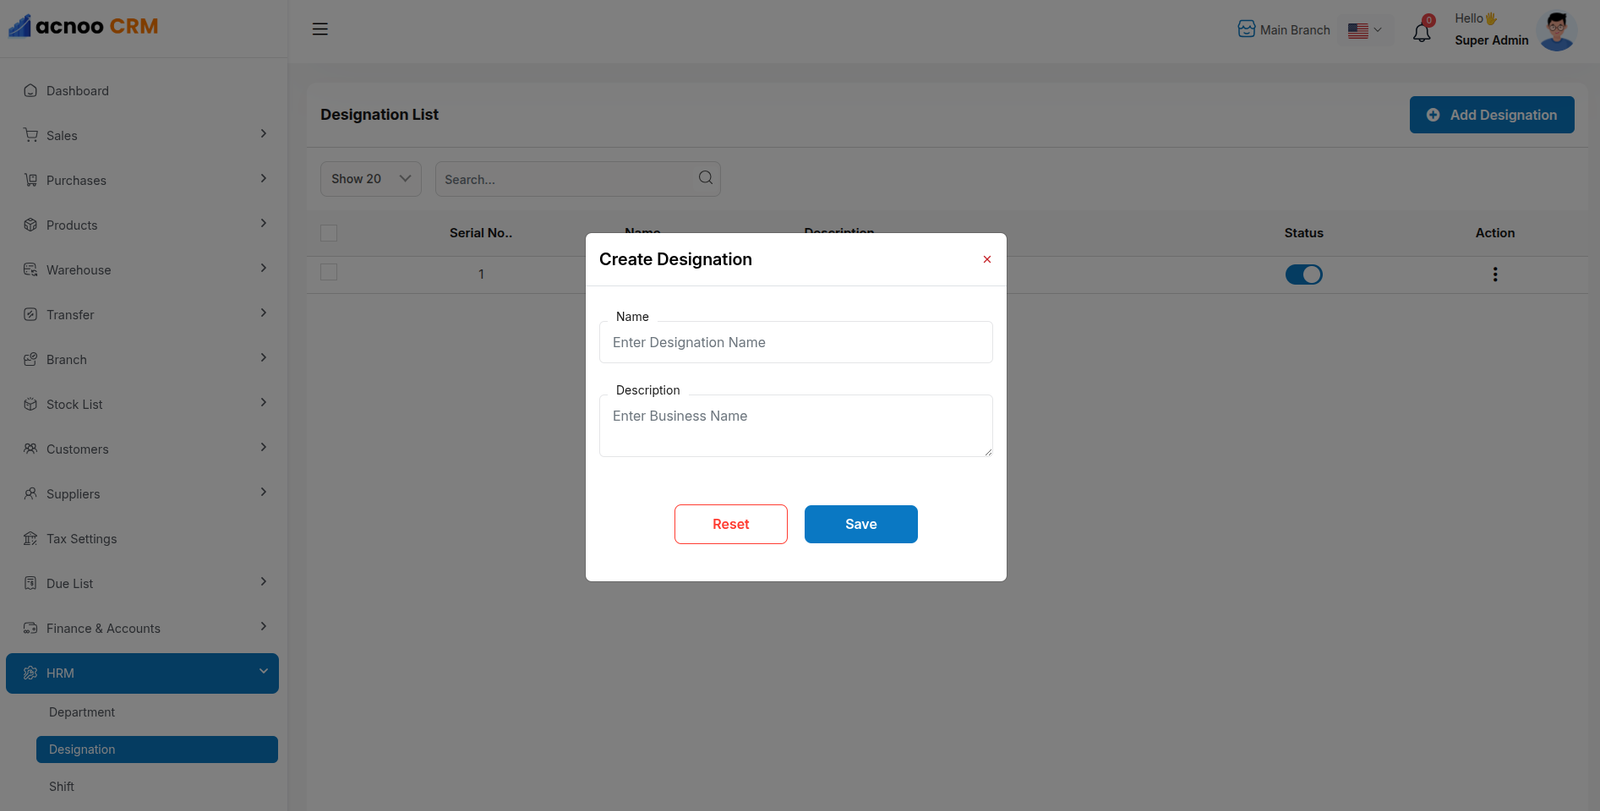
Add New Designation
The "Designation" form appears as a pop-up or overlay on the "Designation List" page. It contains the following fields:
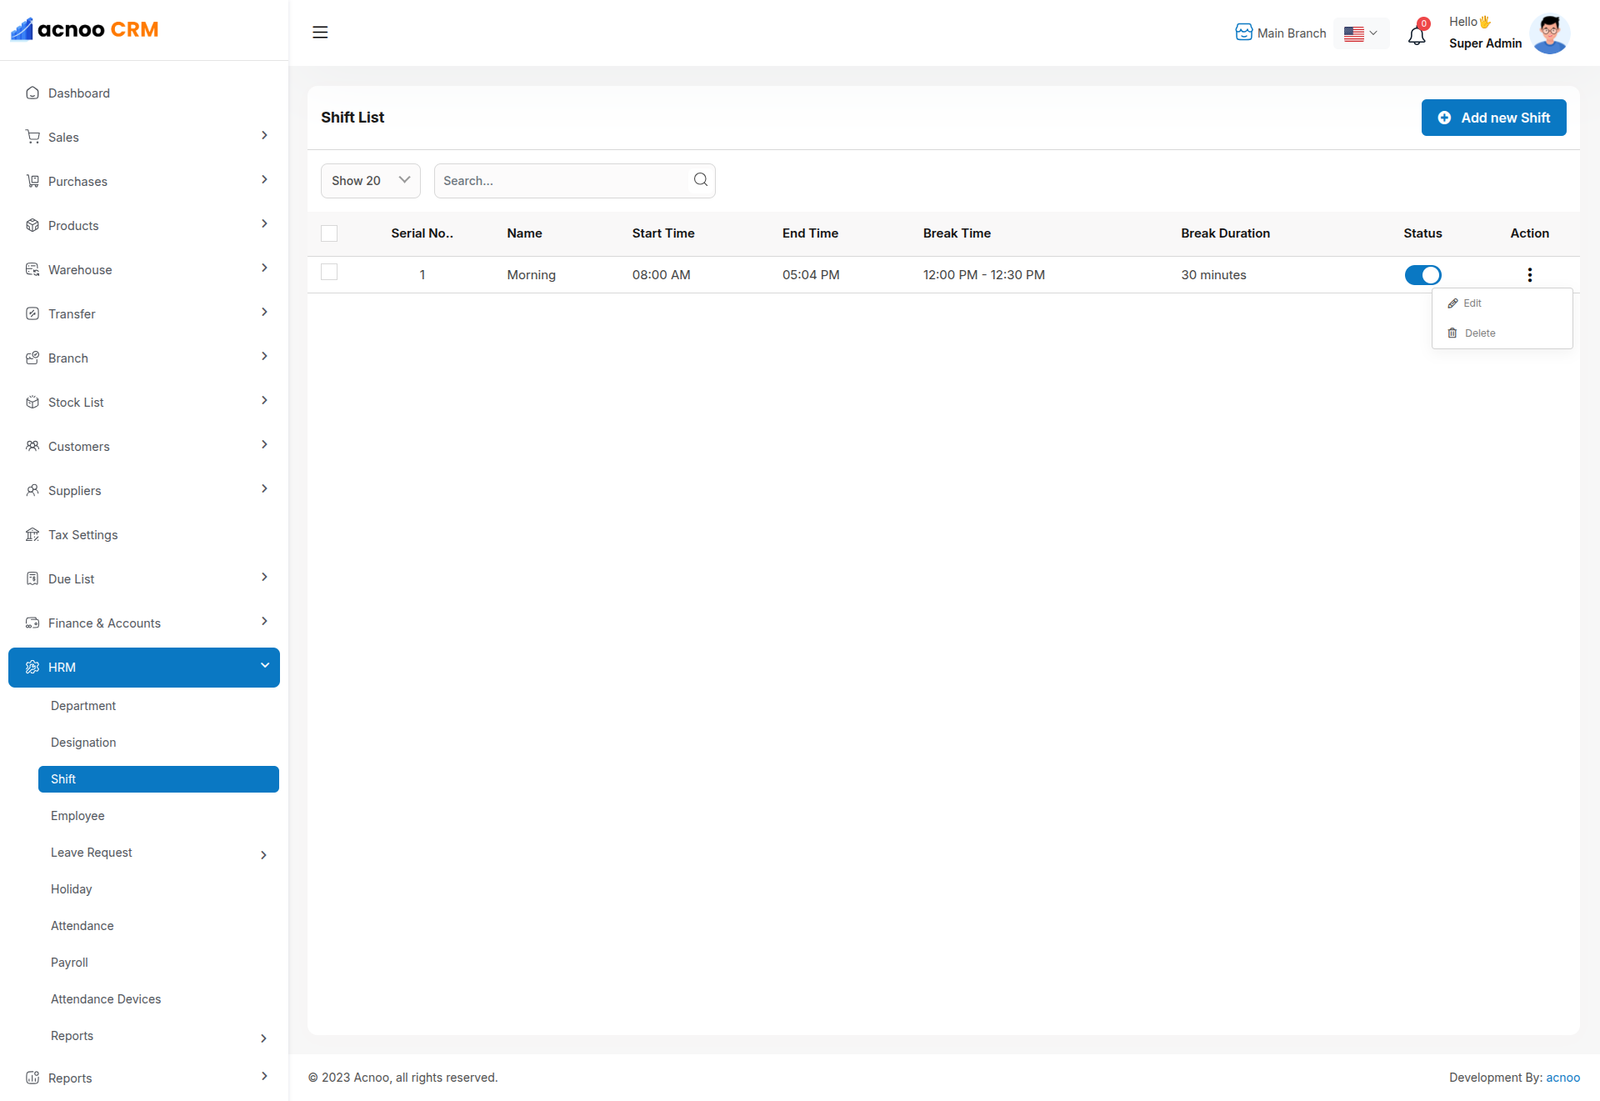
Shift List
The "Shift List" page displays a list of all defined work shifts, including their
names, start and end times, break times, and status. It provides options to manage these
shifts.
Use the search bar to find specific shifts by name.Click the "Add New Shift" button to
navigate to a page or modal where you can add a new work shift to the system.Clicking the
three dots where you can edit,delete and view for shift.
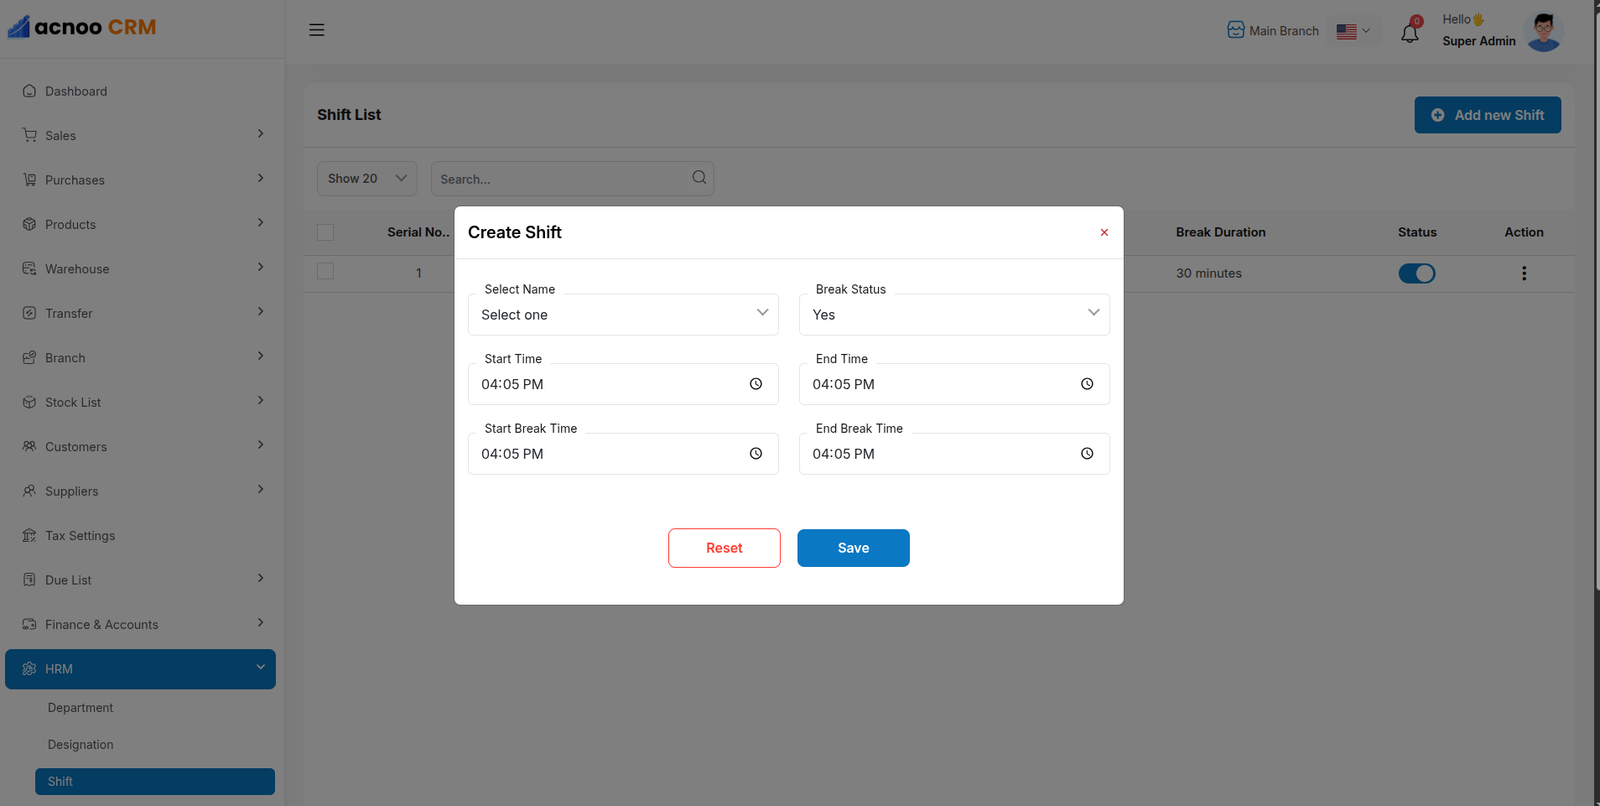
Create New Shift
The "Add New Shift" form appears as a pop-up or overlay on the "Shift List" page. It contains filled the following input fields.
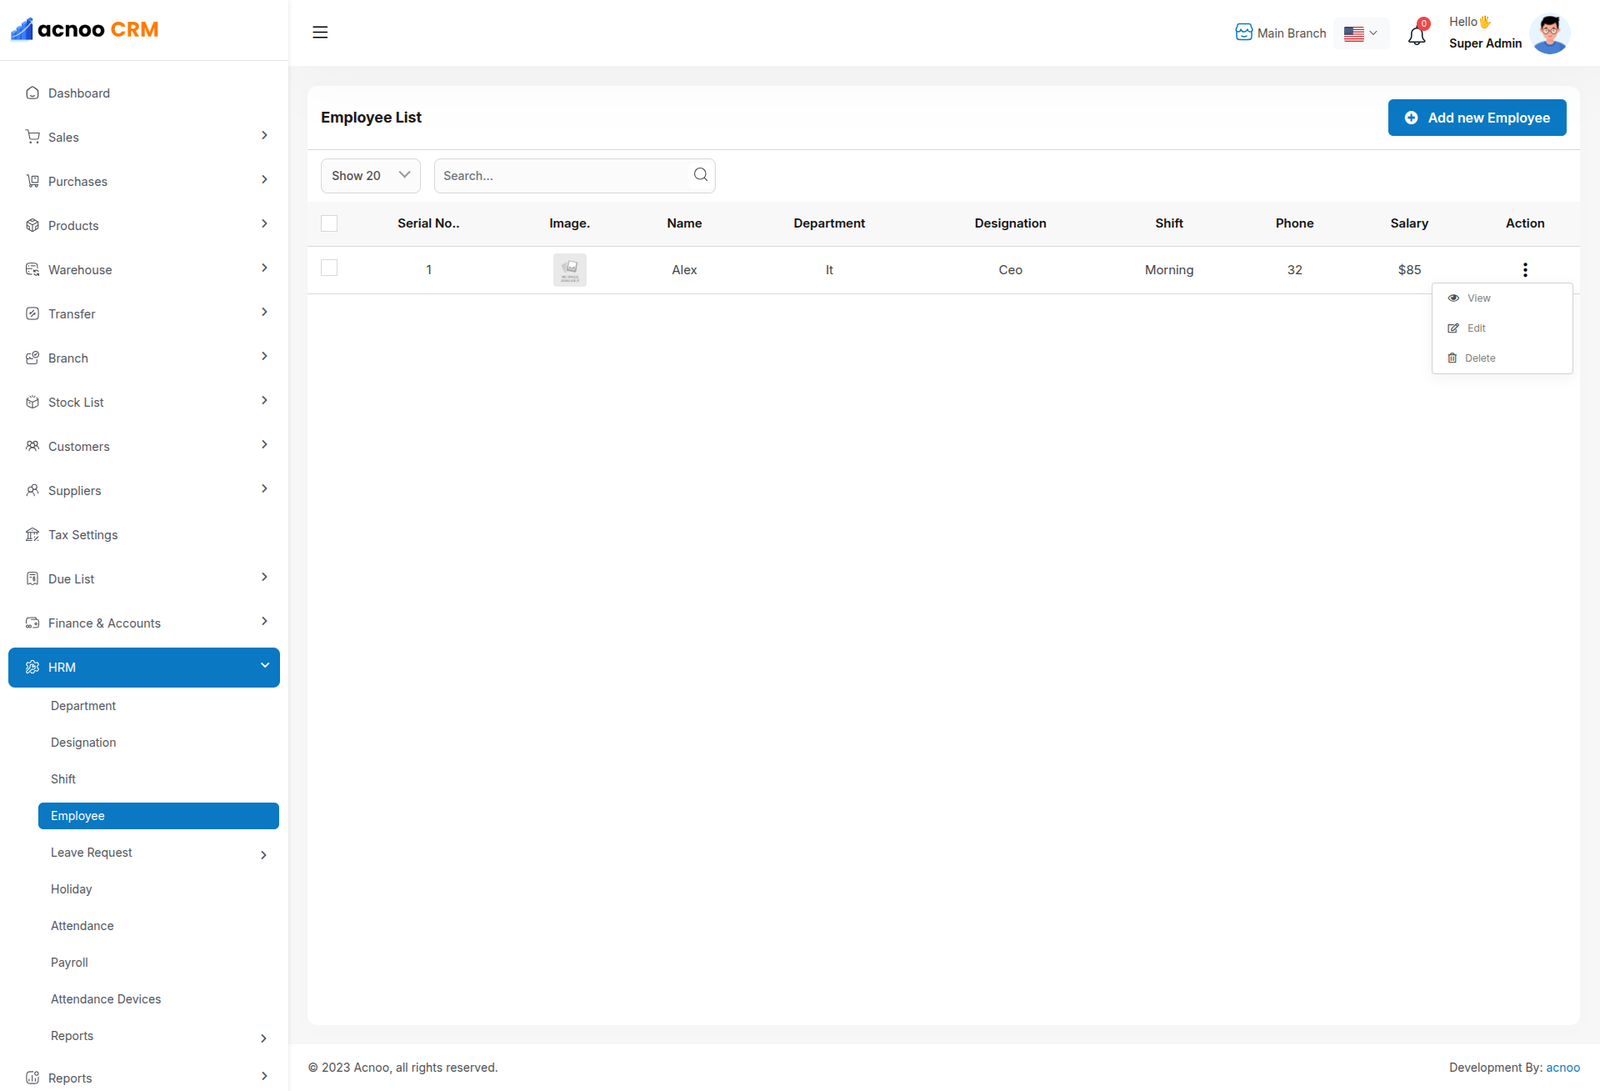
Employee
The "Employee List" page displays a list of all employees, including relevant
details such as their employee ID, name, designation, department, join date, employment
status, shift, and salary. It provides options to manage these employee records.
Use the search bar to find specific employees by name, employee ID, designation, or other
relevant criteria.Click the "Add New Employee" button to navigate to a page or modal where
you can add a new employee record.Clicking the three dots in the "Action" where you can
perform edit,delete and view.
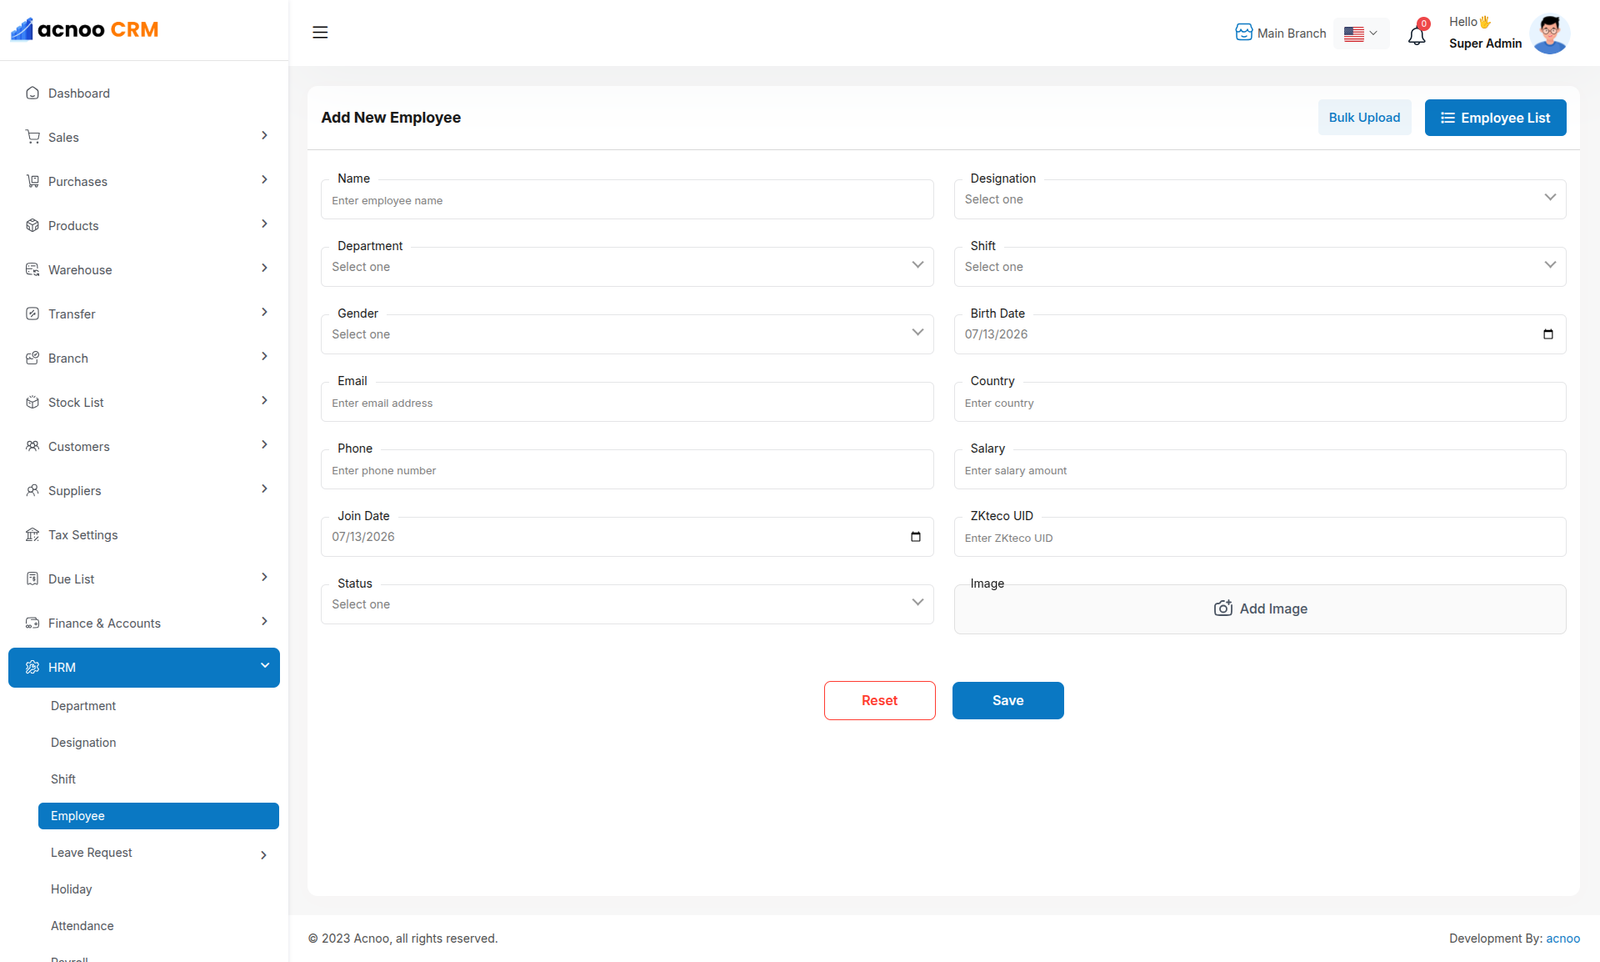
Add New Employee
Here you can create a Employee by filling the following form.
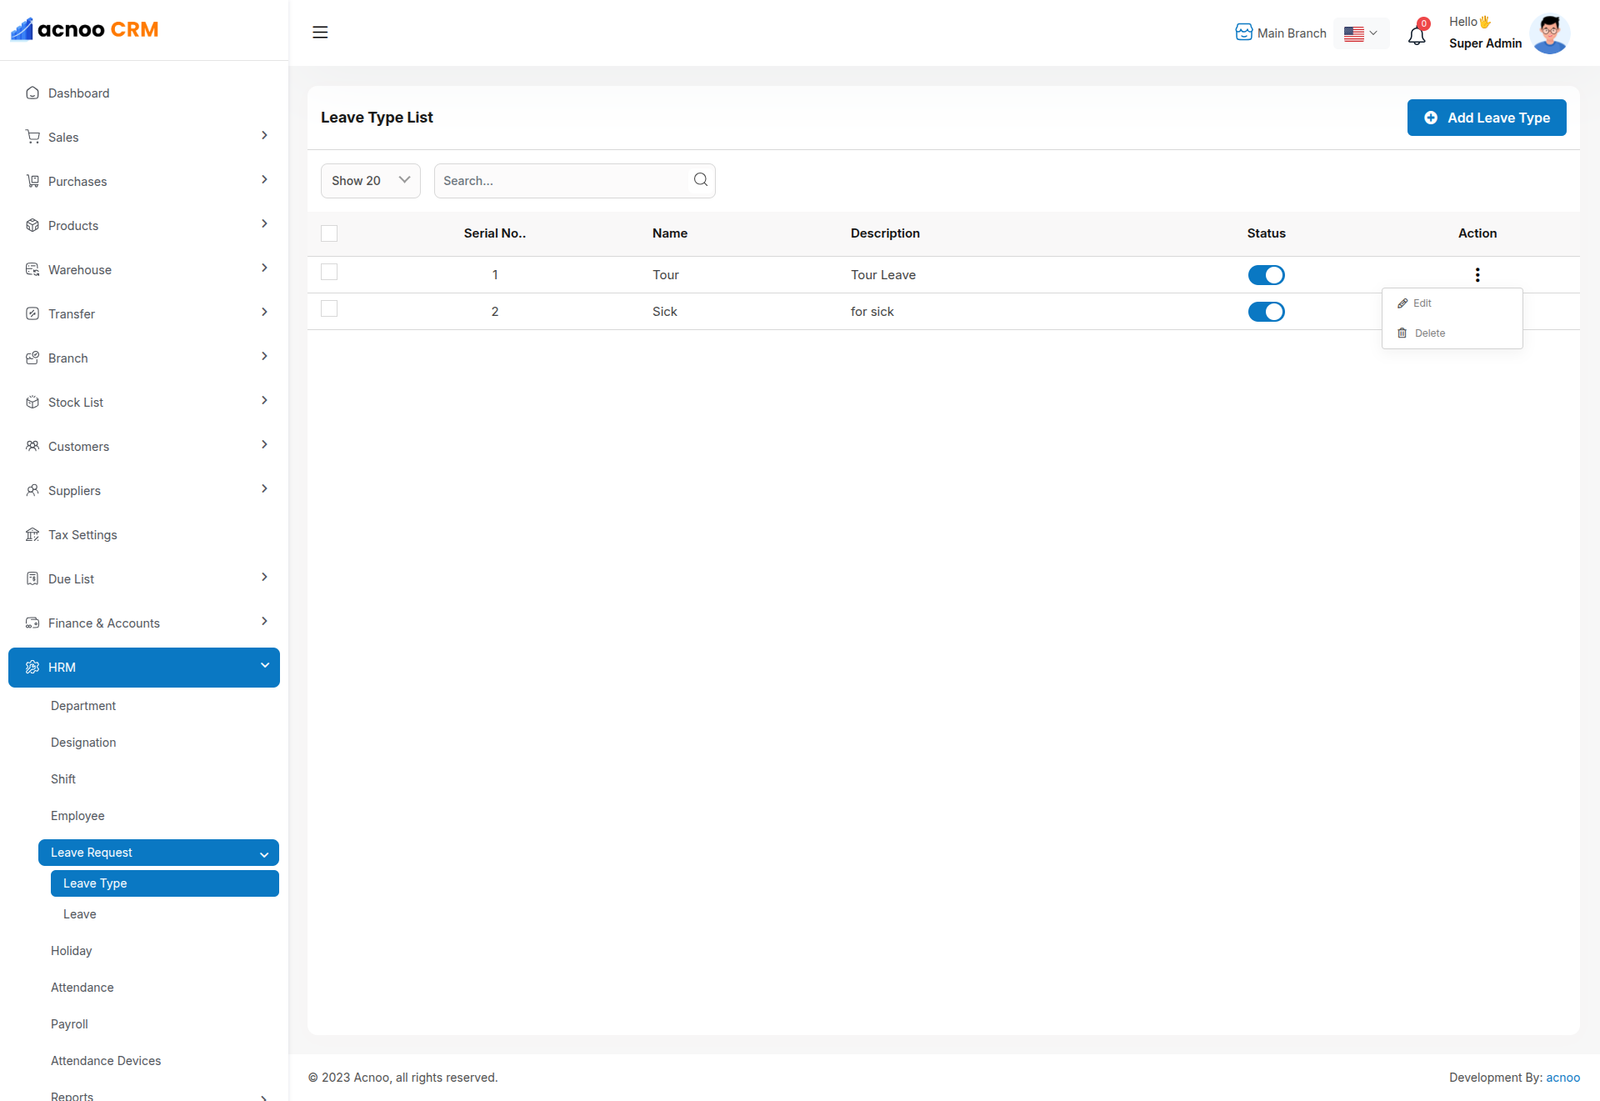
Leave Type List
The "Leave Type List" page displays a list of all defined leave types, including
their names, descriptions, and status. It provides options to manage these leave types.
Use the search bar to find specific leave types by name or description.Click the "Add New
Leave Type" button to navigate to a page or modal where you can add a new leave
type.Clicking the three dots where you can edit,delete and view for leave type.
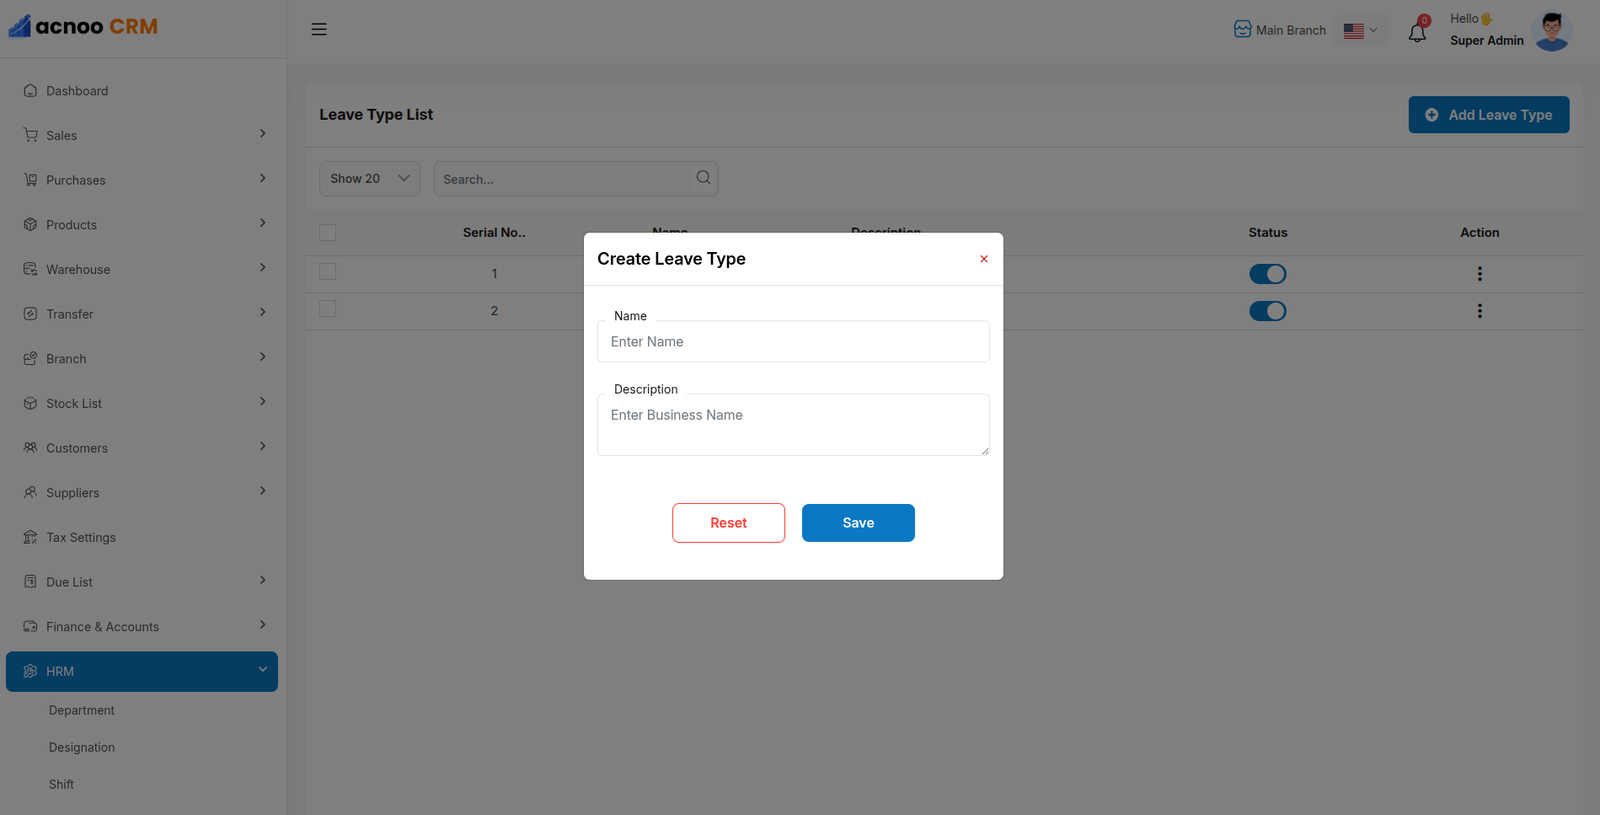
Create New leave type
The "Add New leave type" form appears as a pop-up or overlay on the "Leave Type List" page. It contains filled the following input fields.
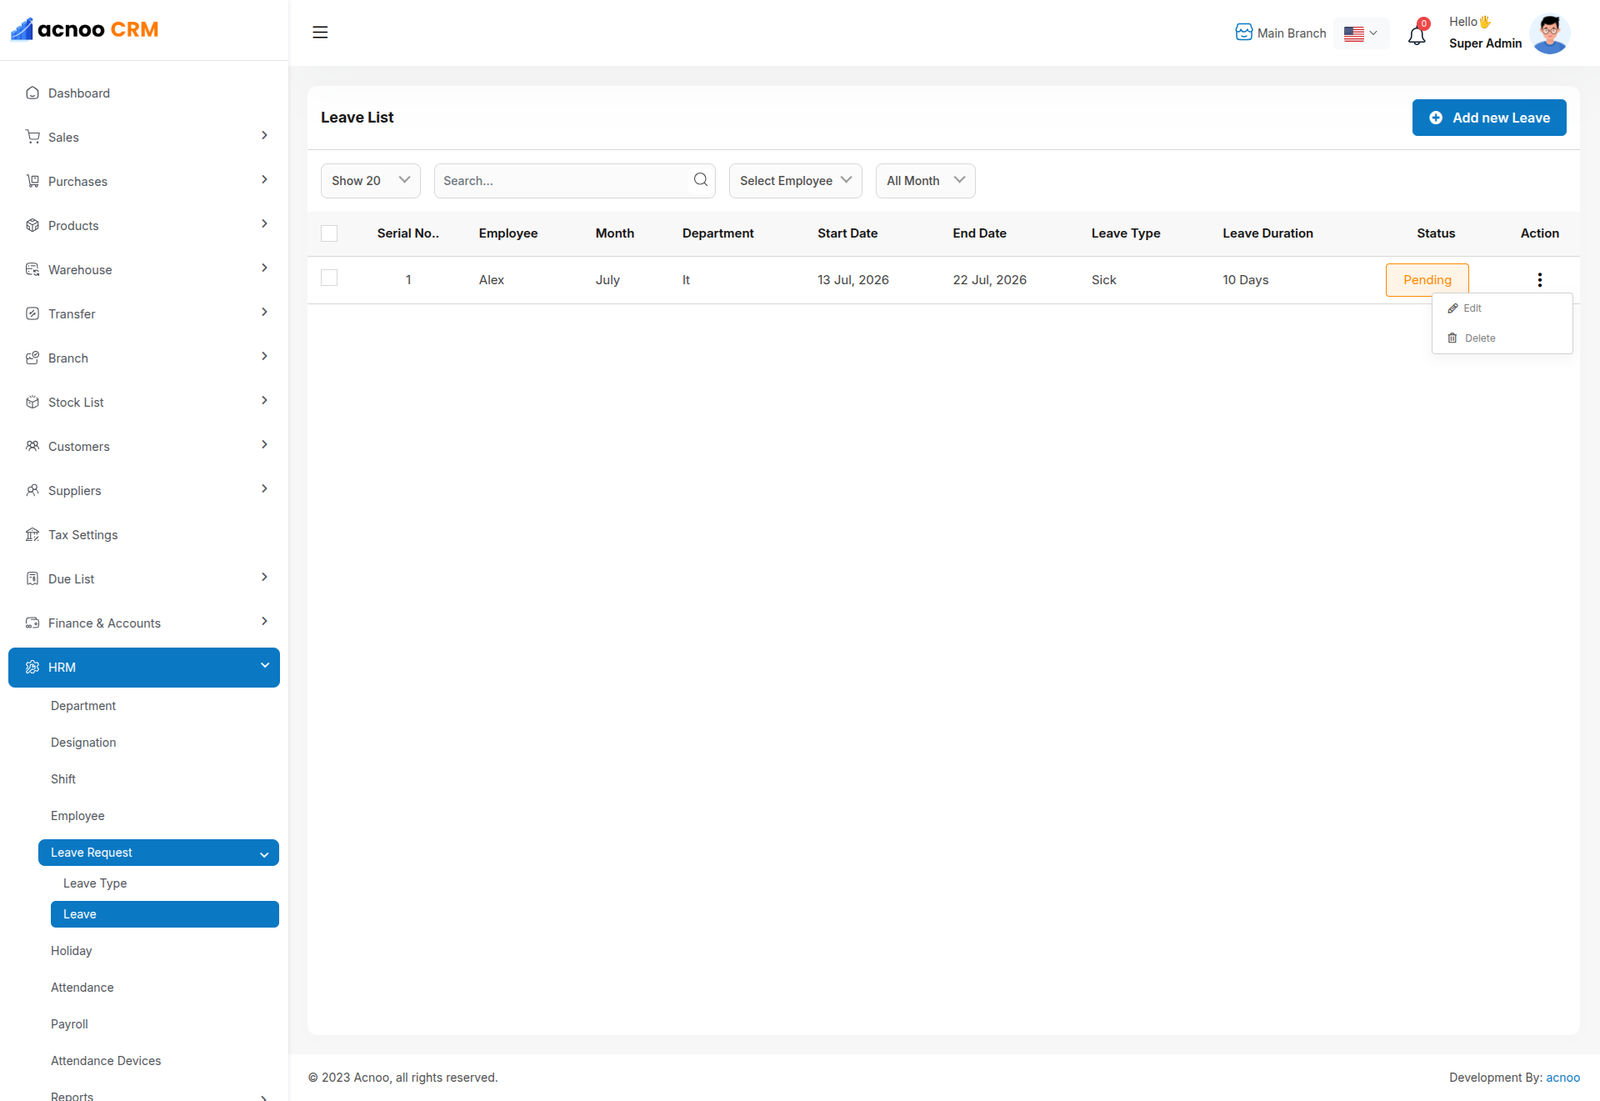
Leaves
The "Leave Employee List" page displays a list of all employee leave requests,
including relevant details such as the employee ID, name, leave type, start and end dates,
leave duration, approval status, and approver. It provides options to manage these leave
requests.
Use the search bar to find specific leave requests by employee ID, name, leave type, or
other relevant criteria.Click the "Add Now Leave" button to navigate to a page where you can
add a new leave request.Clicking the three dots in the "Action" where you can edit,delete
and view.
Status: The current status of the leave request (e.g., Pending, Approved,
Rejected).Where you can update the status.
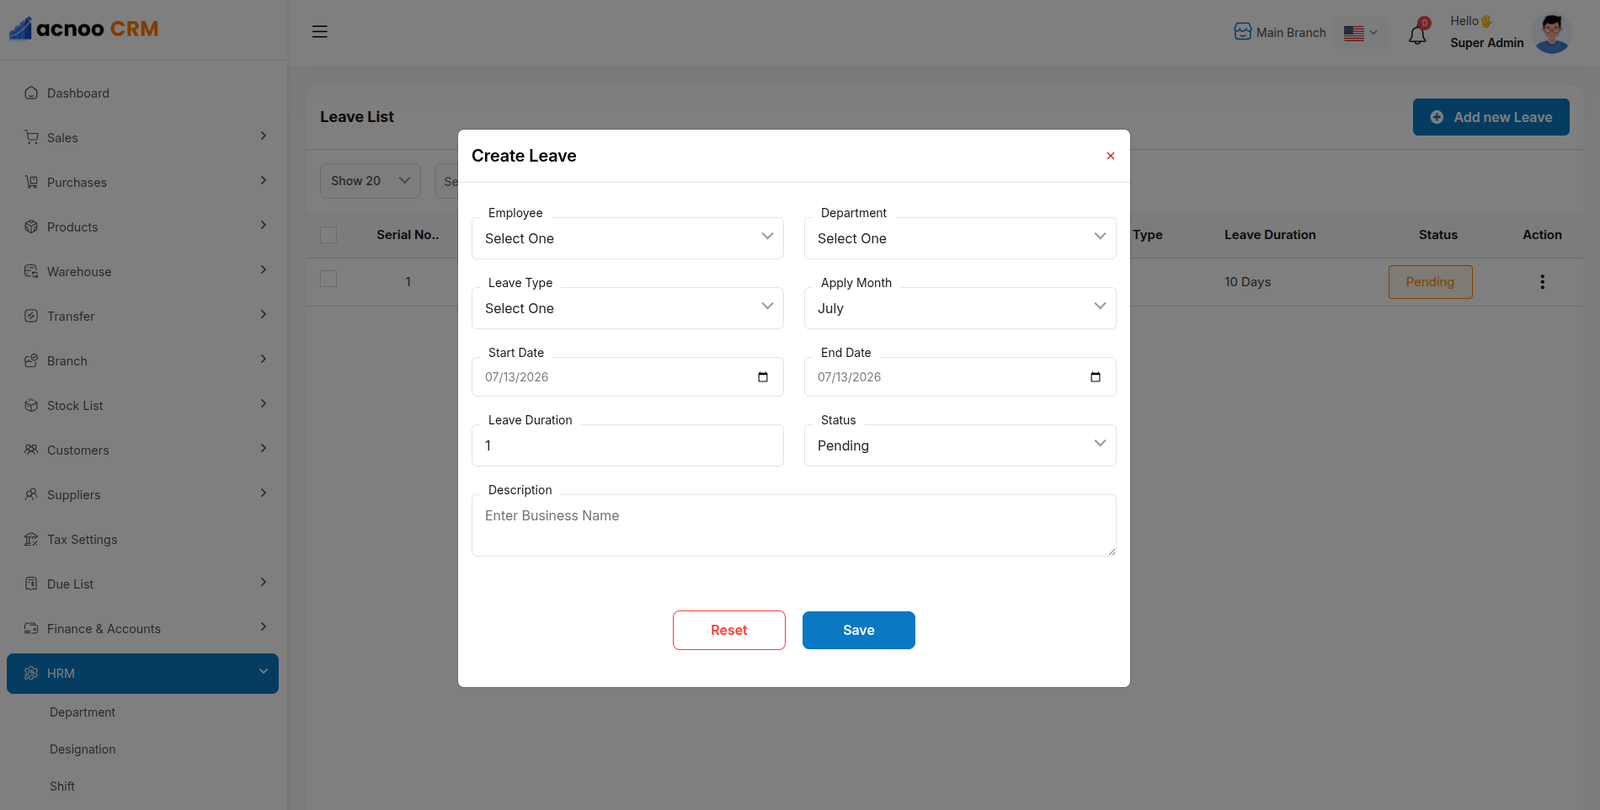
Add New Leave
The "Add New Leave" form appears as a pop-up or overlay on the "Leave Employee List" page. It contains the following fields:
Holiday List
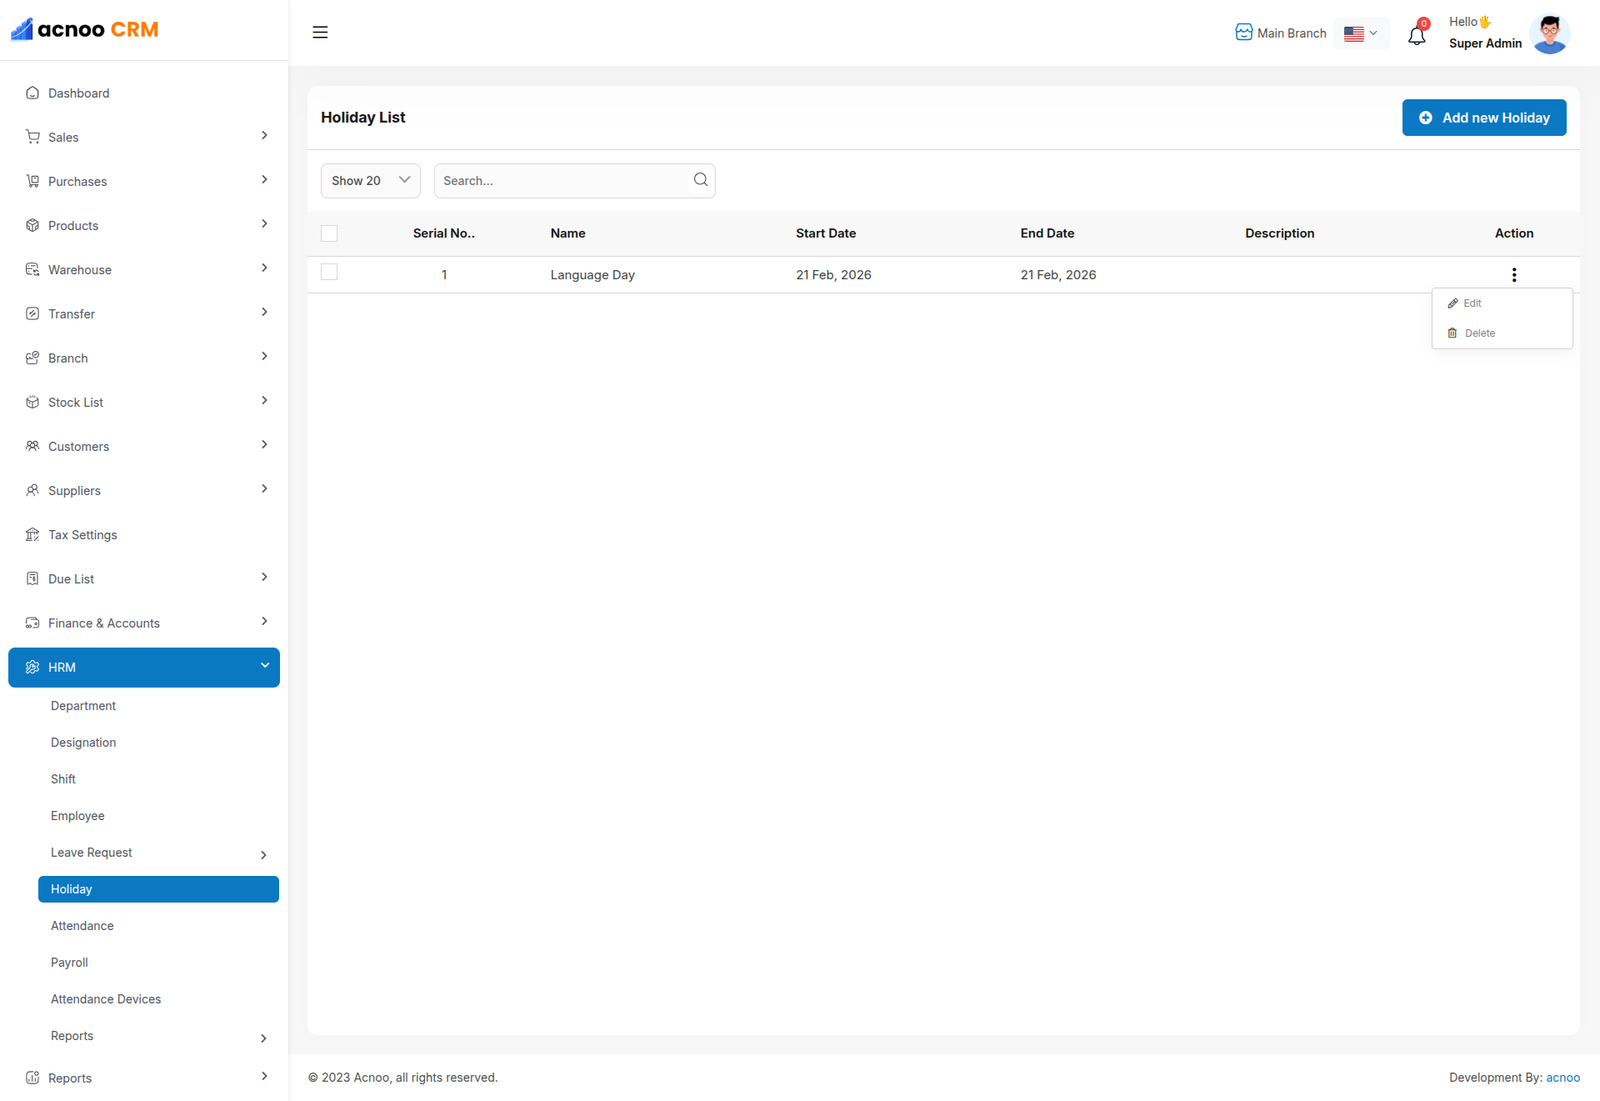
The "Holiday List" page displays a list of defined holidays with their dates, names, and descriptions. It provides options to manage these holidays.Click the "Add New Holiday" button to navigate to a modal where you can add a new holiday to the system.Clicking the three dots in the "Action" where you can edit,delete and view for holiday.
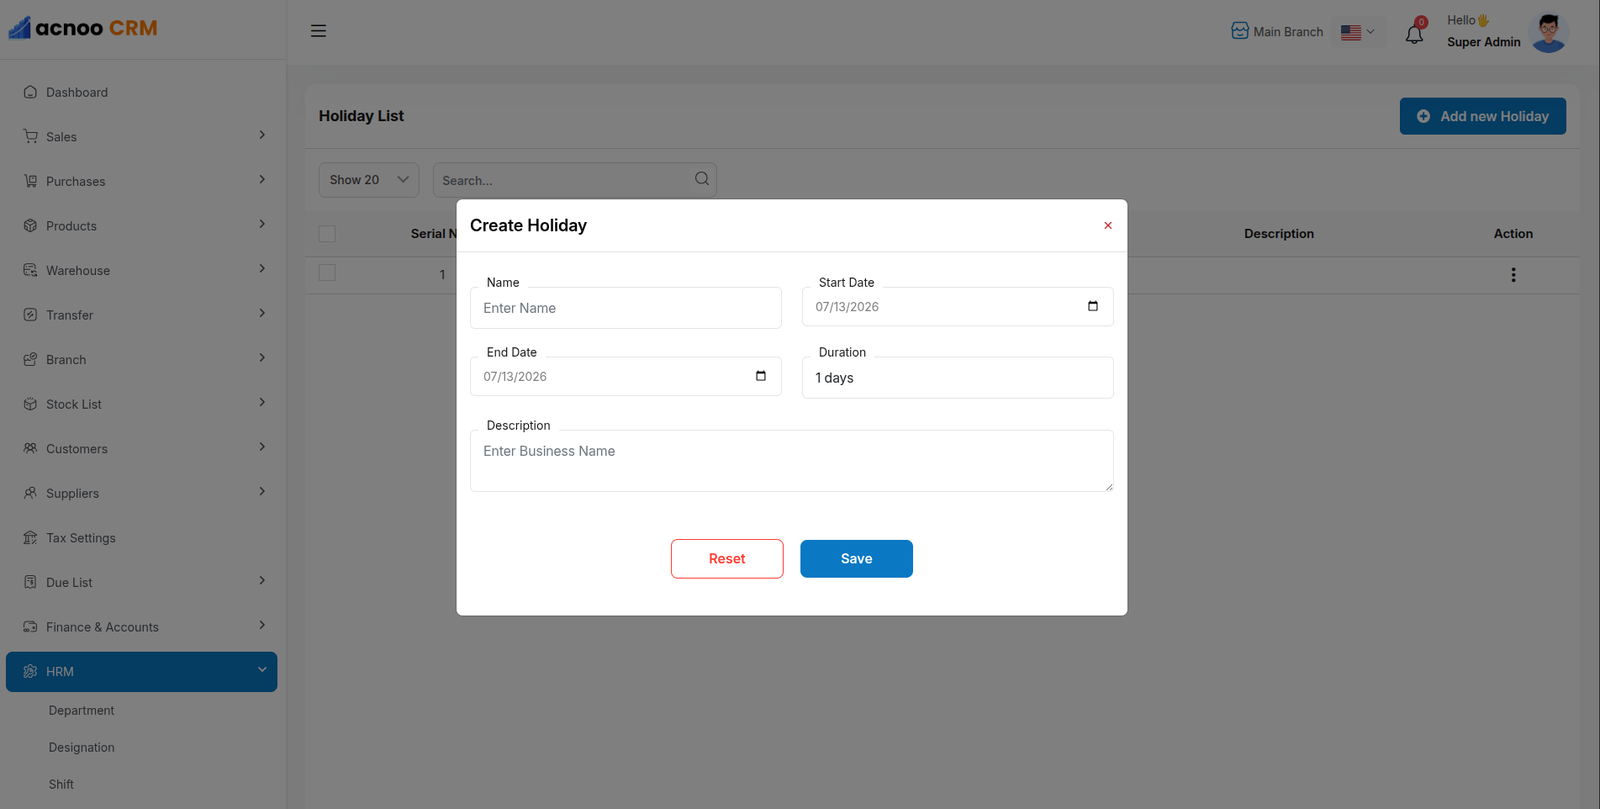
Create New Holiday
The "Add New Holidays" form appears as a pop-up or overlay on the "Holiday List" page. It contains filled the following input fields.
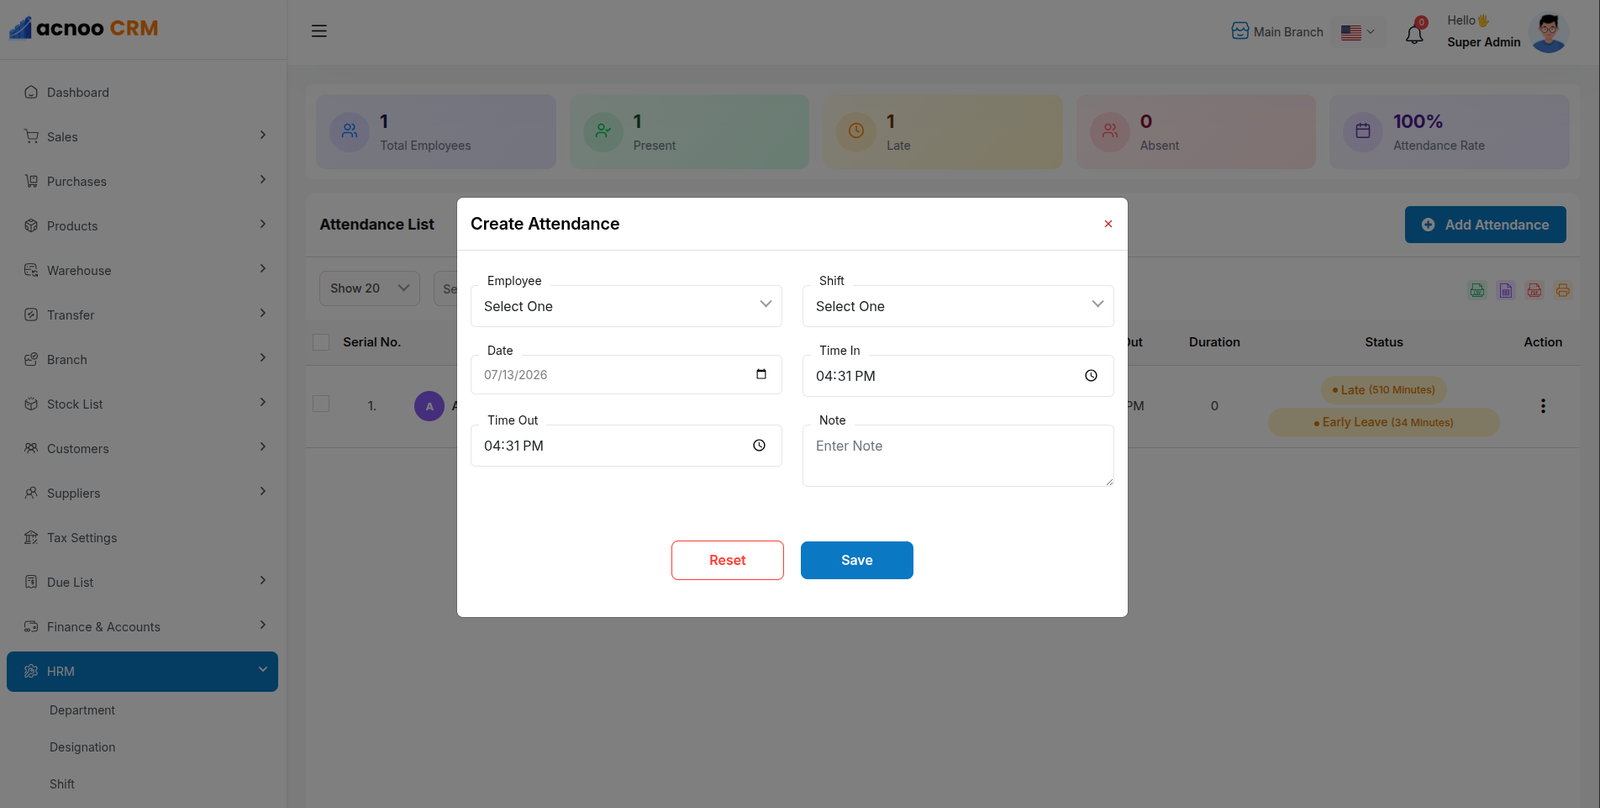
Attendance List
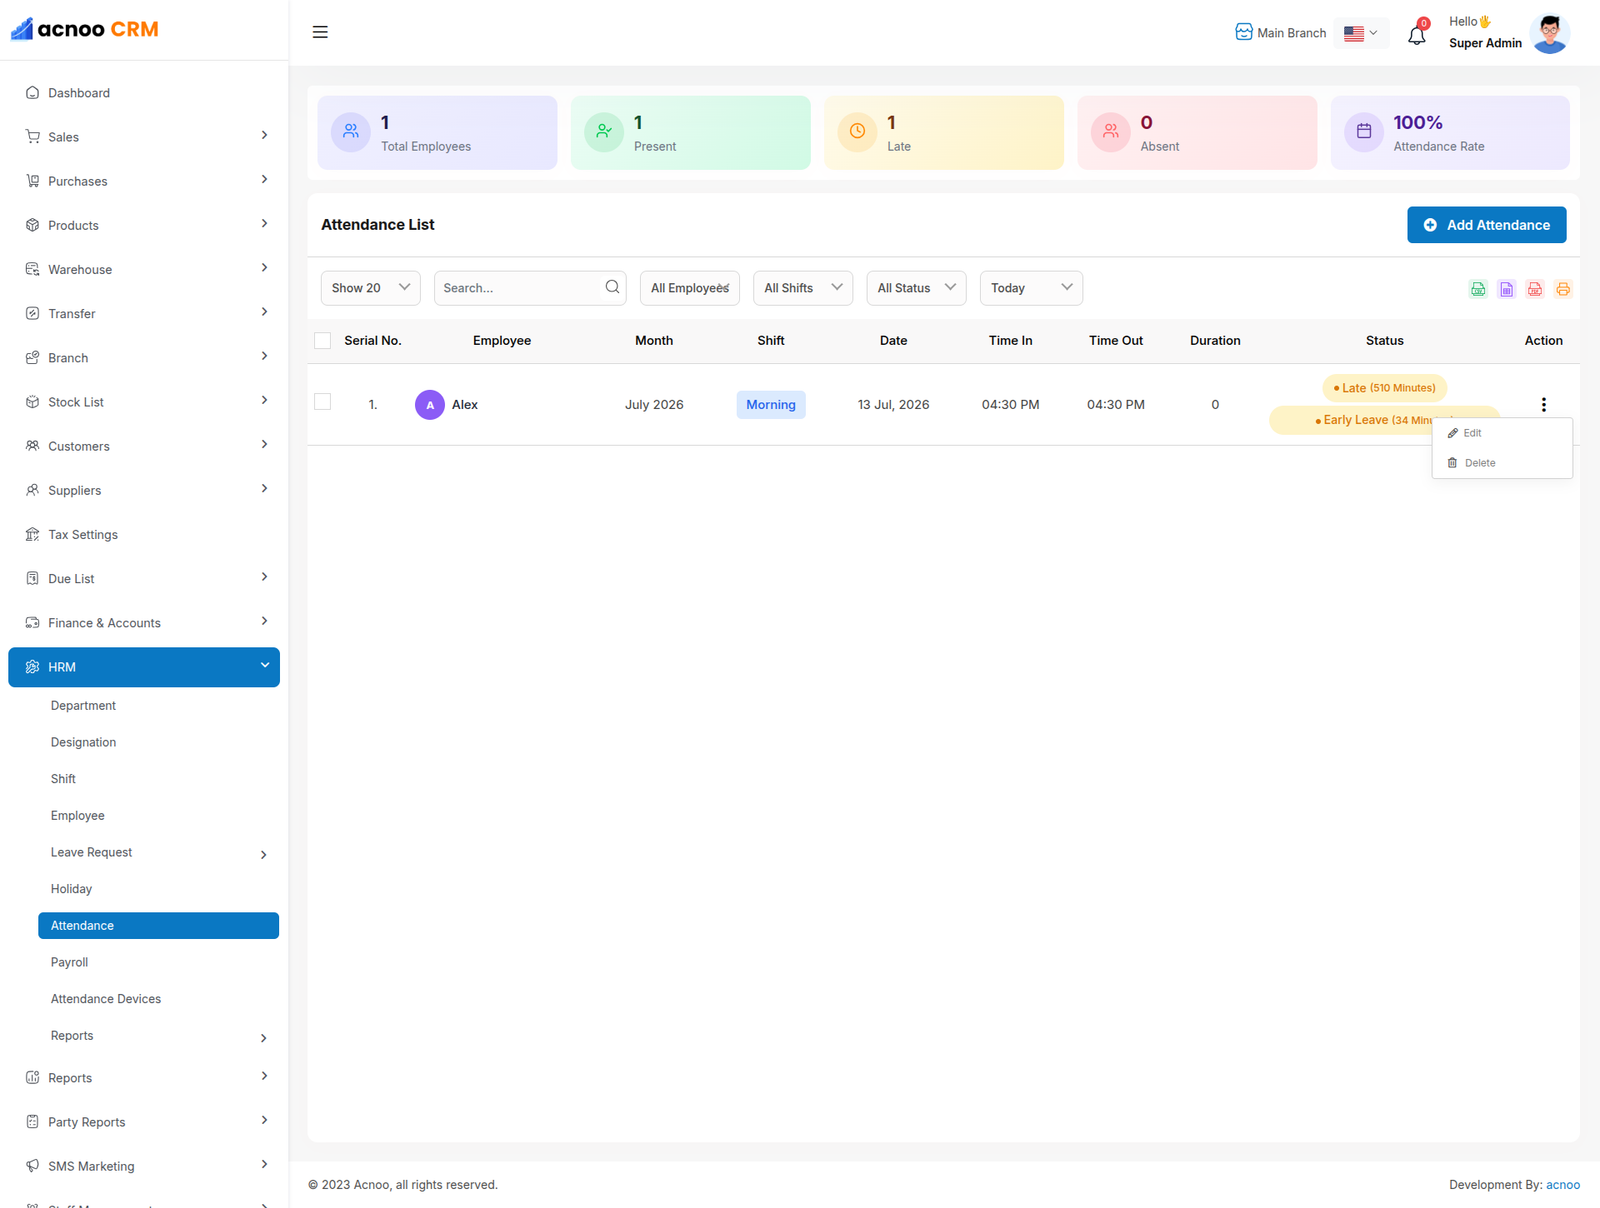
The image displays an attendance records of employees. The system appears to track employee attendance with timestamps and duration calculations.Click the "Add New Attendance" button to navigate to a modal where you can add a new Attendance to the system.Clicking the three dots in the "Action" where you can edit,delete and view for Attendance.
Create New Attendance
The "Add New Attendance" form appears as a pop-up or overlay on the "Attendance List" page. It contains filled the following input fields.
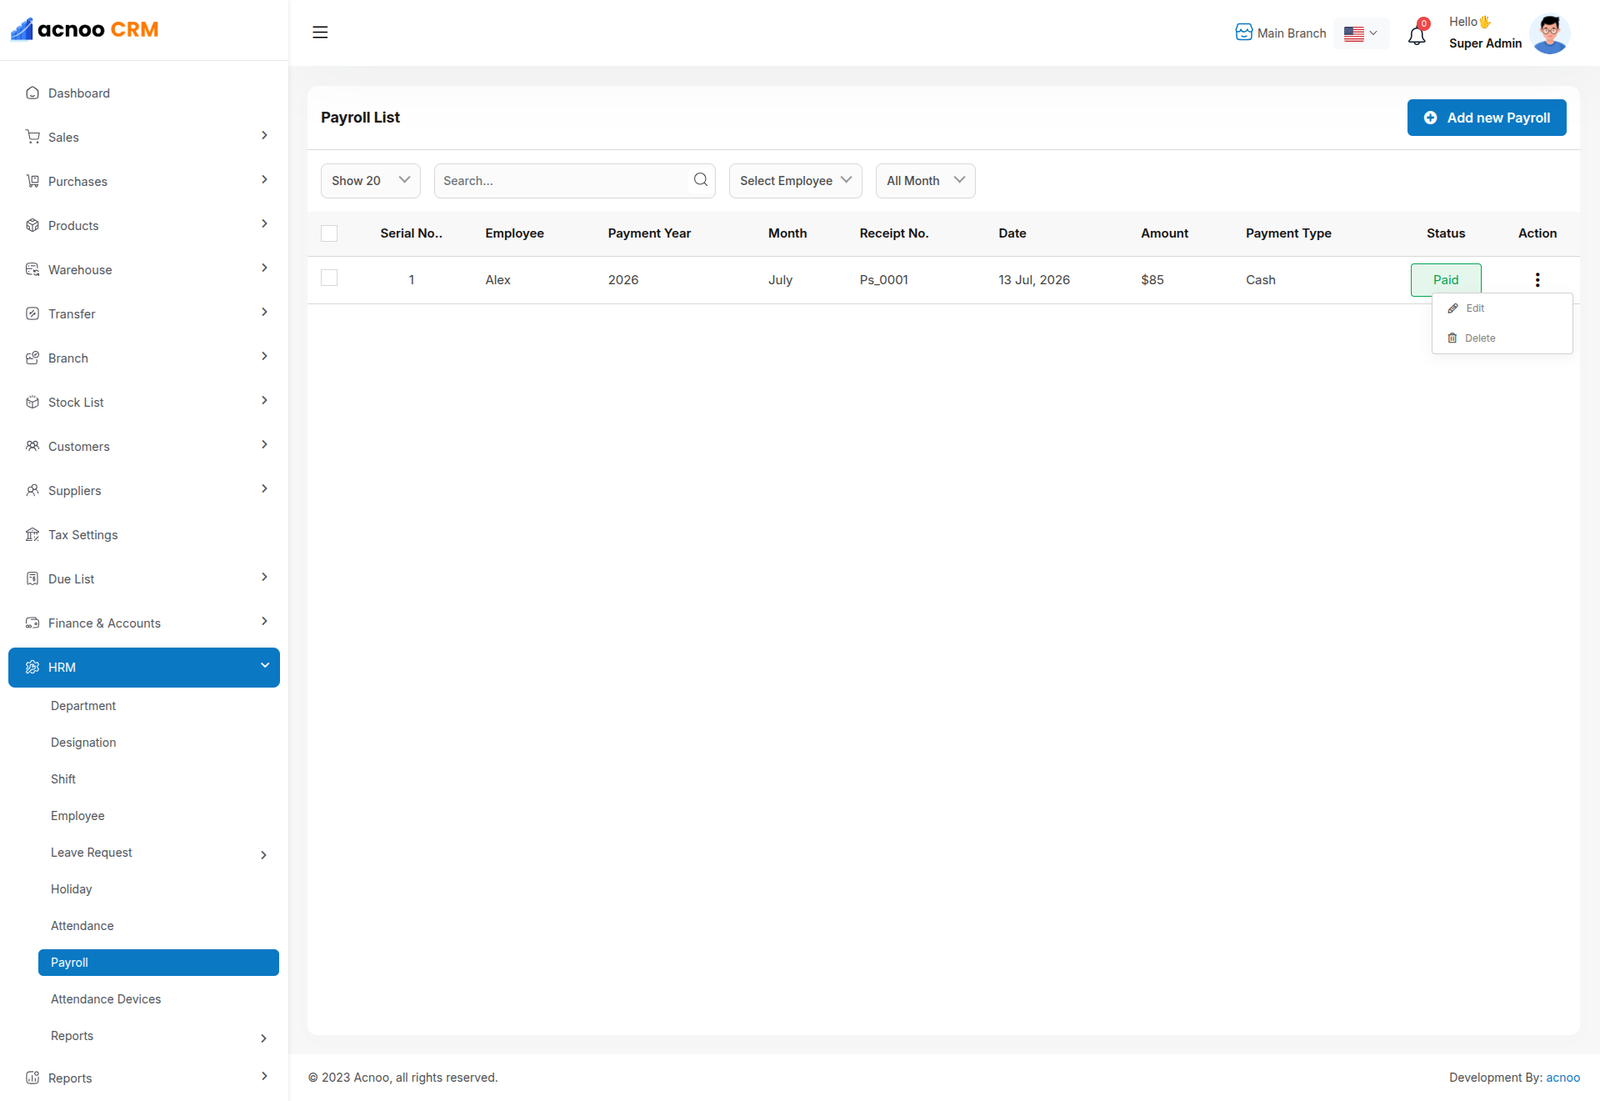
Payroll List
The Payroll List interface provides a comprehensive view of employee payroll transactions, enabling administrators to track payments, verify statuses, and manage records efficiently. This document outlines the key components, functionality, and observations from the displayed interface.Click the "Add New Payroll" button to navigate to a modal where you can add a new Payroll to the system.Clicking the three dots in the "Action" where you can edit,delete and view for Payroll.
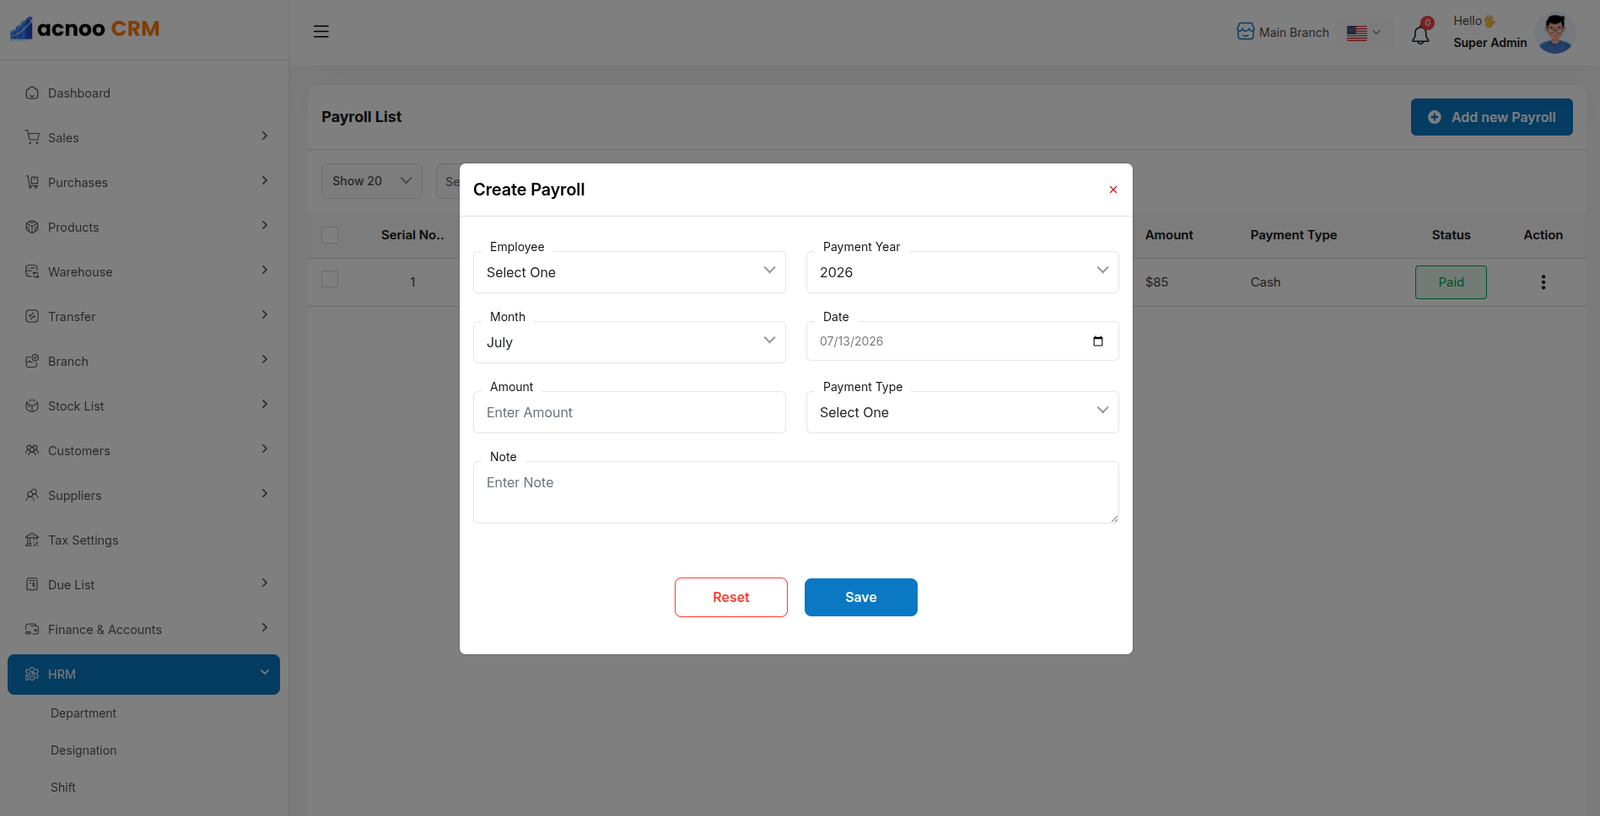
Create New Payroll
The "Add New Payroll" form appears as a pop-up or overlay on the "Payroll List" page. It contains filled the following input fields.
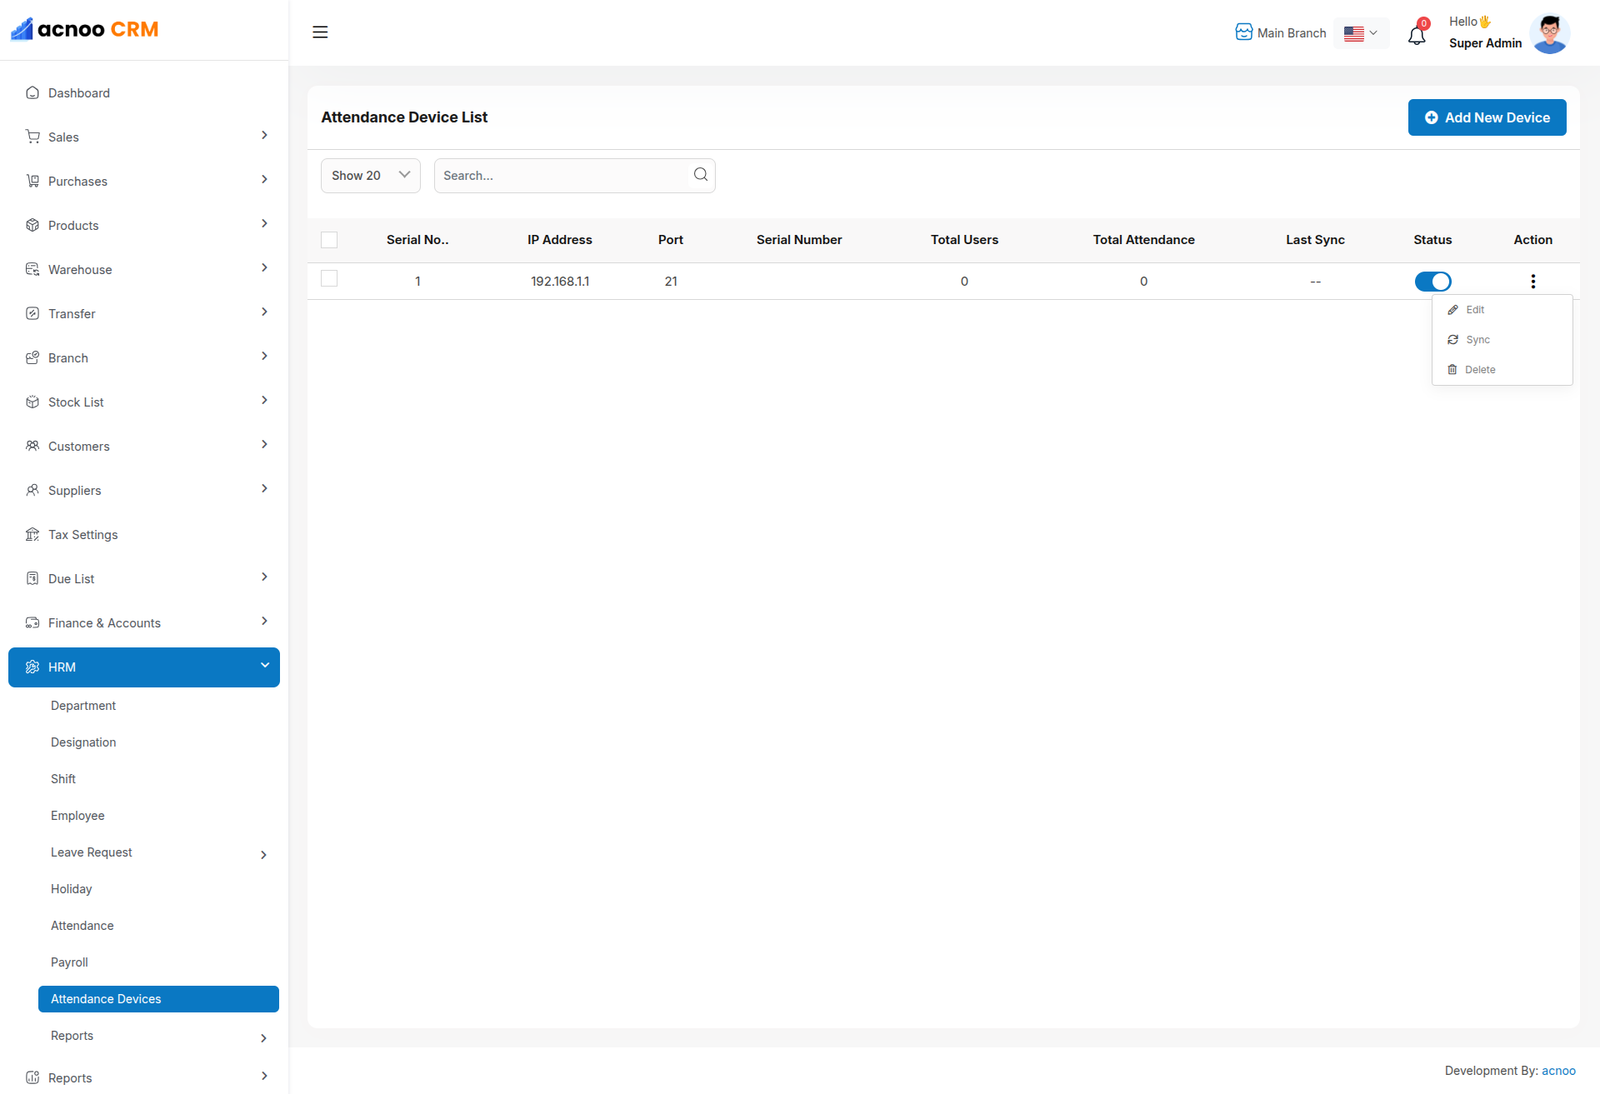
Attendance Device List
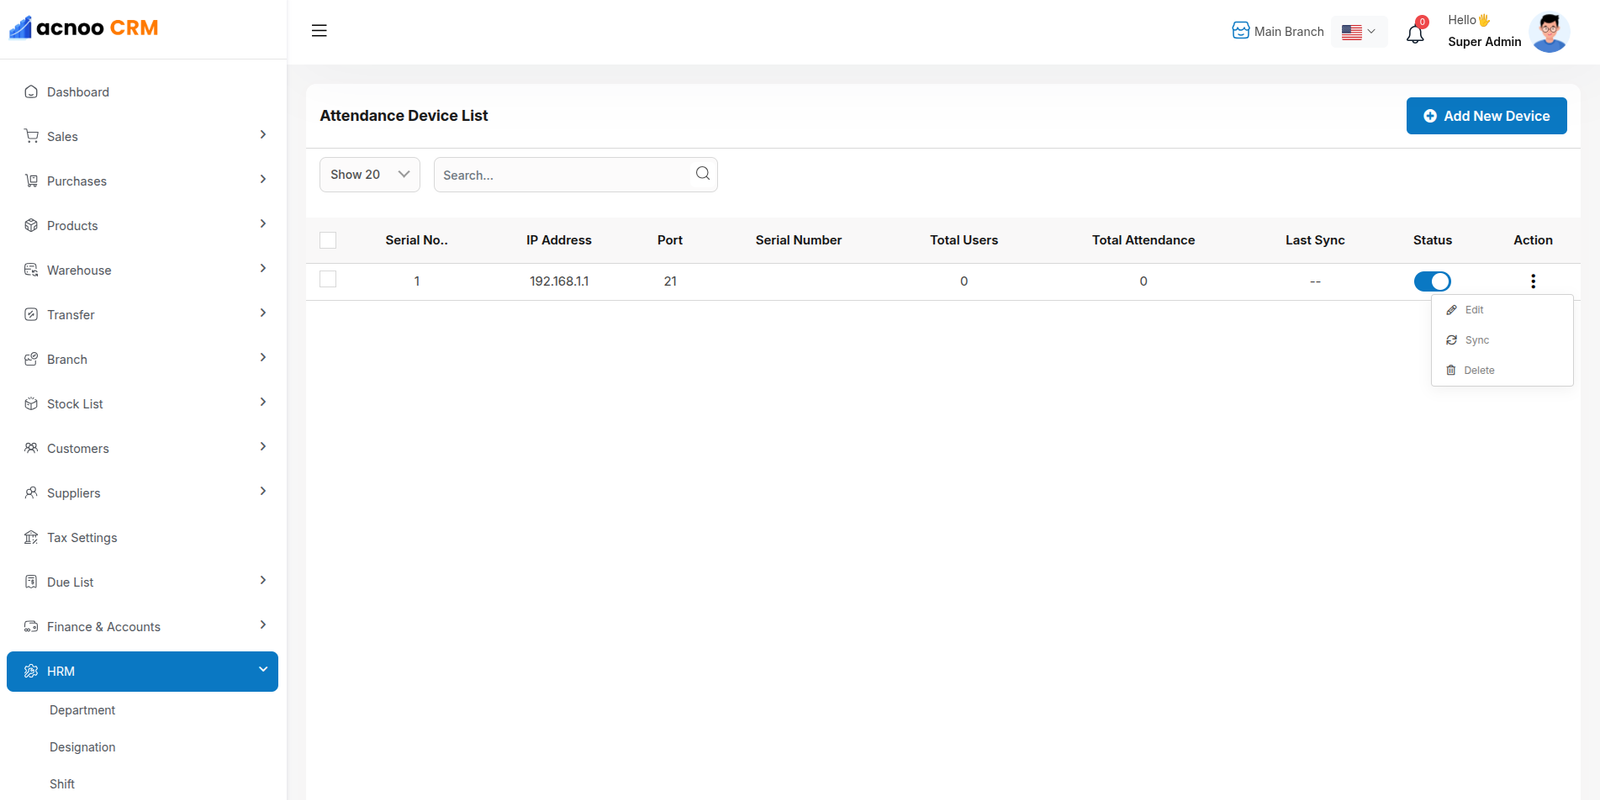
The Attendance Device List page provides a centralized overview of all connected attendance devices within the system. Administrators can monitor registered devices, review their connection status, and manage device configurations. Click the "Add New Device" button to register a new attendance device. The Action menu (three dots) allows you to view, edit, or delete an existing device.
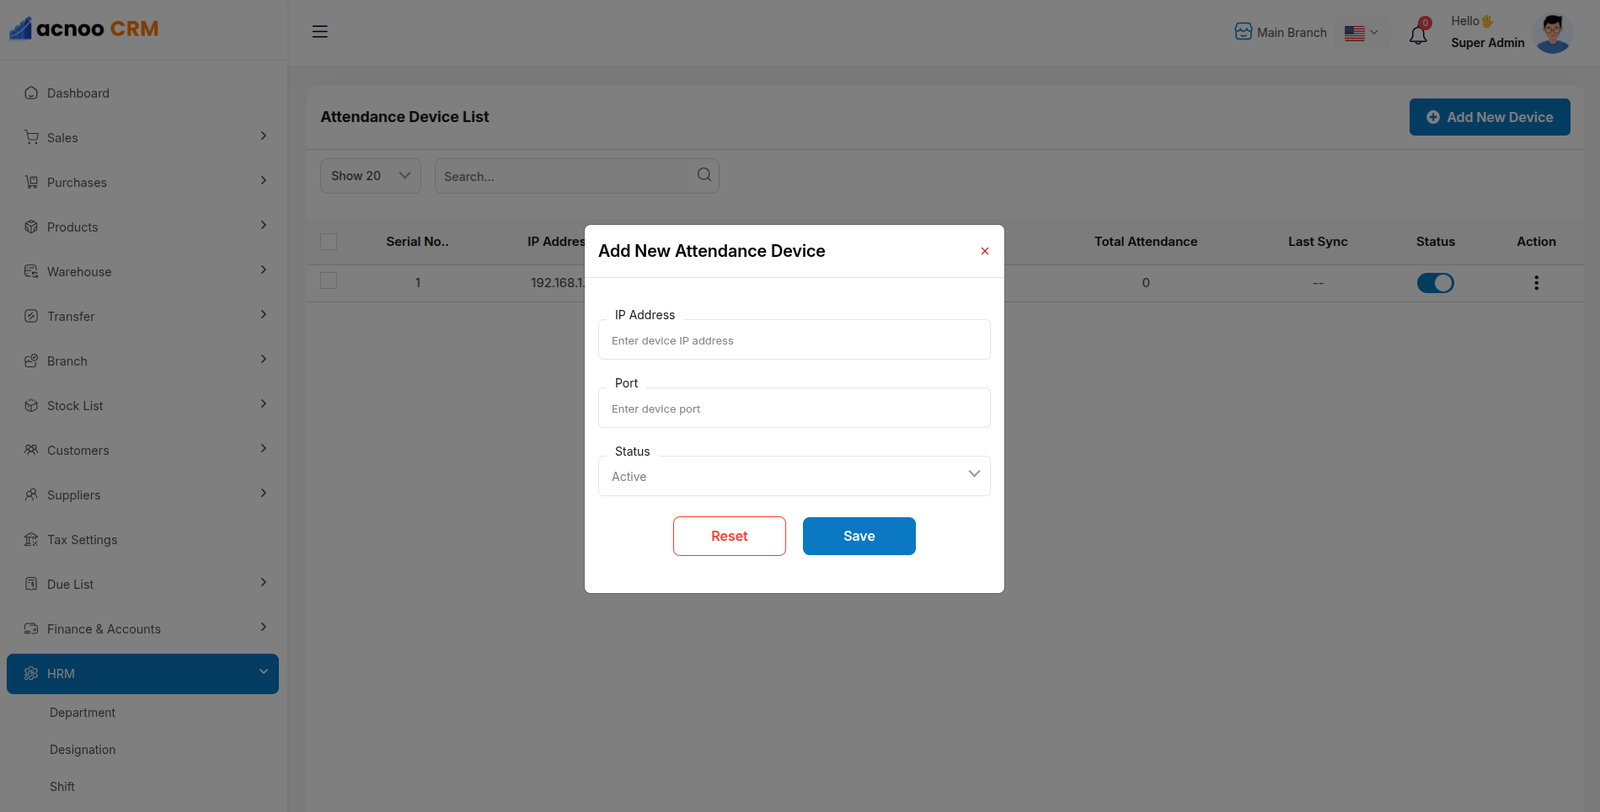
Create New Attendance Device
The "Add Attendance Device" form is displayed in a modal window from the Attendance Device List page. Administrators can configure a new attendance device by providing the required information, such as IP address, port, status, and other necessary settings. After entering all required information, click the "Save" button to register the device and enable attendance synchronization.
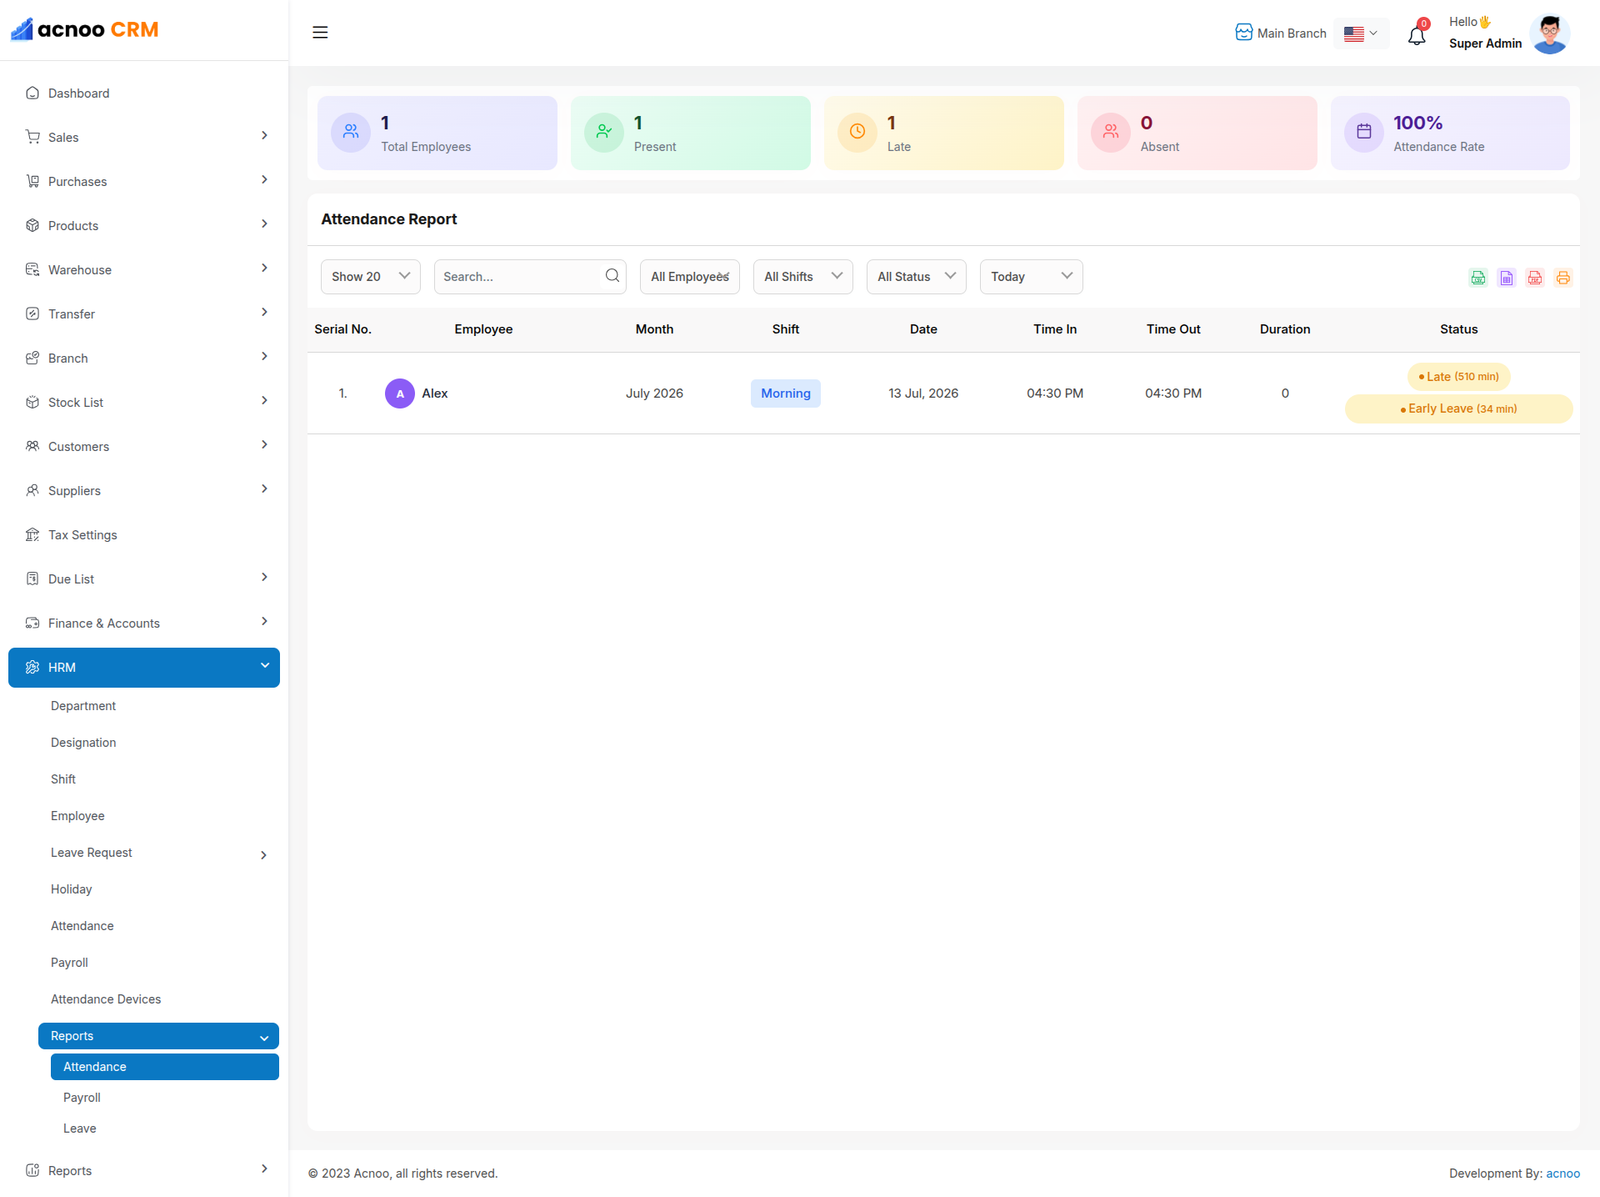
Attendance Reports
The Attendance Report module effectively tracks employee attendance with detailed shift and time data. Minor adjustments to filter logic, date formatting, and labeling would enhance accuracy and user experience.
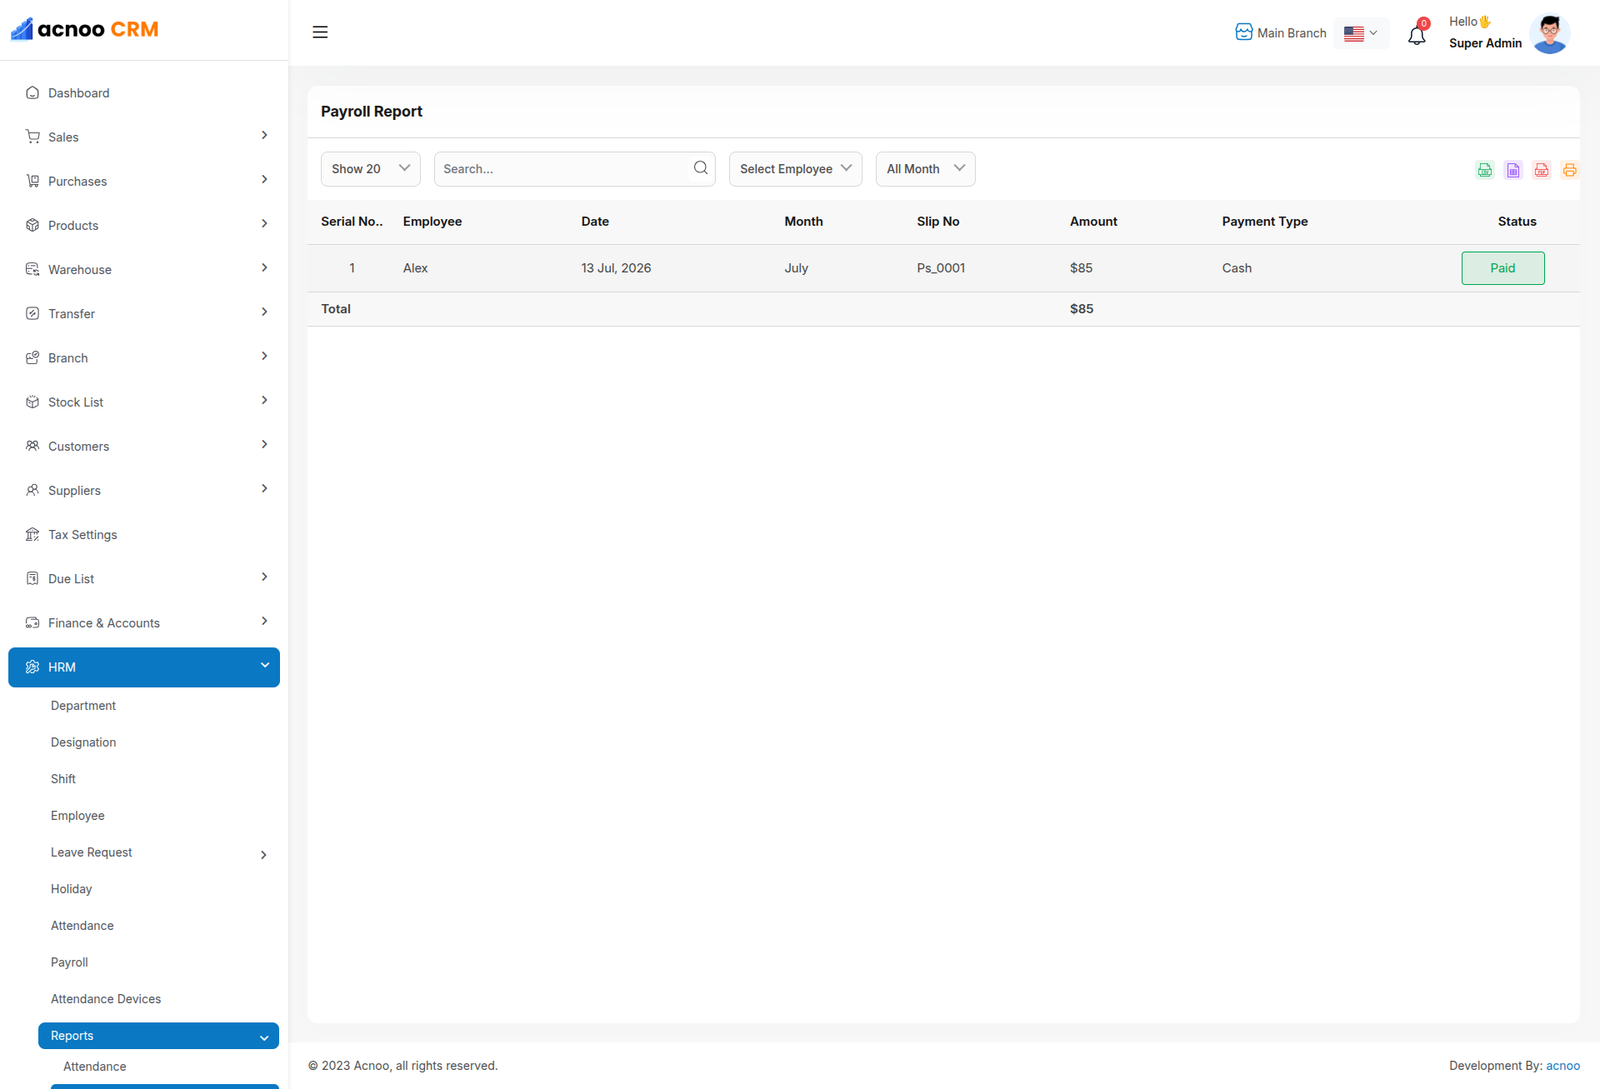
Payroll Reports
The Payroll Report module provides a consolidated view of employee compensation data, enabling HR teams to efficiently manage, verify, and audit payroll transactions.
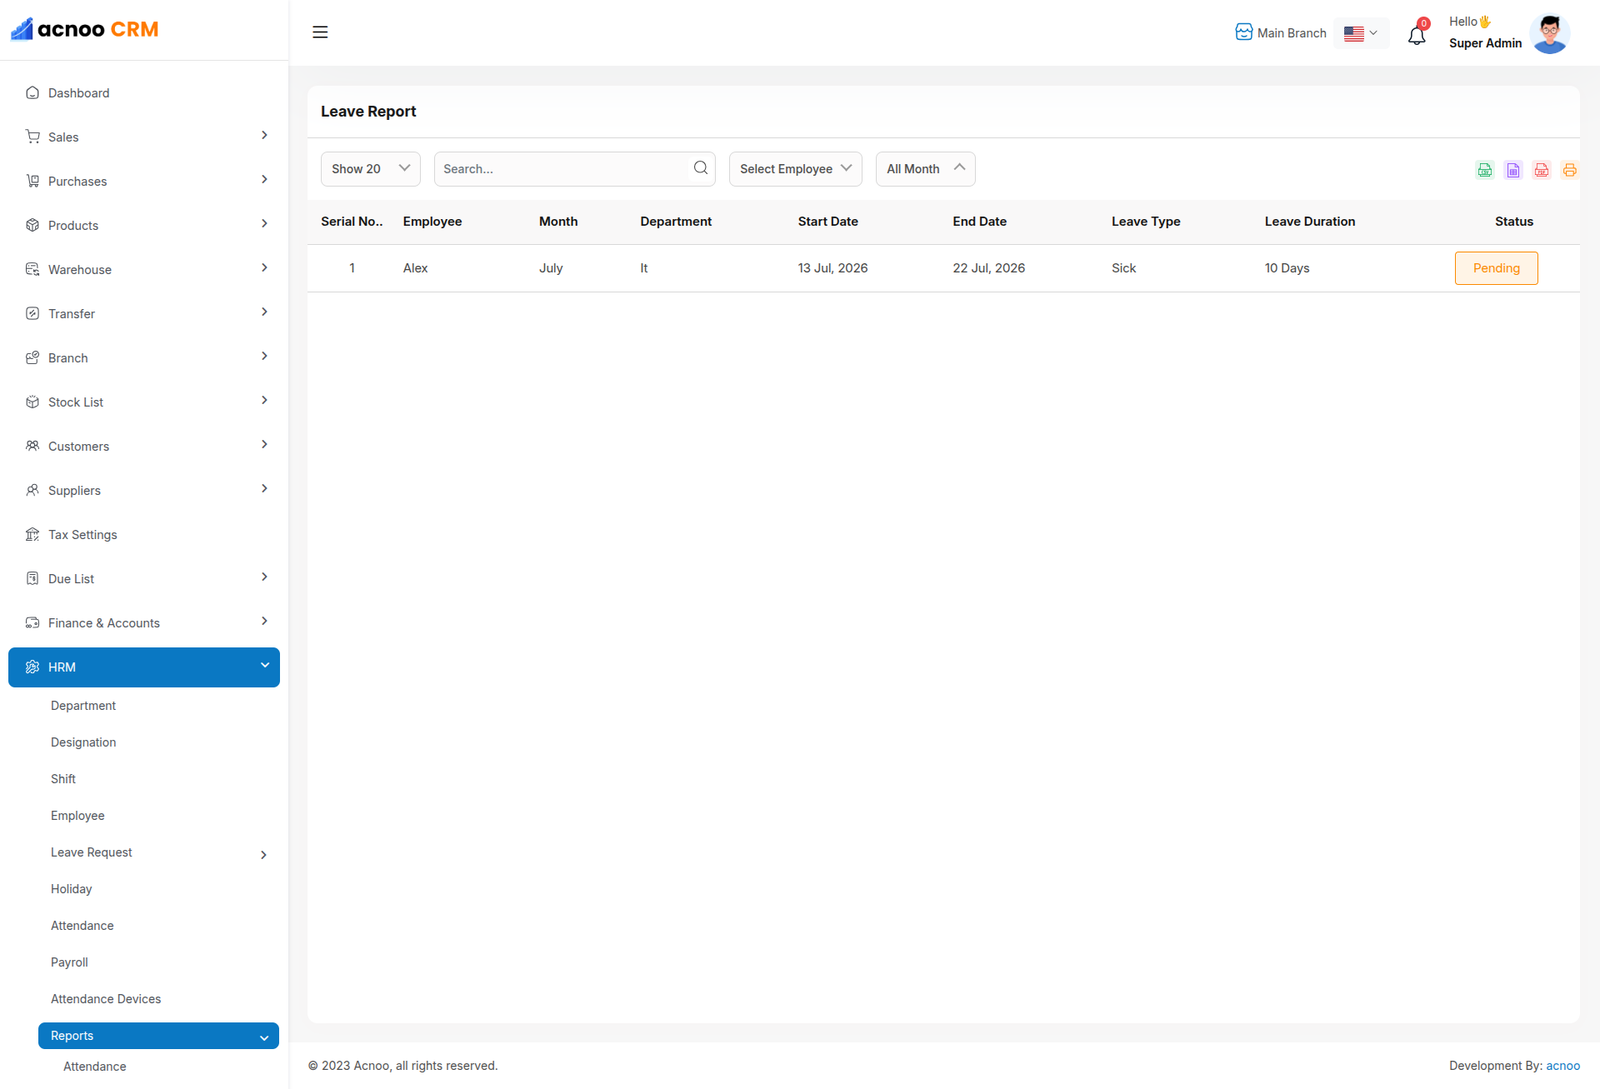
Leave Reports
The Leave Report provides a comprehensive view of employee leave requests, approvals, and tracking.
Requirements
- Latest version of AcnooCRM.
- Supported ZKTeco biometric device.
- PHP Socket Extension enabled.
- TCP/IP Communication enabled on the biometric device.
- Static Local IP or Public IP.
- Communication Port (Default: 4370).
- Cron Job configured for automatic synchronization.
User Creation
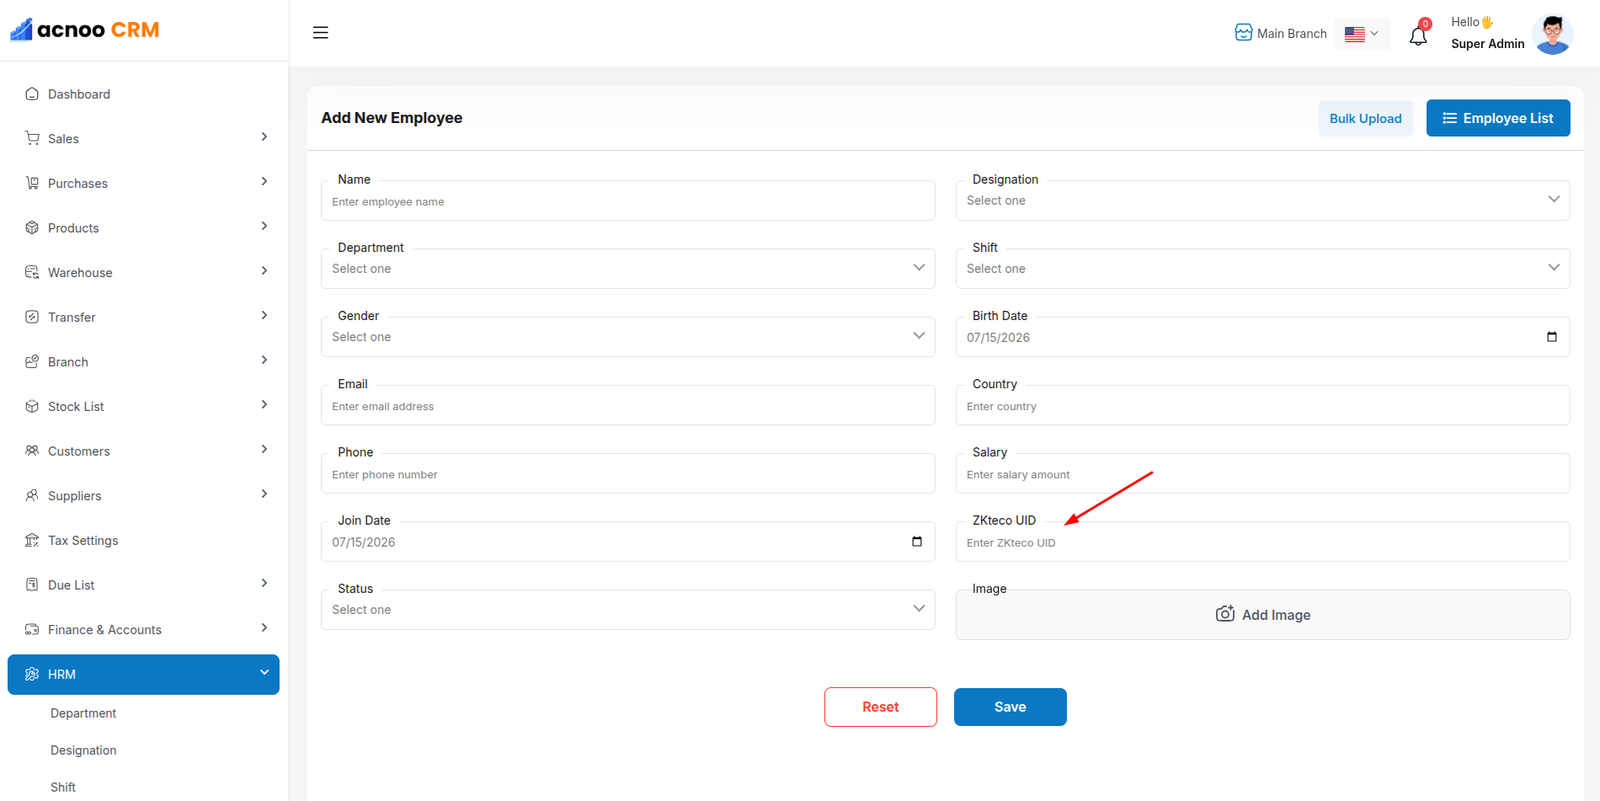
Before adding an employee in AcnooCRM, a corresponding user must first be created on the ZKTeco device. While creating the user, note down the ZKTeco User ID (UID) assigned to that user. When adding the employee in AcnooCRM, the same ZKTeco UID must be entered to establish a proper connection between the device and the system. If the UID does not match, the device and AcnooCRM will fail to synchronize correctly.
The following image illustrates the step-by-step process of creating a new user directly on the ZKTeco device.
- On the ZKTeco device, go to Menu → User Mgt. (User Management).
- Select New User to start creating a new user.
- Select User ID, enter the desired ID using the keypad, and press Confirm (OK).
- Select User Role and choose Normal User for a regular employee, or Registrar / Super Admin if the user needs elevated access on the device.
- Fill in the remaining details such as Name, Verification Mode, Fingerprint, and Badge Number as needed, then save the user. The assigned User ID must be noted down, as it will be used while adding the employee in AcnooCRM.
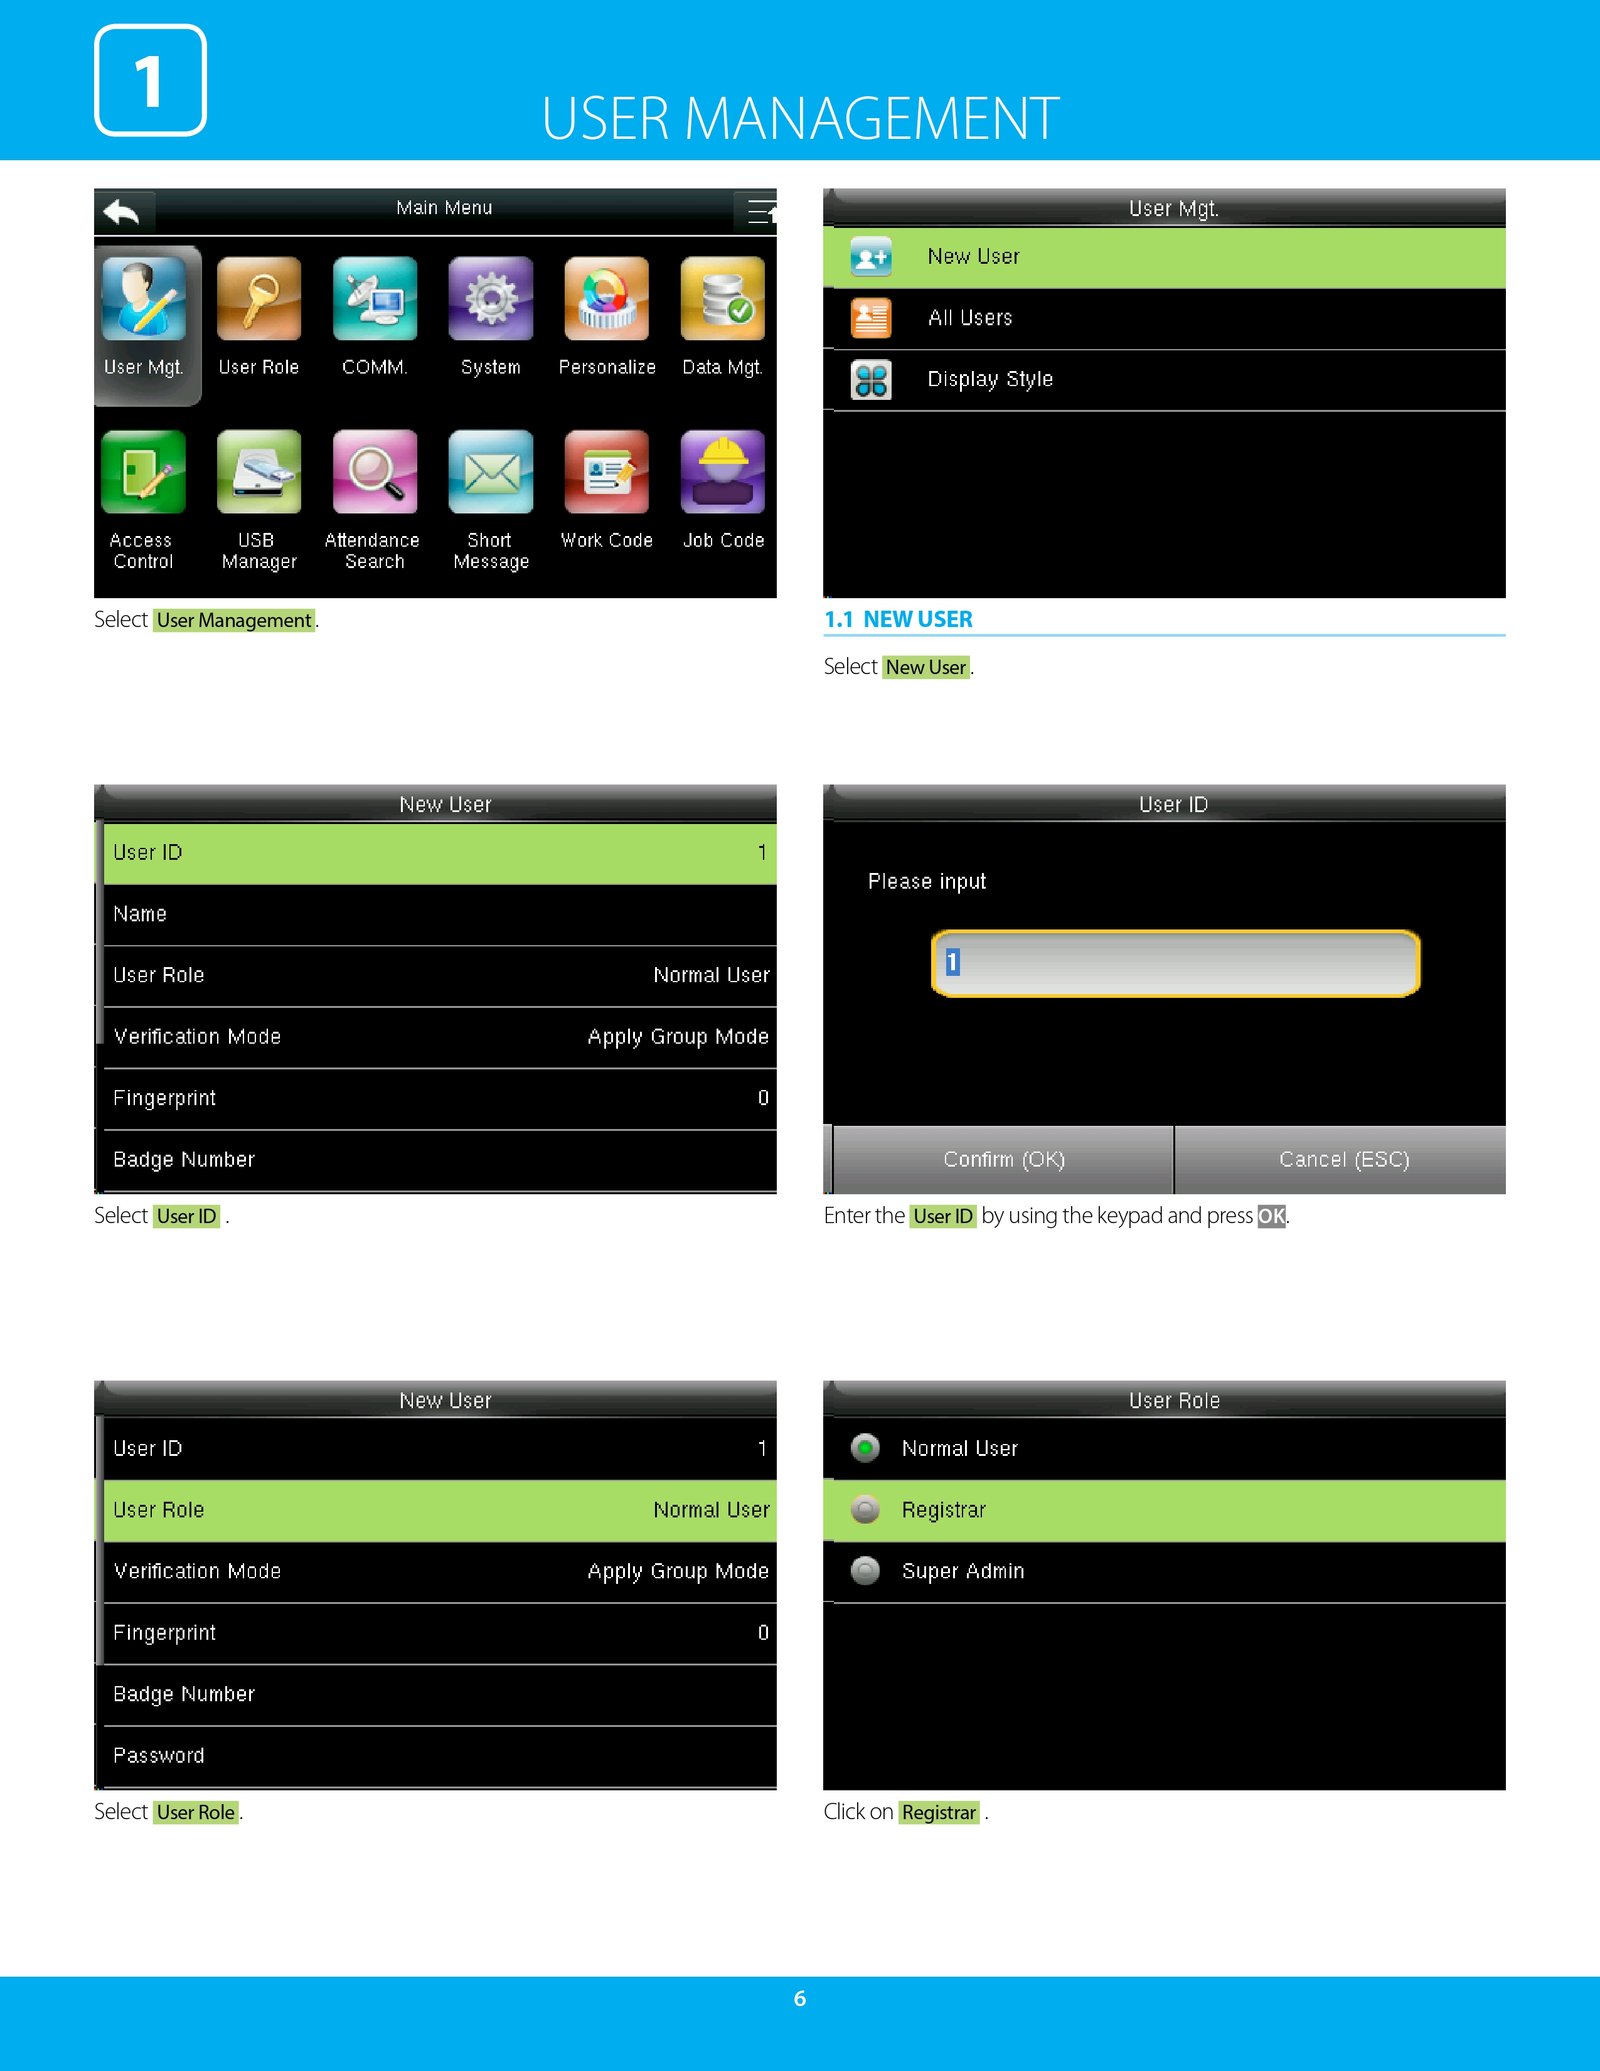
User Role
The ZKTeco device allows assigning a User Role to control what level of access a user has on the device itself. By default, the device provides a Registrar role along with two customizable roles — User Defined Role 1 and User Defined Role 2. The Registrar role can manage users and view standard attendance data for existing users, while a User Defined Role can be enabled and customized with specific permissions as needed.
The following image illustrates the step-by-step process of setting a user role on the ZKTeco device.
- On the ZKTeco device, go to Menu and select User Role.
- From the User Role list, select Registrar to assign the default registrar role, which can manage users and view standard attendance data for existing users on the device.
- Alternatively, select User Defined Role 1 (or User Defined Role 2) to create a custom role, then turn ON Enable Defined Role.
- Select Define User Role to configure the permissions for this role.
- Check the specific rights to assign, such as User Mgt., Comm., System, Access Control, New User, All Users, or Display Style, then save the settings.
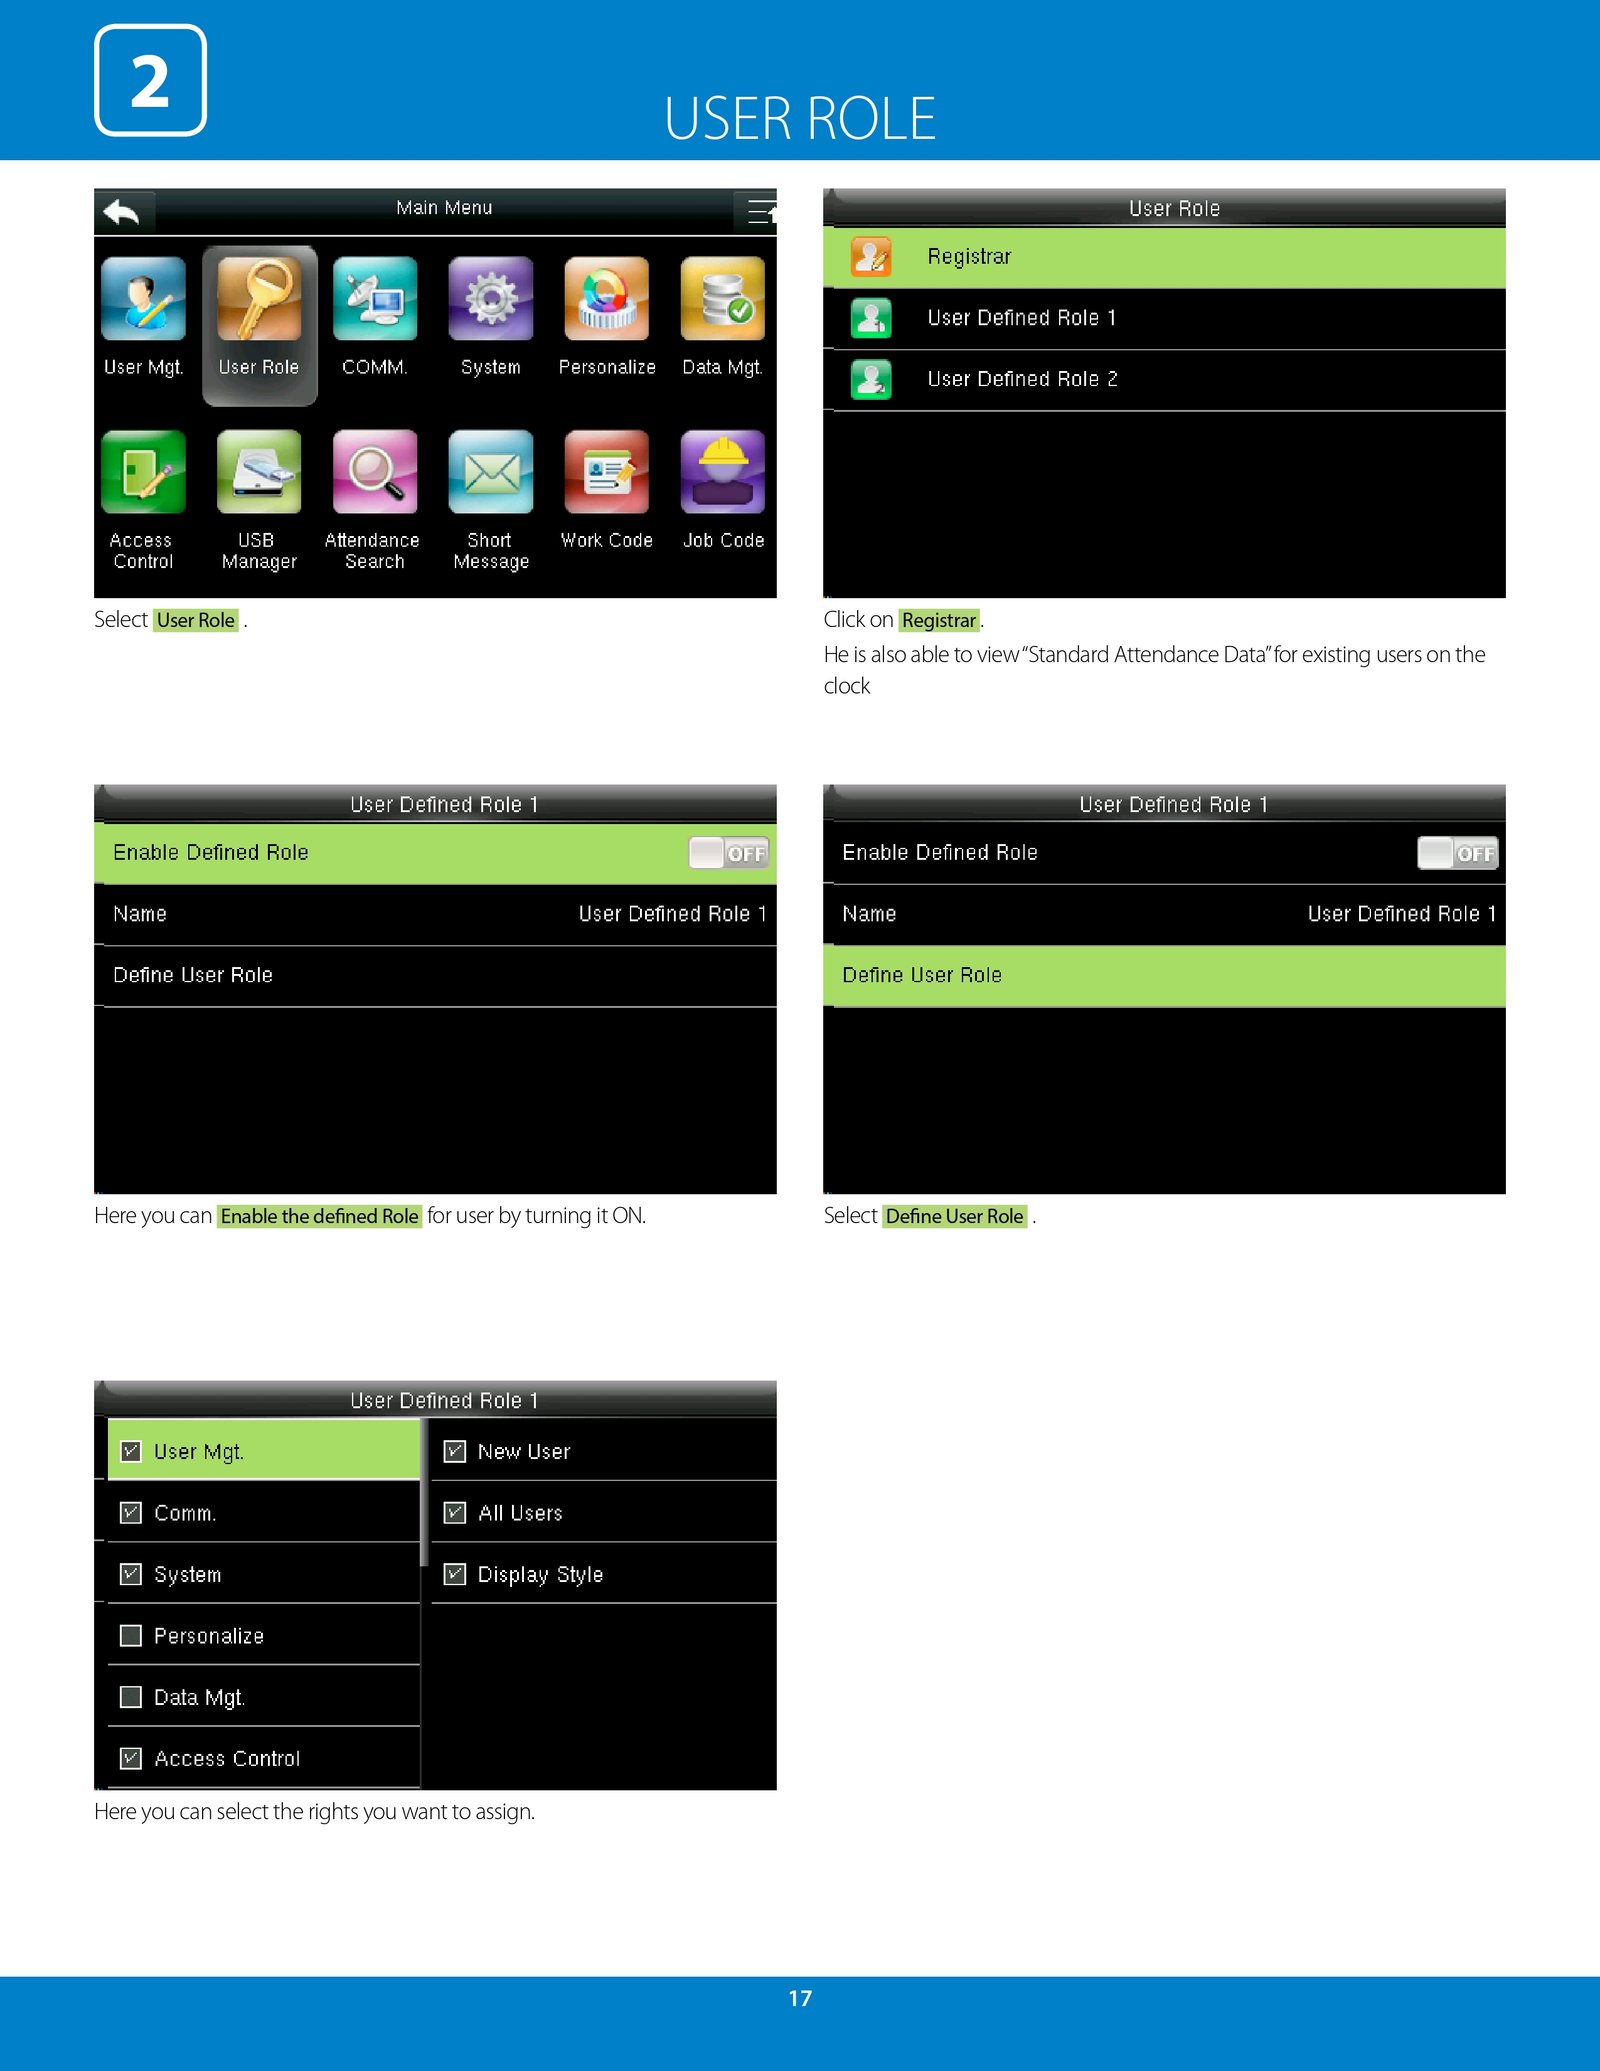
ZKTeco Device Communication
Before connecting the ZKTeco device with AcnooCRM, ensure the device's network (Ethernet) communication settings are properly configured. The following steps illustrate how to access and verify these settings directly on the ZKTeco device.
- On the ZKTeco device, go to Menu and select Comm. (Communication) to view the available connection options.
- Select Ethernet from the Communication menu to configure the device's network connection.
- Review the Ethernet Details, including the device's IP Address, Subnet Mask, and Gateway. Make sure the IP Address matches the Static/Reserved IP assigned to the device from the router.
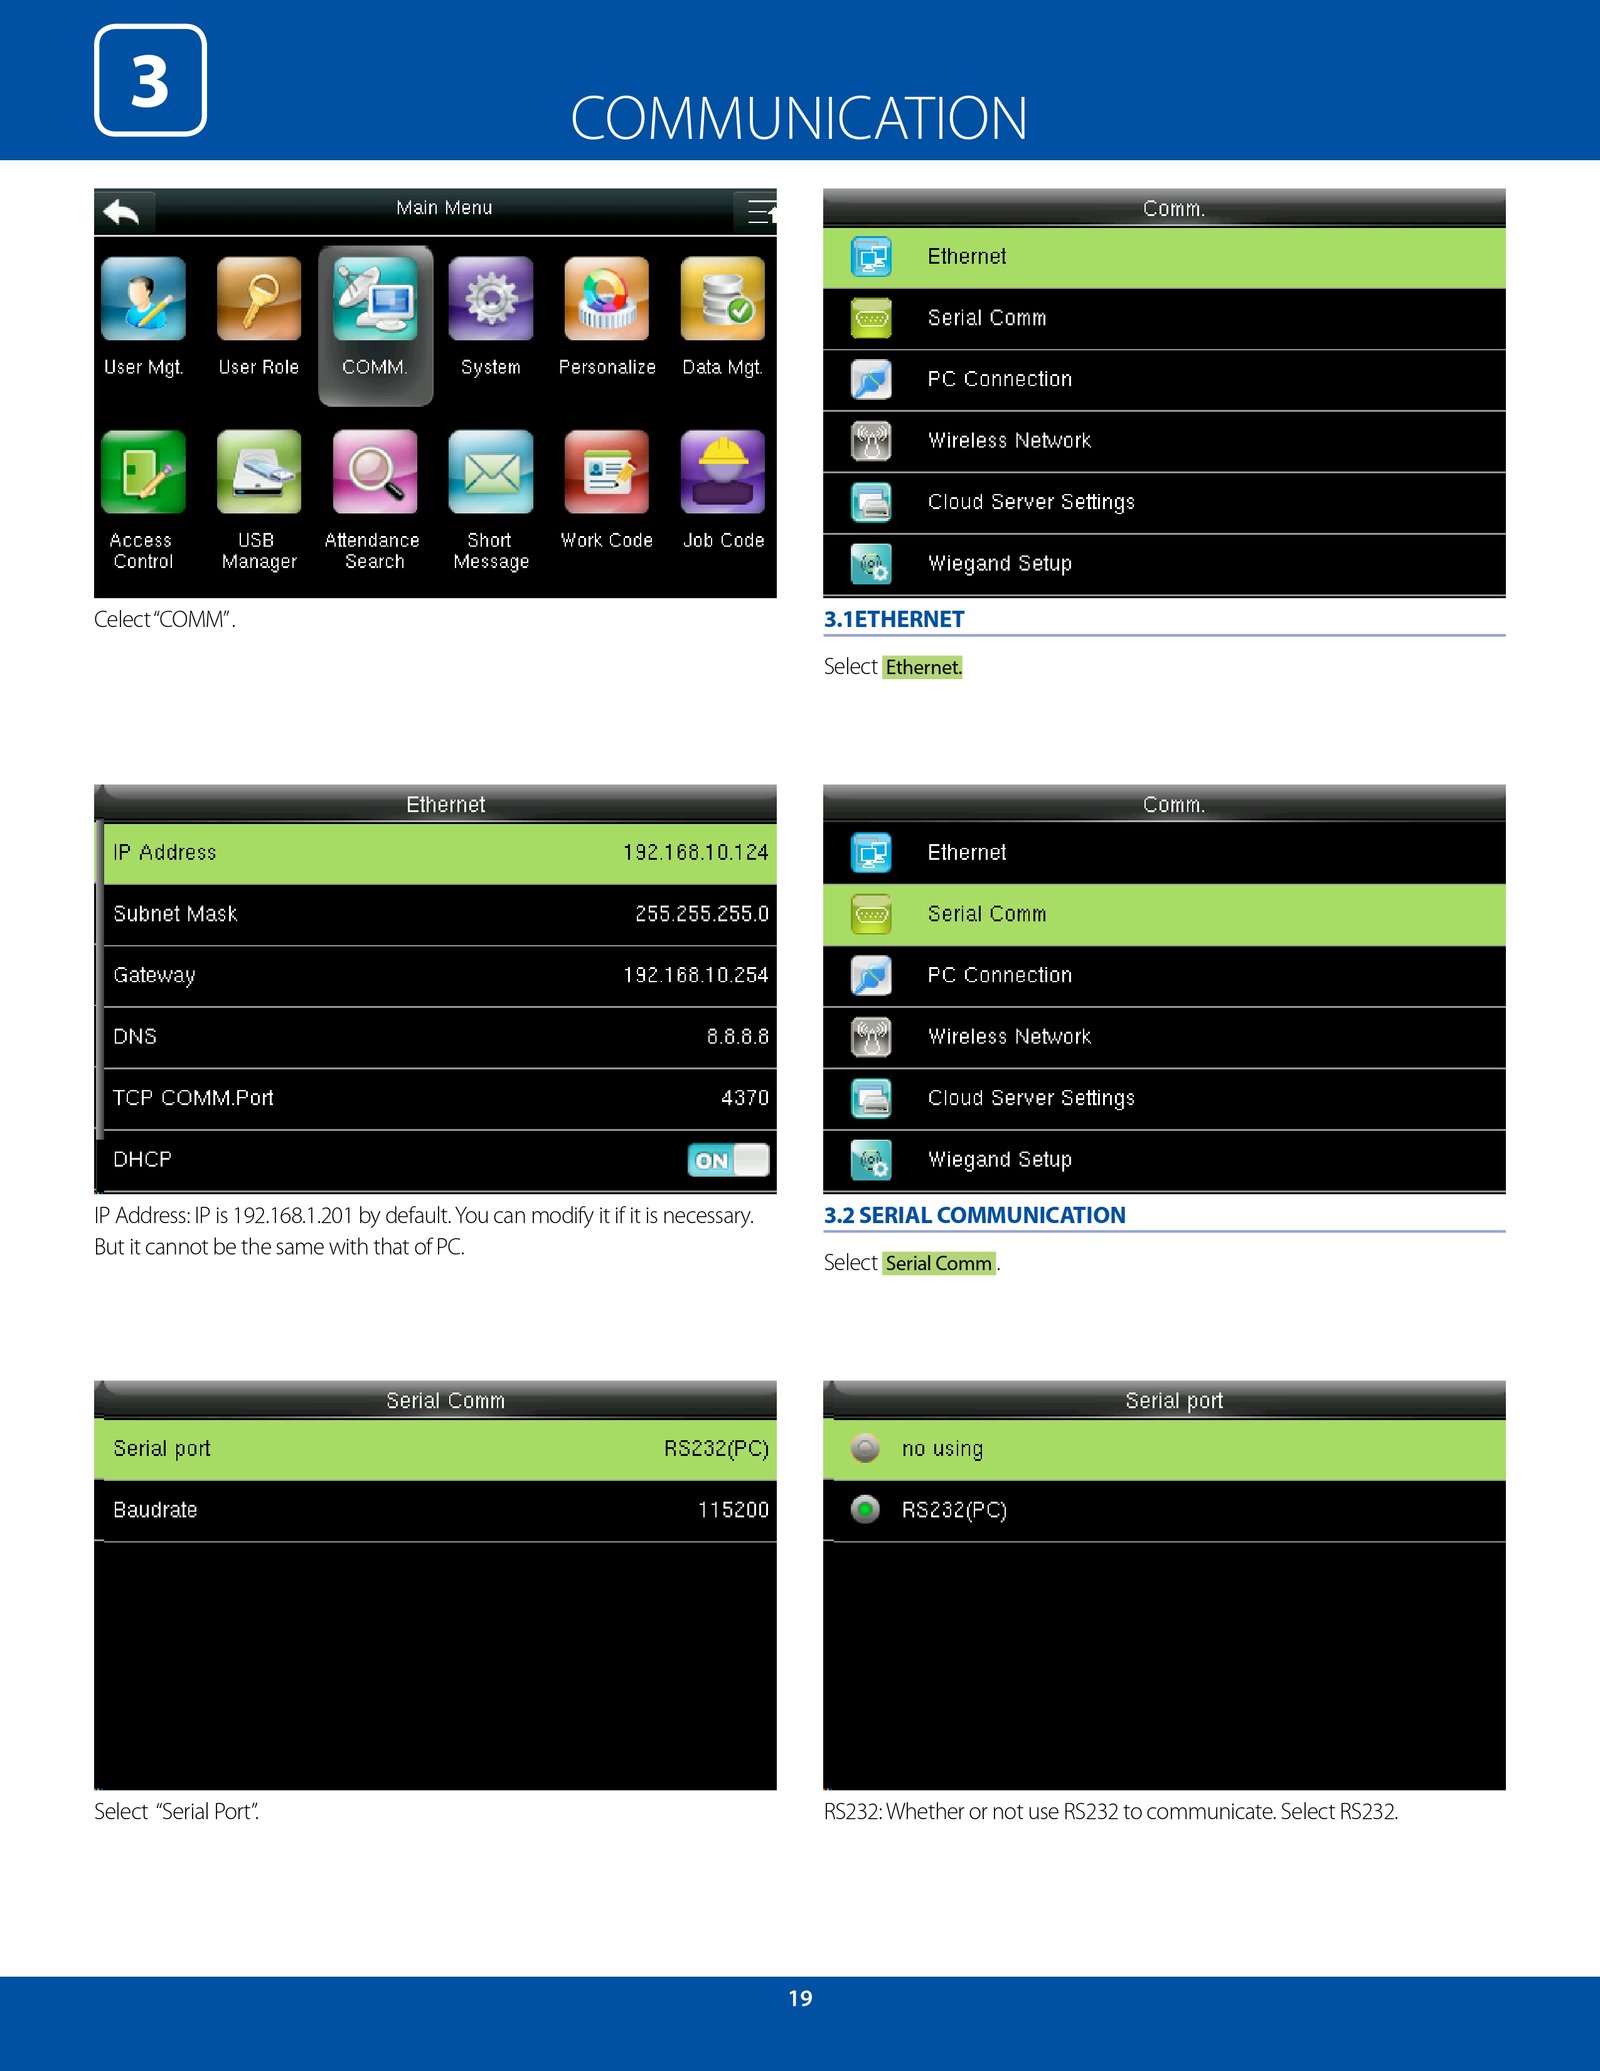
Once the Ethernet details are confirmed, the device is ready to communicate with AcnooCRM over the configured IP and communication port (default: 4370).
Device Configuration
Before connecting the biometric device with AcnooCRM, configure your ZKTeco device properly.
- Connect the biometric device to your network using Ethernet or Wi-Fi.
- Assign a Static IP Address to the device.
- Configure the communication port (Default: 4370).
- If AcnooCRM is hosted online, configure Port Forwarding and use your Public IP provided by your ISP.
- Ensure TCP/IP communication is enabled.
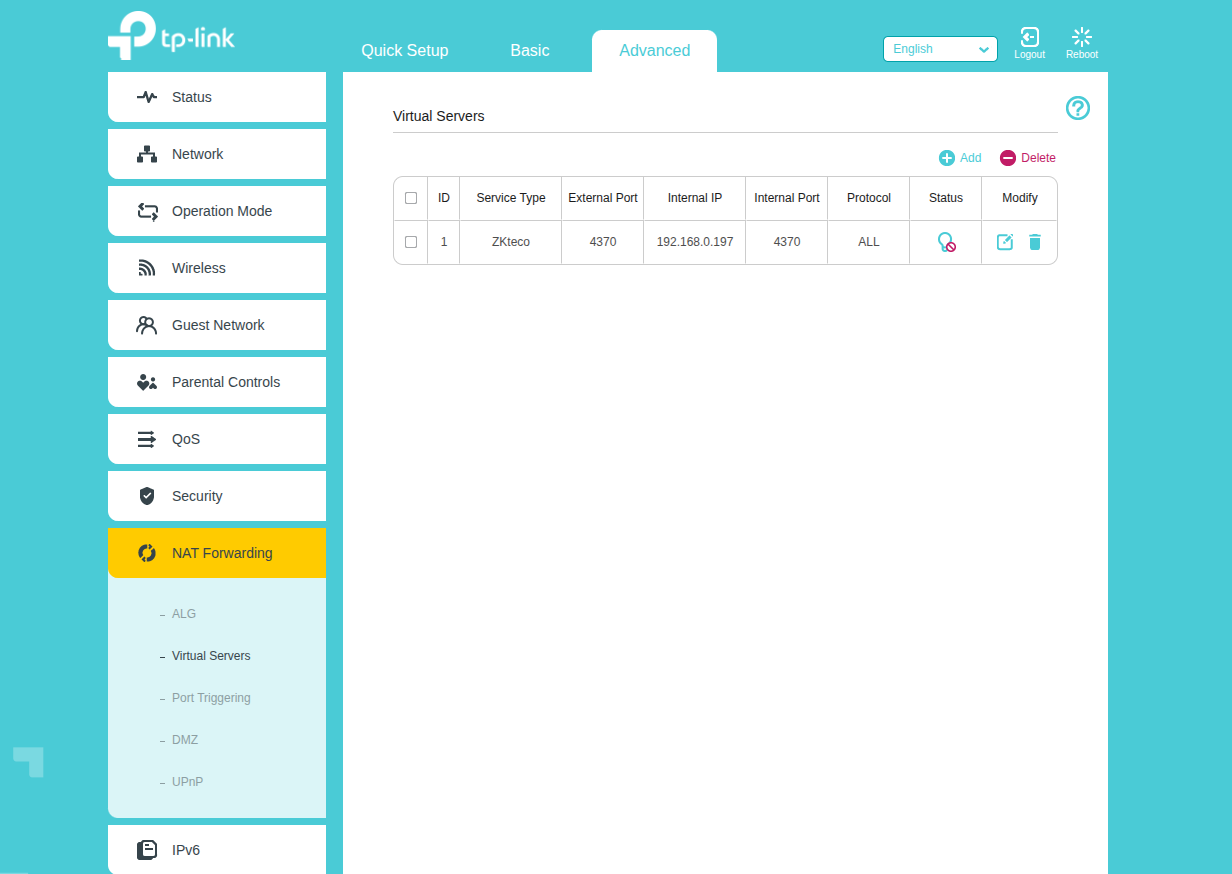
Attendance Device Management
Navigate to:
Dashboard → Attendance → Attendance Device
Click Add Device and provide the following information.
- Branch
- Device IP Address
- Communication Port
- Status
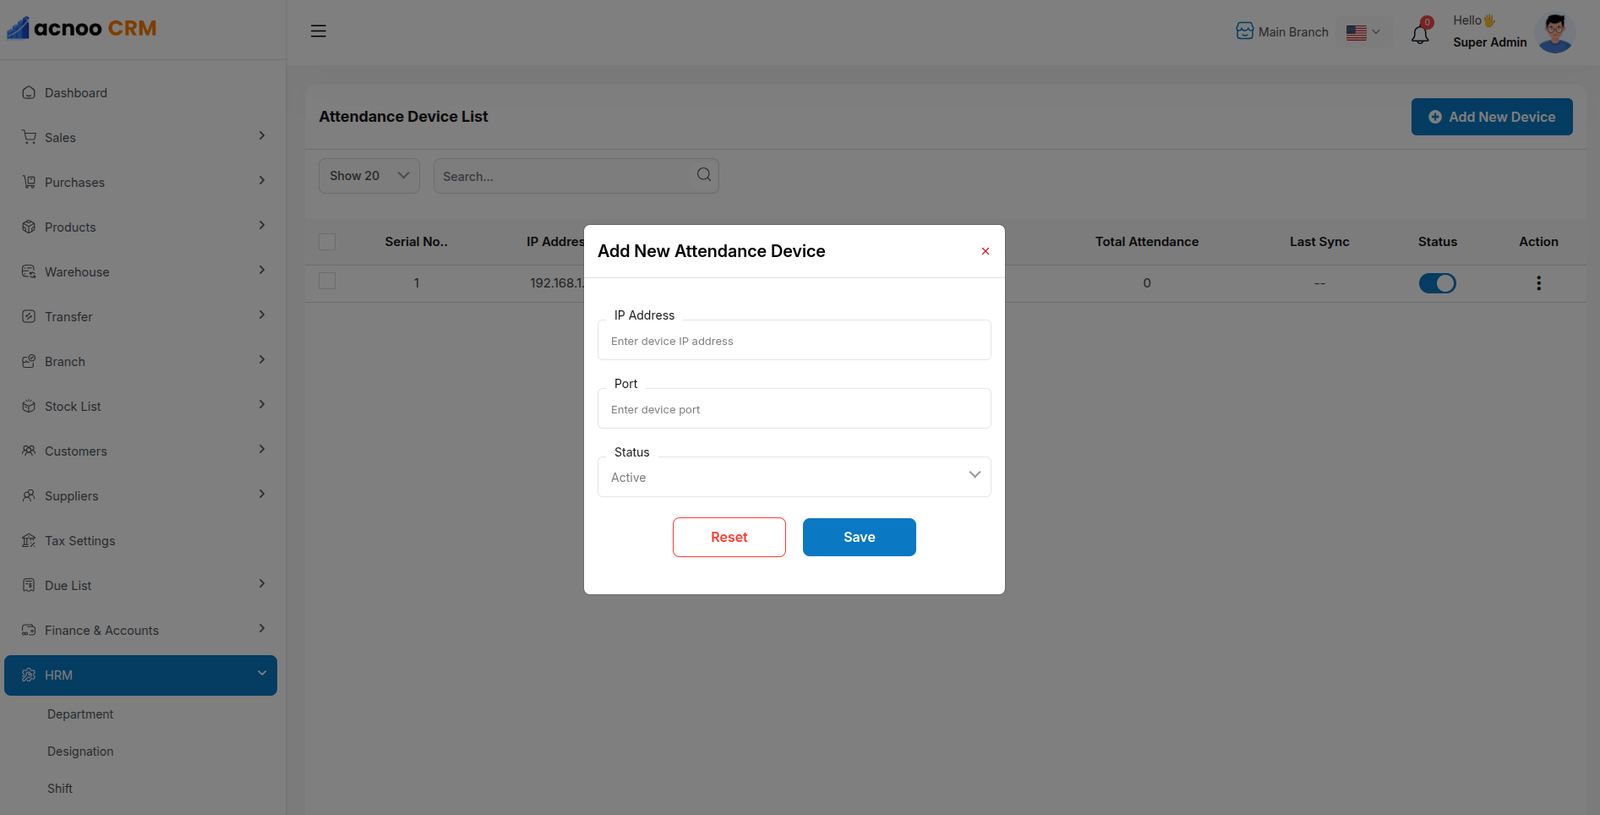
After saving the device successfully, AcnooCRM automatically retrieves the device information.
- Serial Number
- Total Registered Users
- Total Attendance Records
- Last Synchronization Time
Employee ZKTeco UID
Every employee must have the correct ZKTeco User ID (UID).
Navigate to:
Employee Management → Employee → Edit Employee
Enter the same User ID that exists on the biometric device. If the User ID does not match, attendance synchronization will not work.
Test Connection
After adding a device, wait a few moments. If the connection is successful, AcnooCRM automatically displays:
- Serial Number
- Total Users
- Total Attendance Records
- Last Synchronization Time
Attendance Synchronization
Automatic Synchronization
Attendance records are automatically synchronized using Laravel Cron Jobs.
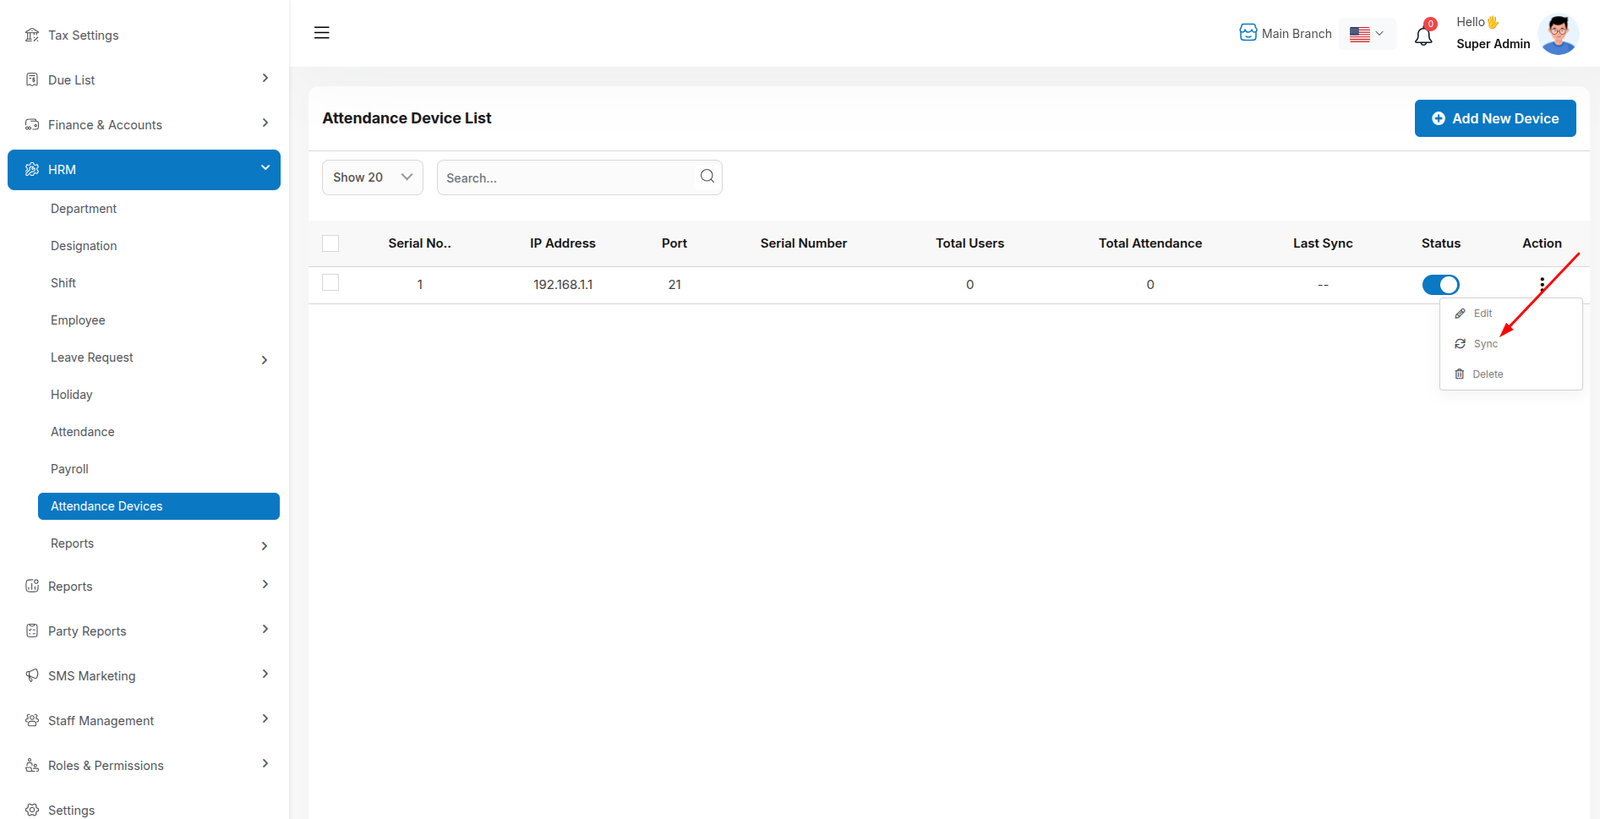
Manual Synchronization
Navigate to:
Attendance → Attendance Device
Click the three-dot action menu beside the device and select Sync Now.
Cron Job Configuration
Configure the following Cron Job to synchronize attendance automatically.
0 * * * * php artisan sync-device:zkteco >/dev/null 2>&1
For cPanel
0 * * * * php /home/{cpanel_username}/{project_directory}/artisan sync-device:zkteco >/dev/null 2>&1
The above Cron Job synchronizes attendance every hour. You may change the interval according to your business requirements.
Troubleshooting
- Verify Device IP Address.
- Verify Communication Port.
- Ensure the biometric device is online.
- Configure Port Forwarding if using an online server.
- Verify Employee ZKTeco UID.
- Ensure the device status is Active.
- Verify the Cron Job is running successfully.
Frequently Asked Questions
Can I connect multiple attendance devices?
Yes. AcnooCRM supports multiple attendance devices across multiple branches.
Why is attendance not synchronizing?
Verify the Device IP, Communication Port, Employee UID, Network Configuration and Cron Job.
Can I synchronize attendance manually?
Yes. Simply click Sync Now from the Attendance Device page.
📖 User Guide:
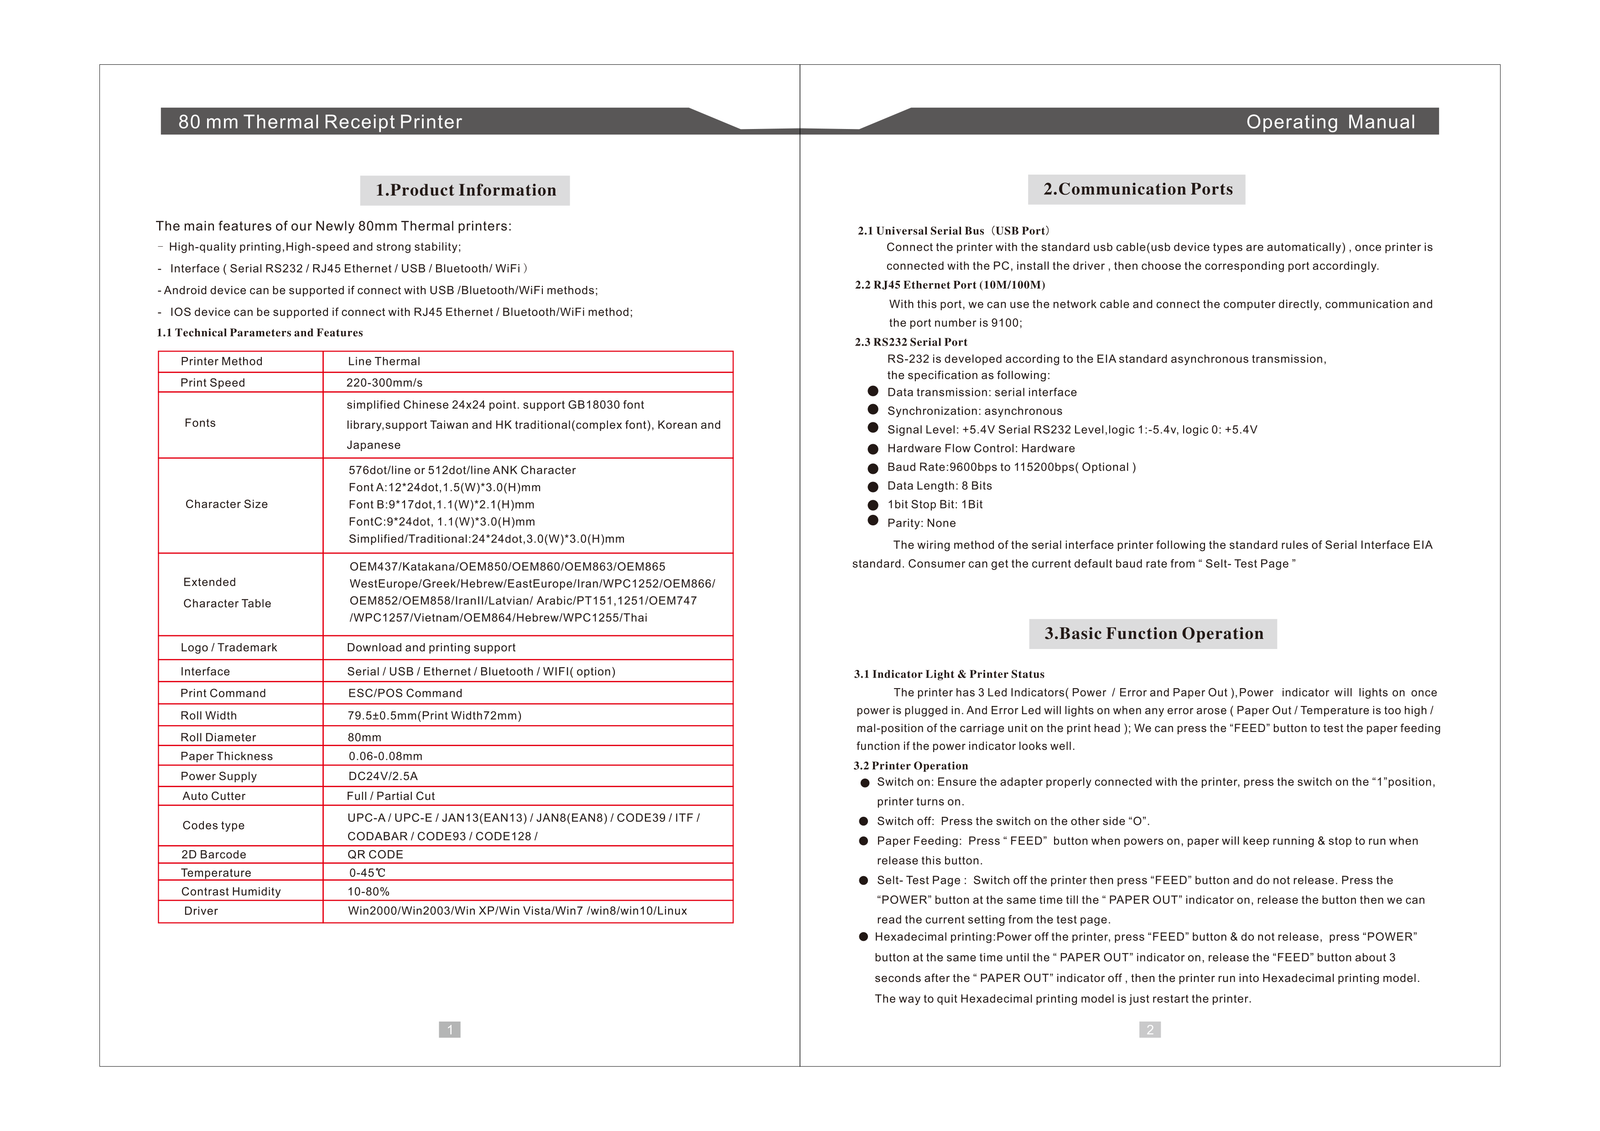
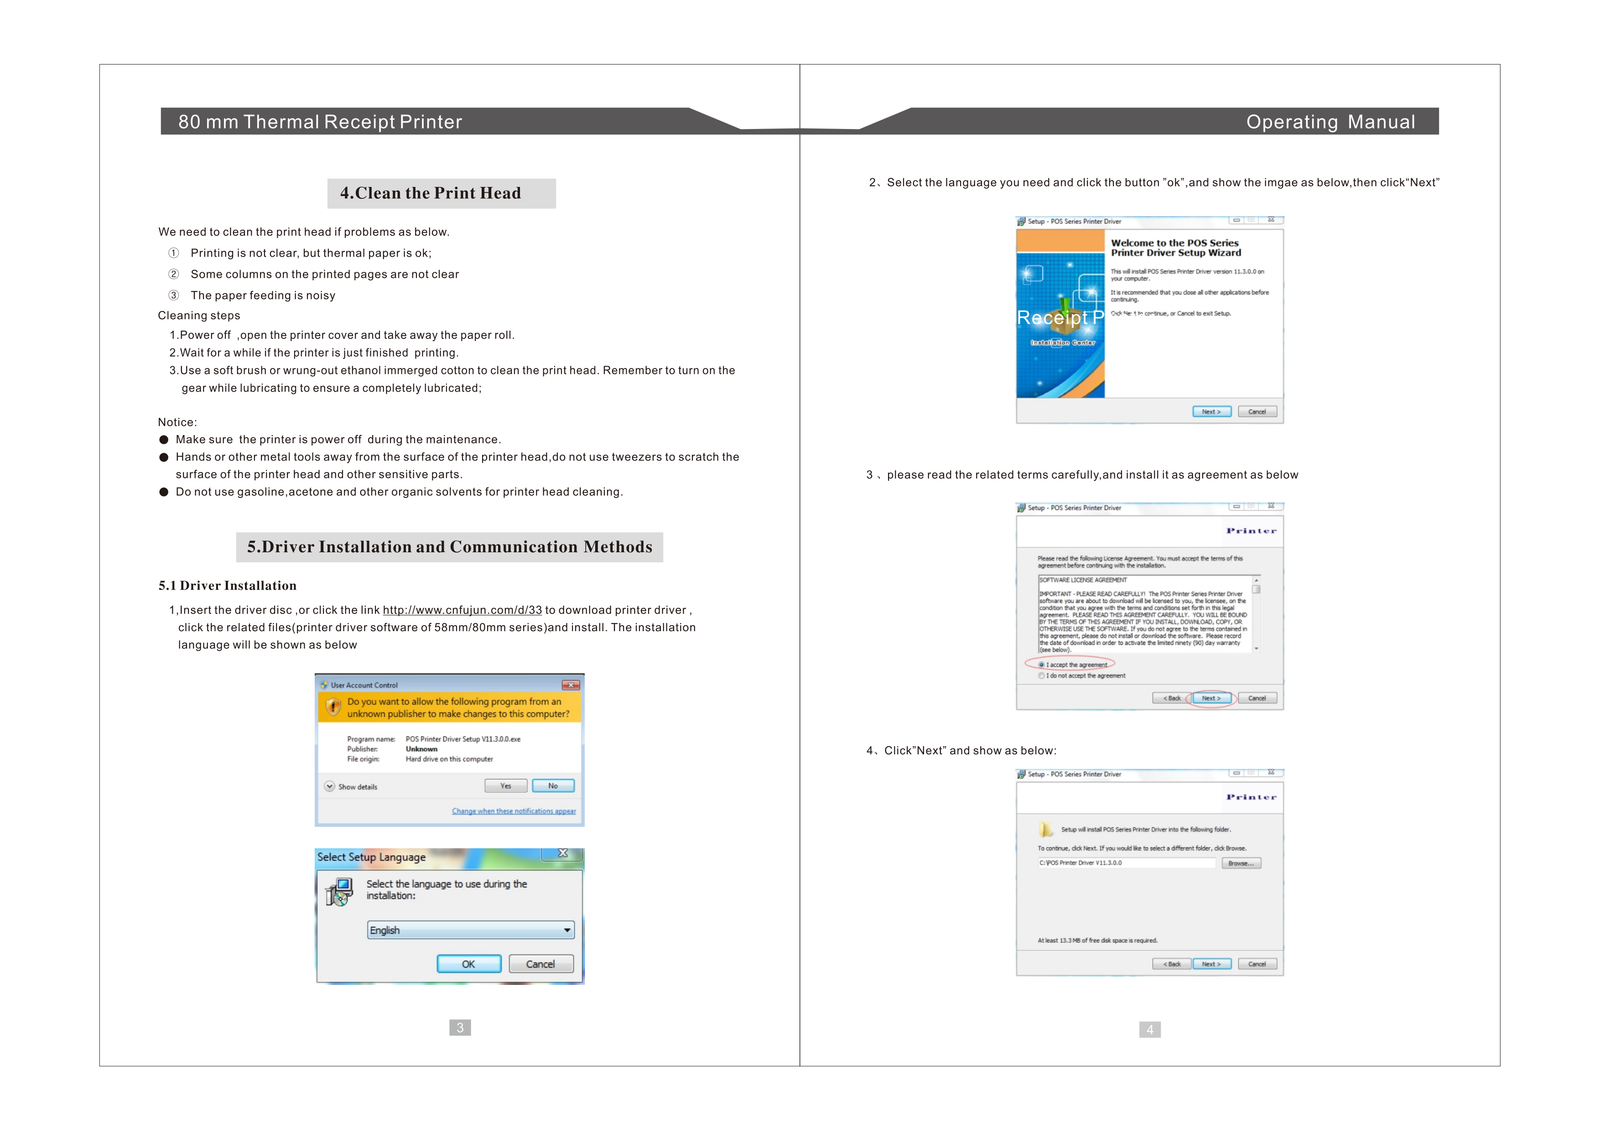
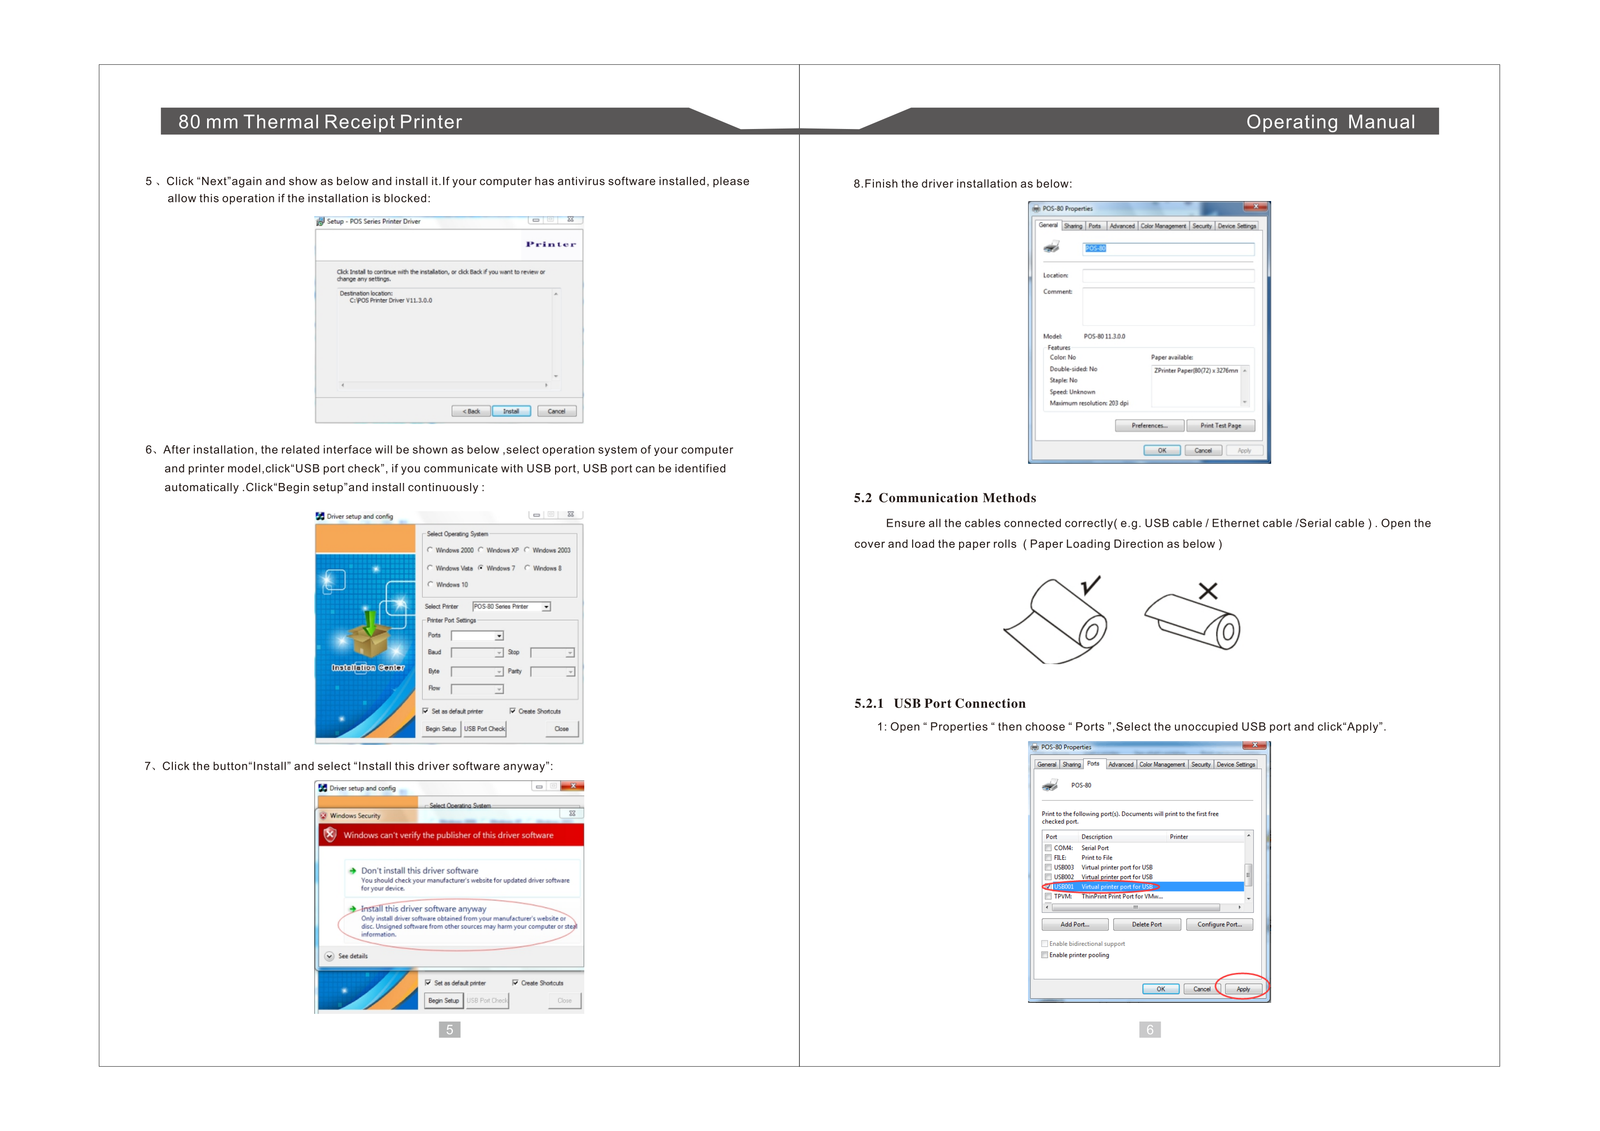
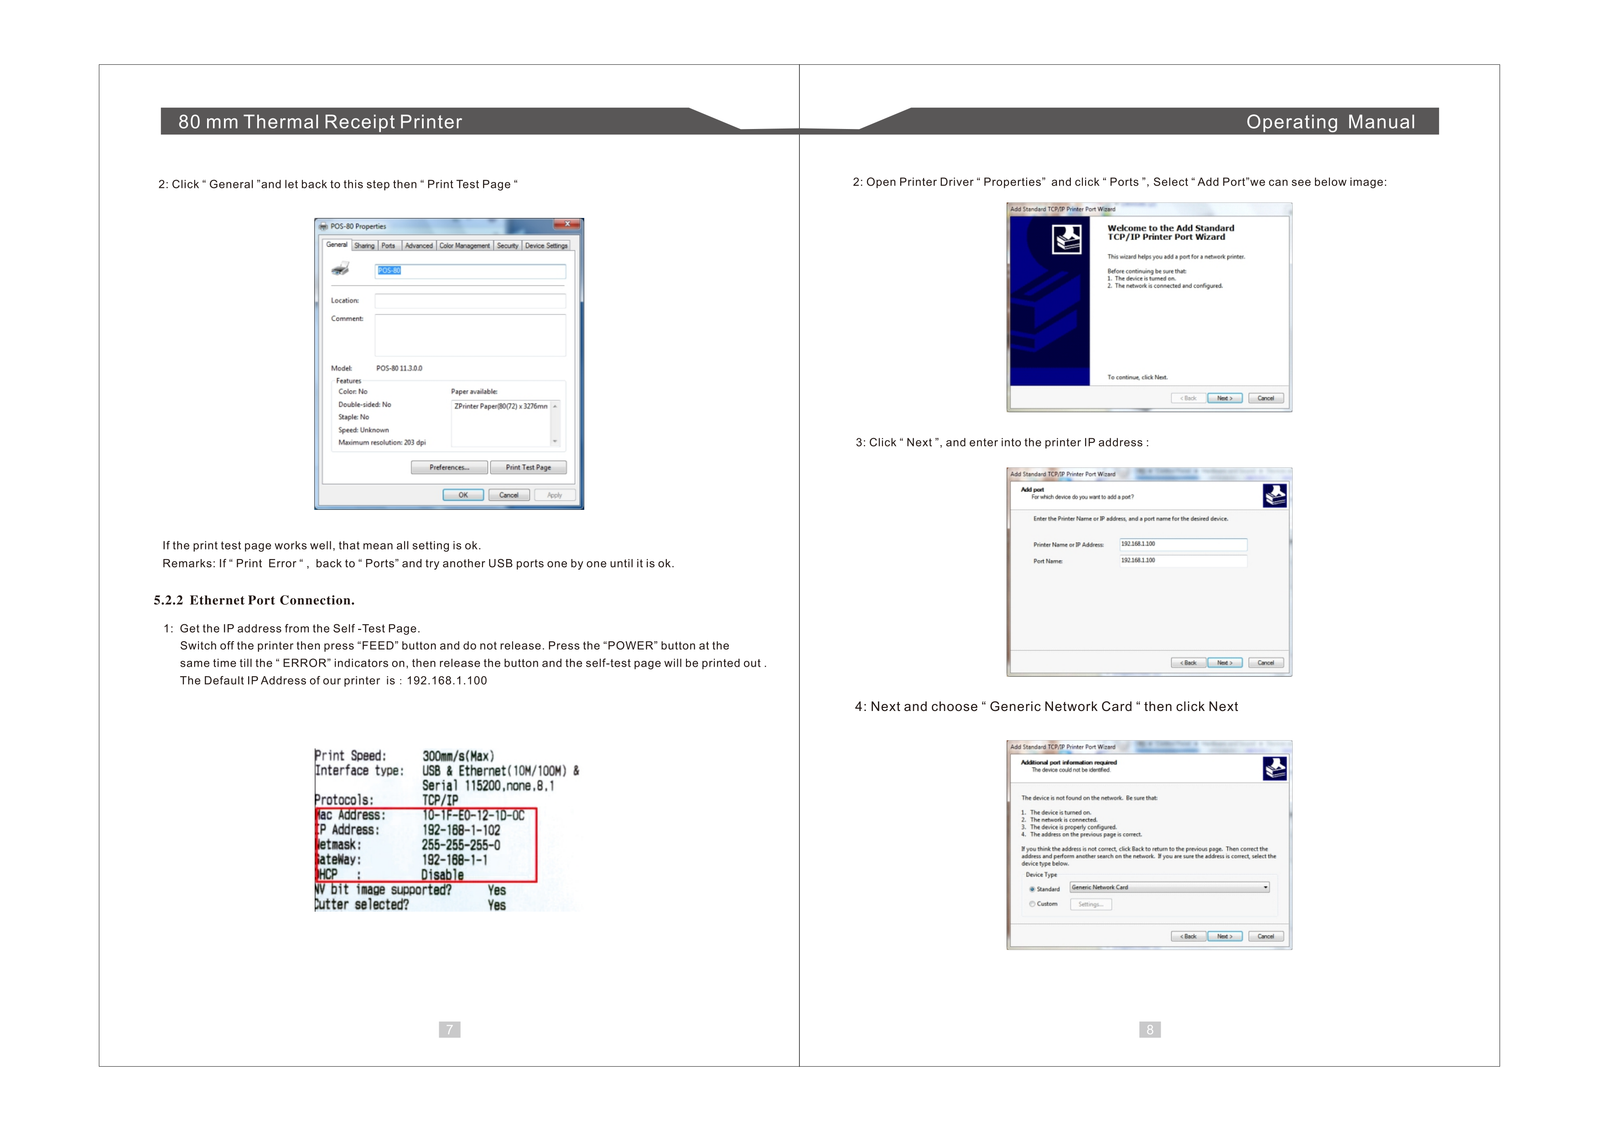
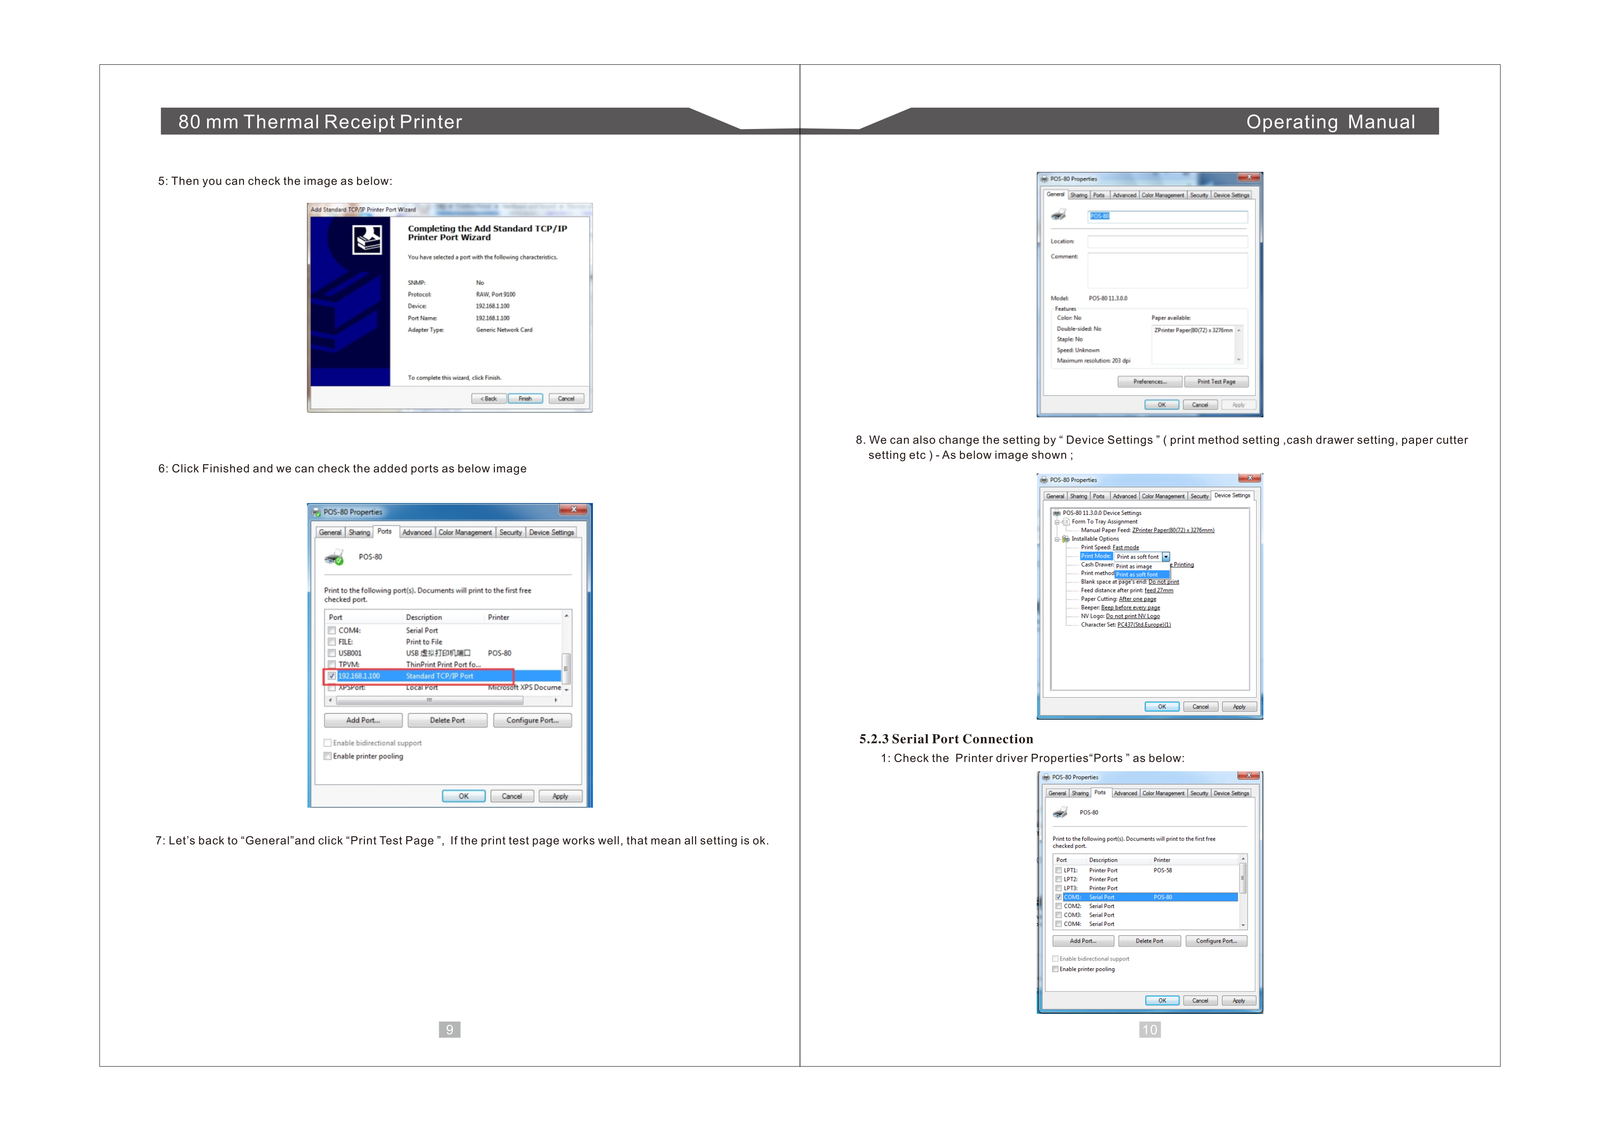
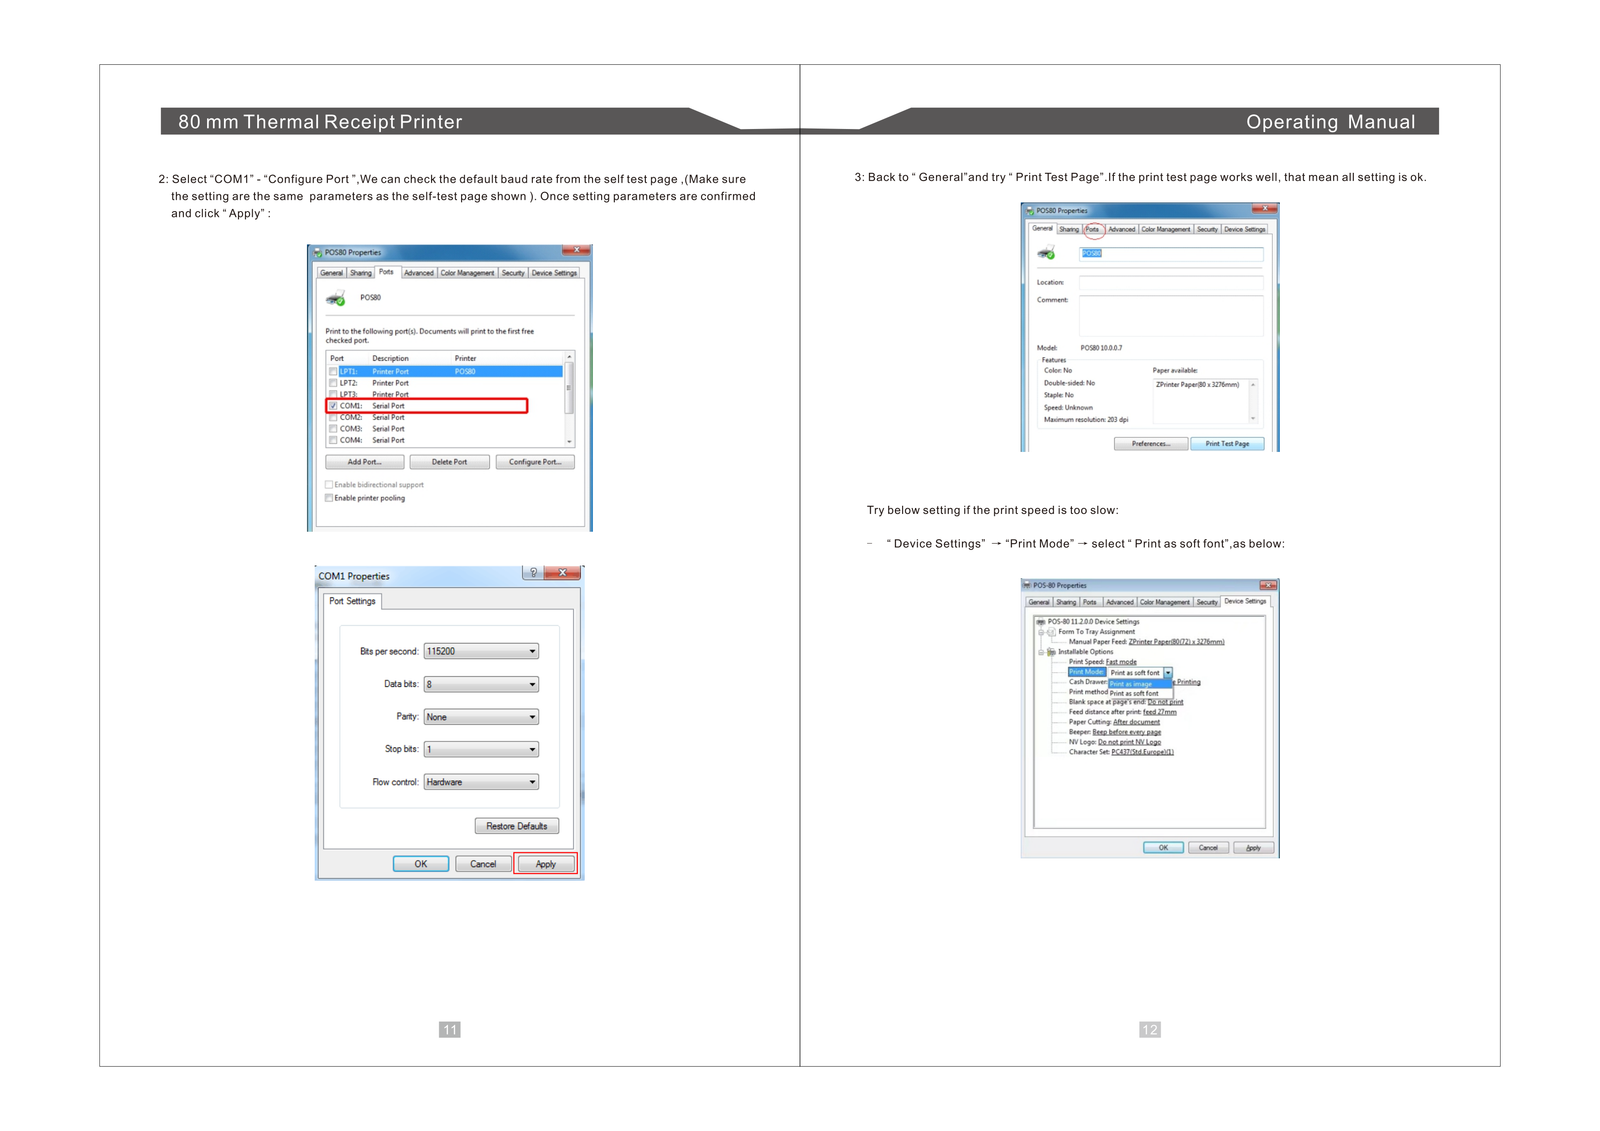
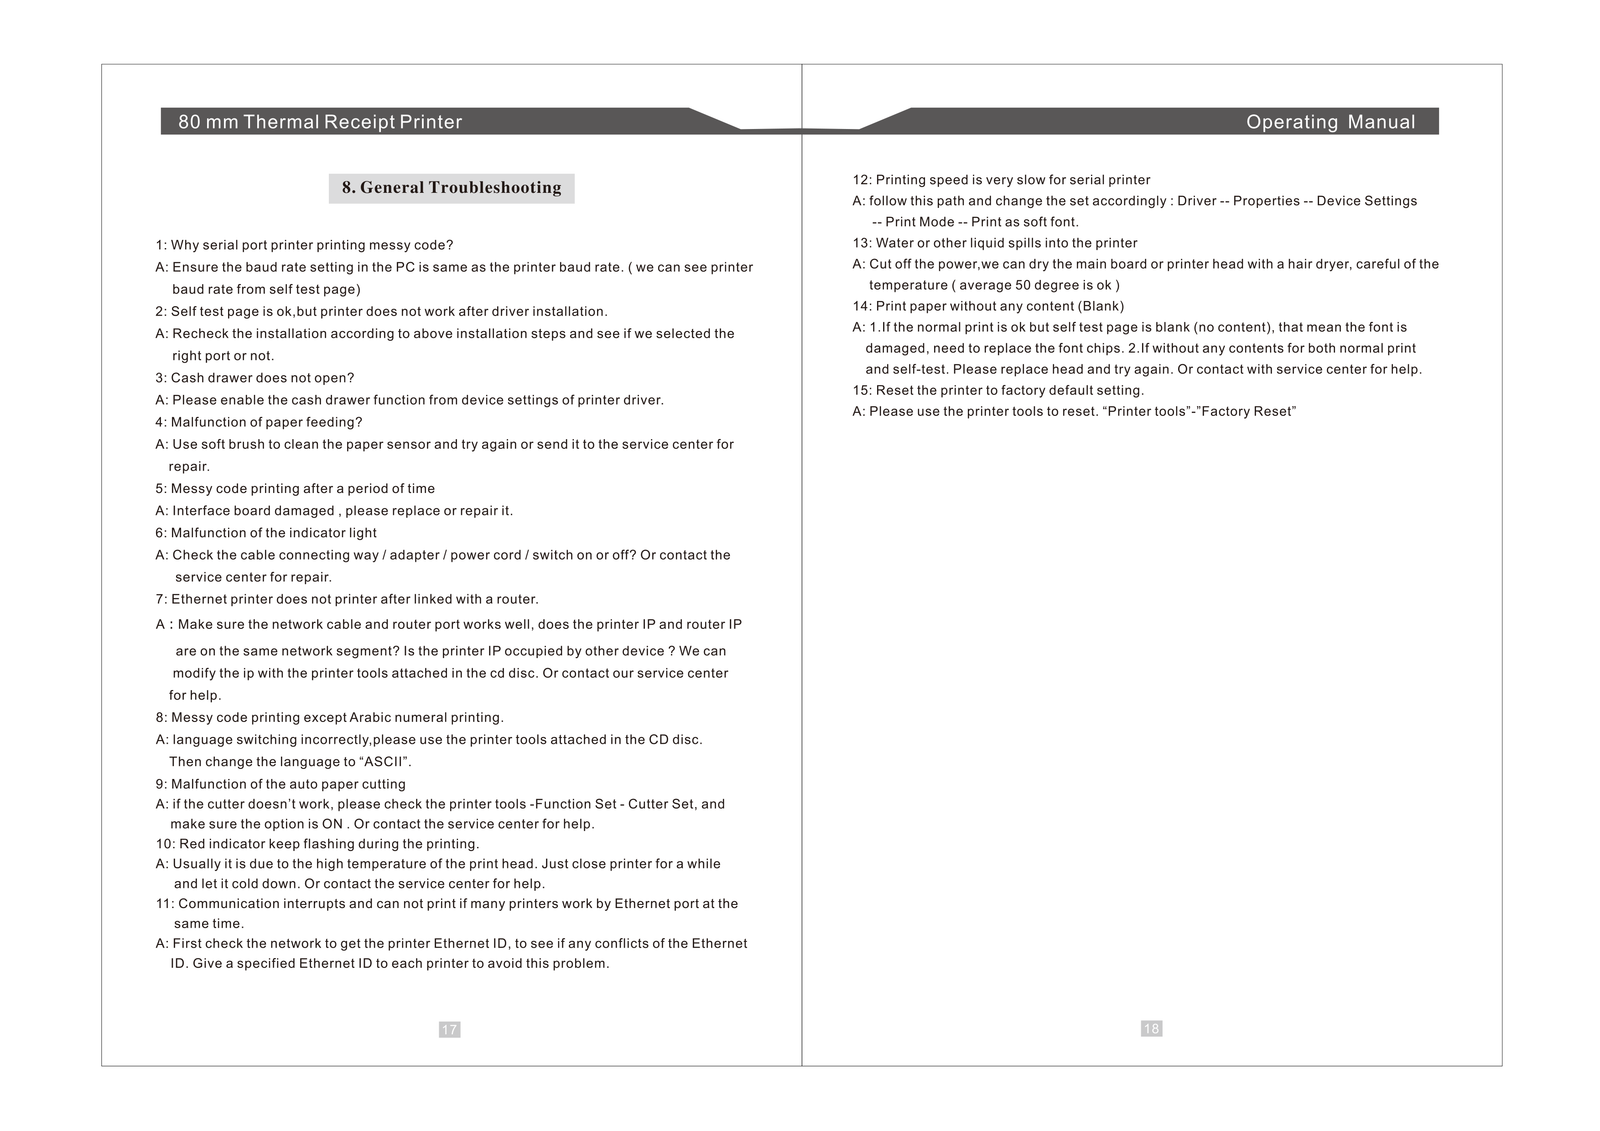
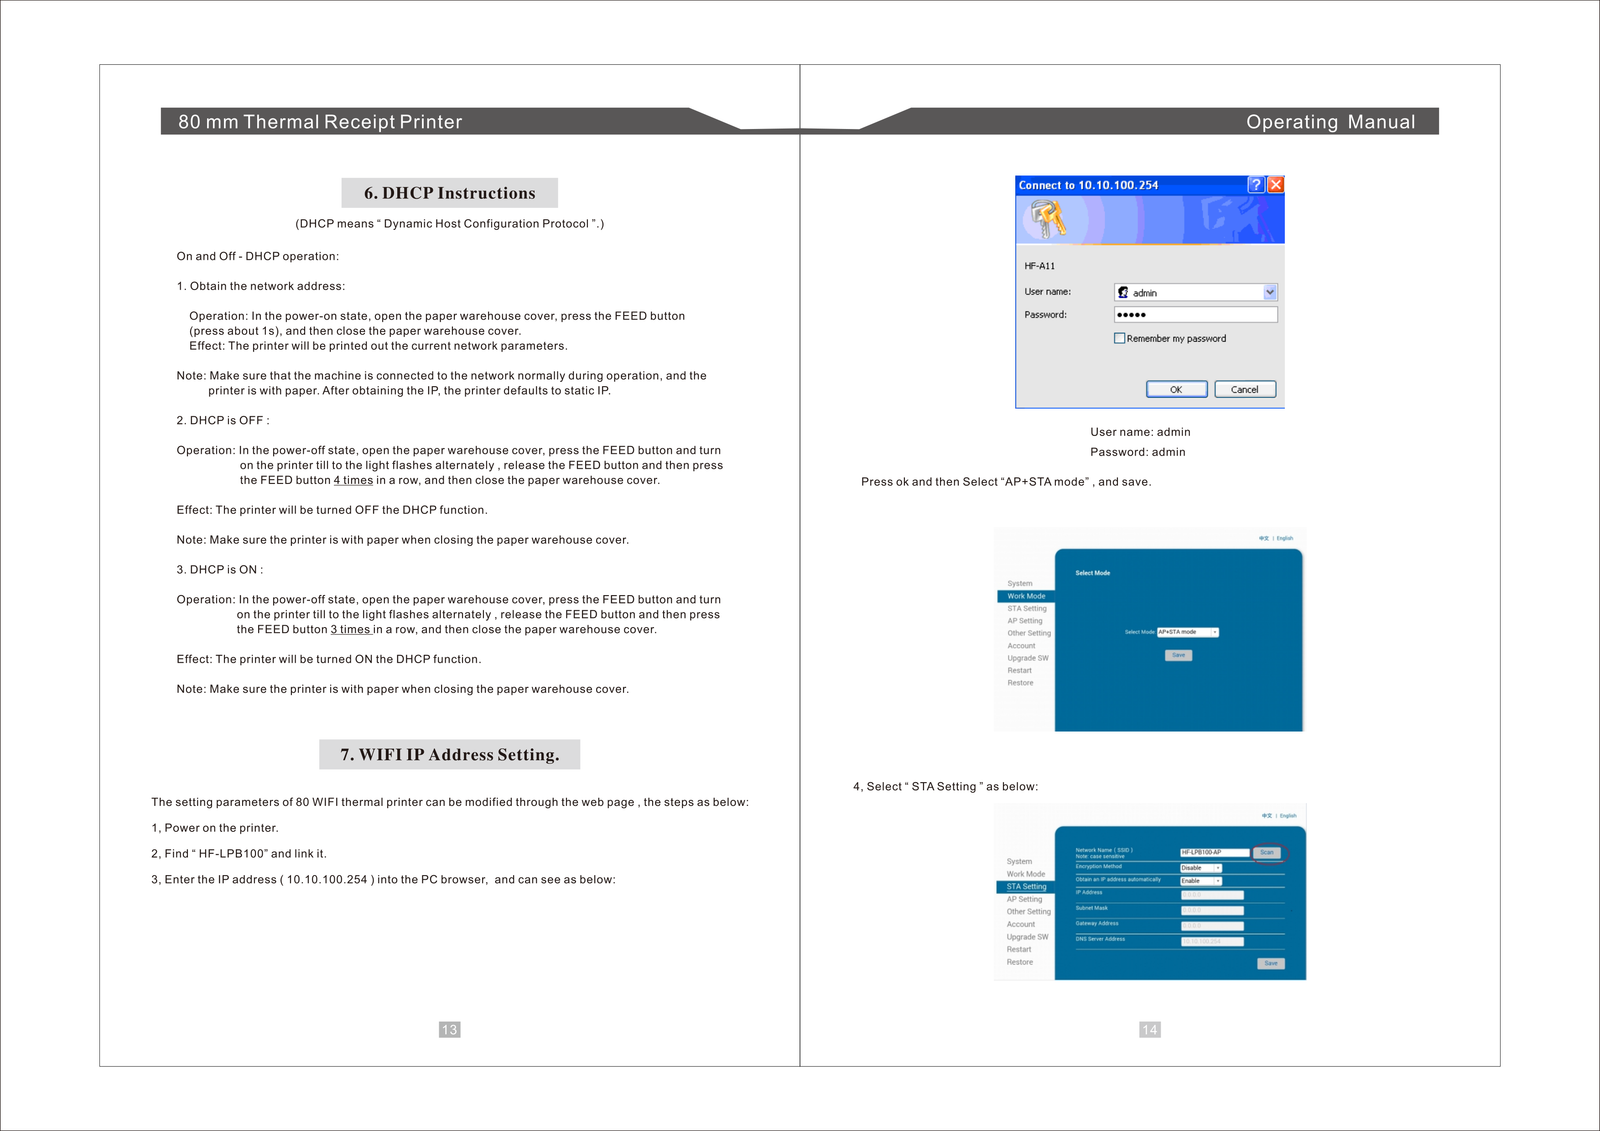
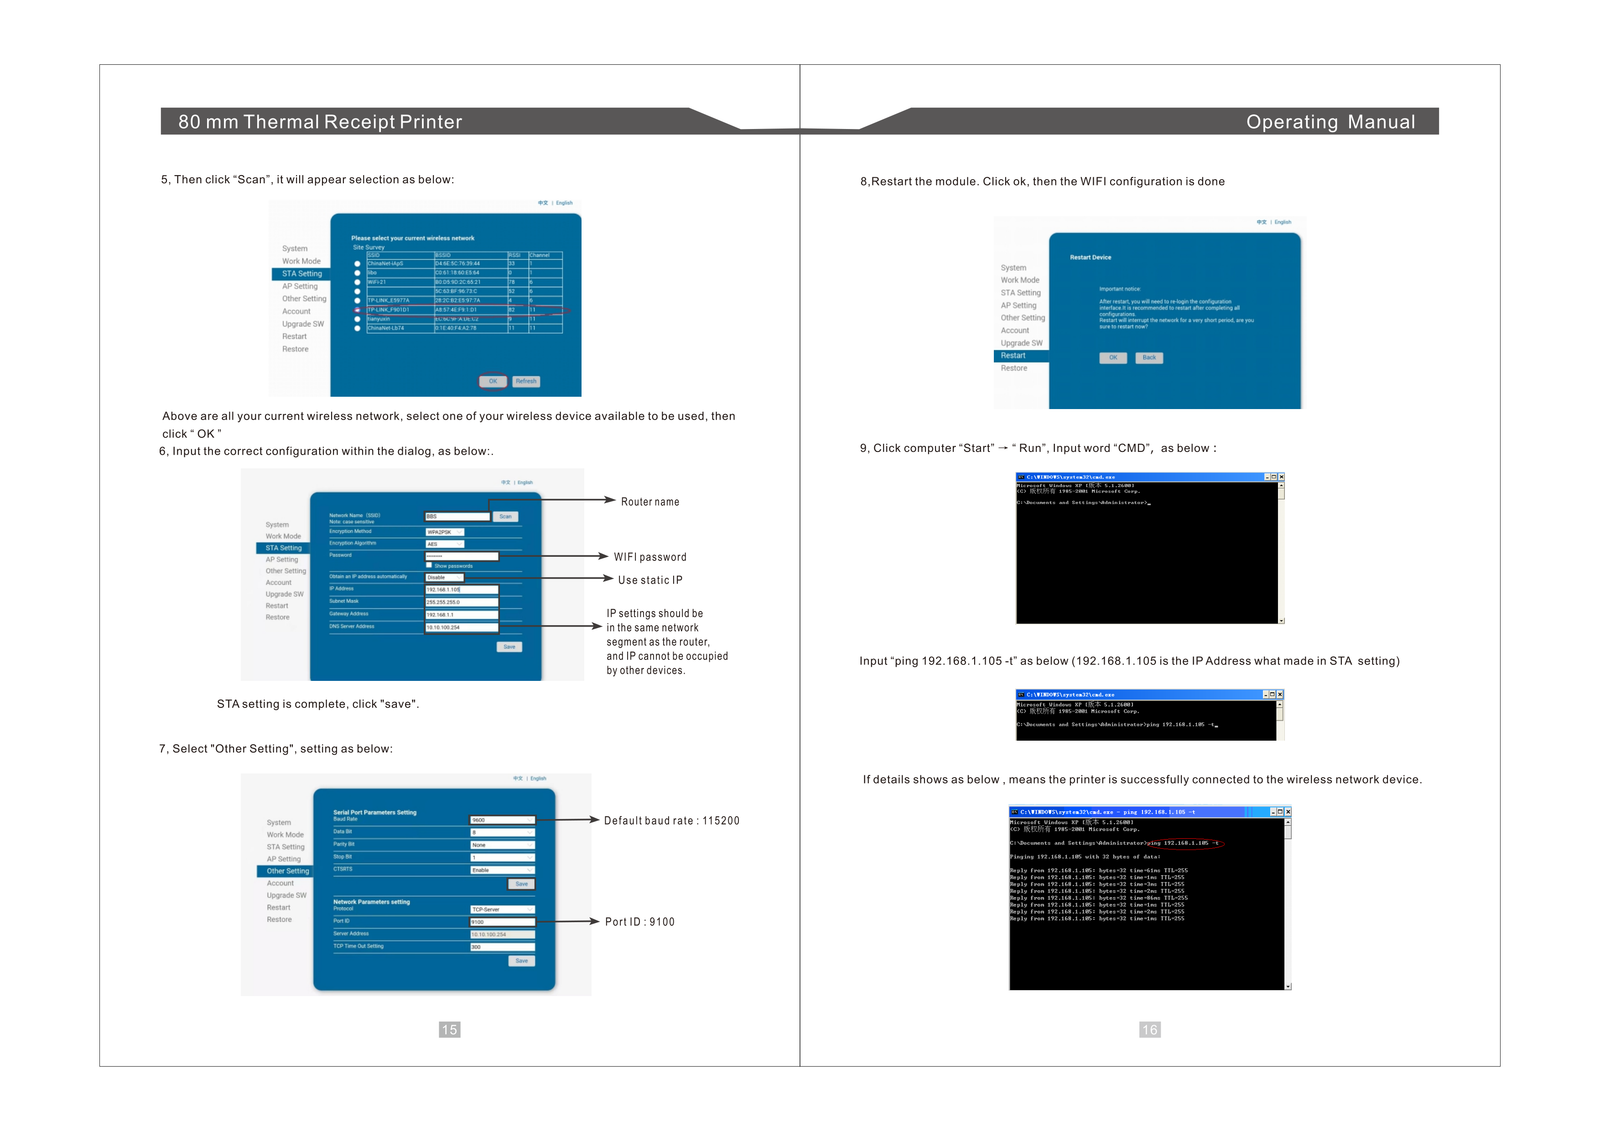
In this section, you will find all the images and step-by-step instructions needed to set up and use the thermal printer effectively.
Warehouse
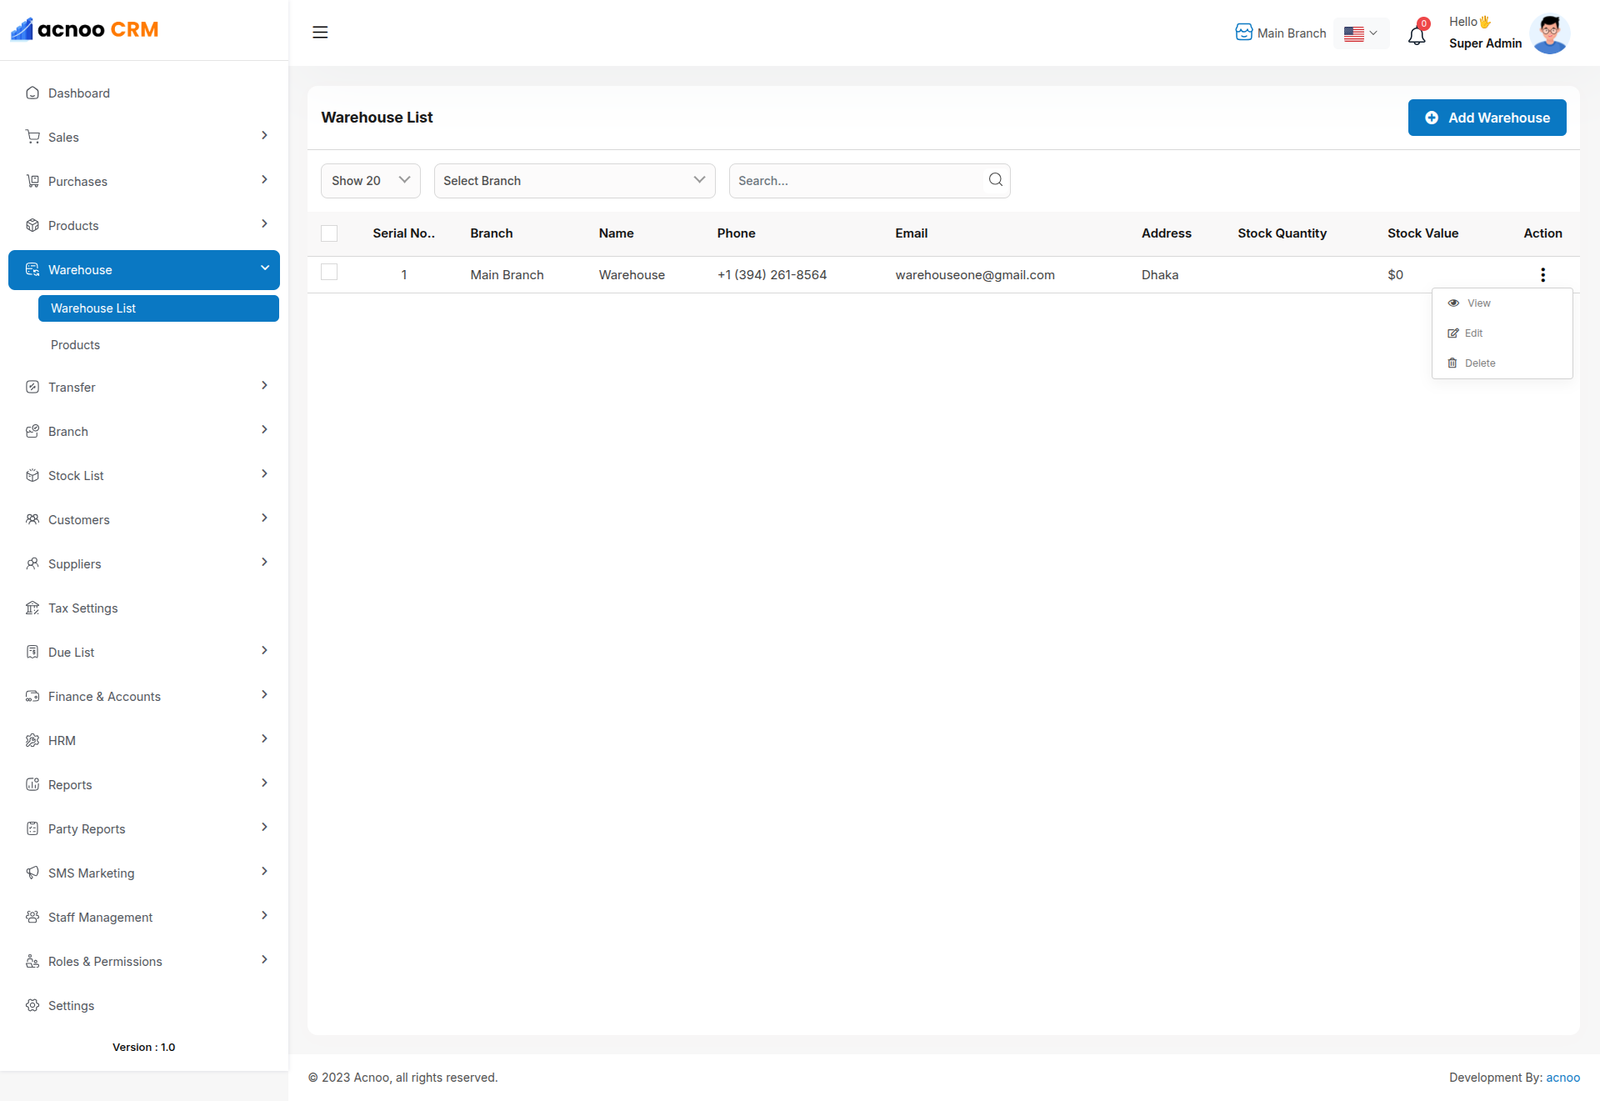
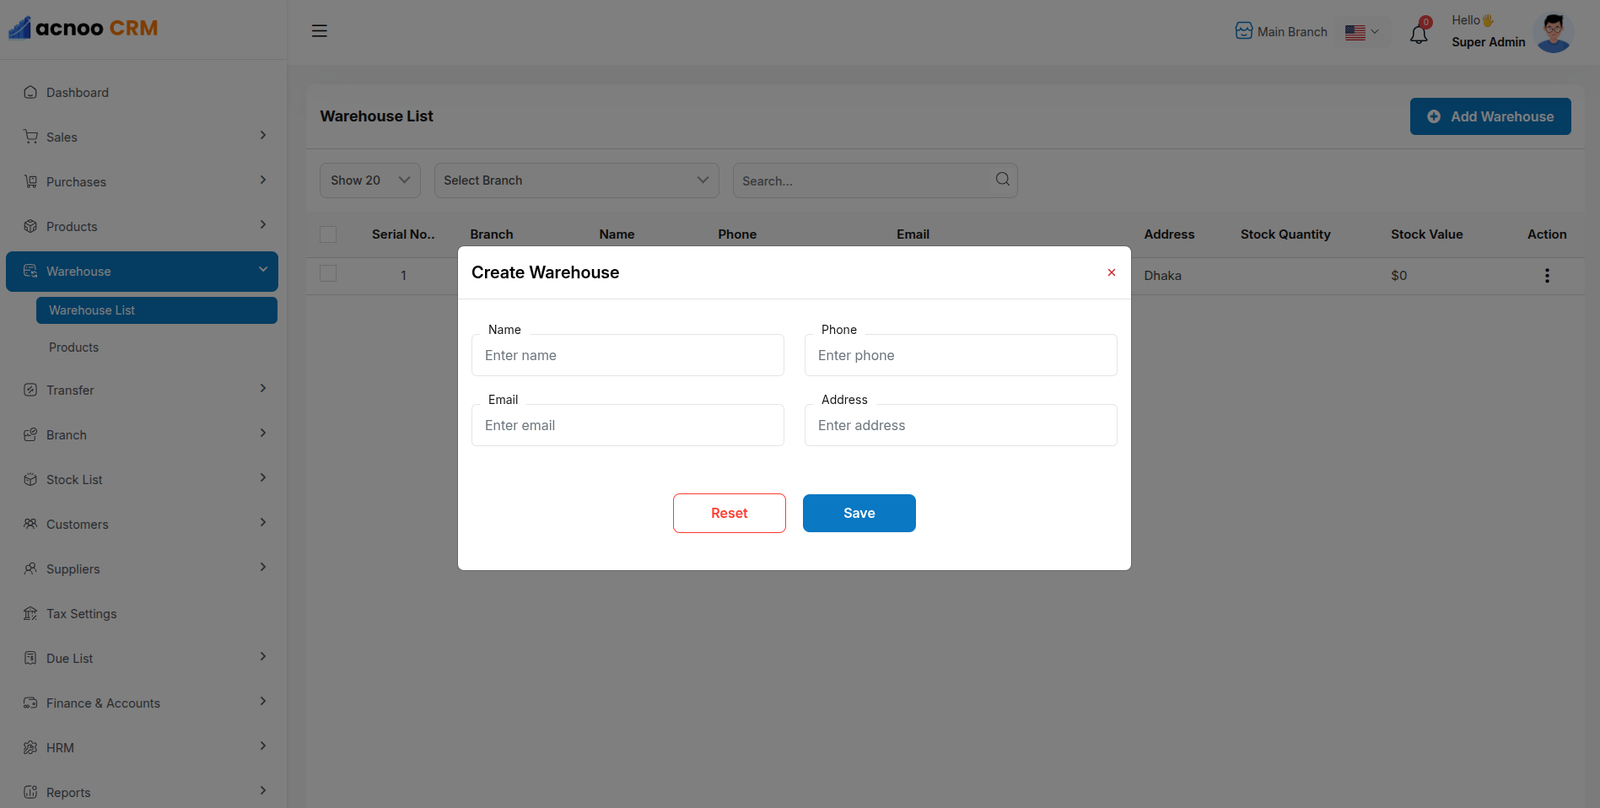
In this module, users can view a list of warehouses, along with their stock values and
quantities across all locations.
Use the search bar to find a specific warehouse by name, phone, email, or address. Per-page
filtering is also available. Click the "Add New" button to open a modal where you can enter
the required information to create a new warehouse. All mandatory fields must be completed.
Click the three dots under the "Action" column to edit, delete, or view details of a
warehouse.
Add New
After clicking "Add New" a form will appear. Fill in the required fields and click the "Save" button. The new warehouse will be successfully added, and you will be redirected to the warehouse list.
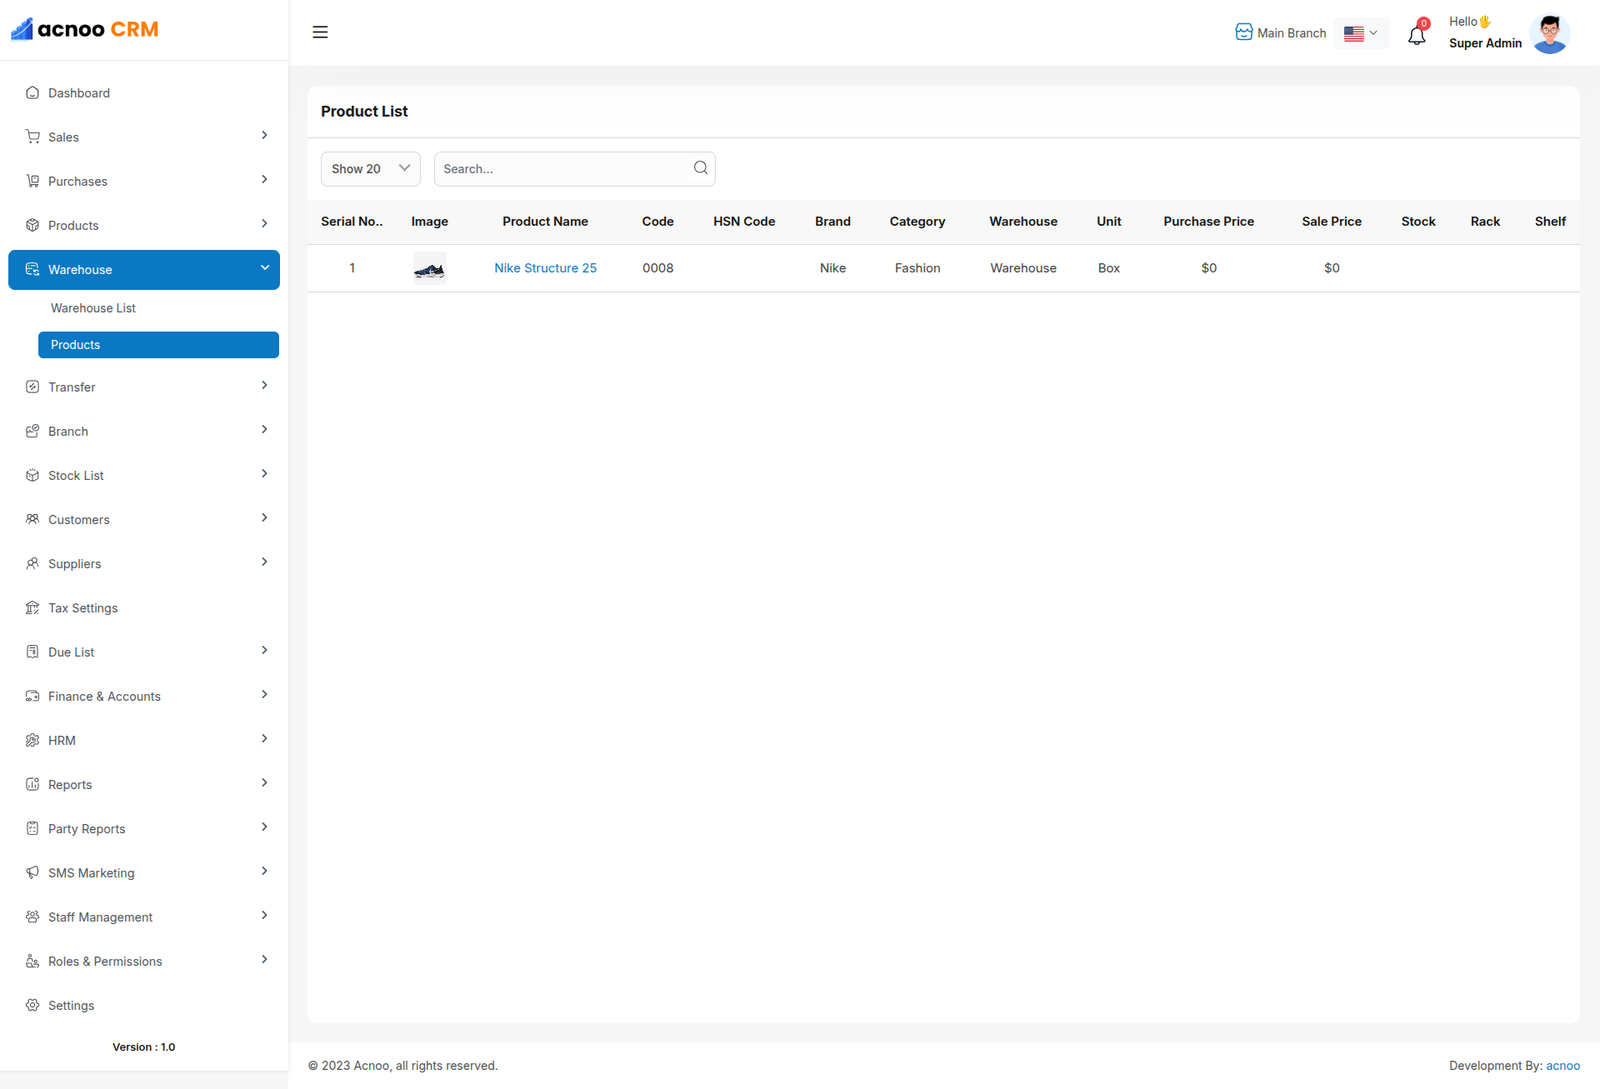
Product
The product list in this table is specific to each warehouse. Only products belonging to the selected warehouse will be displayed.You can filter the list using the input field, and per-page filtering is also available. Clicking on a product name allows you to view the stock details for that product.
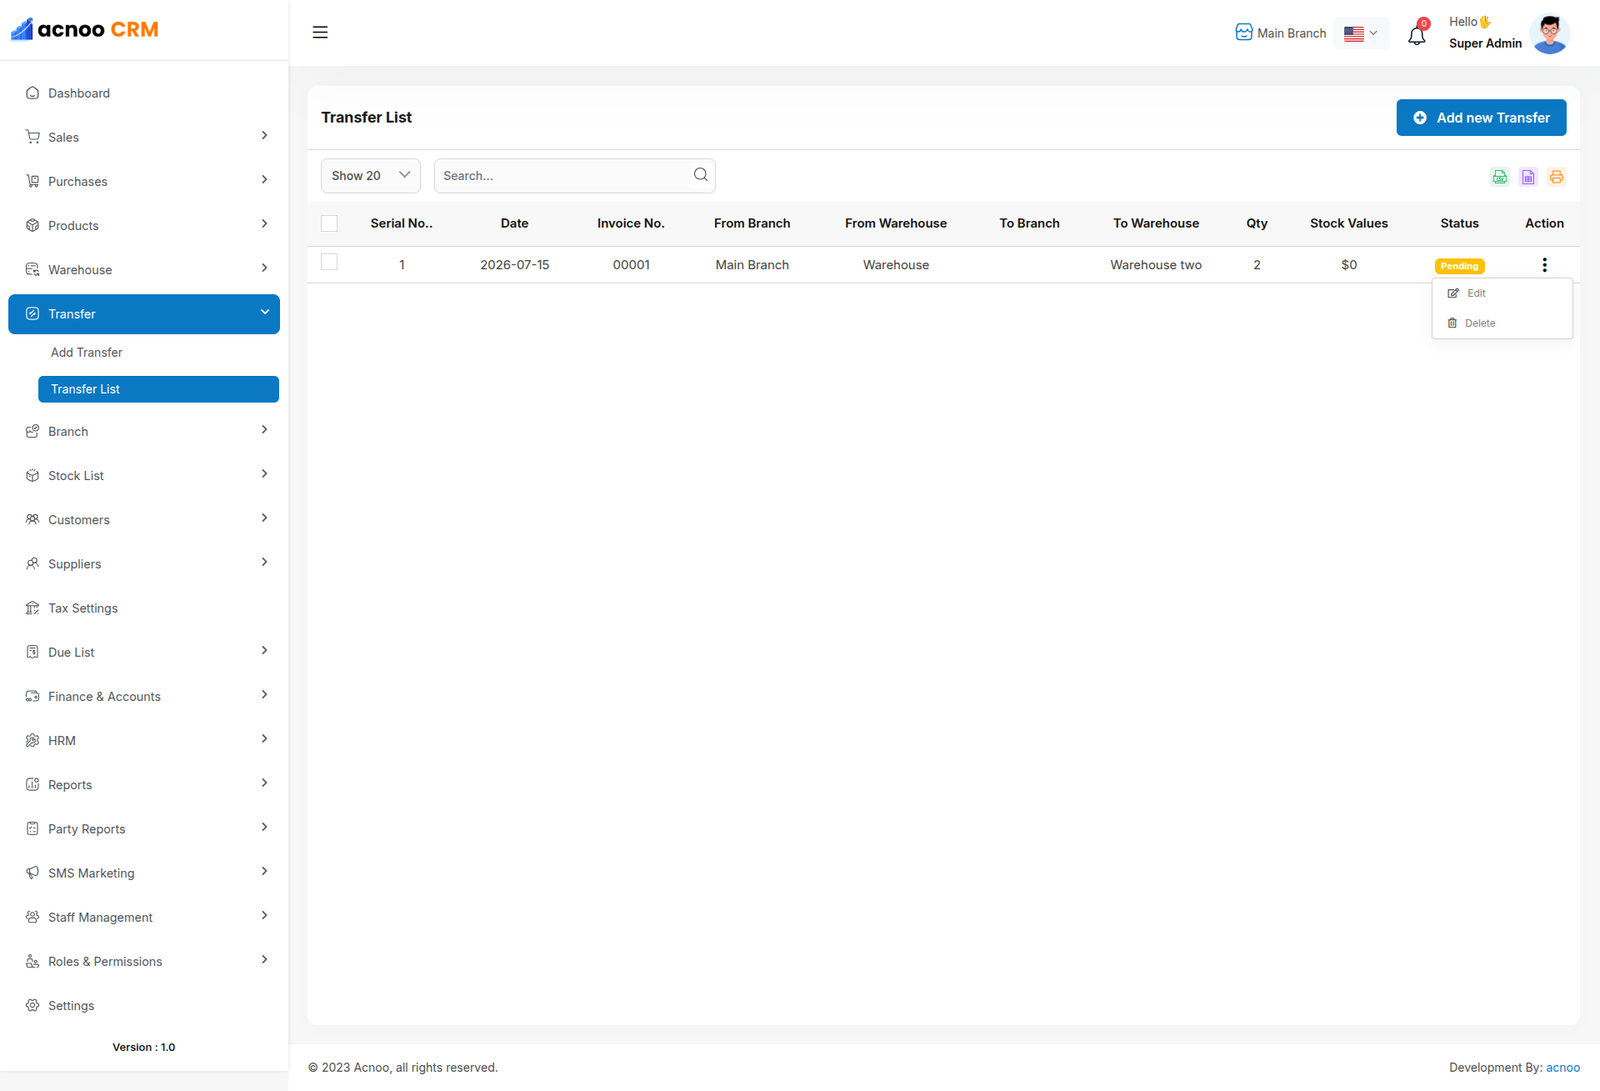
Transfer List
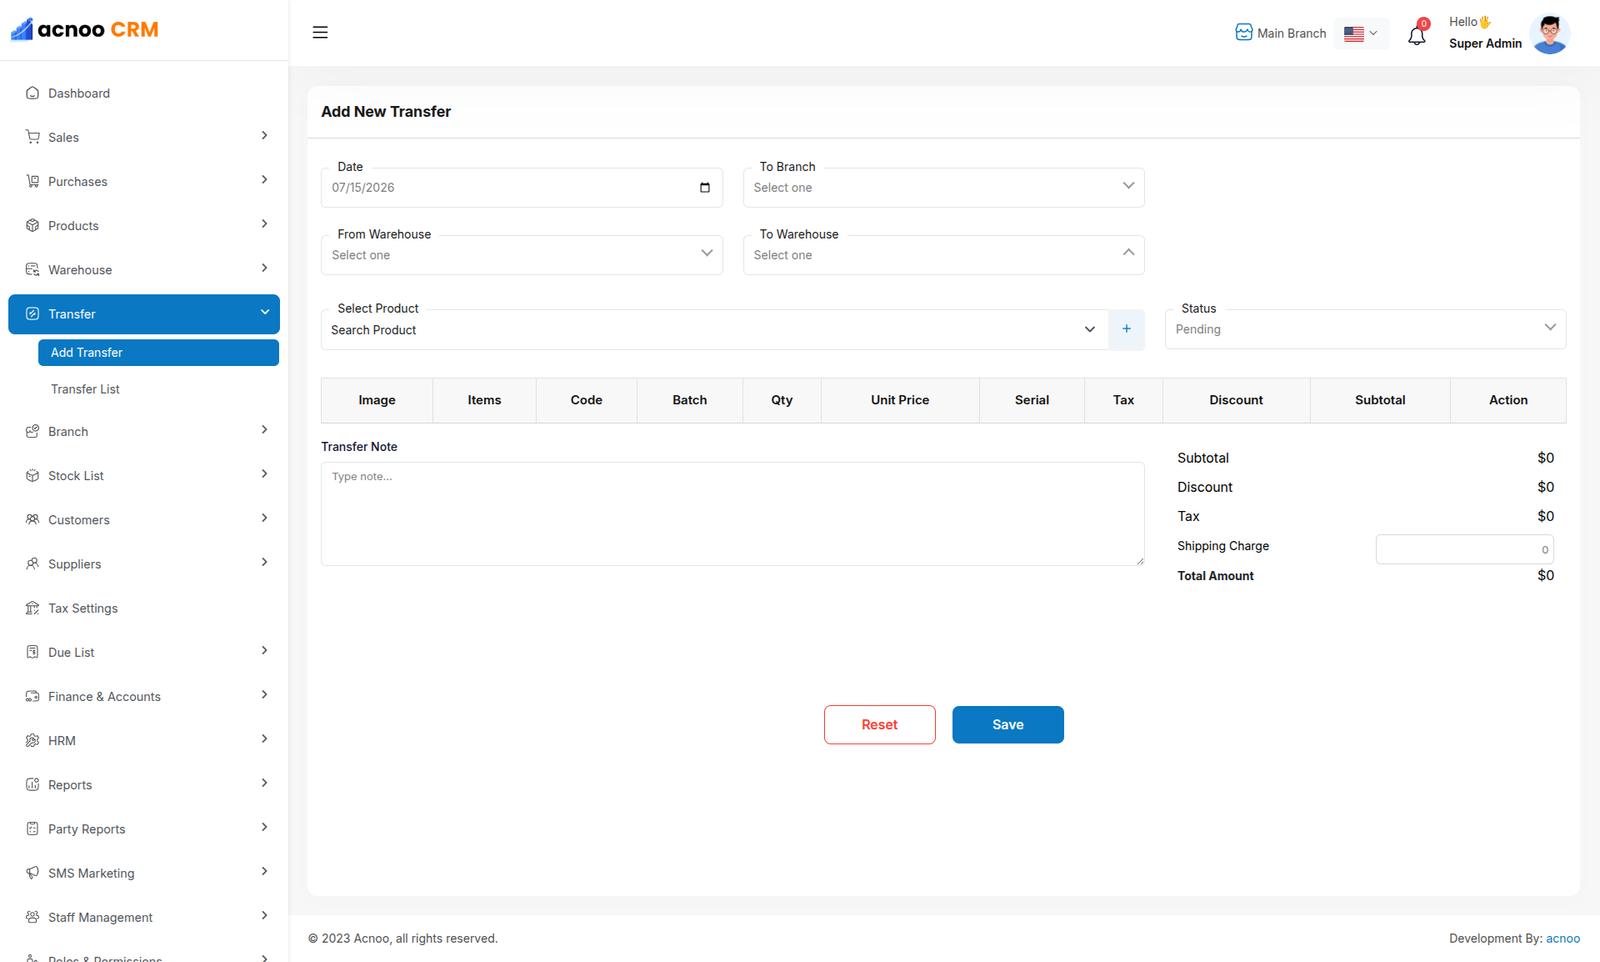
Here, you will see the complete transfer list. The branch column will be visible only if the MultiBranch Add-on is installed. In the listing, you can filter transfers using the search input field or adjust the number of entries displayed per page. From here, you can also add a new transfer, edit or delete a transfer, or perform a multi-delete. Please note that transfers with a status of "Pending" cannot be edited. The Edit page works the same way as the Create page, except that in the status section, an additional "Cancel" option will be available.
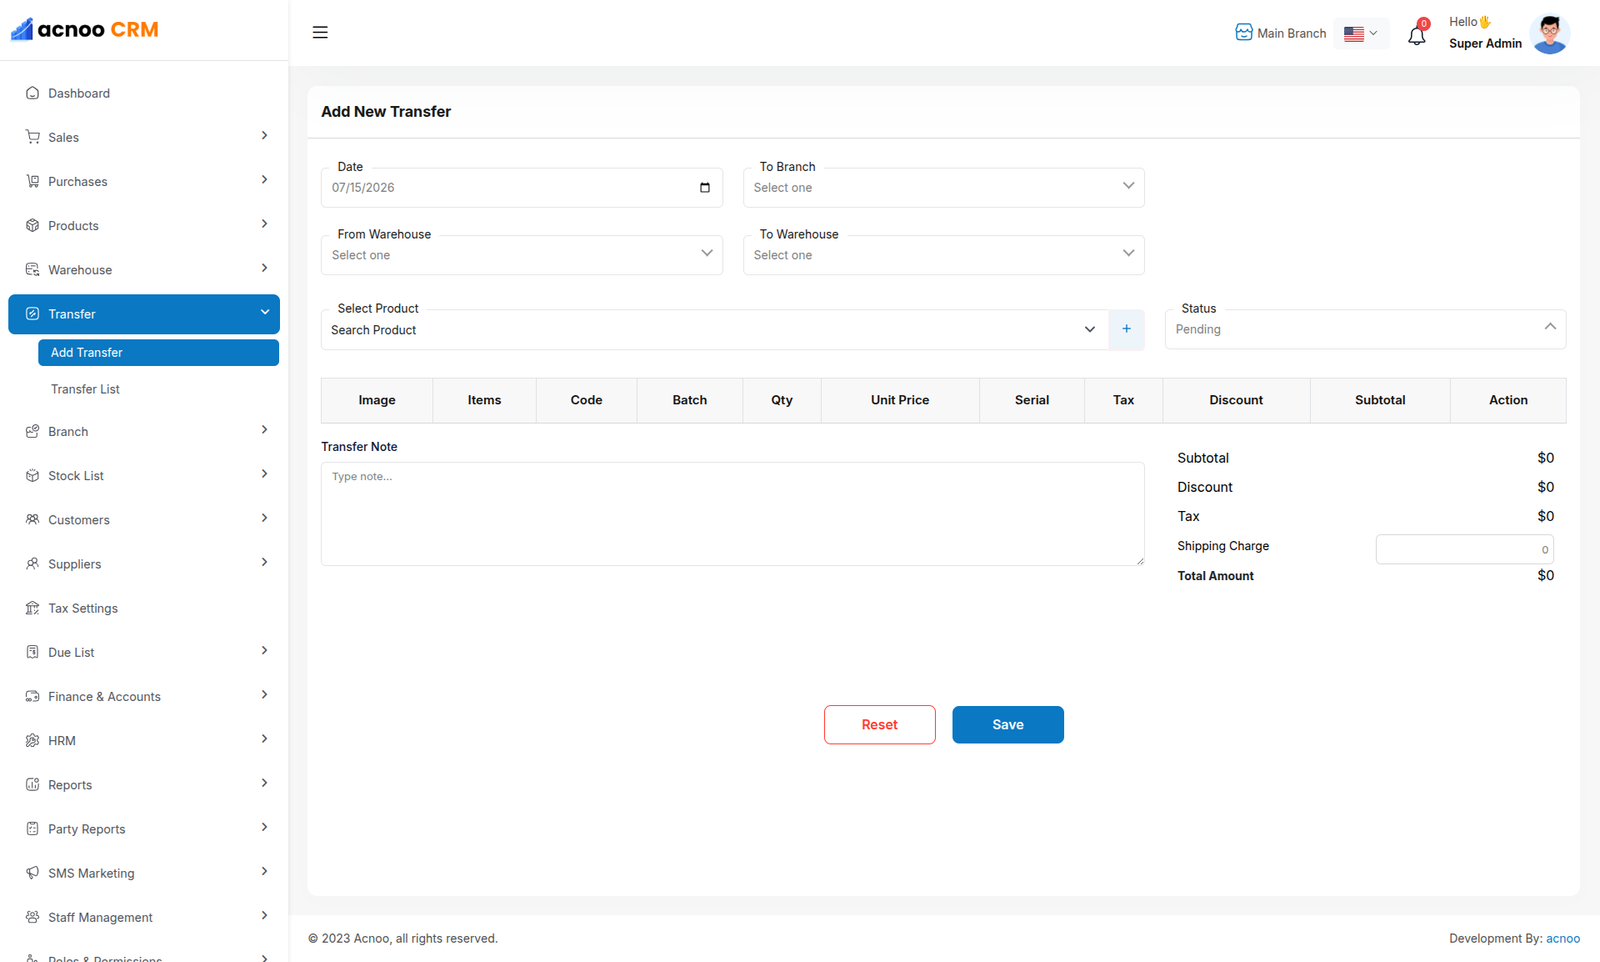
Create Page
You will be able to see the "Branch" field. It will also check whether you are logged in to a branch. Otherwise, only warehouse-to-warehouse transfers will be available.
If you are not logged in under any branch, you will get the option to transfer
products from one branch to another.
* You can transfer products from one branch to another branch.
* You can transfer products from one warehouse to another warehouse.
* You can also transfer products from a warehouse in one branch to a warehouse in another
branch.
Once the transfer is completed, product stock will be automatically updated (increased or
decreased) based on the transfer.
When login into a branch
If you are logged in to a branch, you do not need to select a "from branch" because
you are already under a branch.
* You can transfer products from your branch to another branch.
* You can transfer products from a warehouse to another warehouse in your branch.
Once the transfer is completed, product stock will be automatically updated (increased or
decreased) based on the transfer.
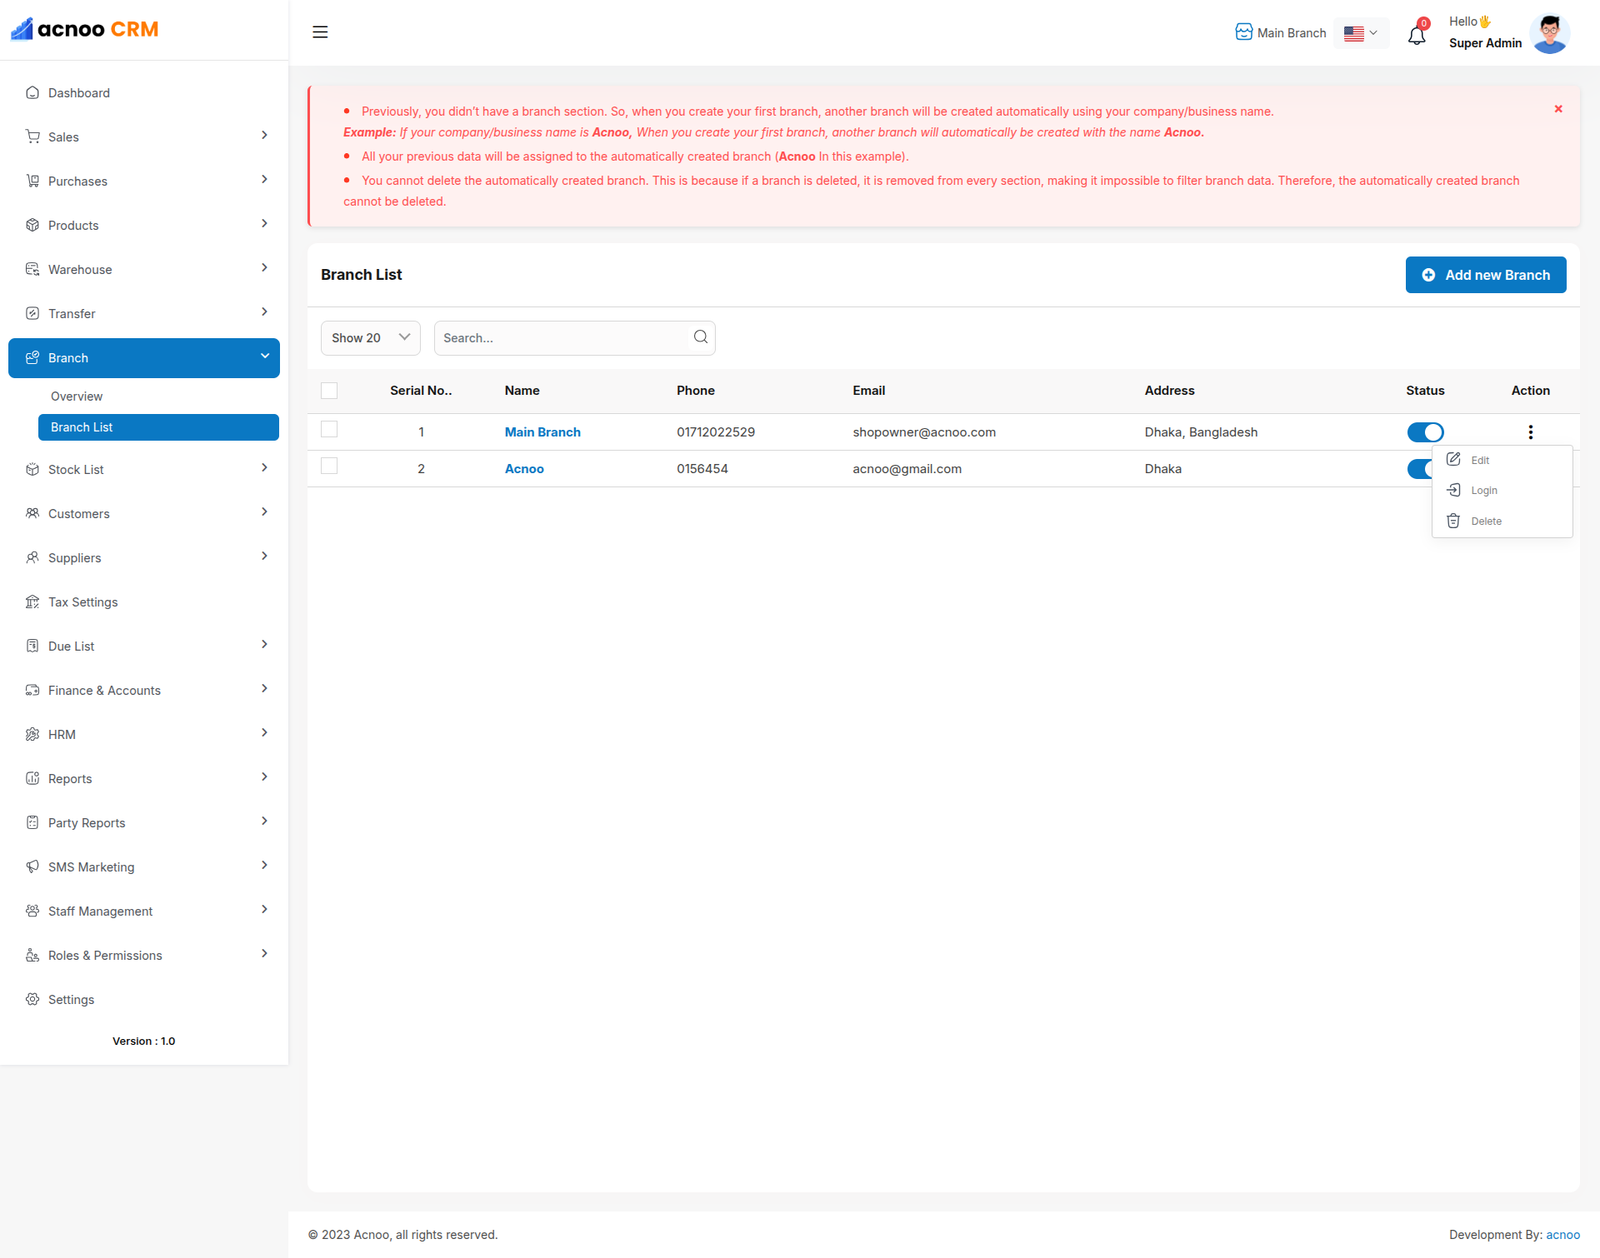
Branch List
Here, you can view a list of all branches, including the first branch. At the top of the
table, instructions are provided on how to create a branch. When creating a new branch, the
system will automatically generate it (if it does not already exist), and relevant data will
be moved to the new branch. For example, when a branch is created, the new branch will be
generated automatically using the business name. Note that the first branch cannot be
deleted.
In the listing, you can filter branches using the search input field or adjust the number of
entries displayed per page. From here, you can also add a new branch, edit or delete
branches, or perform a multi-delete. Additionally, by click on business name, also have the
"Login" button allows you to log in directly to the selected branch.
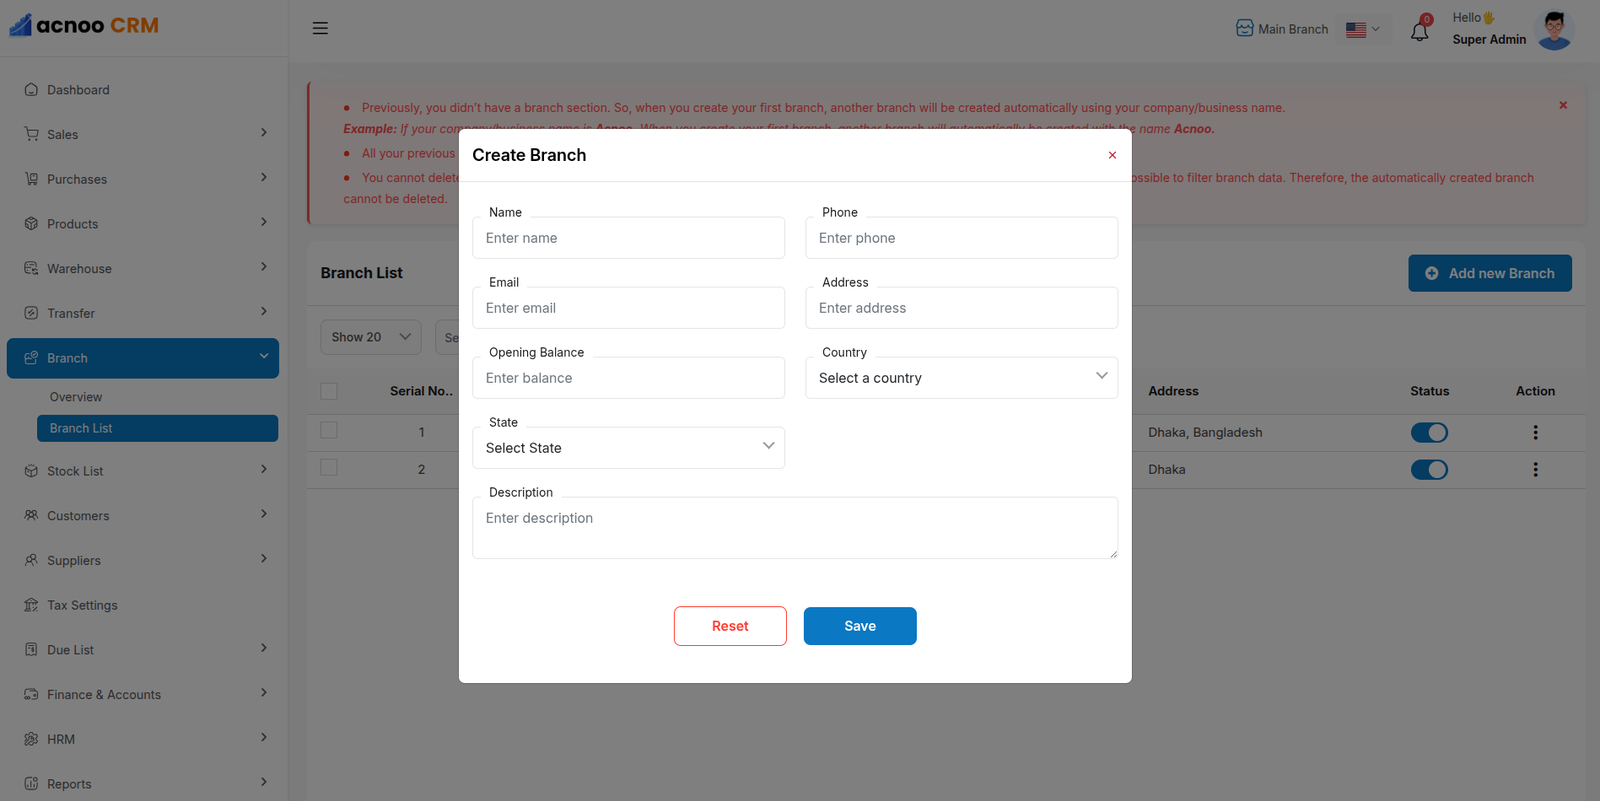
Create New
After clicking on "Add New Branch" a modal will open where you need to fill in the required information. Once completed, click the "Save" button. The new branch will be created successfully, and you will be redirected to the branch list. If you are logged in to a branch, the name of that branch will be displayed in the header.
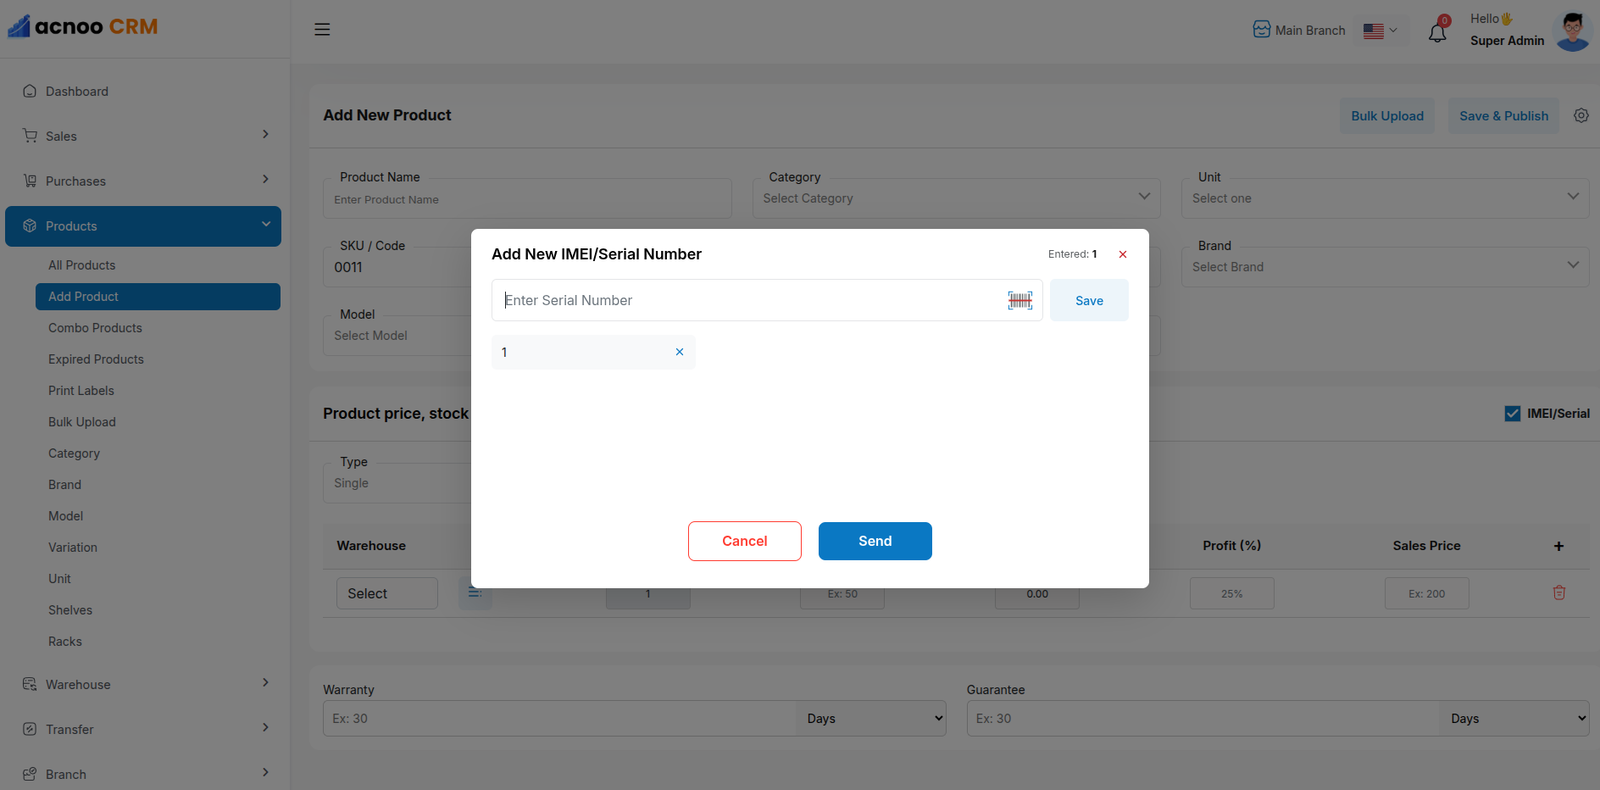
Products
When creating a product, if you select IMEI/Serial, a Serial column will appear. Clicking the button in this column will open a pop-up where you can add serial numbers. The quantity will be automatically calculated based on the serial numbers, so you don’t need to enter the quantity manually.
Sales
Here, when you select any product, if that product has serial numbers, a pop-up will open. From this pop-up, the selected serial numbers will be added to the Cart-list. You can click the Serial column in the cart list again to update the serials. Note: Once serials are added, the quantity cannot be updated manually.
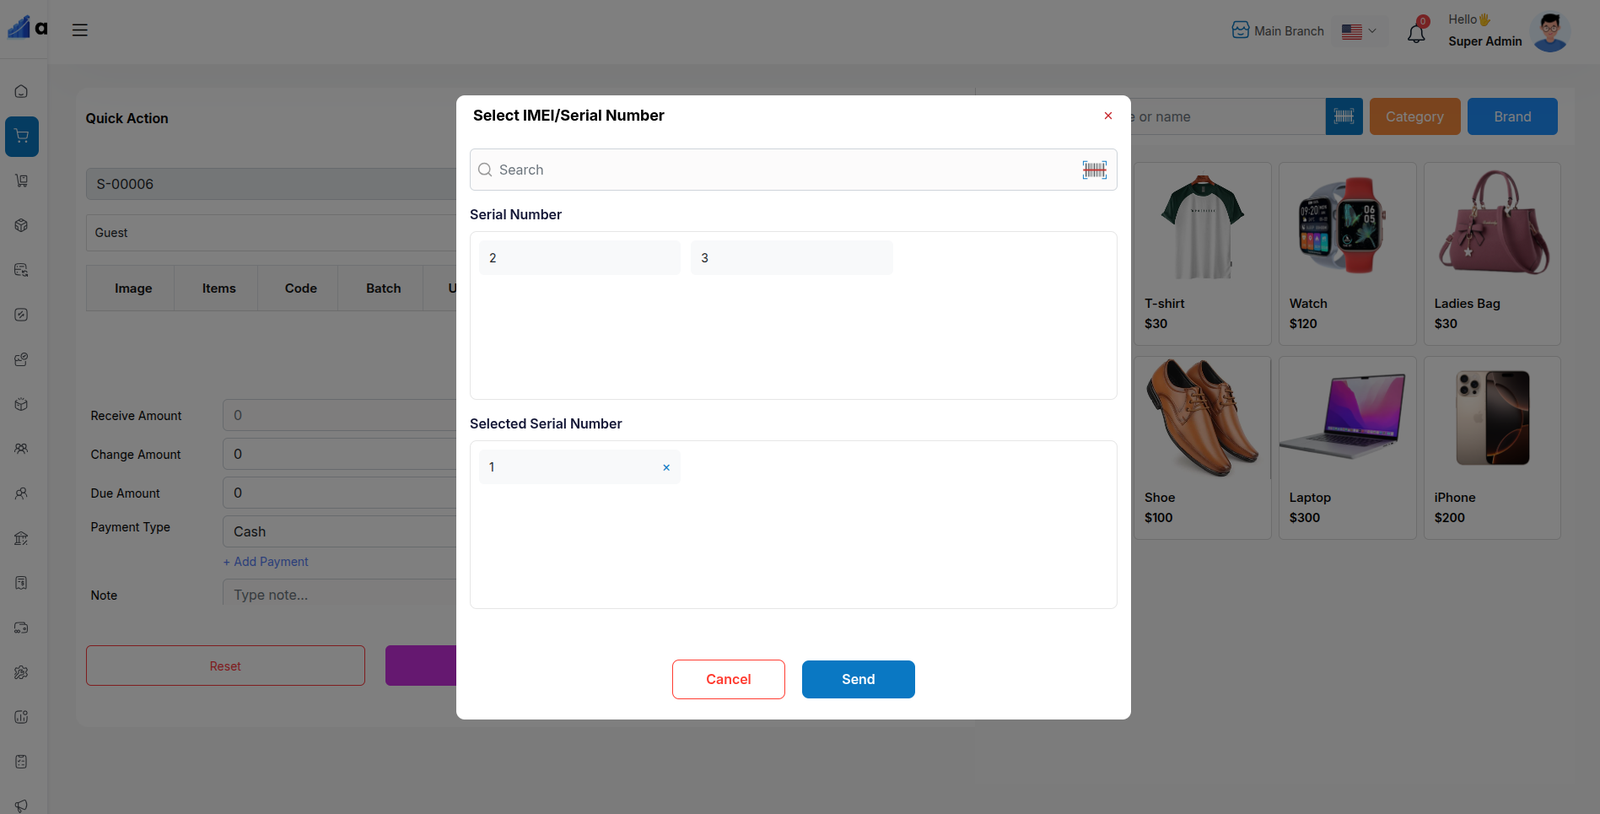
Sales Return
When processing a sale return, if the product has serial numbers, you must return it according to its serial numbers. The product cannot be returned without specifying the serial numbers.
Purchases
When making a purchase, if a product has serial numbers, clicking that product will open a pop-up where you can add serial numbers. After adding serial numbers, they will appear in the cart list. From there, you can click the Serial button again to update the serials in the cart. Note: The quantity of a serial product cannot be updated directly from the cart list.
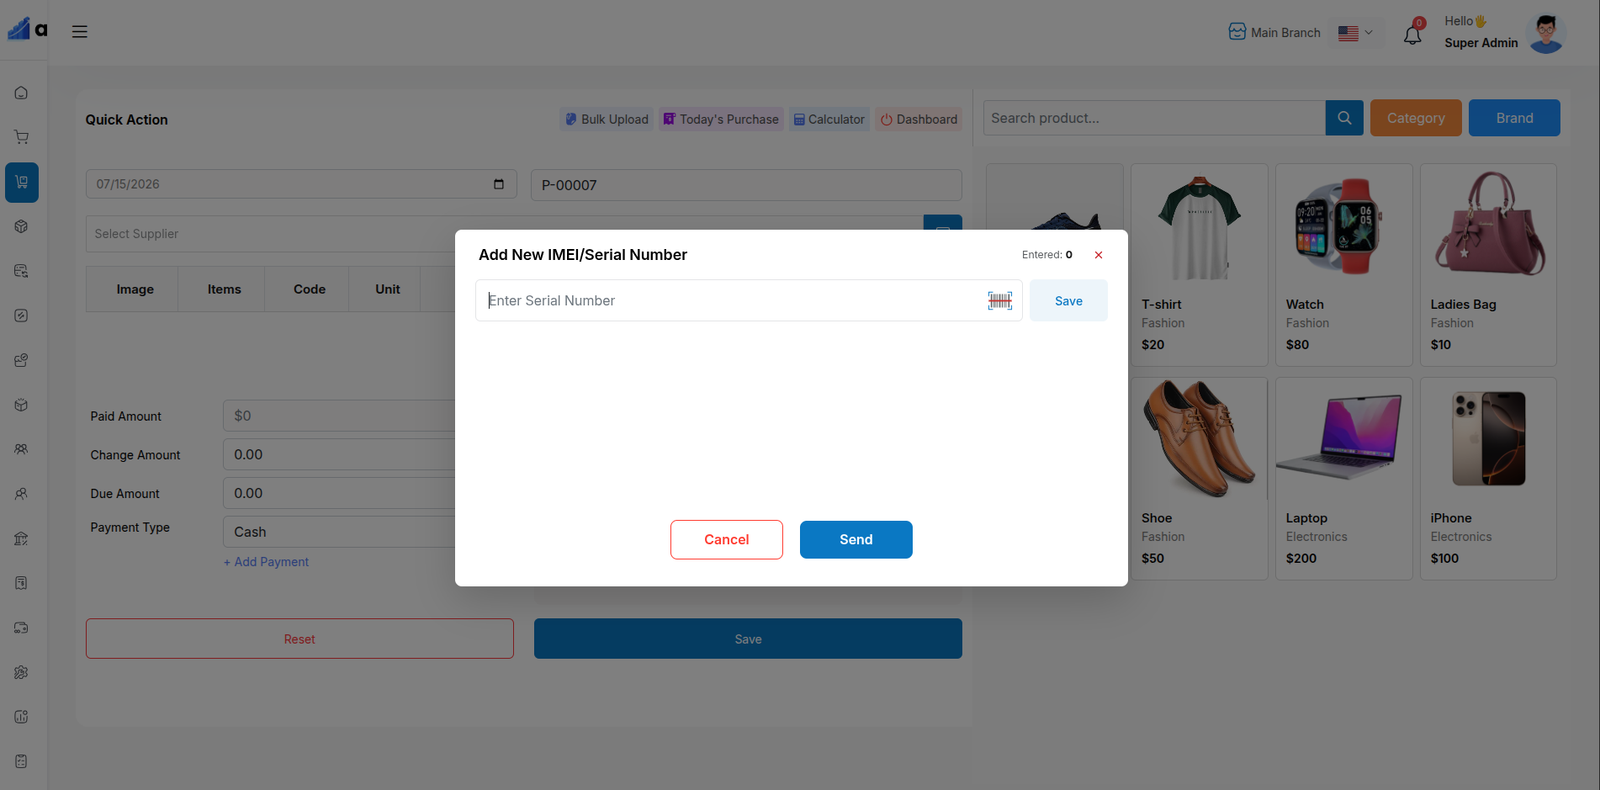
Purchase Return
When processing a purchase return, if the product has serial numbers, you must return it according to its serial numbers. The product cannot be returned without specifying the serial numbers.
Transfer
When selecting a product, if it has serial numbers, a pop-up will open. From this pop-up, you can select serial numbers and add them to the cart. The pop-up will look similar to the Sale Serial pop-up. You can also click the Serial button in the cart list to update the serial numbers. As in other sections, the quantity cannot be updated manually.
Note: Transfer Section will available if the Warehouse Add-on or Multi-Branch Add-on is installed
SMS Template
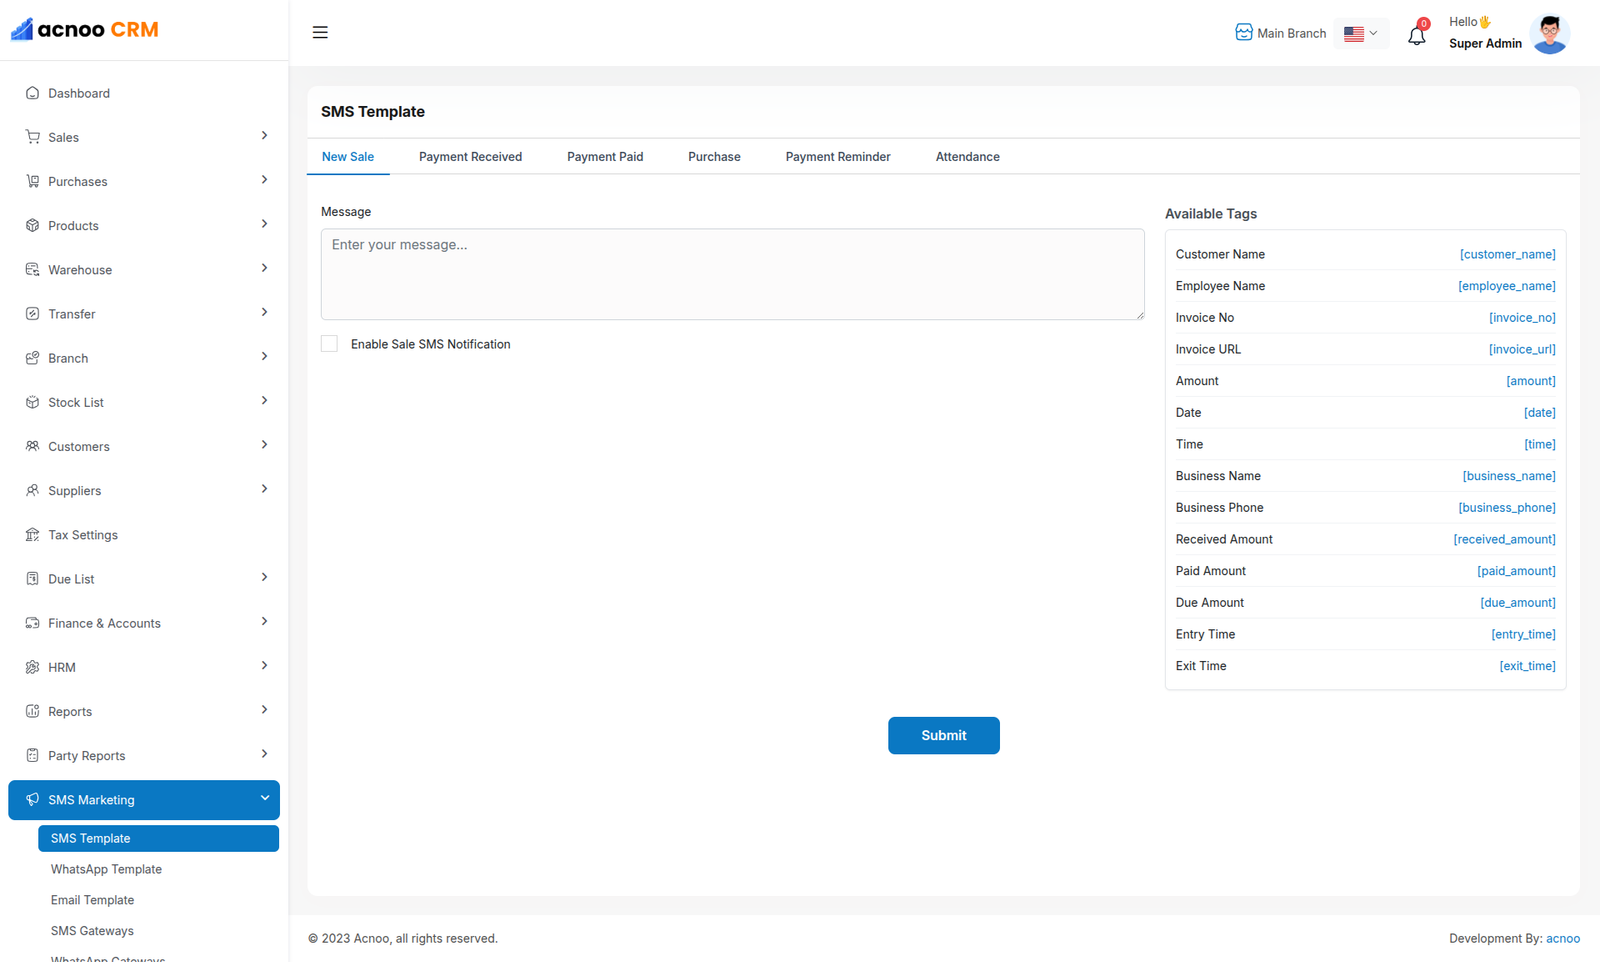
The SMS Template module allows you to create and manage various types of SMS messages that can be automatically sent for different business events. These templates ensure consistent communication with your customers and employees.
Available SMS template types include:
- Sale Confirmation
- Payment Received
- Payment Paid
- Purchase Notifications
- Payment Reminder
- Attendance Notifications
- And other customizable templates as needed
Each template can be sent in a standardized format and supports dynamic placeholders to personalize messages for recipients.
Dynamic Tags (Placeholders)
Dynamic tags allow you to automatically insert relevant data into SMS messages. The available tags include:
Using these dynamic tags ensures that each SMS message is personalized and relevant. For example, in a Payment Received template, the tag [received_amount] will automatically be replaced with the actual amount received by the customer.
This system allows businesses to efficiently communicate transactional information, reminders, and notifications, while maintaining a professional and consistent message format.
WhatsApp Template
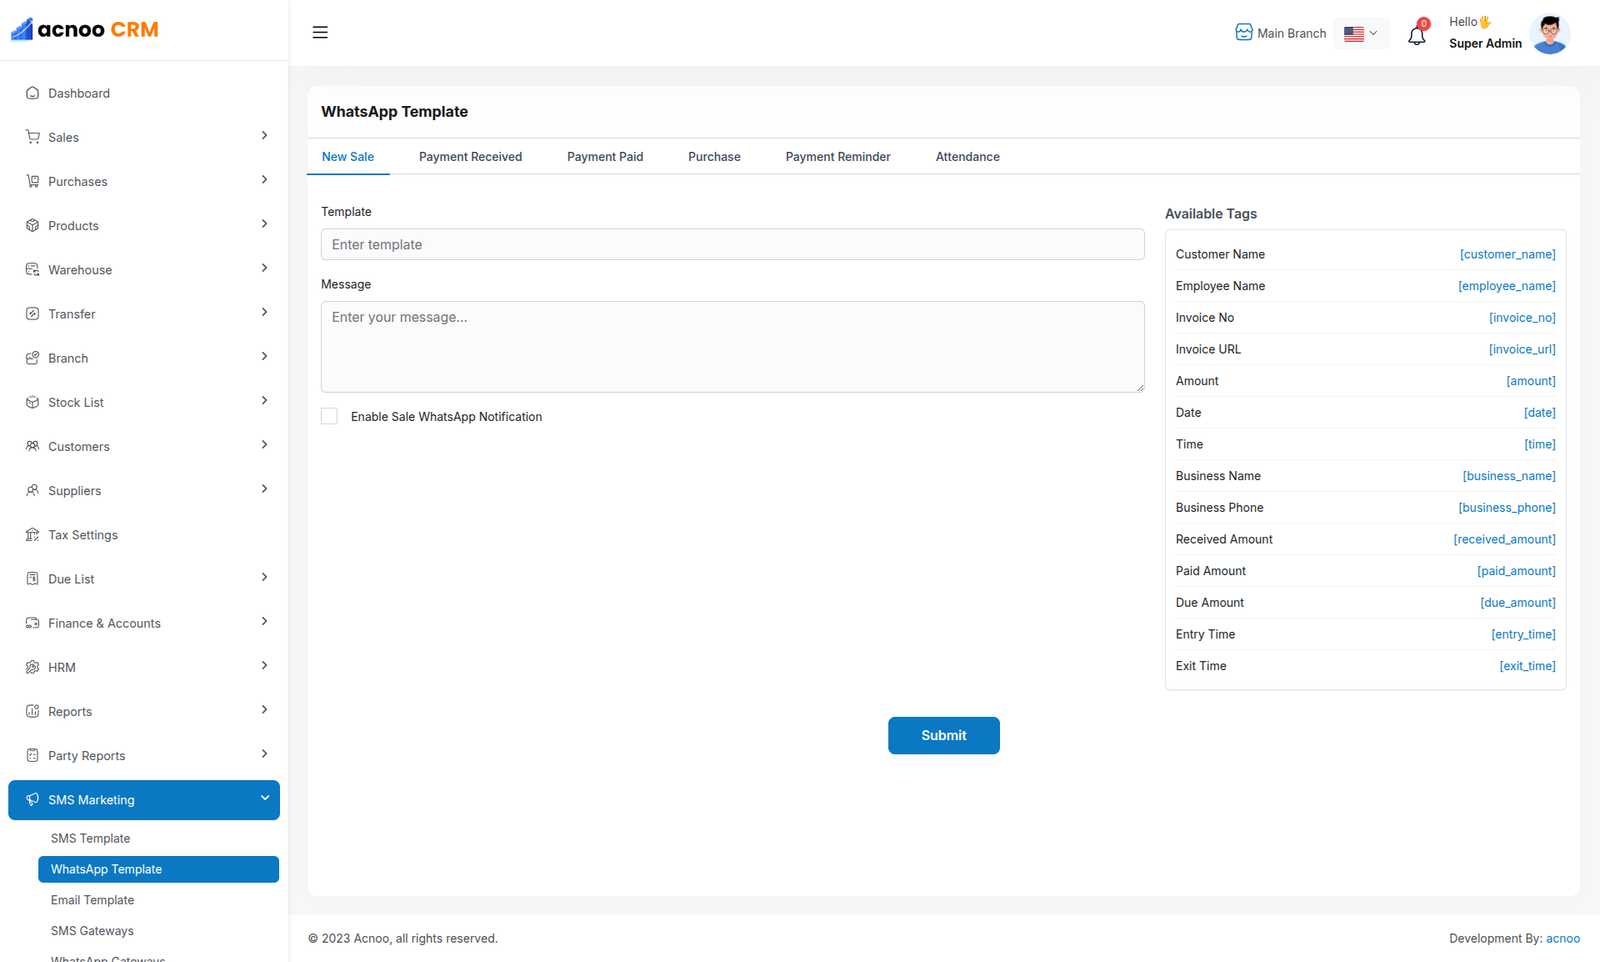
The WhatsApp Template module allows you to create, manage, and send WhatsApp messages for various business events. These templates ensure consistent communication with your customers and employees, similar to SMS templates, but through WhatsApp.
Available template types include:
- Sale Confirmation
- Payment Received
- Payment Paid
- Purchase Notifications
- Payment Reminders
- Attendance Notifications
- Custom templates for other business communications
Each template supports dynamic placeholders (tags) that allow you to personalize messages automatically. This ensures that the recipient receives relevant information, such as invoice details, amounts, and dates.
Dynamic Tags (Placeholders)
Similar to SMS templates, WhatsApp templates can use the following dynamic tags:
Using these placeholders ensures that every WhatsApp message is personalized and accurate. For example, in a Payment Reminder template, the tag [due_amount] will automatically show the customer’s outstanding balance.
This module helps businesses maintain professional and automated communication through WhatsApp while improving customer engagement and operational efficiency.
Email Template
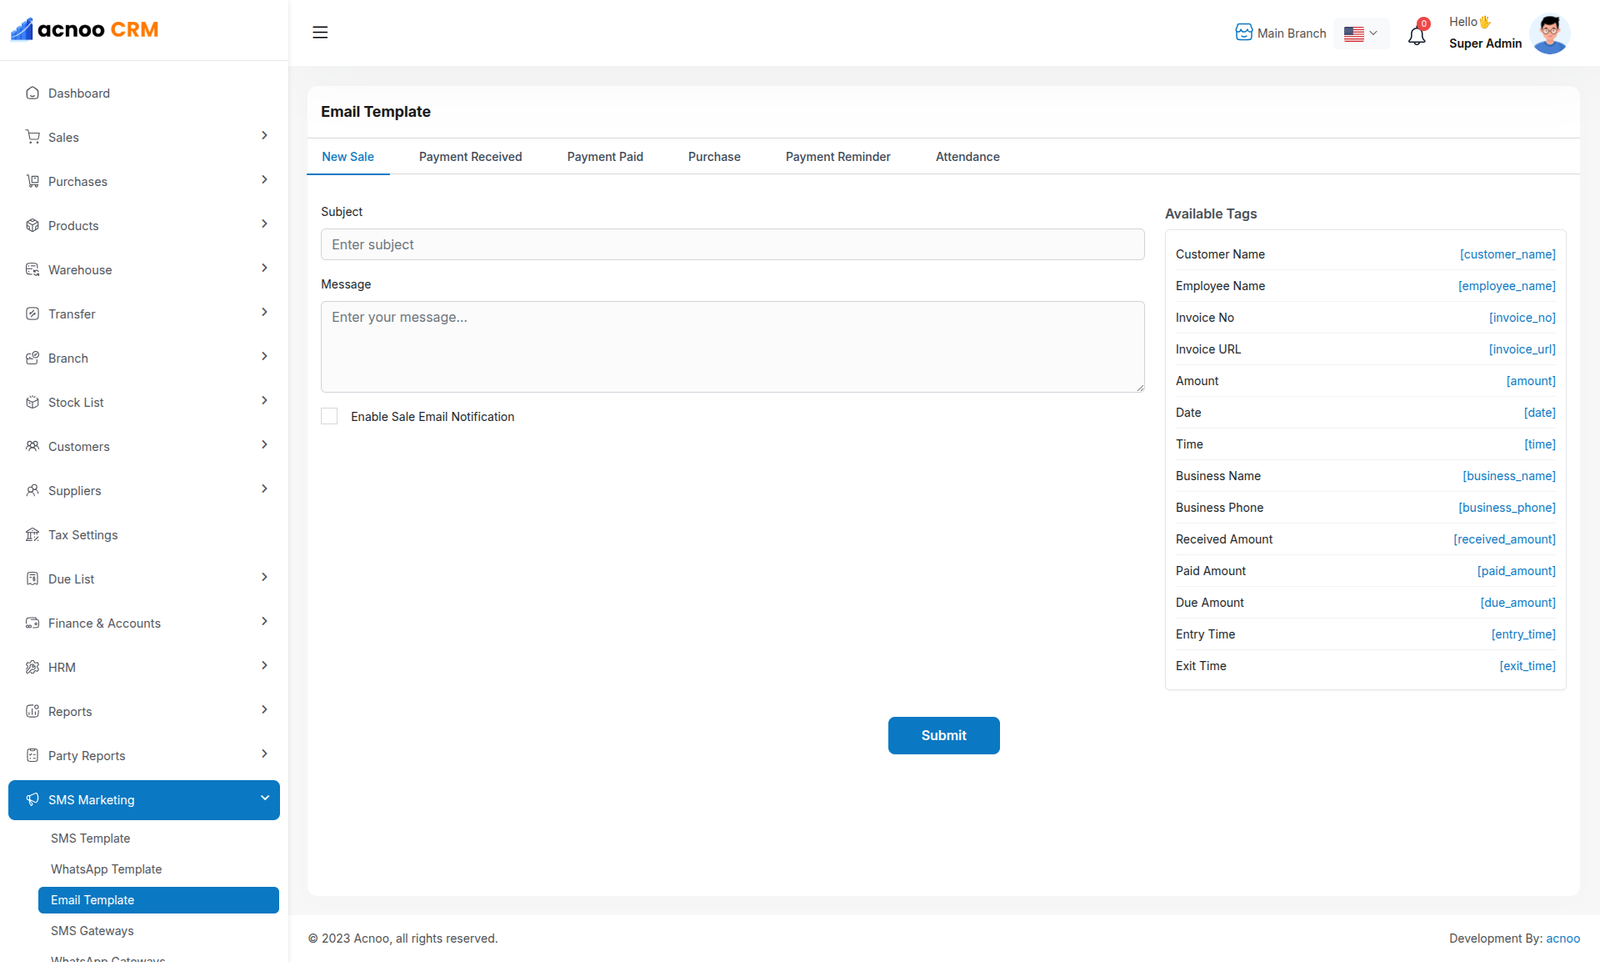
The Email Template module allows you to create, manage, and send email messages for various business events. These templates ensure consistent, professional communication with your customers and employees.
Common template types include:
- Sale Confirmation
- Payment Received
- Payment Paid
- Purchase Notifications
- Payment Reminders
- Attendance Notifications
- Custom templates for other business communications
Email templates support dynamic placeholders to automatically personalize content. This ensures that each recipient receives relevant information such as invoice details, amounts, and dates.
Dynamic Tags (Placeholders)
The following placeholders are available for email templates:
By using these placeholders, email messages can be personalized automatically. For example, a Payment Reminder email will replace [due_amount] with the customer’s actual outstanding balance.
This module helps businesses maintain professional email communication, streamline notifications, and improve customer engagement.
SMS Gateway
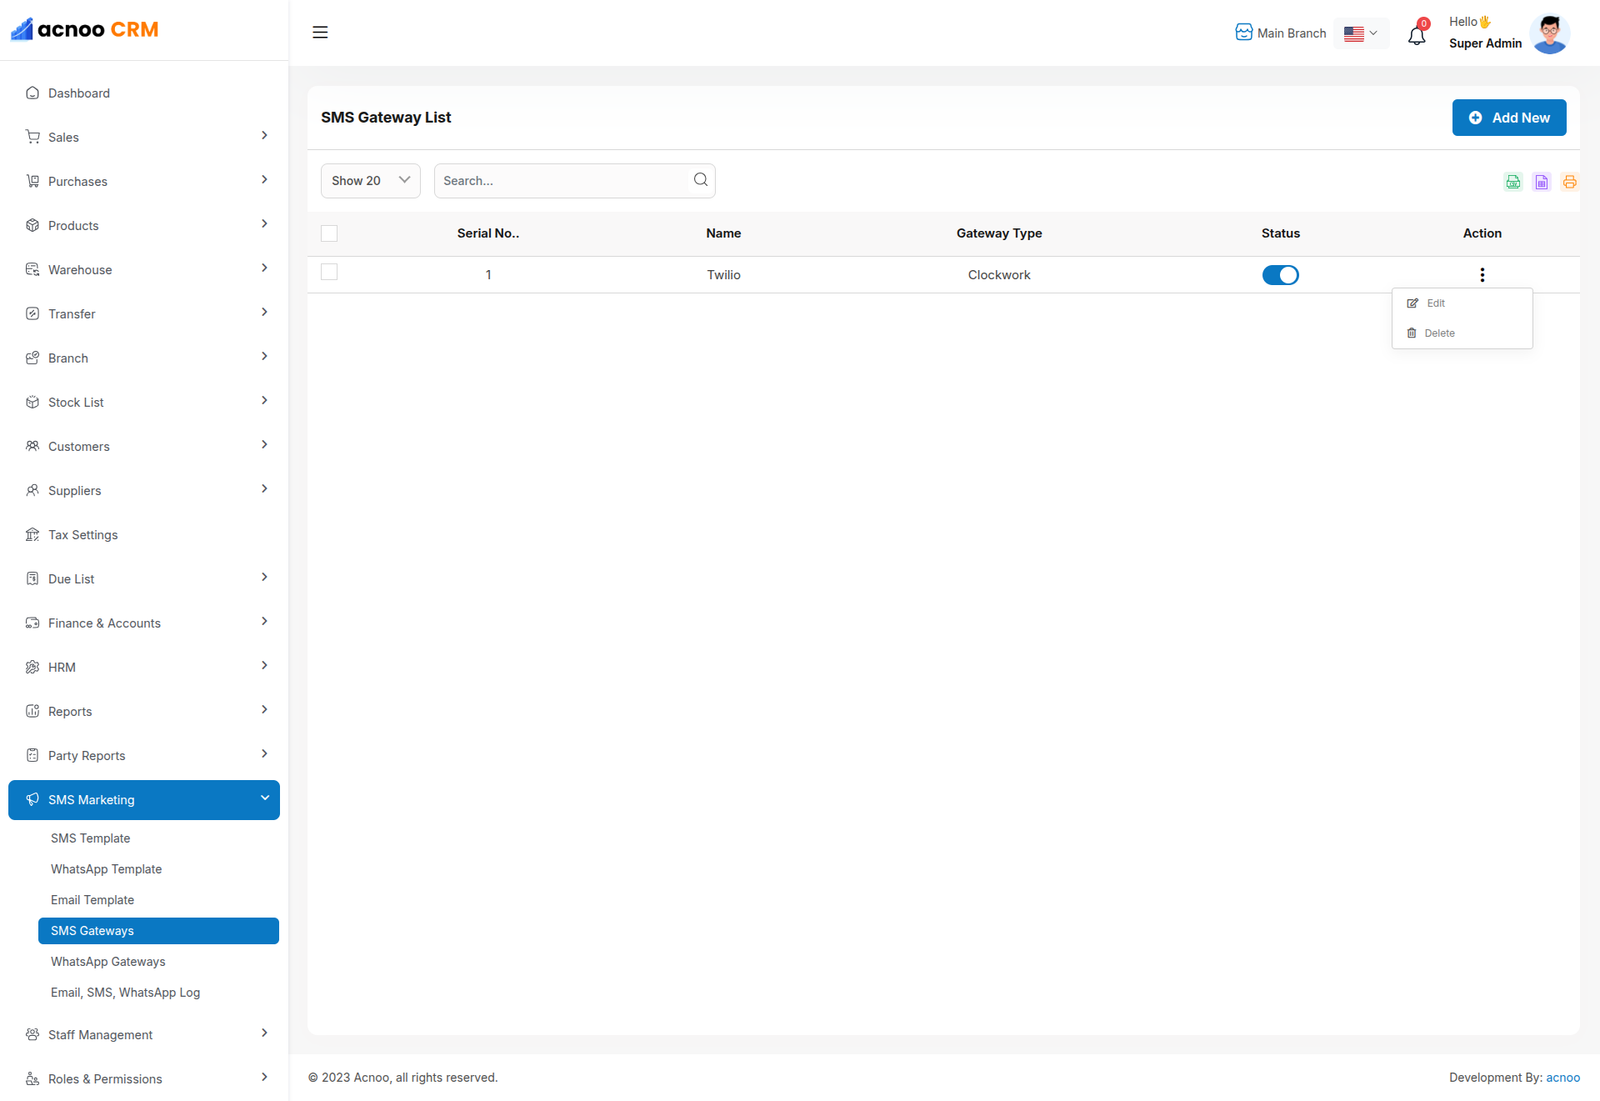
The SMS Gateway module allows you to add, manage, and configure multiple SMS providers for your business. This ensures that your marketing and transactional messages are delivered reliably through different gateways.
Key Features
- Add multiple SMS gateways to support redundancy or priority delivery.
- Configure credentials and settings for each gateway dynamically.
- Set the gateway status (active/inactive) to control message delivery.
- Support for multiple gateway providers like Twilio, Textlocal, AWS SNS, Nexmo, and more.
- Integrated with SMS templates to automatically send messages via the selected gateway.
How It Works
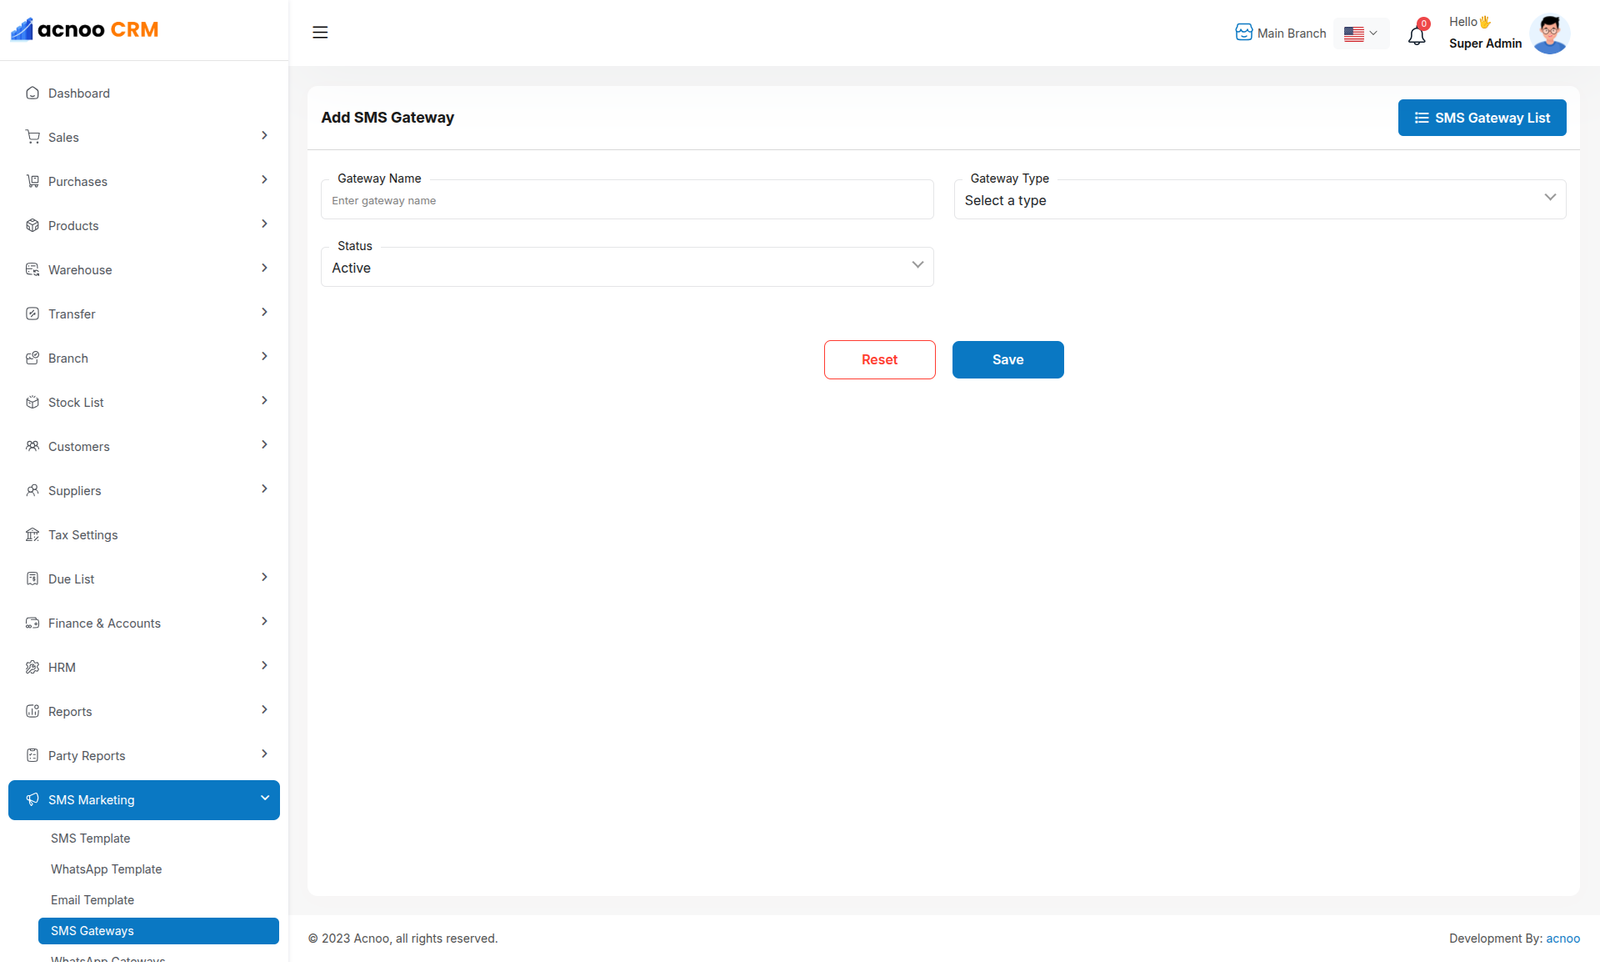
1. Navigate to Marketing → SMS Gateway from the business panel. 2. Click Add New to create a new SMS provider configuration. 3. Select the Gateway Type (e.g., Twilio, Textlocal) from the dropdown. 4. Fill in the required credentials and parameters for the selected gateway. 5. Save the gateway. Once active, the system will use it to send SMS messages according to the priority.
Gateway Types
Each SMS Gateway requires a Gateway Type that defines how the system communicates with the provider. Currently supported SMS Gateway Types:
- AWS SNS
- Textlocal
- Twilio
- Clockwork
- LINK Mobility
- Melipayamak
- Melipayamakpattern
- Kavenegar
- Smsir
- Tsms
- Farazsms
- Farazsmspattern
- SMS Gateway Me
- SmsGateWay24
- Ghasedak
- Sms77
- SabaPayamak
- LSim
- Rahyabcp
- Rahyabir
- D7networks
- Hamyarsms
- SMSApi
- Route Mobile
- HaDavar
- Acnoo Sms
Gateway Configuration Fields
When creating a new SMS Gateway, the following fields must be configured:
- Name: Friendly name for the gateway (e.g., "Twilio Gateway").
- Type: Select a Gateway Type from the list (defines driver & namespace).
- Status: Set as active (1) or inactive (0).
- Priority: Determines which gateway is used first when multiple gateways are active.
- Parameters: Provider-specific credentials (API Key, SID, Token, Sender ID, etc.).
- Driver: Automatically populated from Gateway Type.
- Namespace: Automatically populated from Gateway Type.
- Channel: Set to
smsfor SMS gateways.
Example Usage
After creating a Twilio gateway:
- The system can automatically send "Payment Received" or "Sale Confirmation" SMS using Twilio.
- If multiple gateways are active, the system selects the gateway based on the configured priority.
- Admins can deactivate a gateway temporarily without deleting it.
Benefits
- Reliable and flexible SMS sending across multiple providers.
- Supports business continuity in case one provider fails.
- Fully integrated with SMS templates for automation.
- Easy management of provider credentials and settings from a single panel.
WhatsApp Gateway
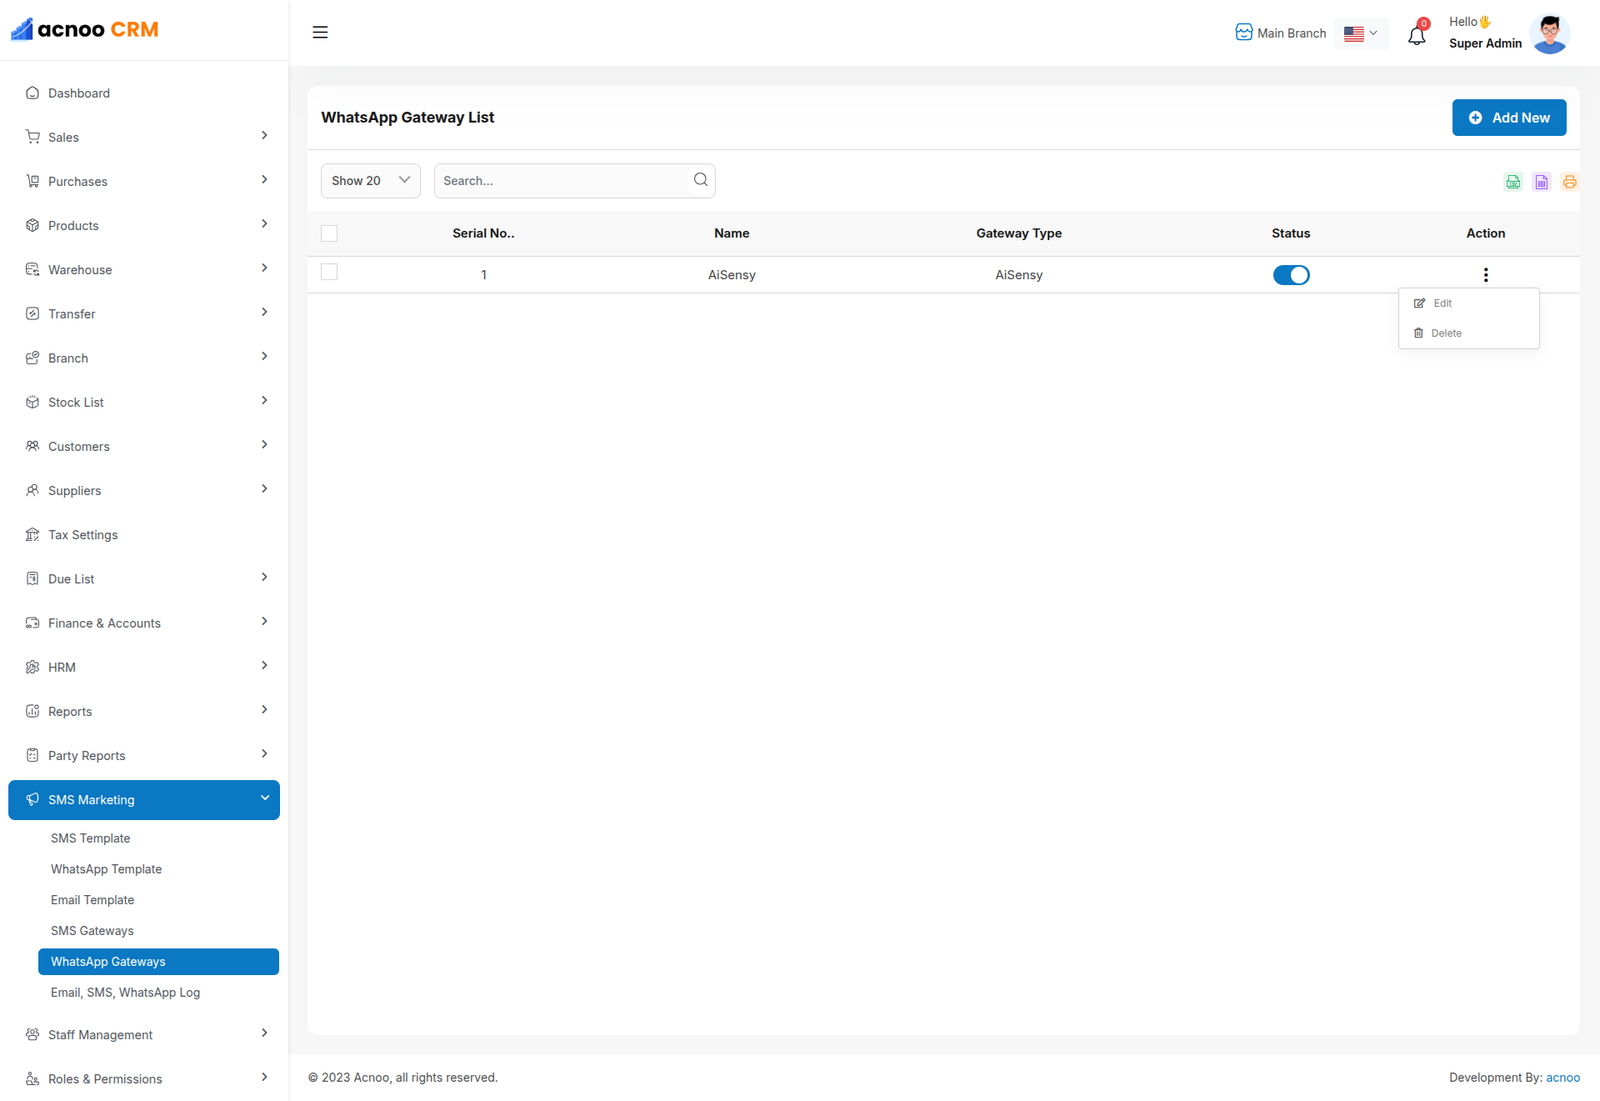
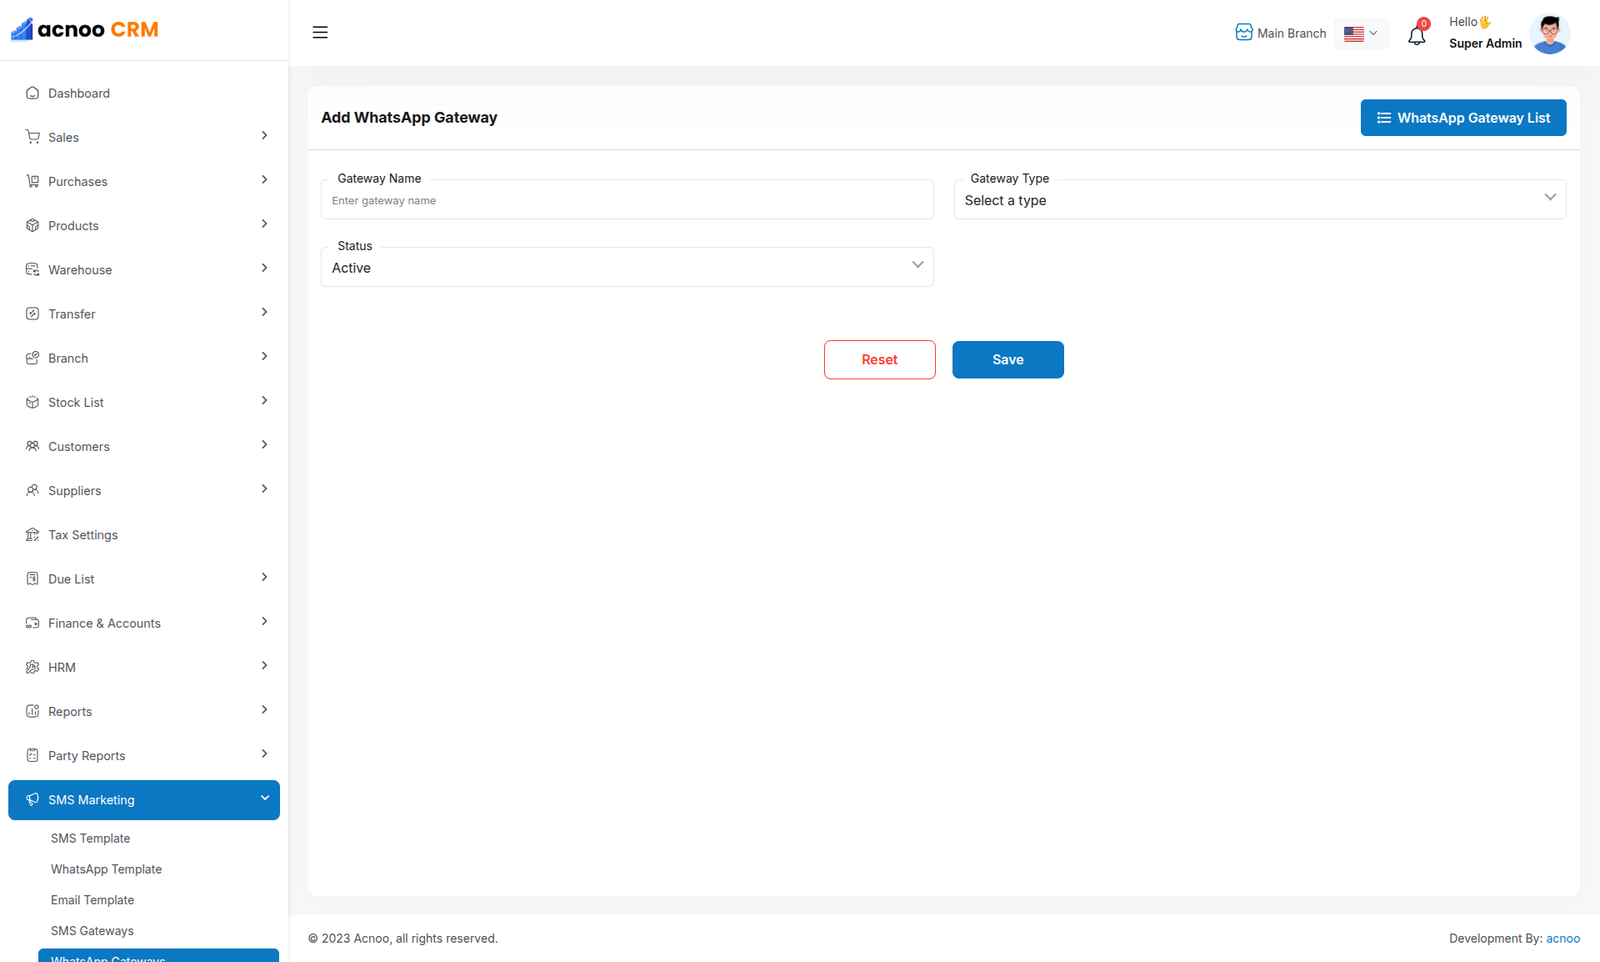
The WhatsApp Gateway module allows you to add, manage, and configure WhatsApp service providers to send messages directly from the system. This ensures your WhatsApp marketing and transactional messages are delivered reliably to customers and employees.
Key Features
- Add multiple WhatsApp gateways to support different providers.
- Configure API keys, tokens, and other credentials for each provider.
- Set the gateway status (active/inactive) to control message sending.
- Integrate seamlessly with WhatsApp templates to send personalized messages automatically.
- Support popular providers like AiSensy, WhatsApp Cloud API, and other custom gateways.
How It Works
1. Navigate to Marketing → WhatsApp Gateway from the business panel. 2. Click Add New Gateway to create a new WhatsApp provider configuration. 3. Select the Gateway Type (e.g., AiSensy) from the dropdown. 4. Fill in the required credentials (API Key, Token, etc.) for the selected gateway. 5. Save the gateway. Once active, it will be used to send WhatsApp messages via your selected templates.
Gateway Types
Each WhatsApp Gateway requires a Gateway Type that defines how the system communicates with the provider. Currently supported WhatsApp Gateway Types:
- AiSensy – Cloud-based WhatsApp messaging provider.
- WhatsApp Cloud API – Official WhatsApp Business API for sending messages directly via Meta's infrastructure.
Gateway Configuration Fields
- Name: Friendly name for the gateway (e.g., "WhatsApp Cloud API Gateway").
- Type: Select a Gateway Type (defines driver & namespace).
- Status: Active (1) or Inactive (0).
- Parameters: Provider-specific credentials (API Key, Token, etc.).
WhatsApp Cloud API Configuration Fields
When setting up WhatsApp Cloud API as the gateway type, configure the following fields in the Parameters section:
- Access Token: Long-lived access token from Meta developer app. Used to authenticate API requests.
- Phone Number ID: The WhatsApp phone number ID associated with your business app. This identifies which phone number will be used to send messages.
- API Version: The WhatsApp API version to use (e.g.,
v25.0). Must match the version supported by your app. - Template Language Code: Language code for message templates (e.g.,
enfor English,en_USfor US English). Used to render templates in the correct language.
How to Get WhatsApp Cloud API Credentials
Follow these steps to obtain the required credentials for WhatsApp Cloud API:
- Go to Meta for Developers and sign in with your Facebook account.
- Create a new app or select an existing one. Choose Business app type.
- In the app dashboard, add WhatsApp product to your app.
- Navigate to WhatsApp → Configuration to get your Phone Number ID and set up the WhatsApp Business Account.
- Go to App Settings → Basic to get your App ID and App Secret.
- Generate a User Access Token from Tools → Graph API Explorer with required permissions (
whatsapp_business_management,whatsapp_business_messaging). - Create message templates in Meta Business Manager or through the WhatsApp Business app to use with this gateway.
Documentation Reference: WhatsApp Business Platform Documentation
Example Usage
- Automatically send "Payment Received" WhatsApp messages using the AiSensy or WhatsApp Cloud API gateway.
- Use multiple gateways with priority for reliability.
- Deactivate a gateway temporarily without deleting it, for maintenance or testing.
Benefits
- Reliable WhatsApp message delivery across multiple providers.
- Automated and personalized communication via templates.
- Easy management of provider credentials and status from a single panel.
- Supports business continuity in case one provider fails.
Email, SMS, WhatsApp Log
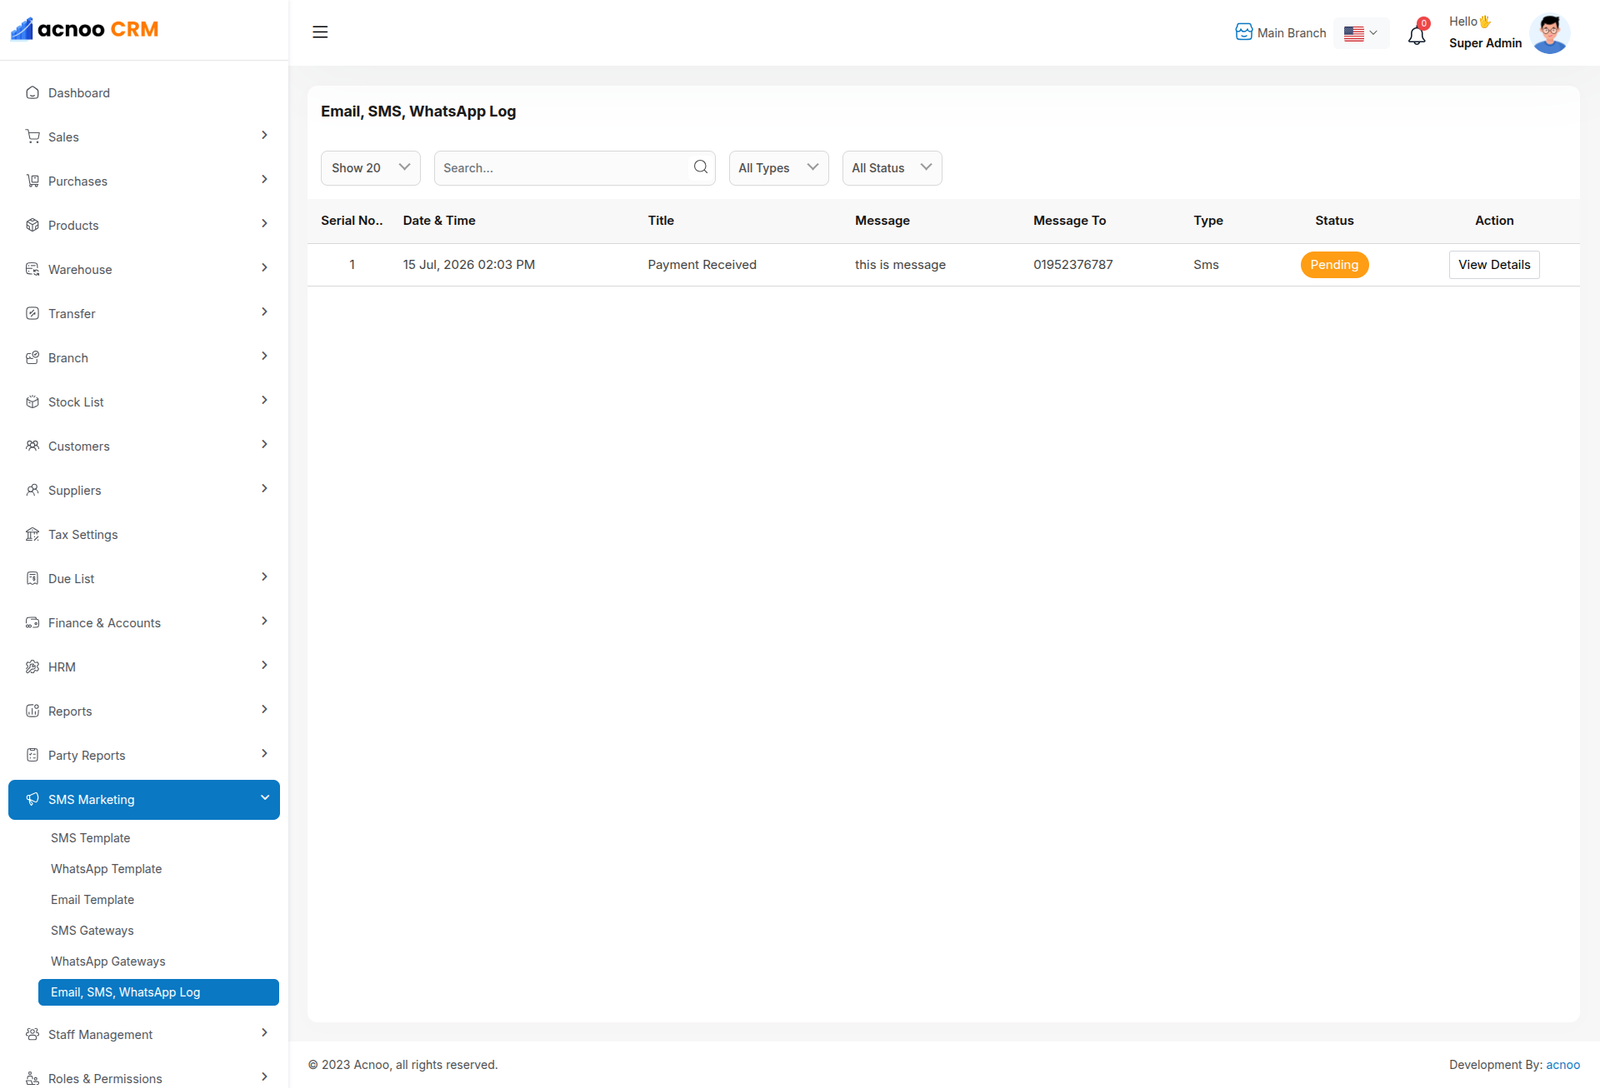
The Message Log module provides a centralized view of all outgoing messages sent via Email, SMS, and WhatsApp. This module helps track message delivery, monitor failures, and review message content for audit and reporting purposes.
Key Features
- View all messages sent through Email, SMS, and WhatsApp.
- Filter messages by channel (Email/SMS/WhatsApp), status (Success, Failed, Pending), or search keywords.
- Paginated view with summary of each message.
- Quick view of message content via the “View Details” modal.
- Tracks recipient info and message timestamps for audit purposes.
Log Table Columns
- SL: Serial number of the message in the list.
- Date & Time: Timestamp when the message was sent.
- Title: Subject or title of the message.
- Message: Preview of the message content (first few words).
- Message To: Recipient’s phone number (SMS/WhatsApp) or email address.
- Type: Channel of the message (Email, SMS, WhatsApp).
- Status: Delivery status of the message:
- Success – Message delivered successfully.
- Failed – Message failed to deliver.
- Pending – Message is pending delivery.
- Action: View detailed information for the message in a modal.
How to Use
- Navigate to Marketing → Message Log in the admin panel.
- Use the search bar to look for messages by title, channel, phone/email, or status.
- Use the filters to narrow down logs by type (Email/SMS/WhatsApp) or status.
- Click View Details to see the full message content, recipient, type, and timestamp in a popup modal.
- Paginate through the messages using the navigation links at the bottom of the table.
Benefits
- Centralized tracking of all outgoing messages.
- Quick identification of failed or pending messages.
- Easy auditing for business communications.
- Supports Email, SMS, and WhatsApp channels from a single interface.
Cron Jobs Setup
To ensure that marketing notifications (Email, SMS, WhatsApp) are sent automatically in the background, you must configure a Cron Job on your server. The Marketing Add-on uses Laravel queues to handle message delivery efficiently.
Required Command:
Note: Make sure to provide the full path to your PHP binary and the artisan file.
Example: /usr/local/bin/php /home/username/public_html/artisan queue:work --queue=high,medium,low
How to add this Cron Job to cPanel
- Log in to your cPanel account.
- Search for "Cron Jobs" in the search bar and click on it.
- Under "Common Settings", select "Once Per Minute (* * * * *)" (or your preferred interval).
- In the "Command" field, paste the following command (adjusting the path to your project):
/usr/local/bin/php /home/your-username/public_html/artisan queue:work --queue=high,medium,low --stop-when-empty
- Click "Add New Cron Job" to save the settings.
Pro Tip: Using --stop-when-empty in the cron command is recommended for shared hosting to avoid keeping the process running indefinitely. The cron will restart the worker every minute if there are new messages in the queue.
Super Admin Settings
After successfully purchasing and activating the Tax Invoice Add-on, a new Invoice Template Design tab will appear in the system settings. From this tab, you can update the A4 invoice image and upload a demo image of the tax invoice for the business. This allows the business to maintain a consistent and professional invoice layout.
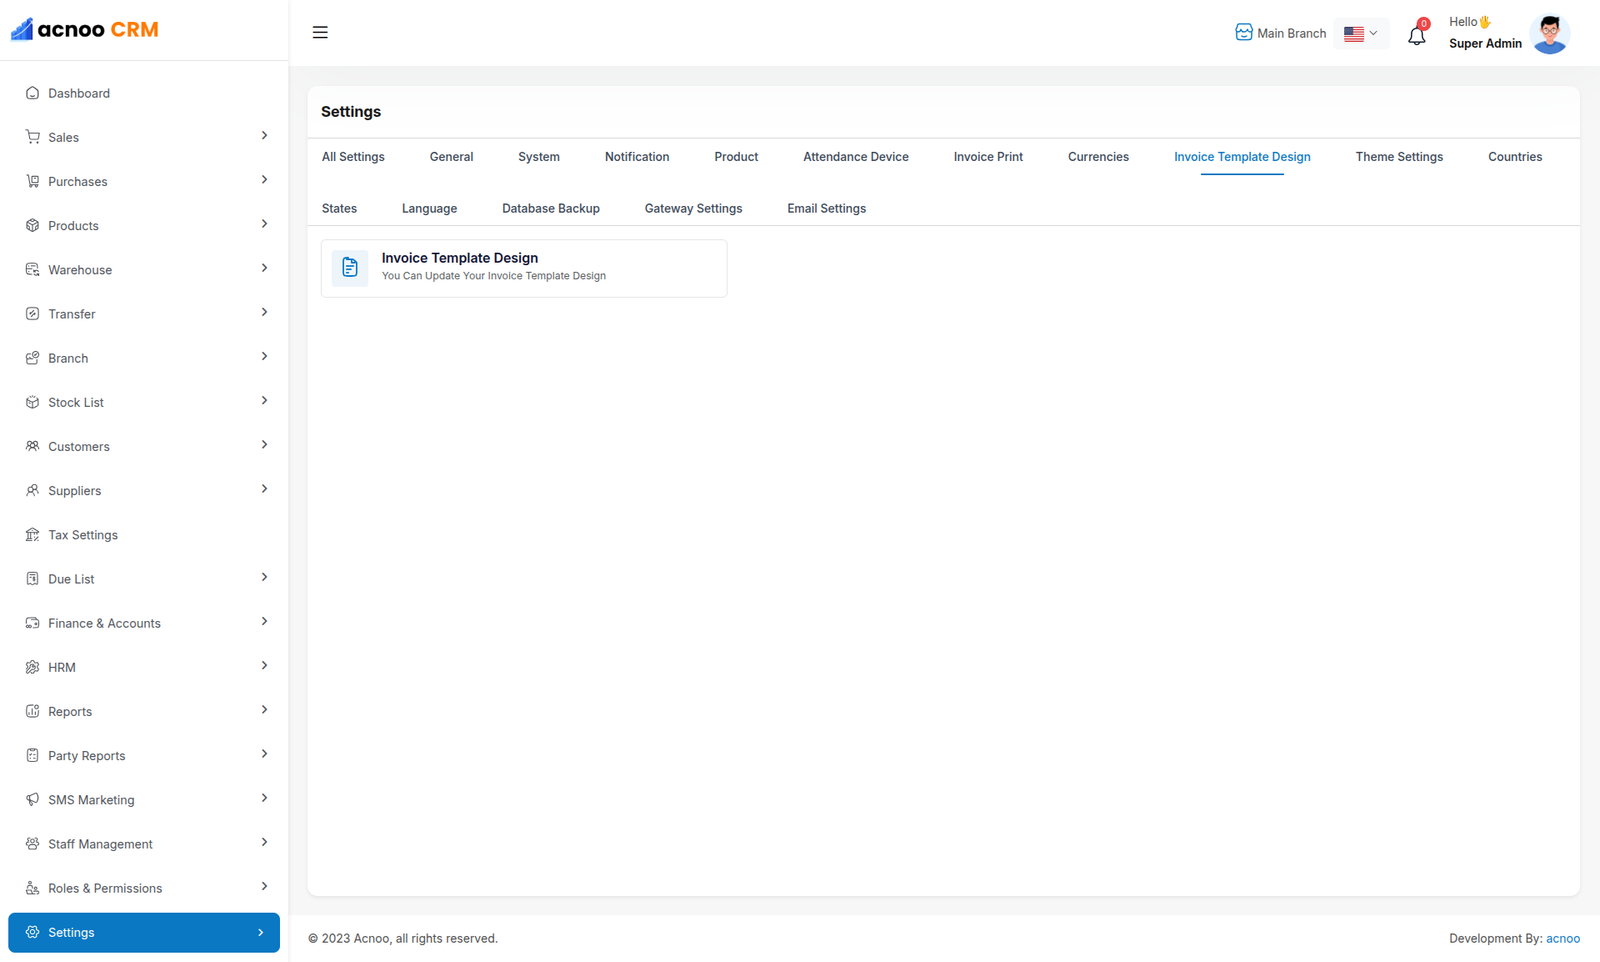
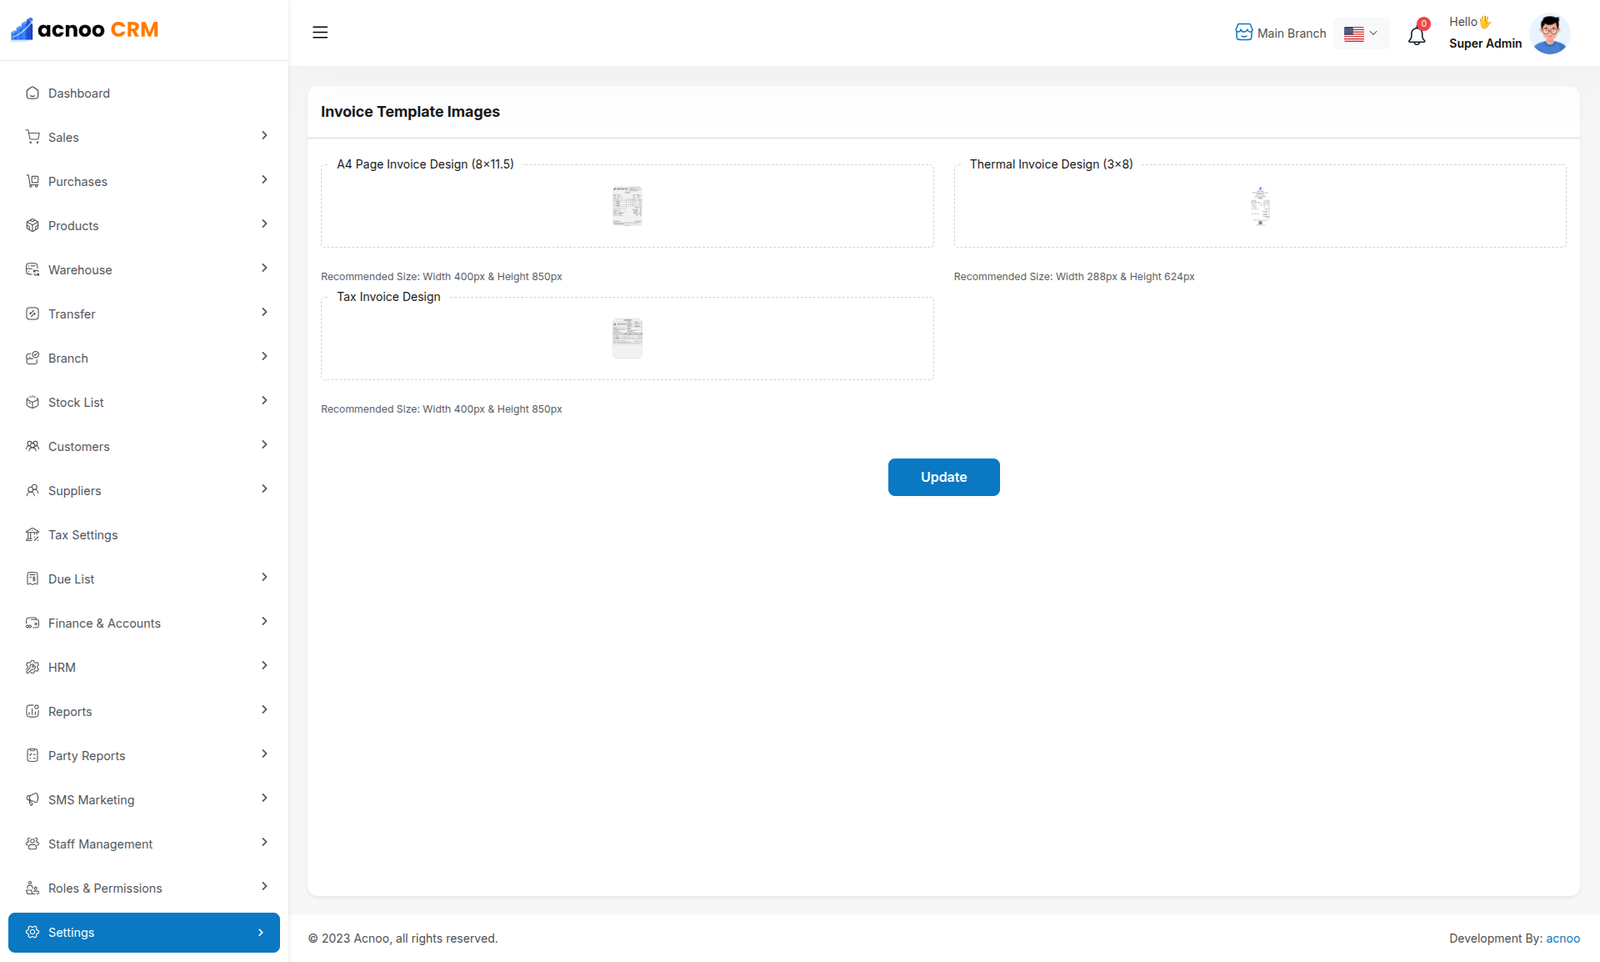
From this section, you can upload or update the invoice images for the business. The interface allows you to manage A4 invoice images, Thermal invoice images, and demo tax invoice images efficiently.
Setting
In the Setting section, you have the capability to configure the fundamental aspects or core elements of this project.
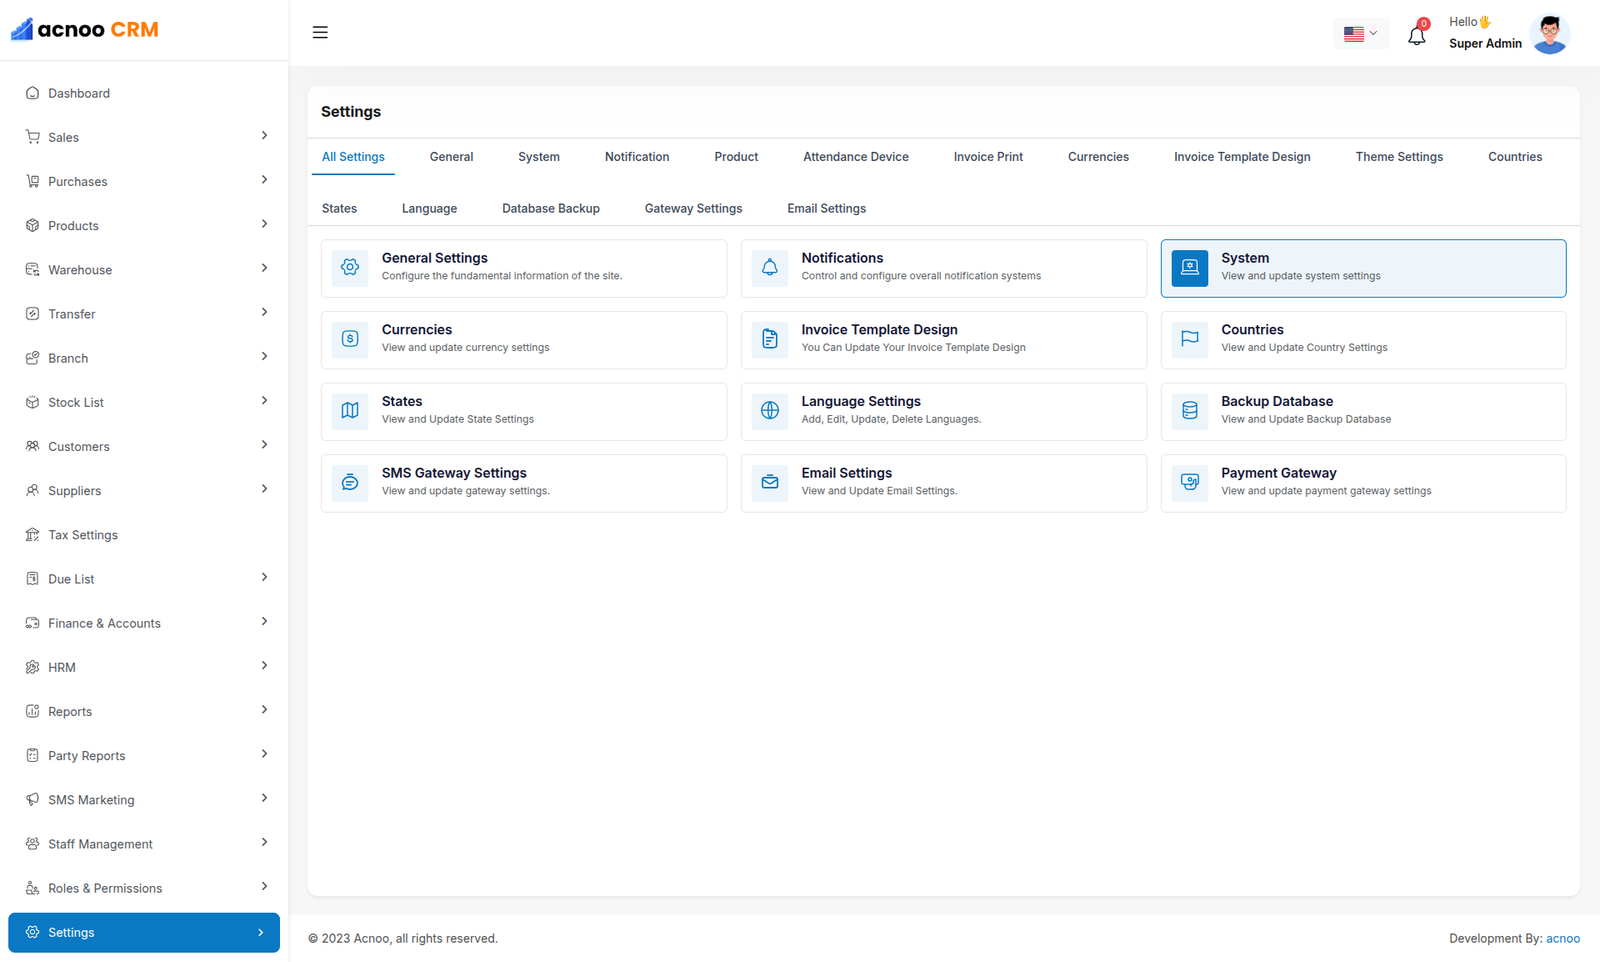
General Settings
You have the capability to modify the general project information.
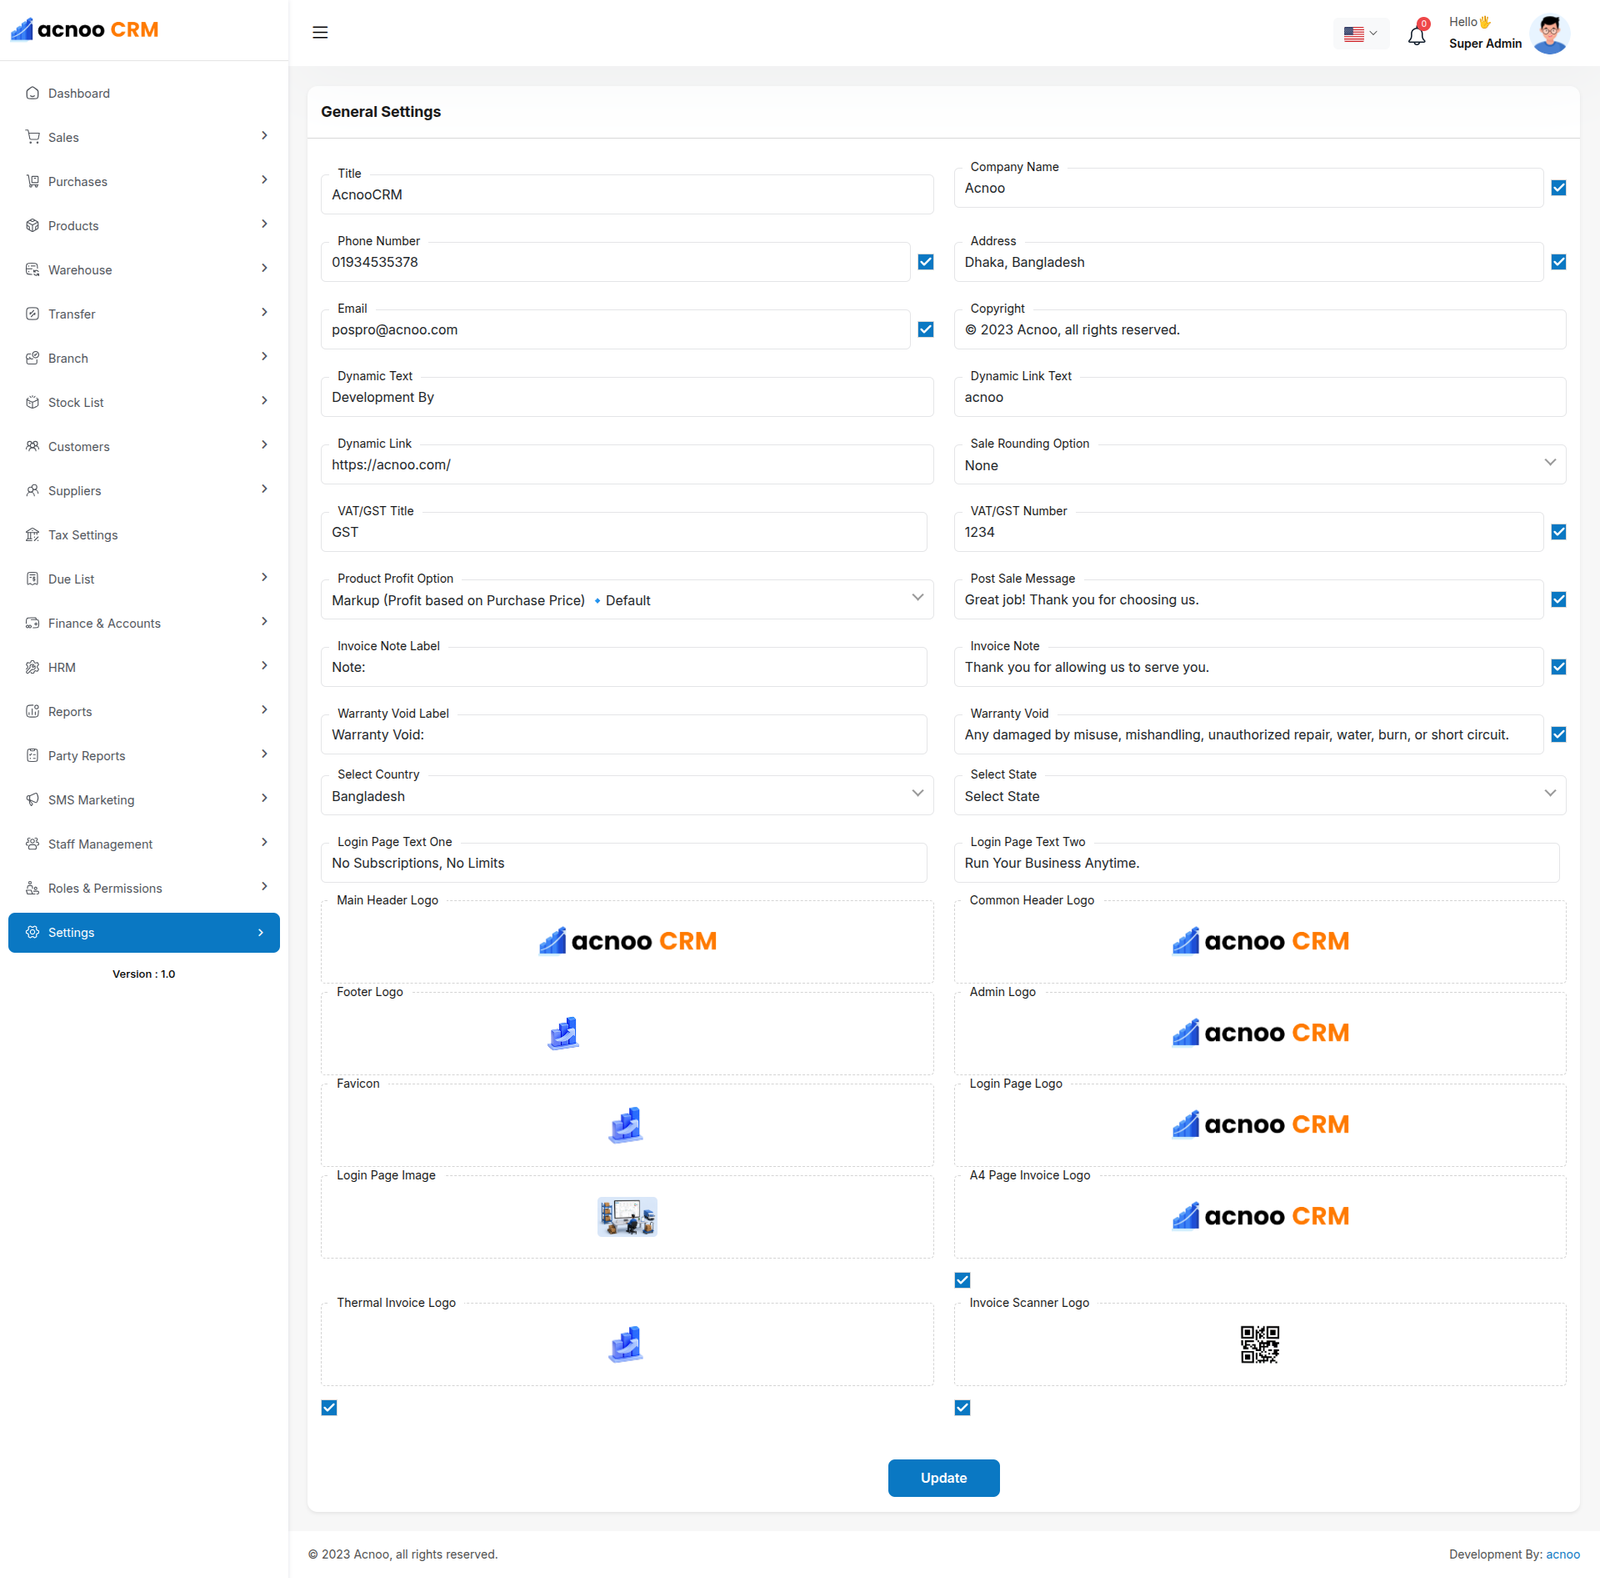
Notification
Here, you can view a list of various notifications. You also have the option to filter these notifications based on available criteria.In each list, clicking the "View" button allows you to see detailed information.
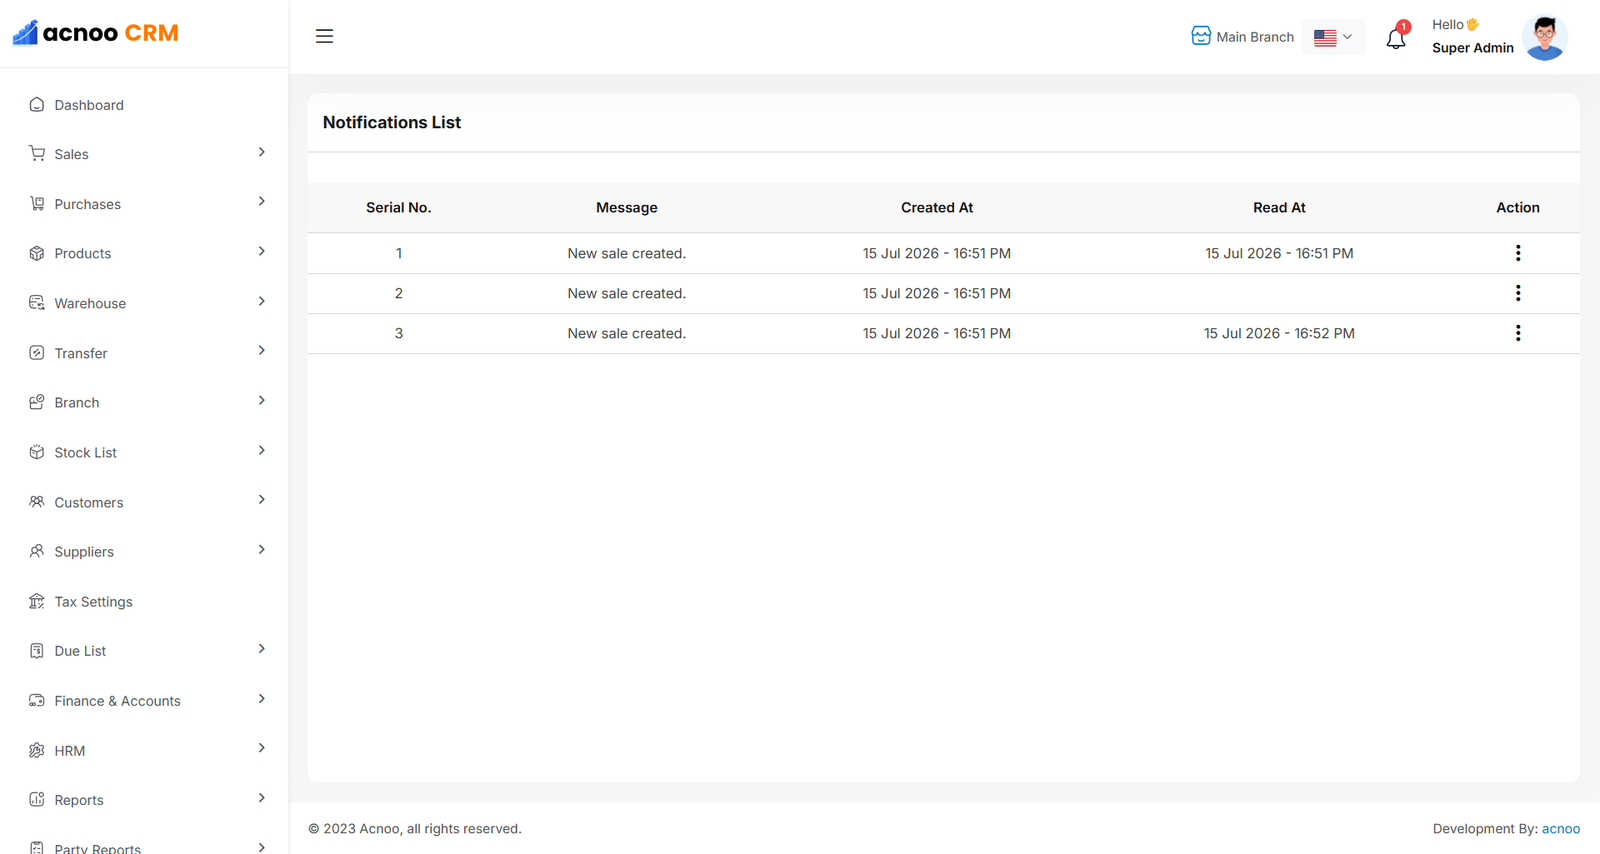
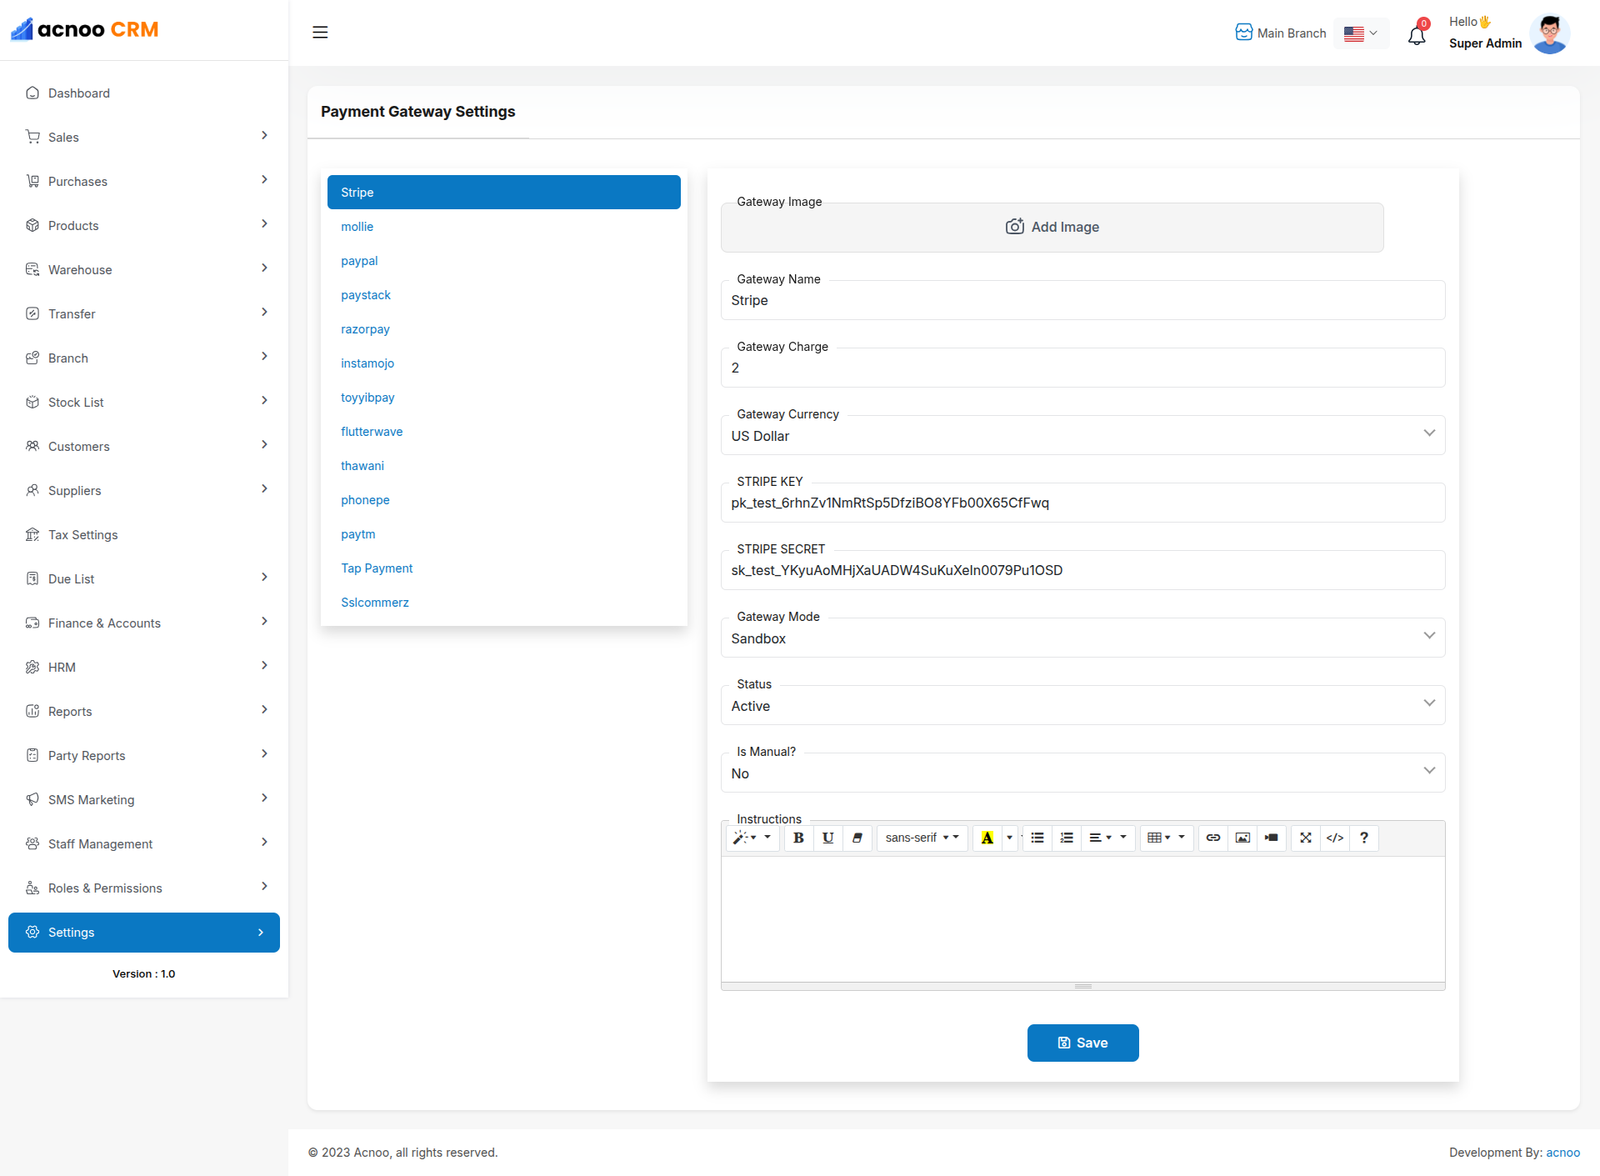
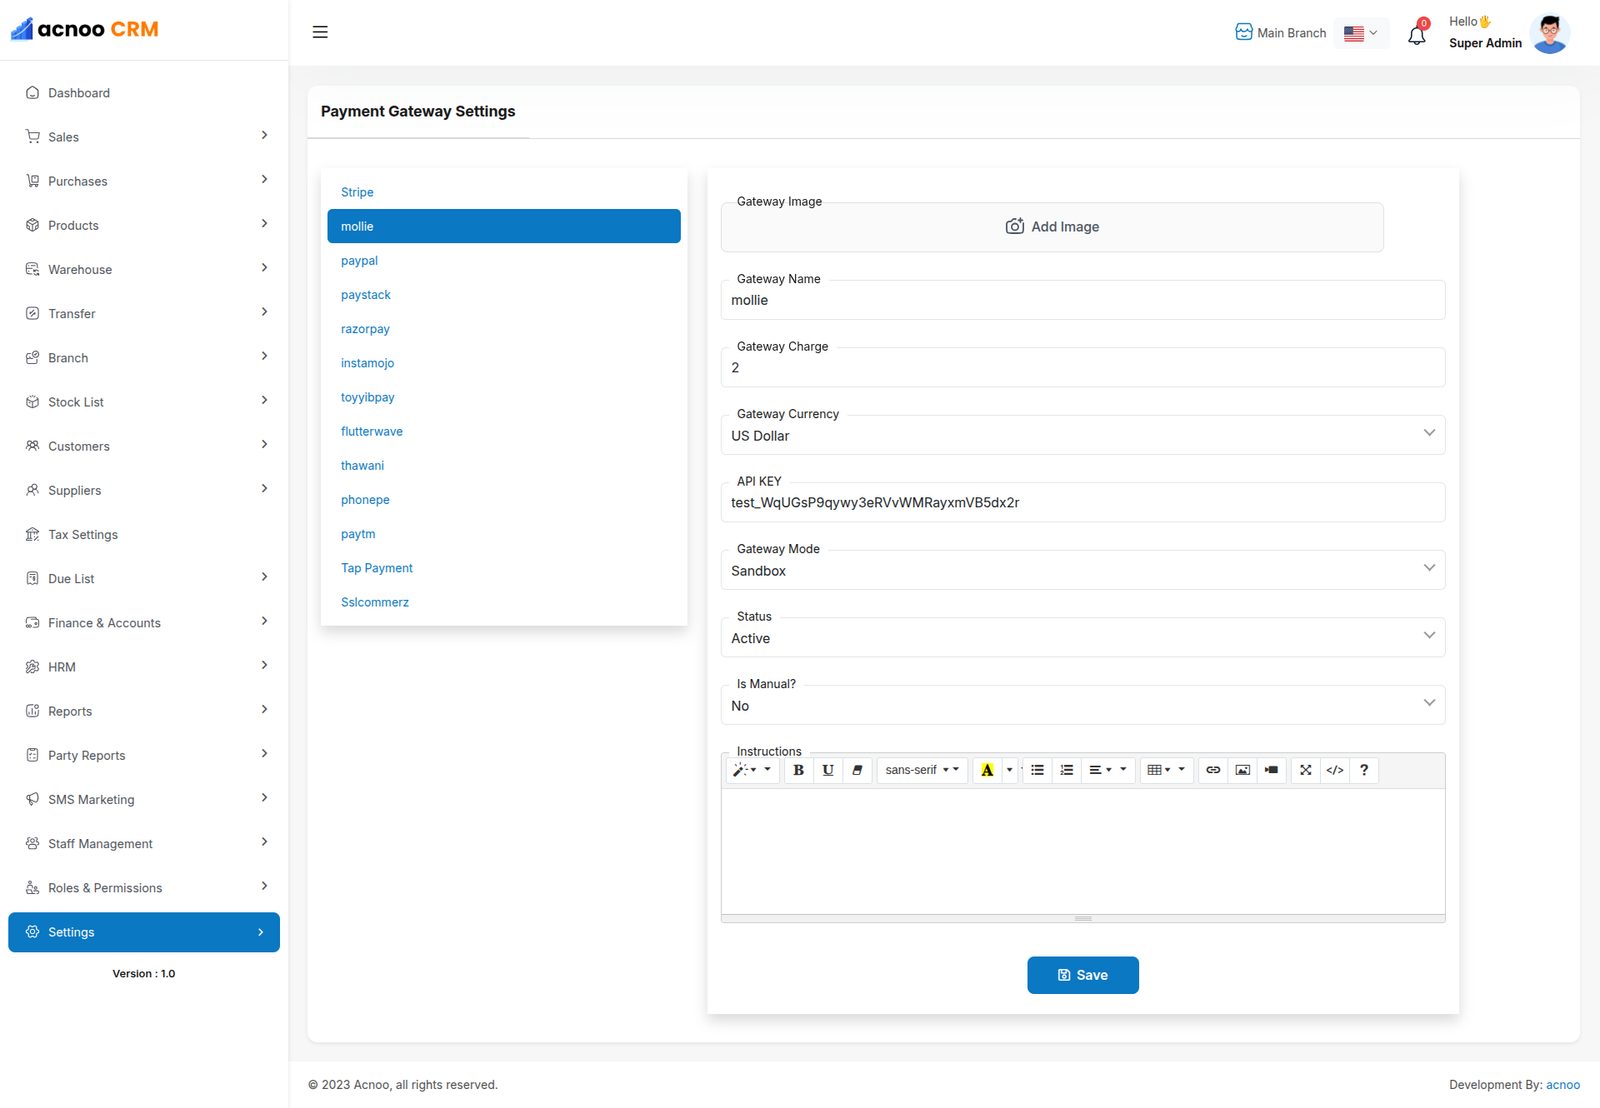
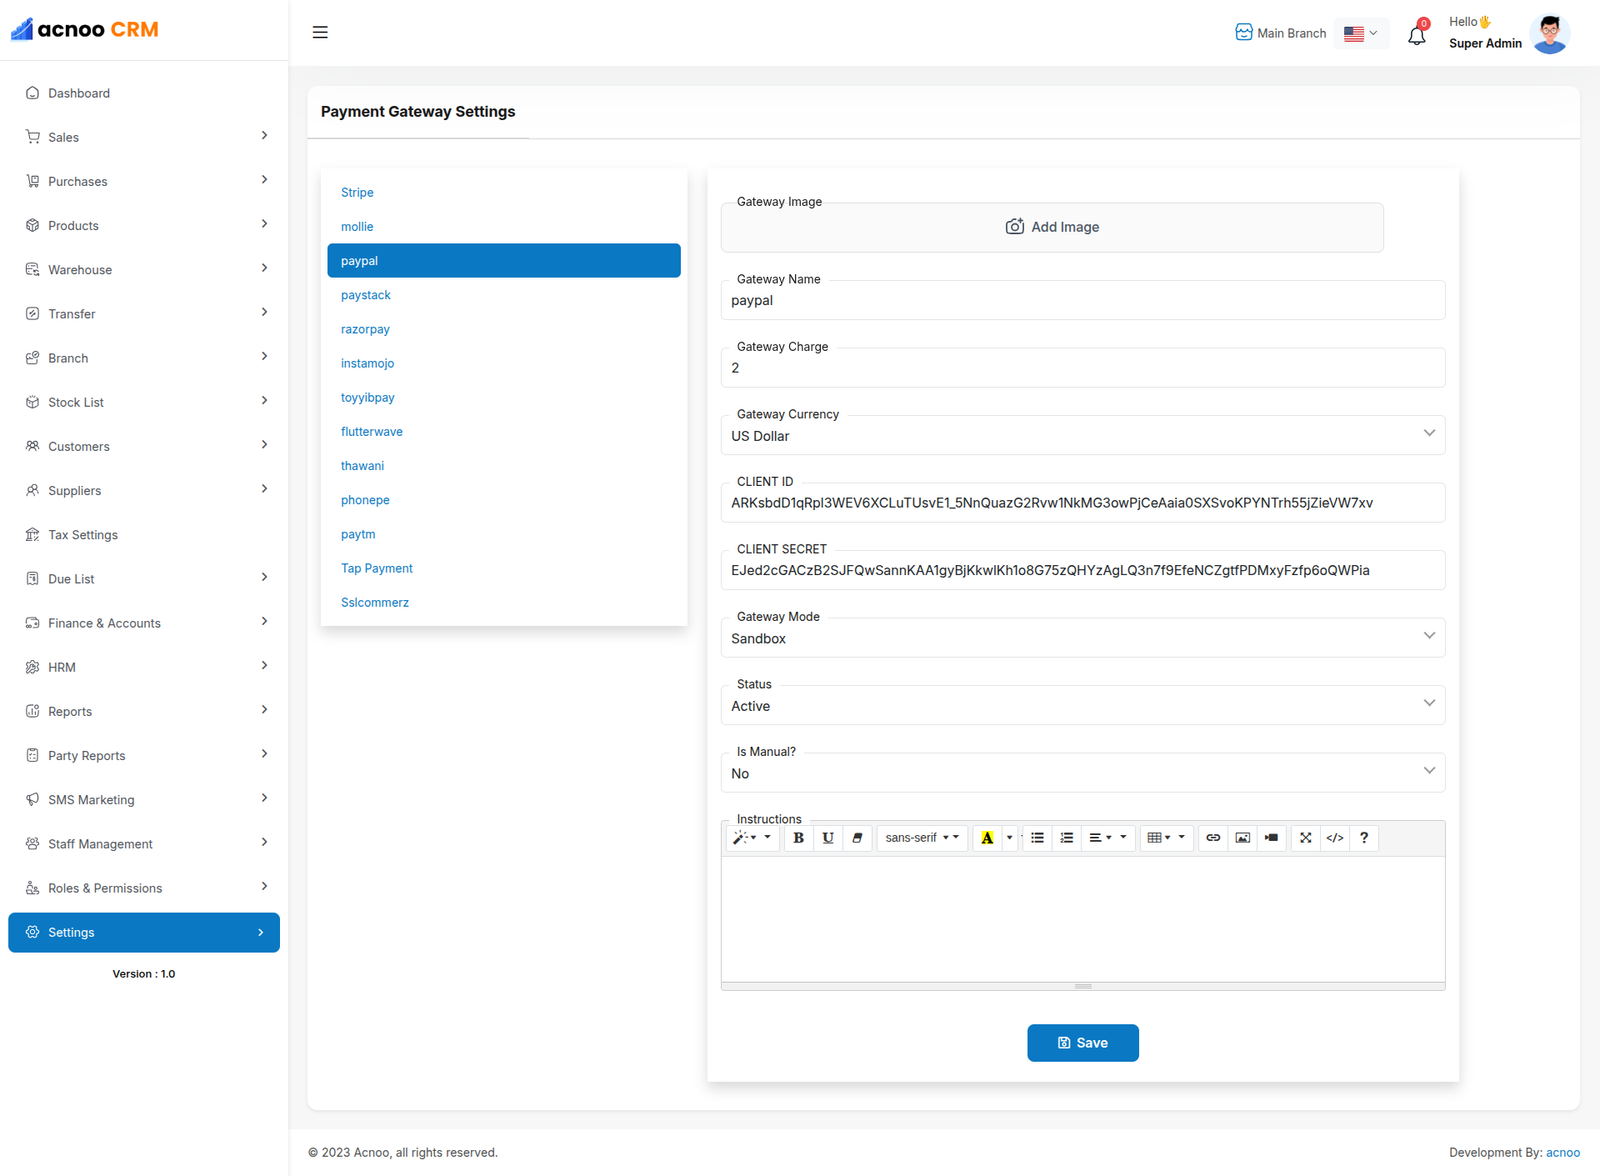
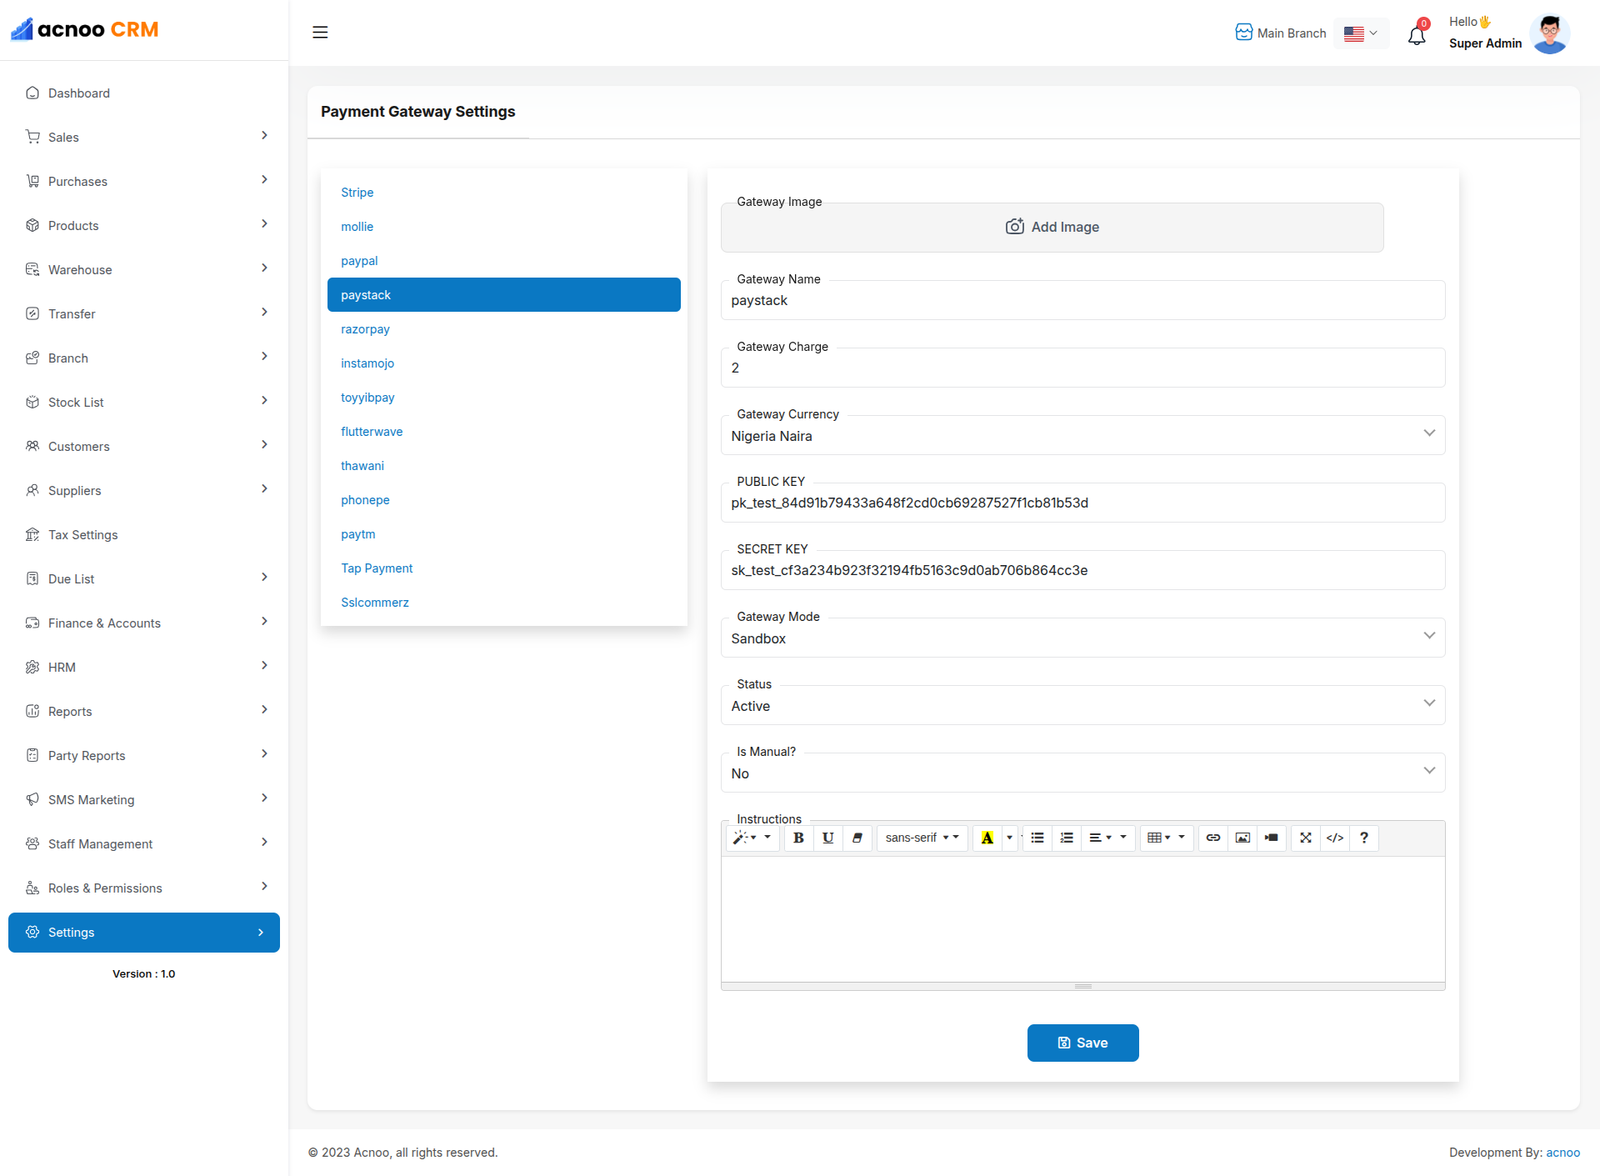
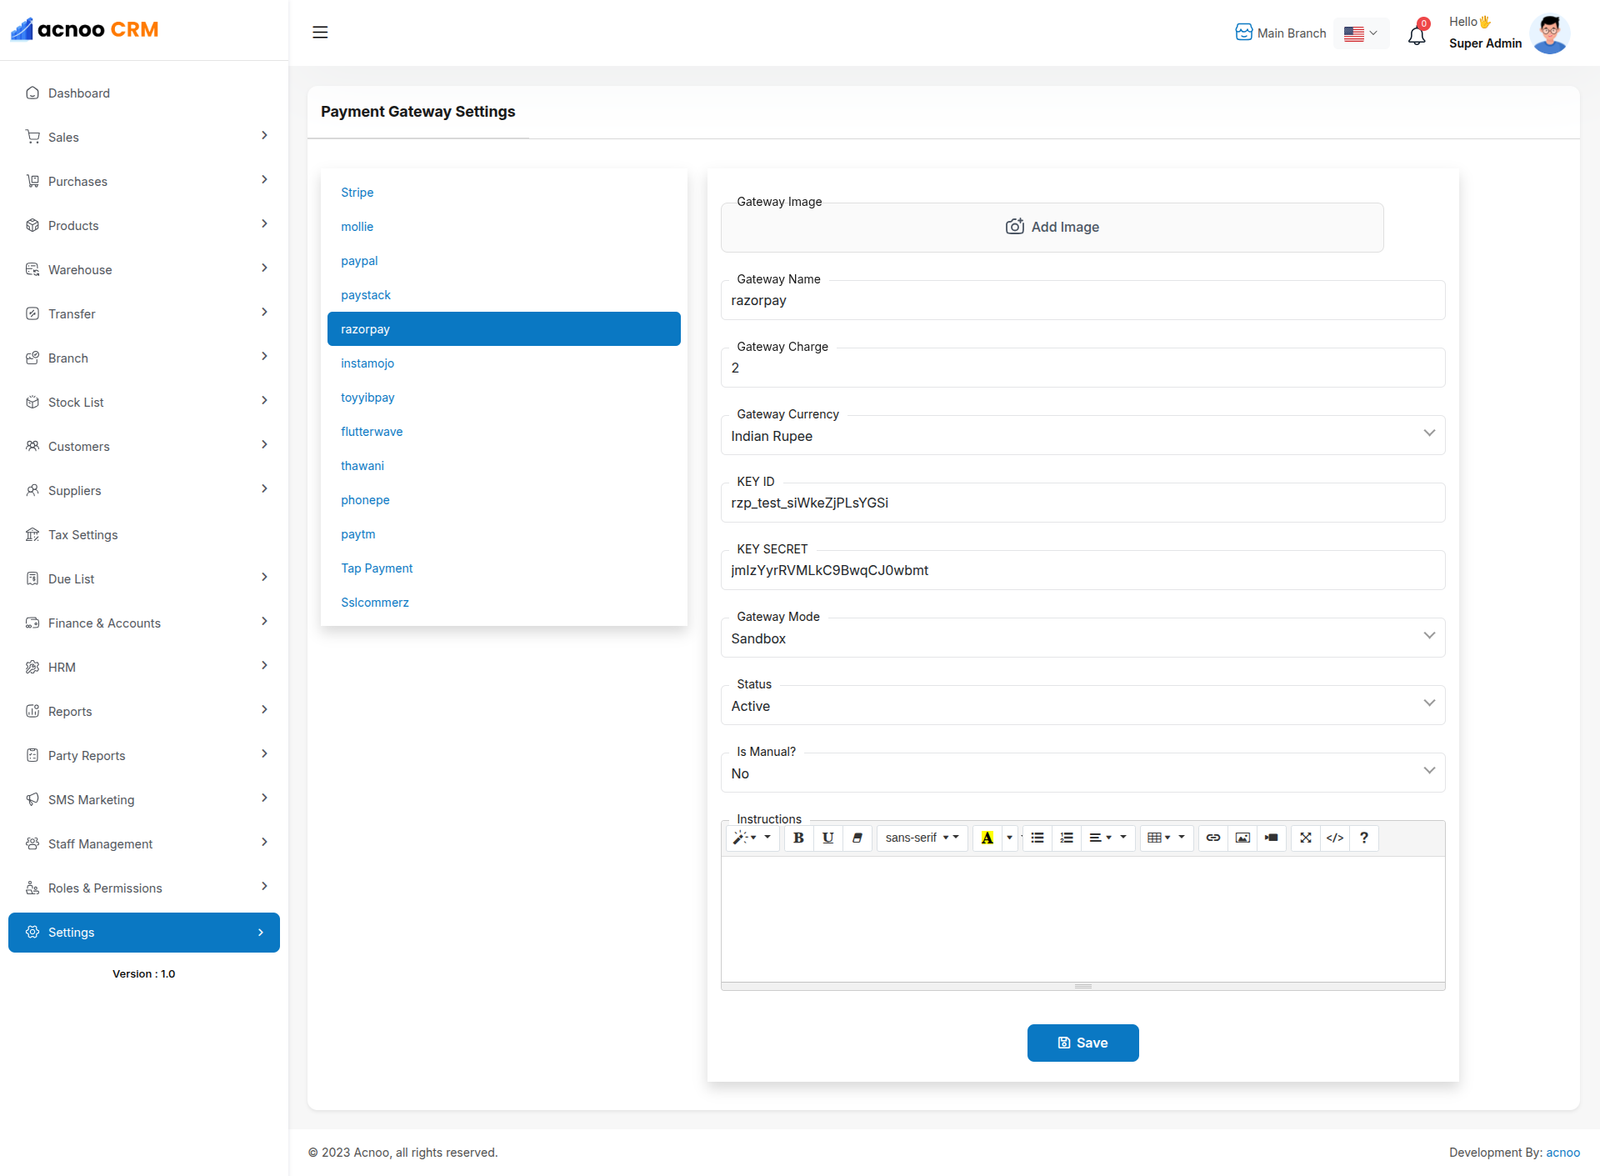
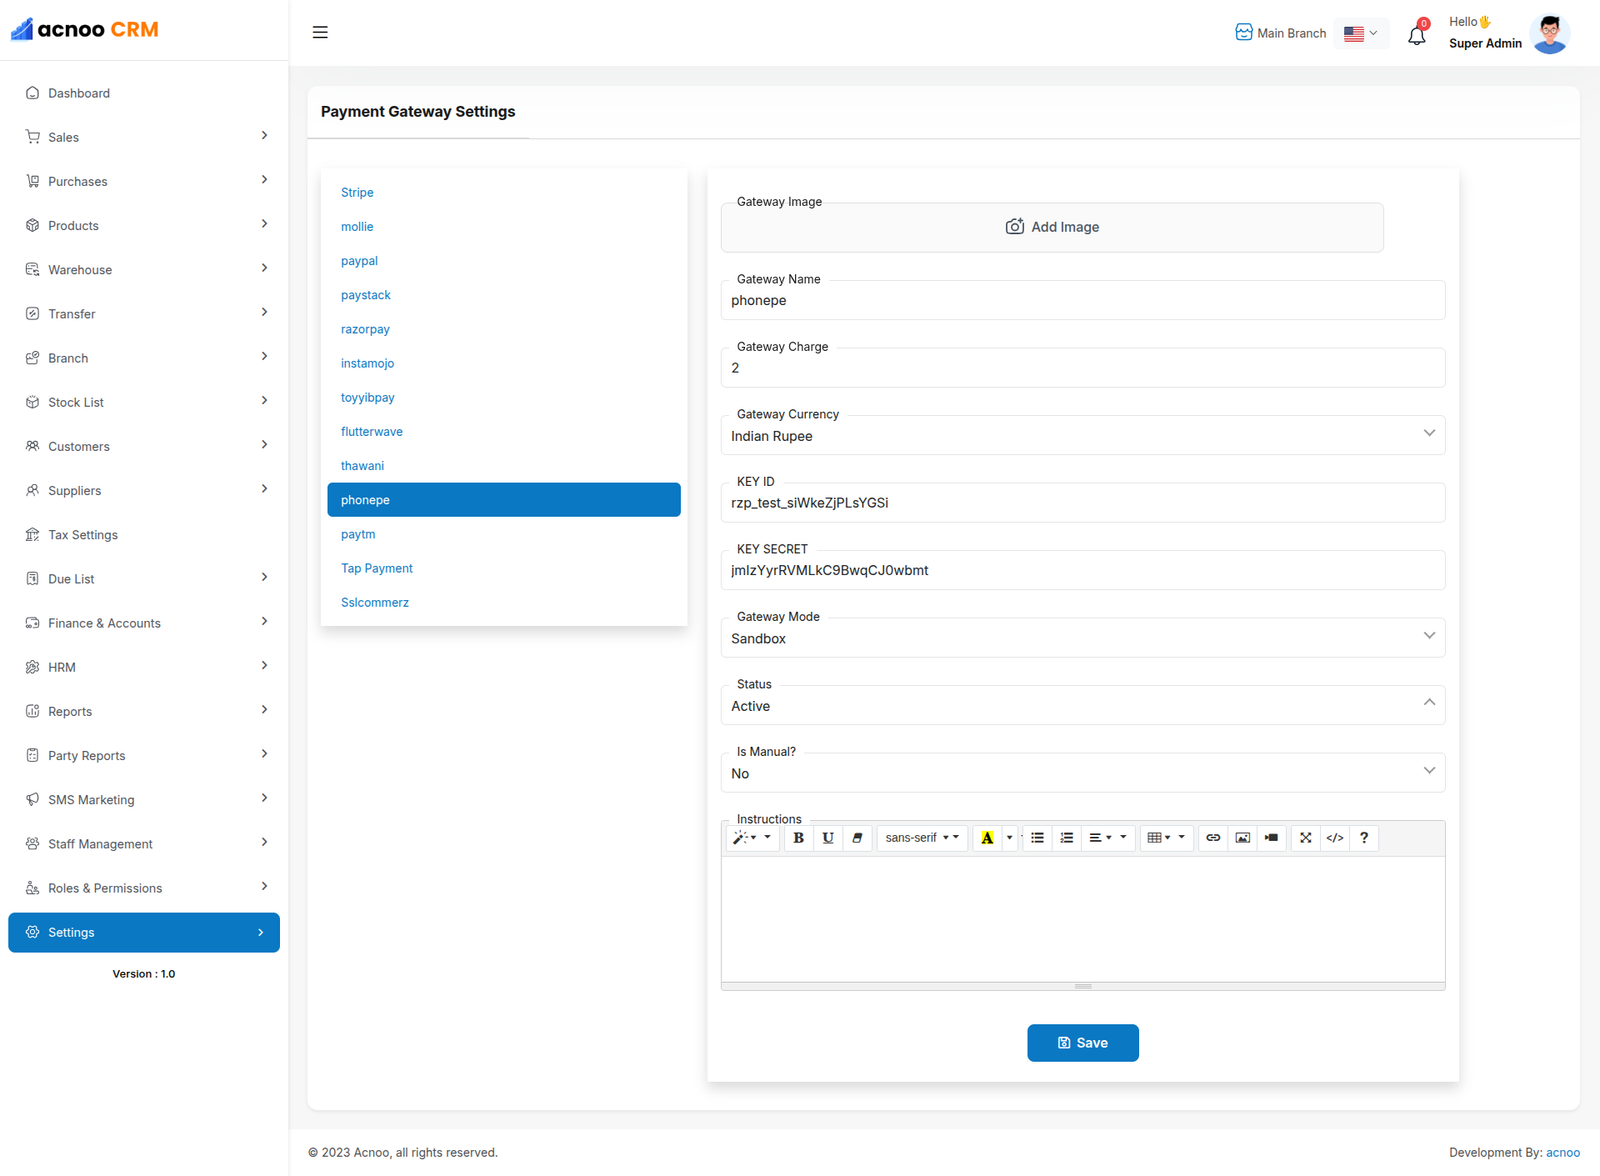
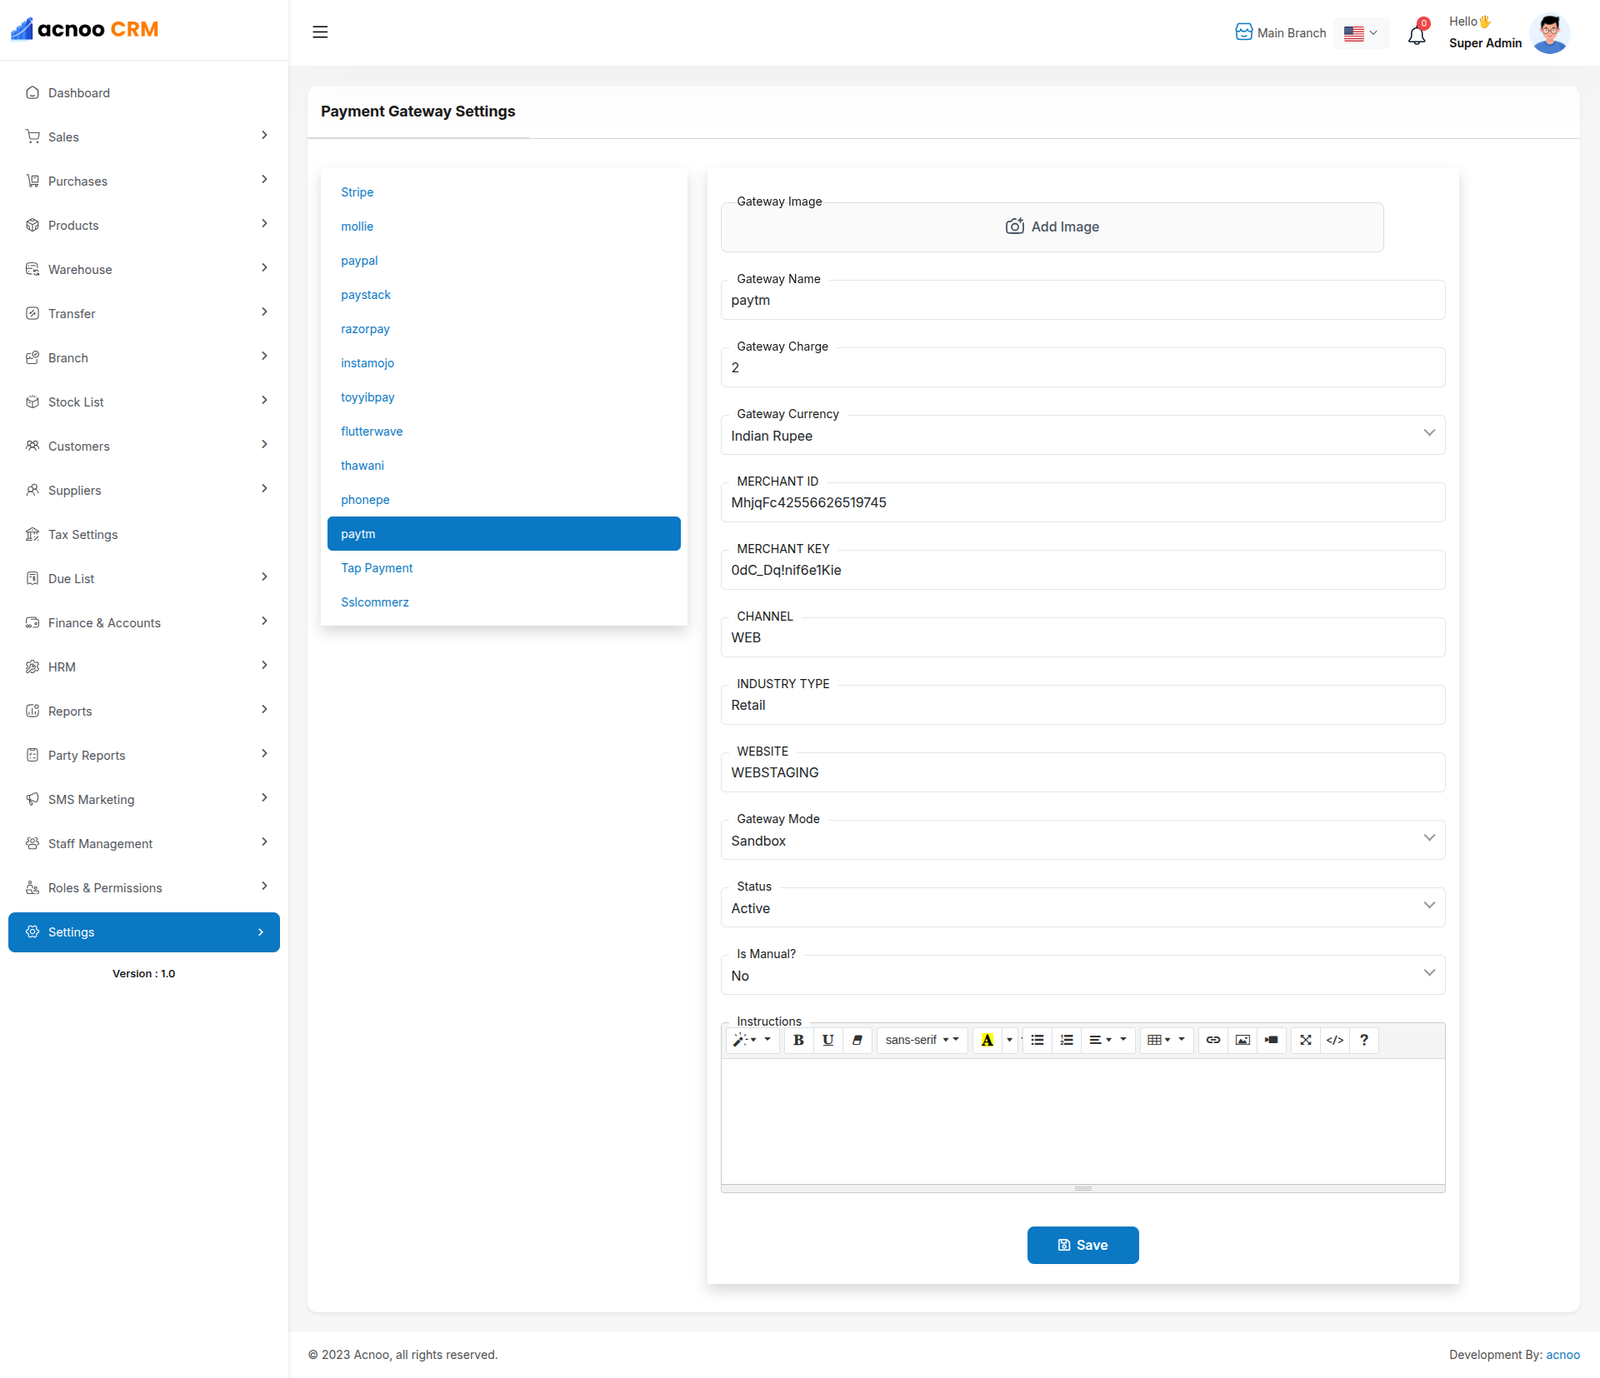
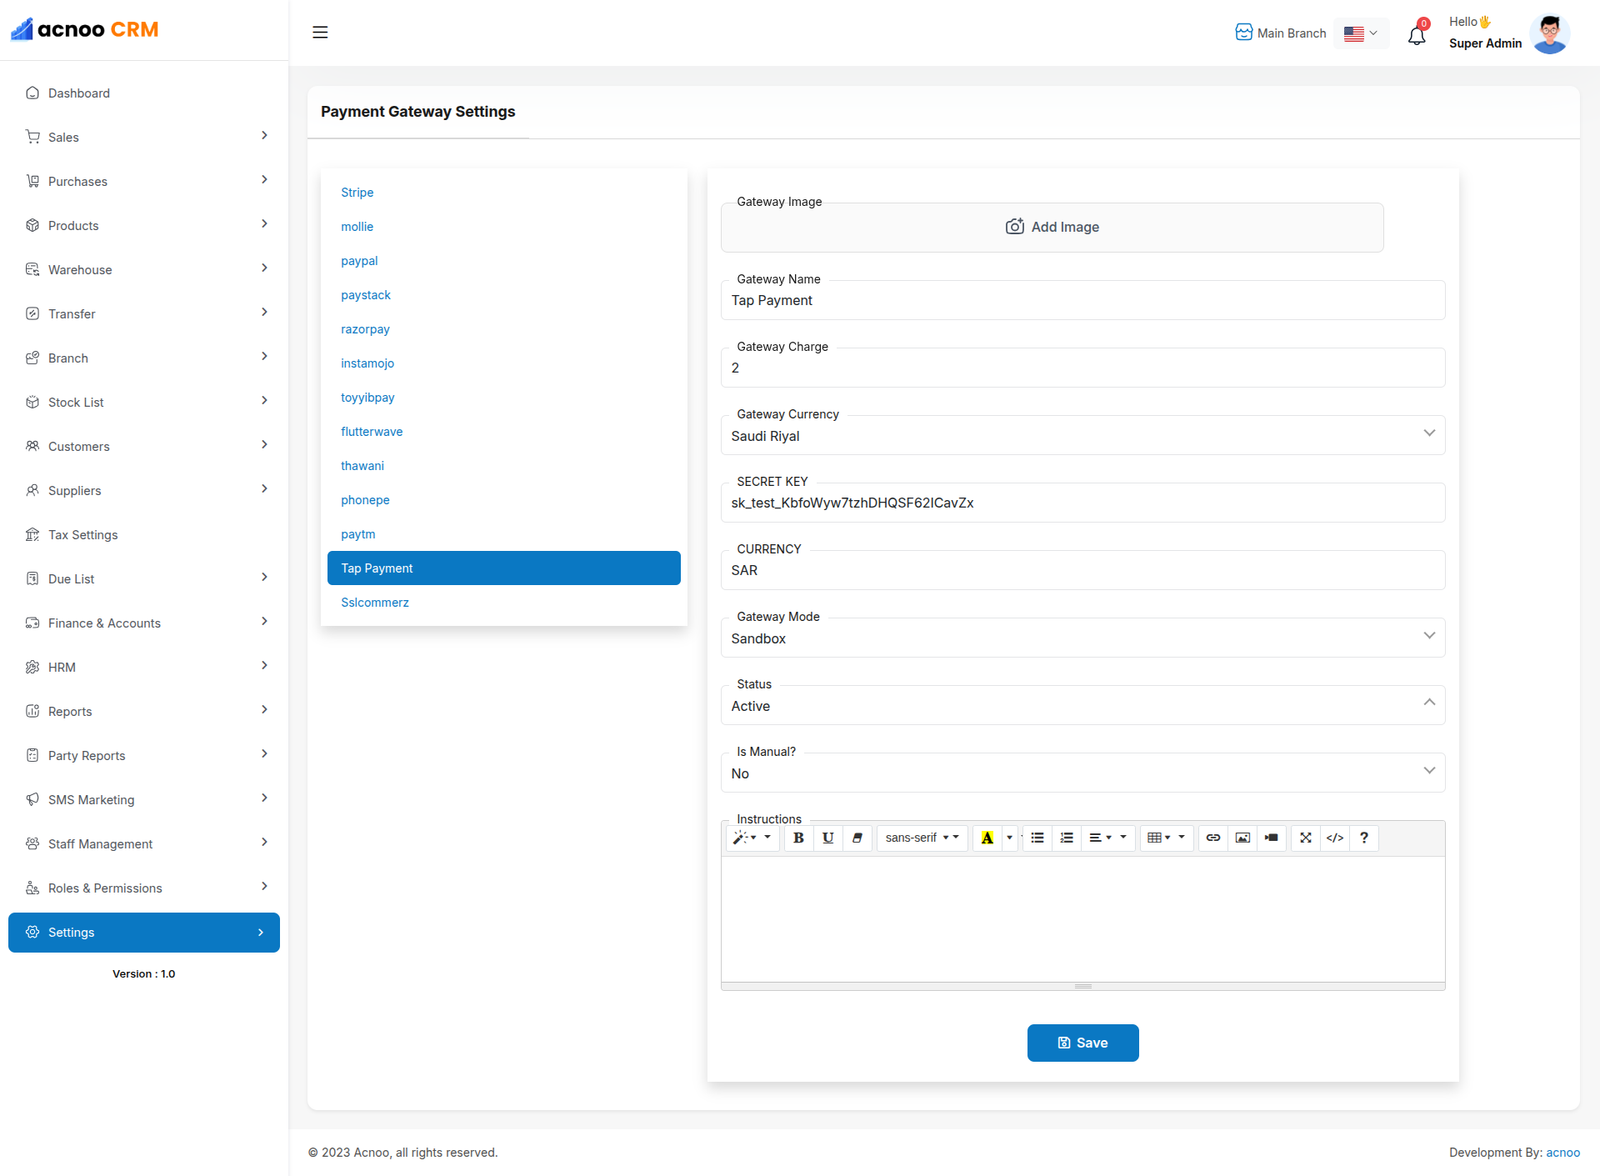
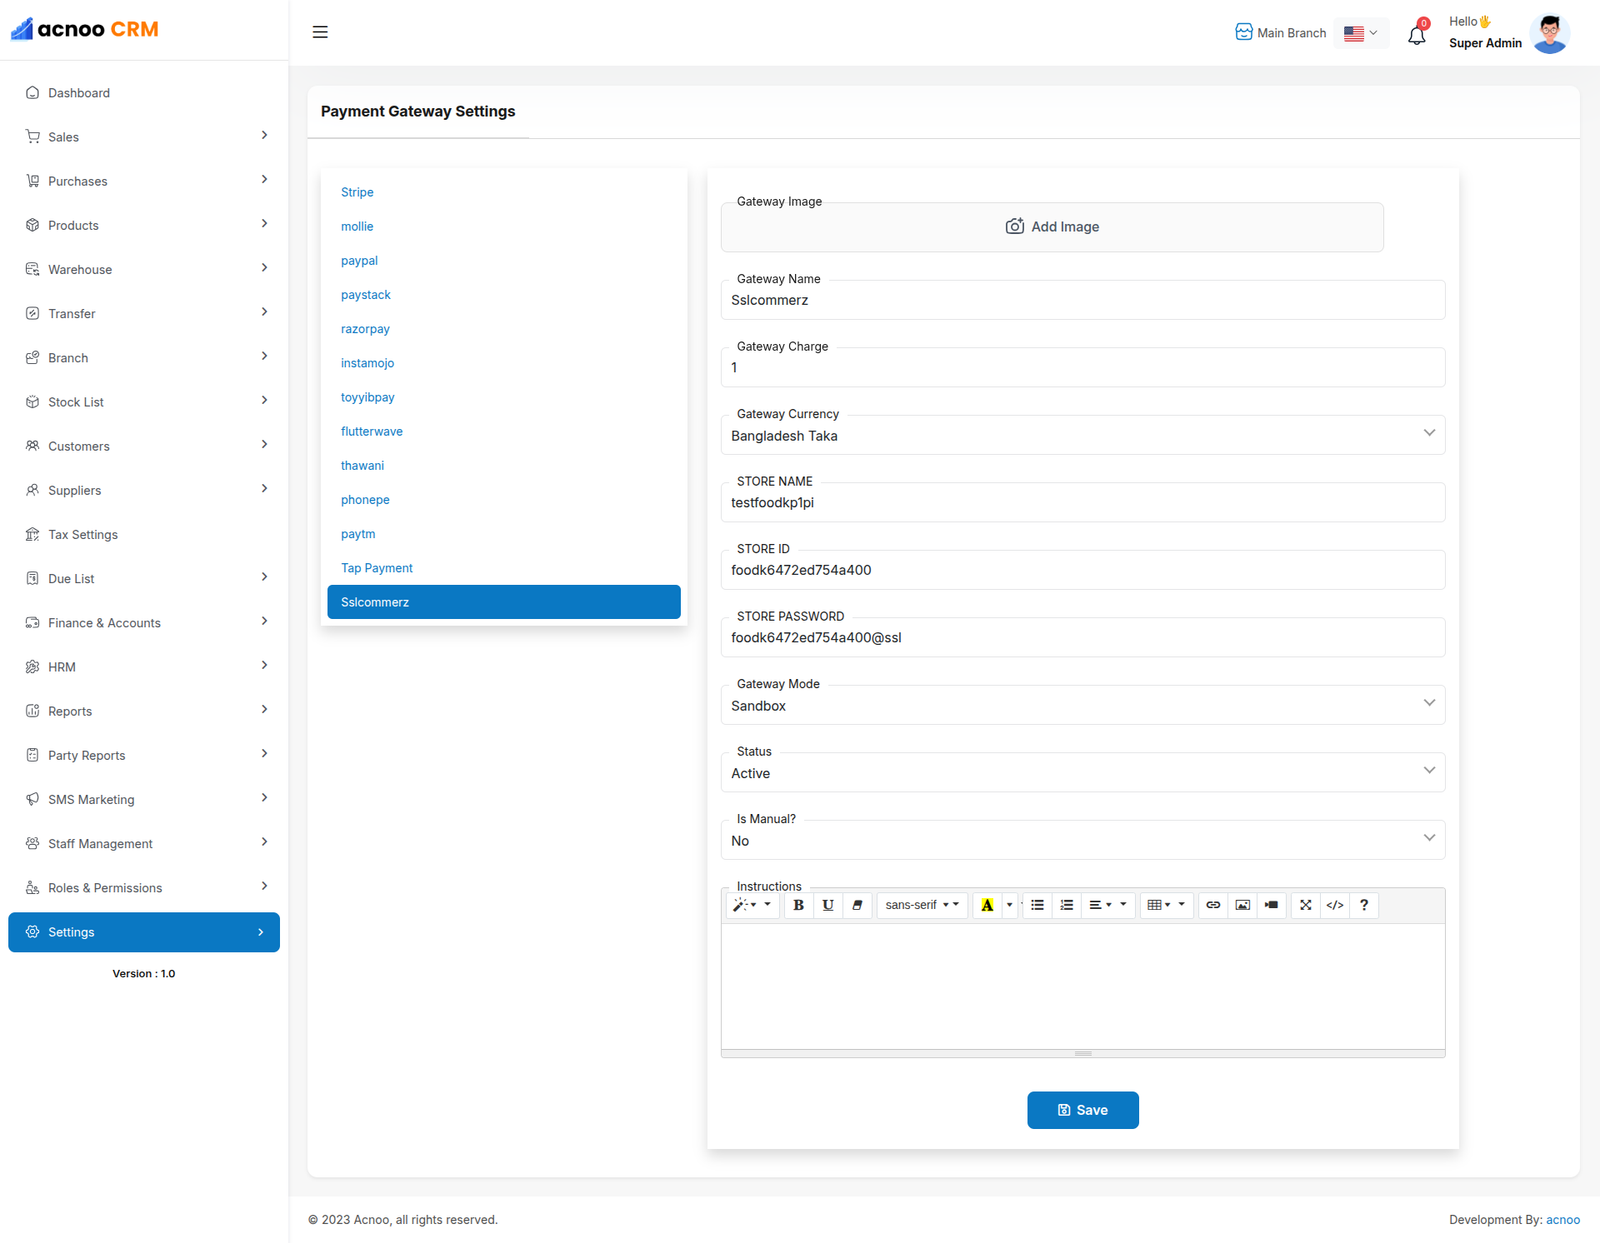
Payment Gateway Settings
Here, you can modify various payment gateways like Stripe, PayPal, SSLCommerz, manual and many others options.
Stripe
Mobile
Paypal
Paystack
Razorpay
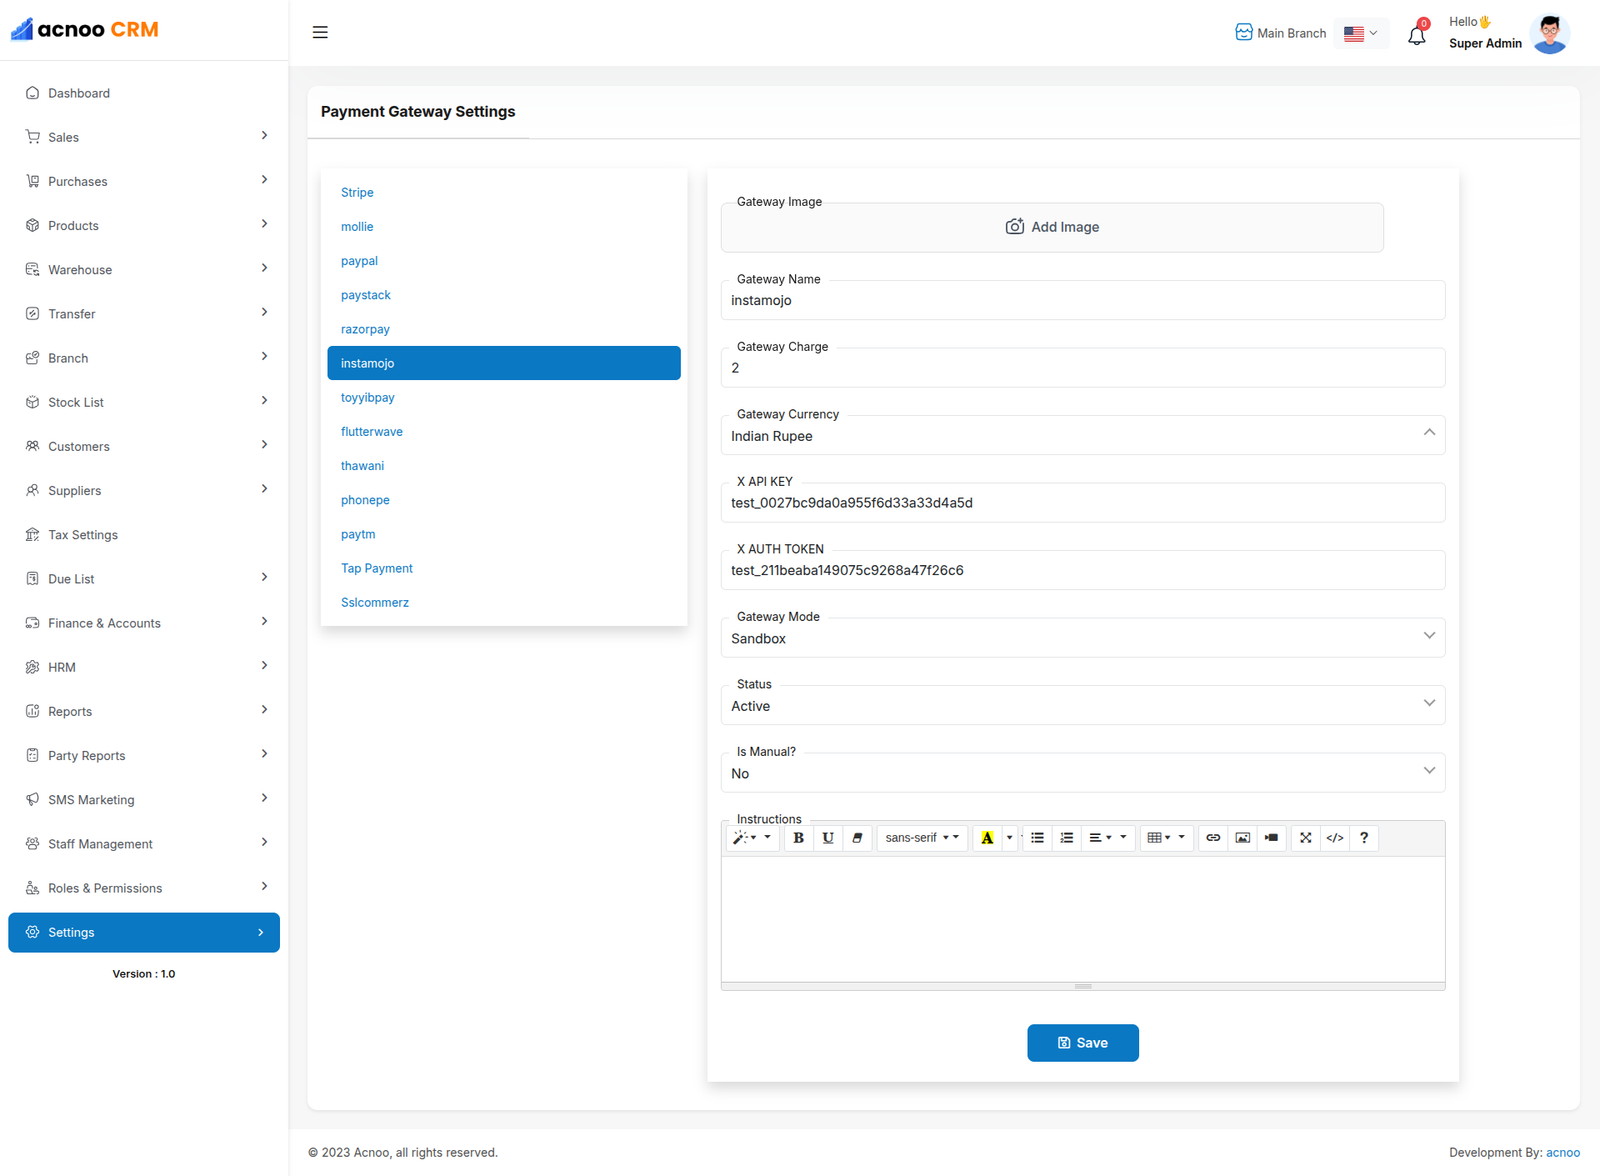
Instamojo
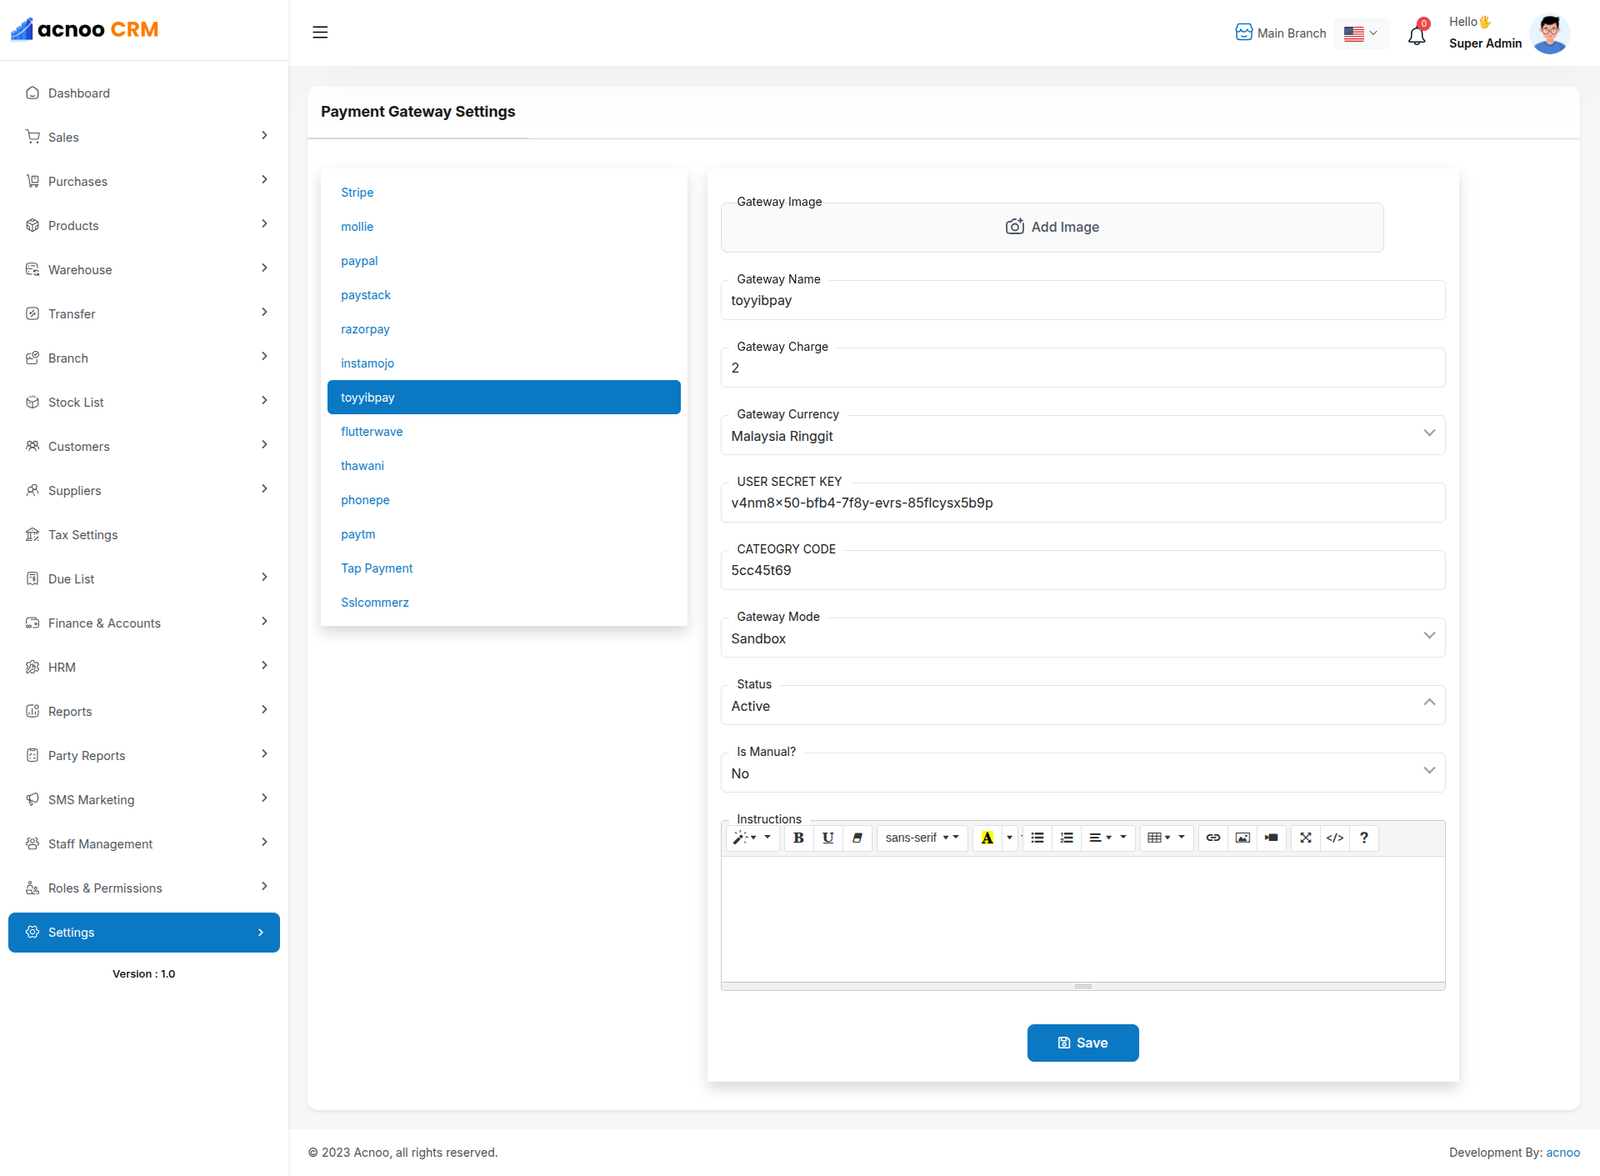
Toyyibpay
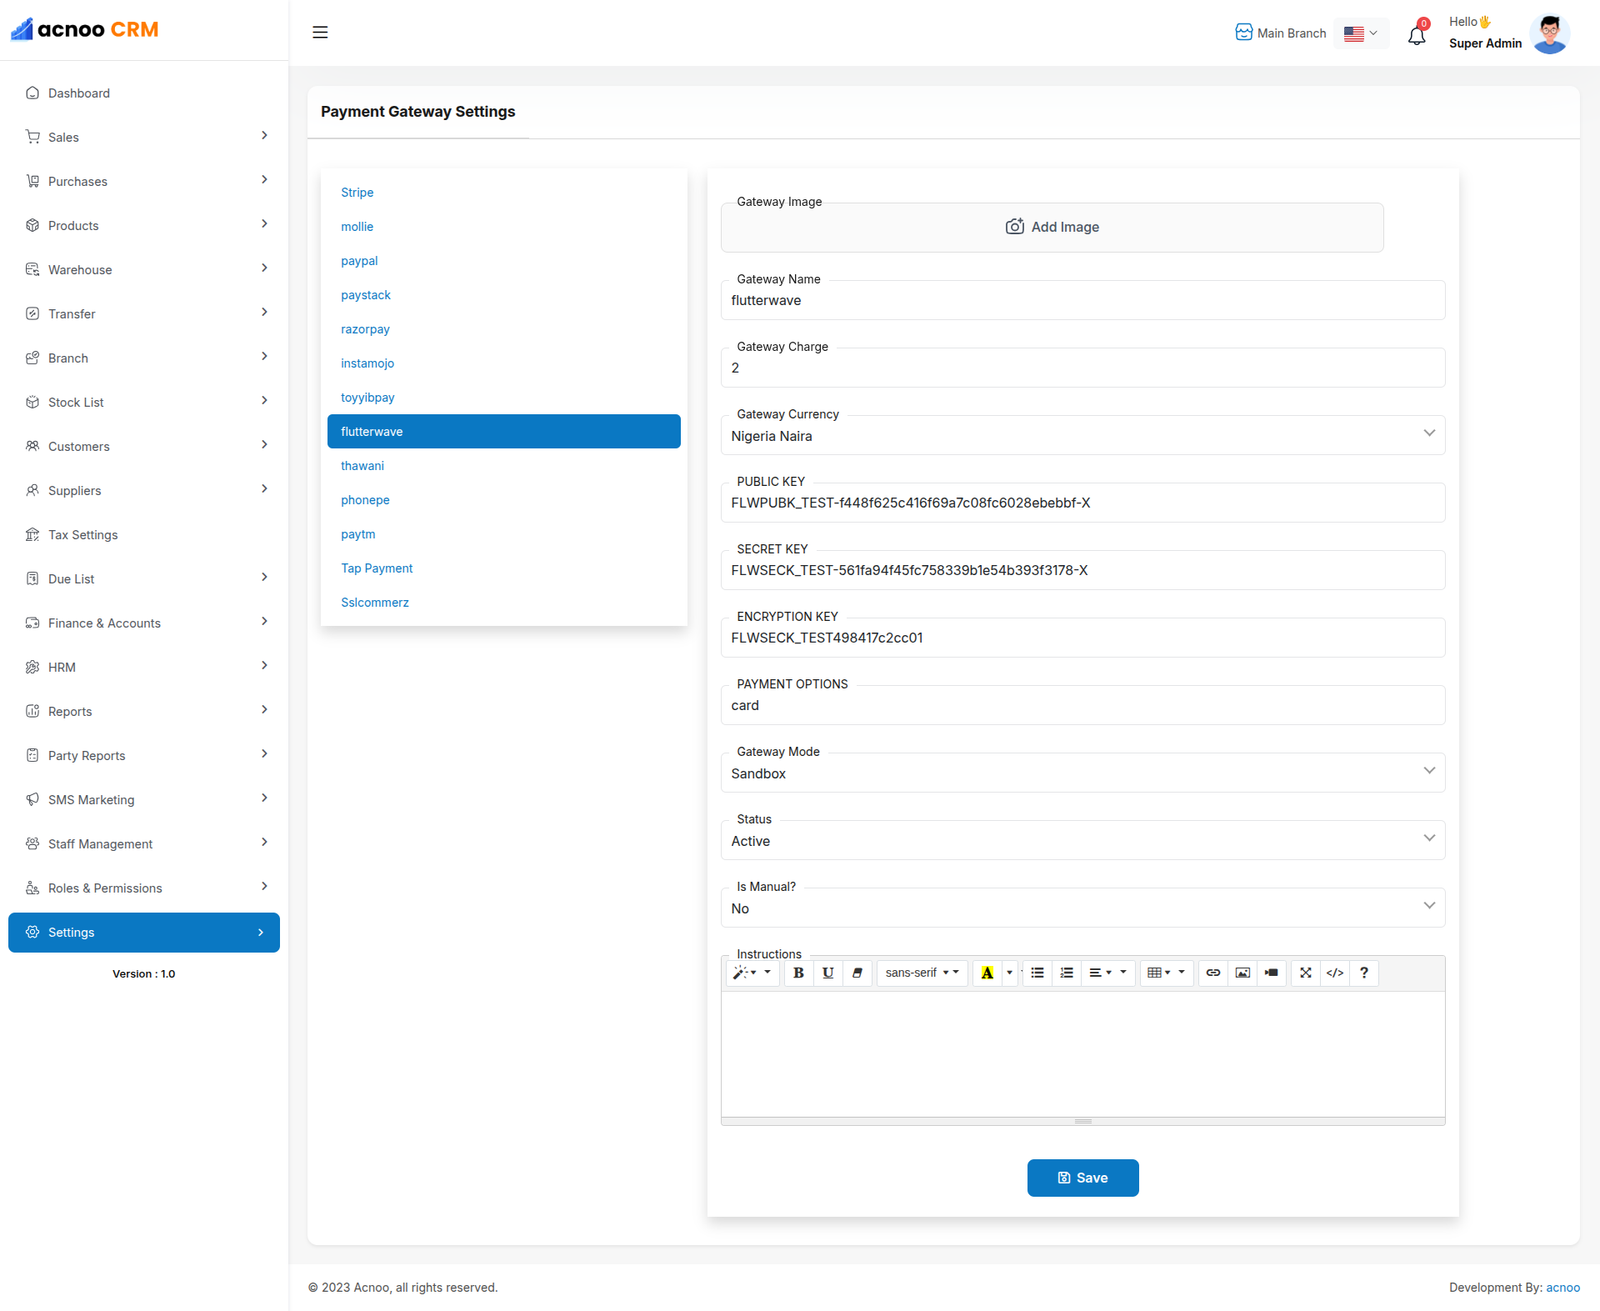
Flutter Wave
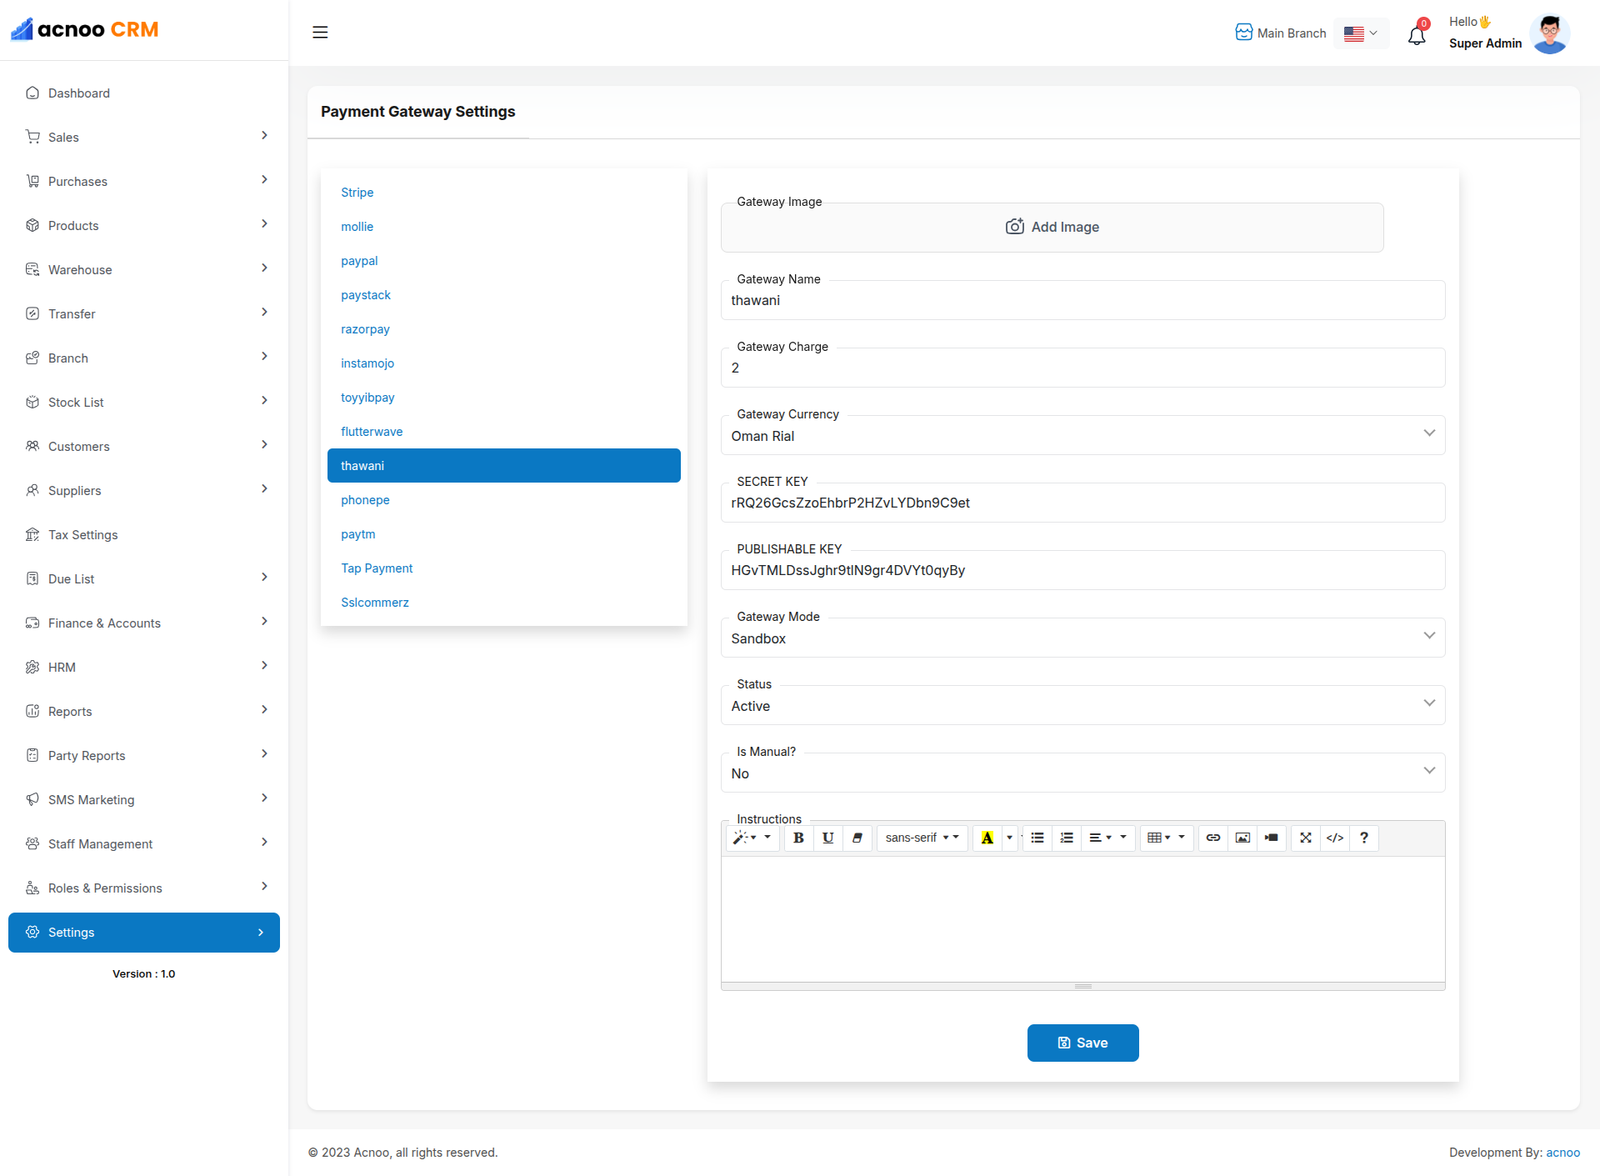
Thawani
Phonepe
Paytm
Tap Payment
Sslcommerz
System Settings
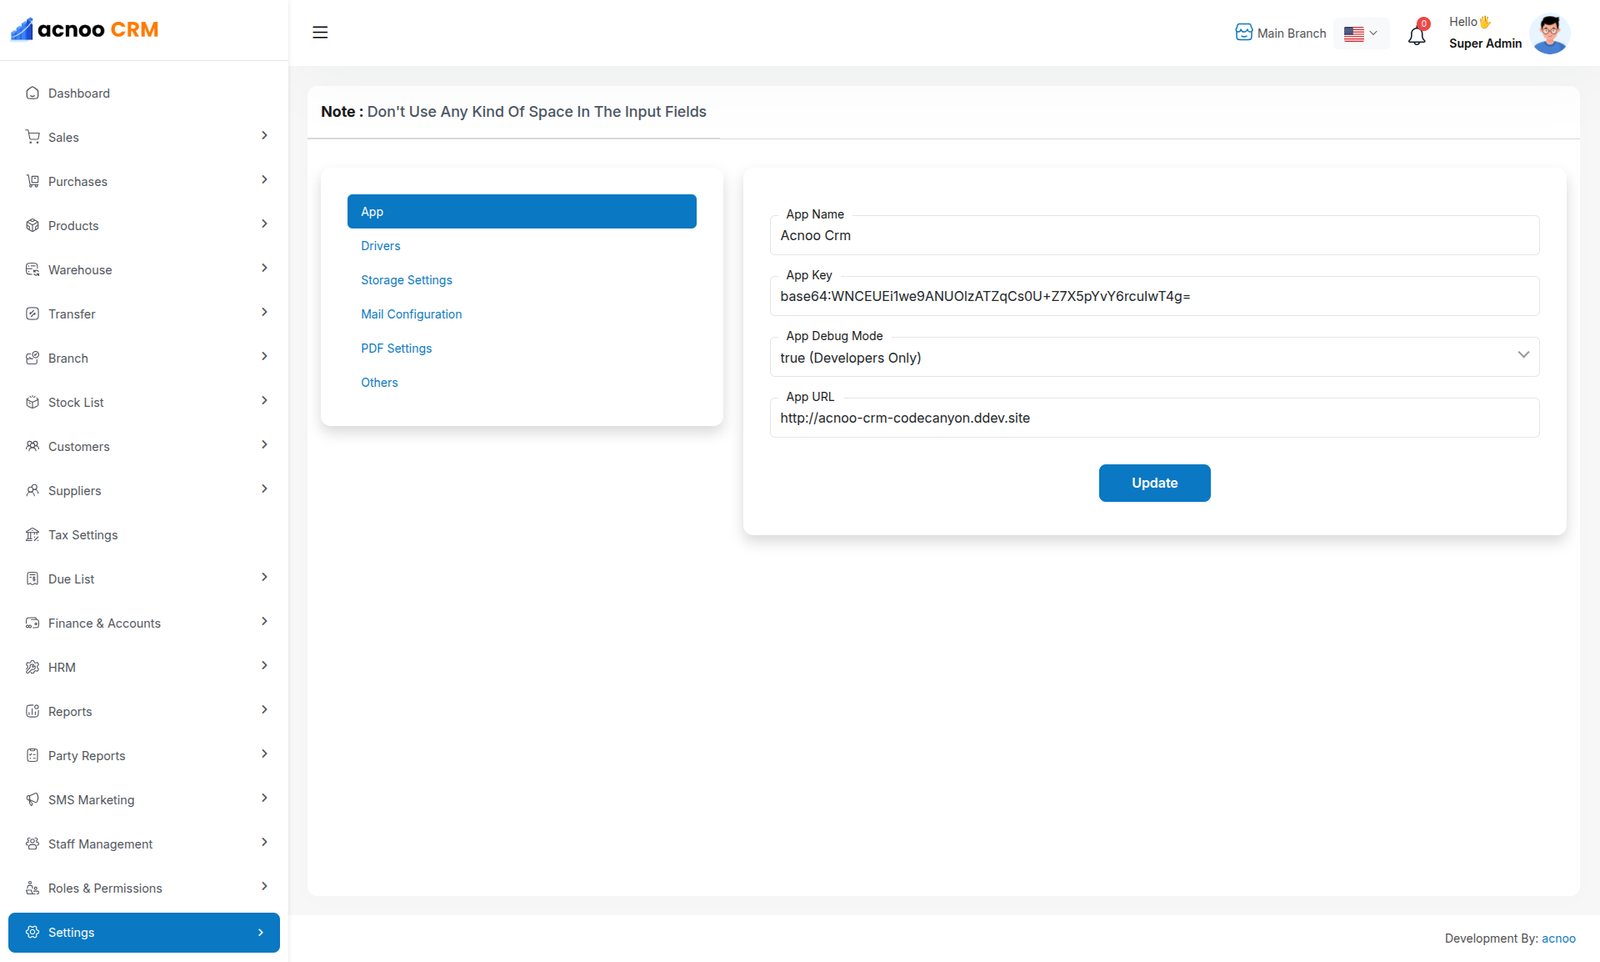
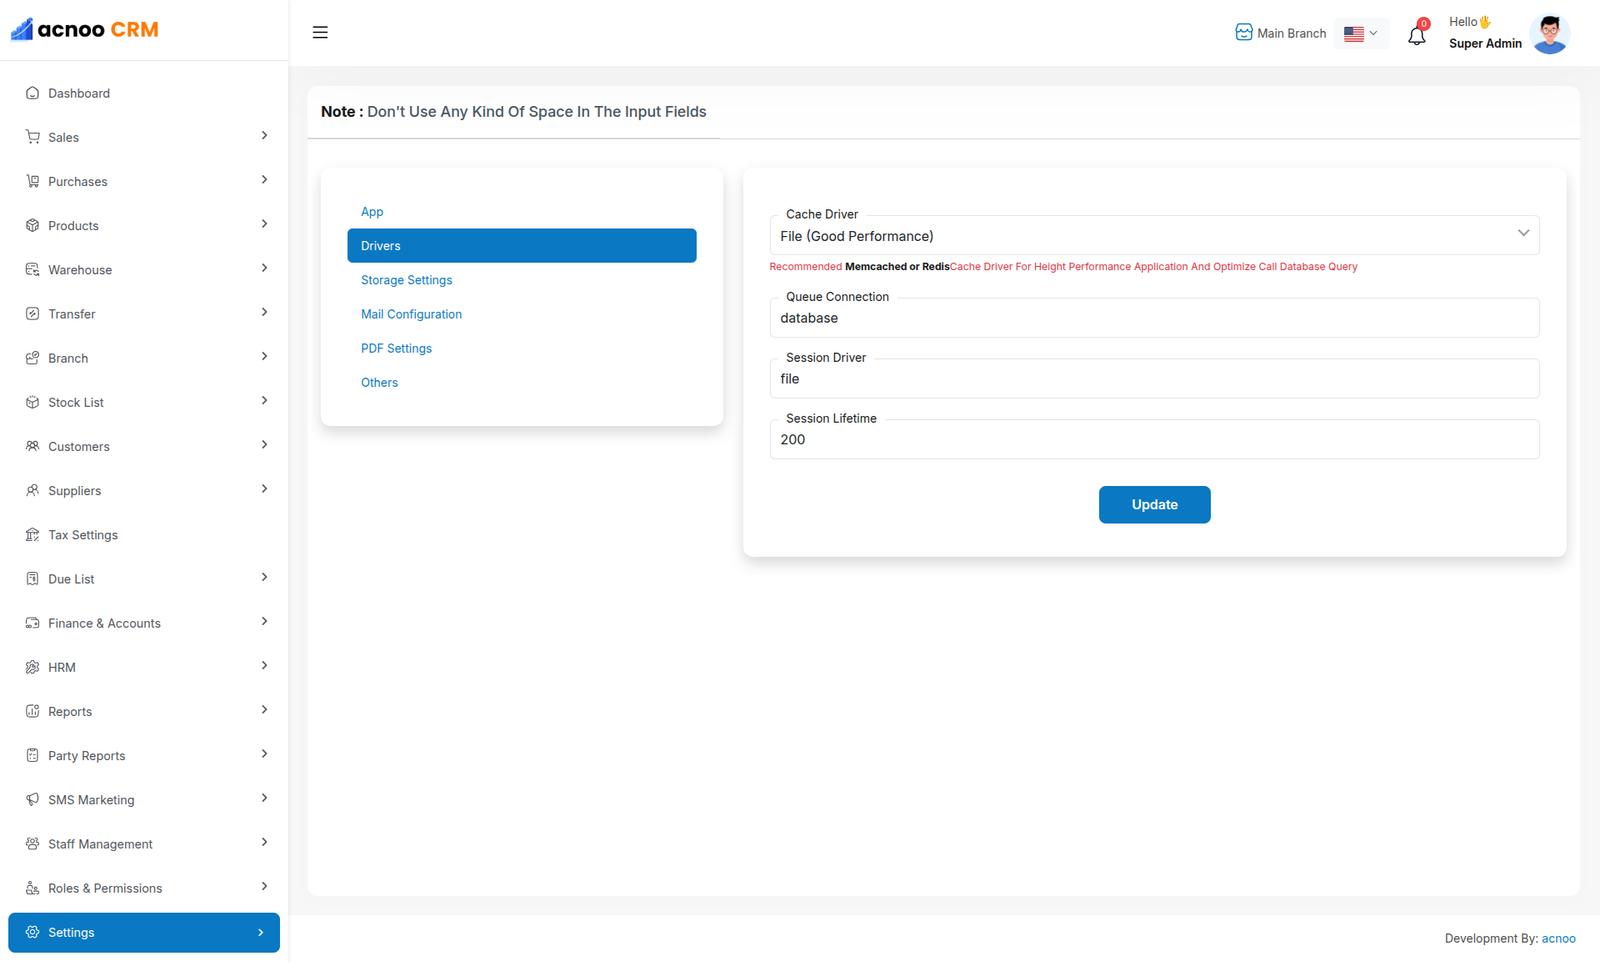
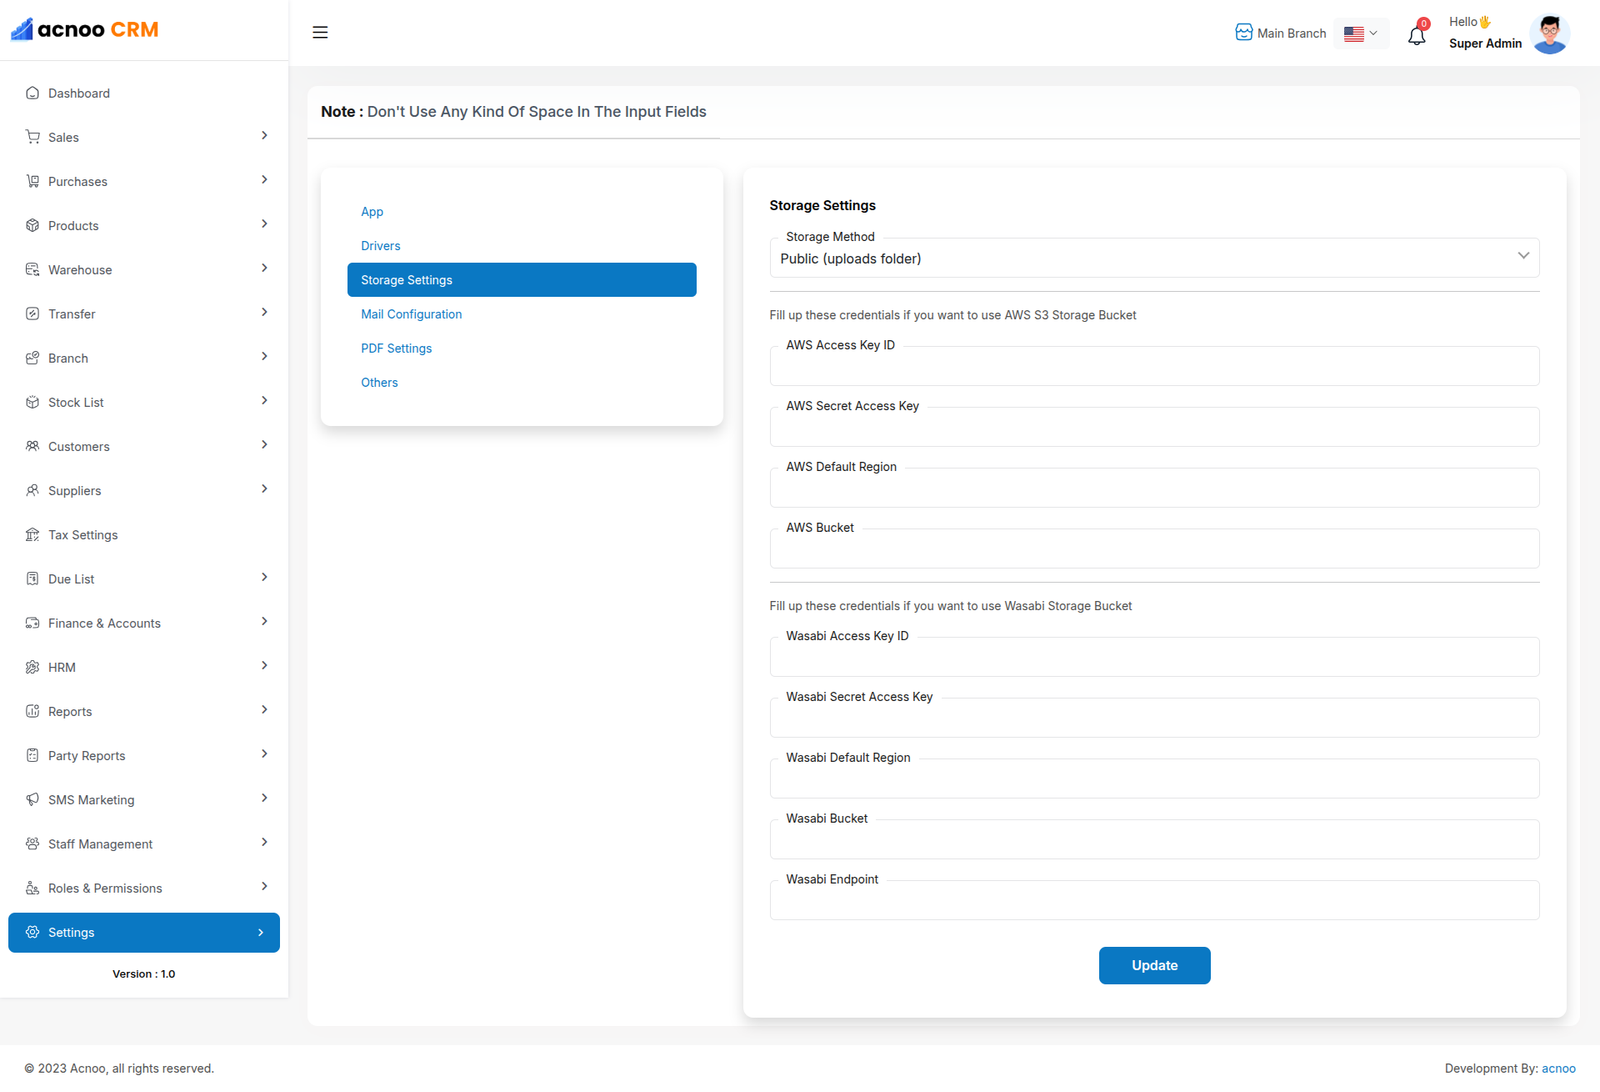
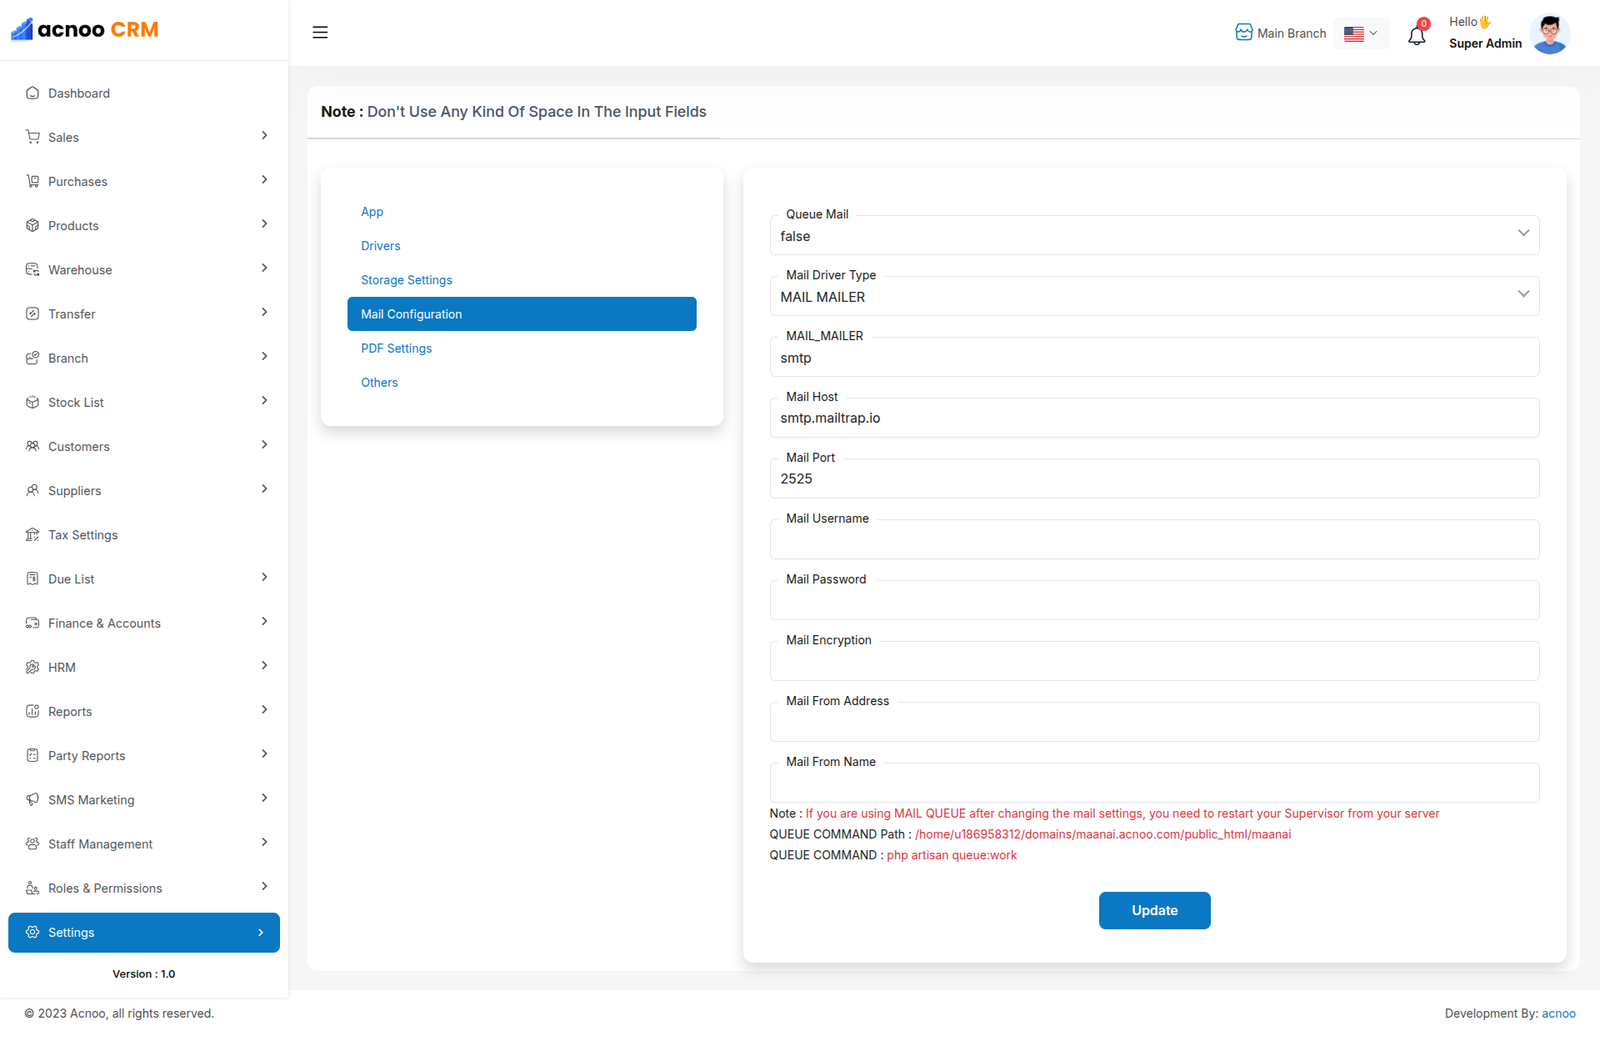
In this section, you can configure various backend settings for the project, including application setup, driver configurations, mail settings, storage configurations, and other essential components. It's crucial to handle these configurations with care as they impact the functionality and security of the system.
App
Drivers
Storage Settings
Mail Configuration
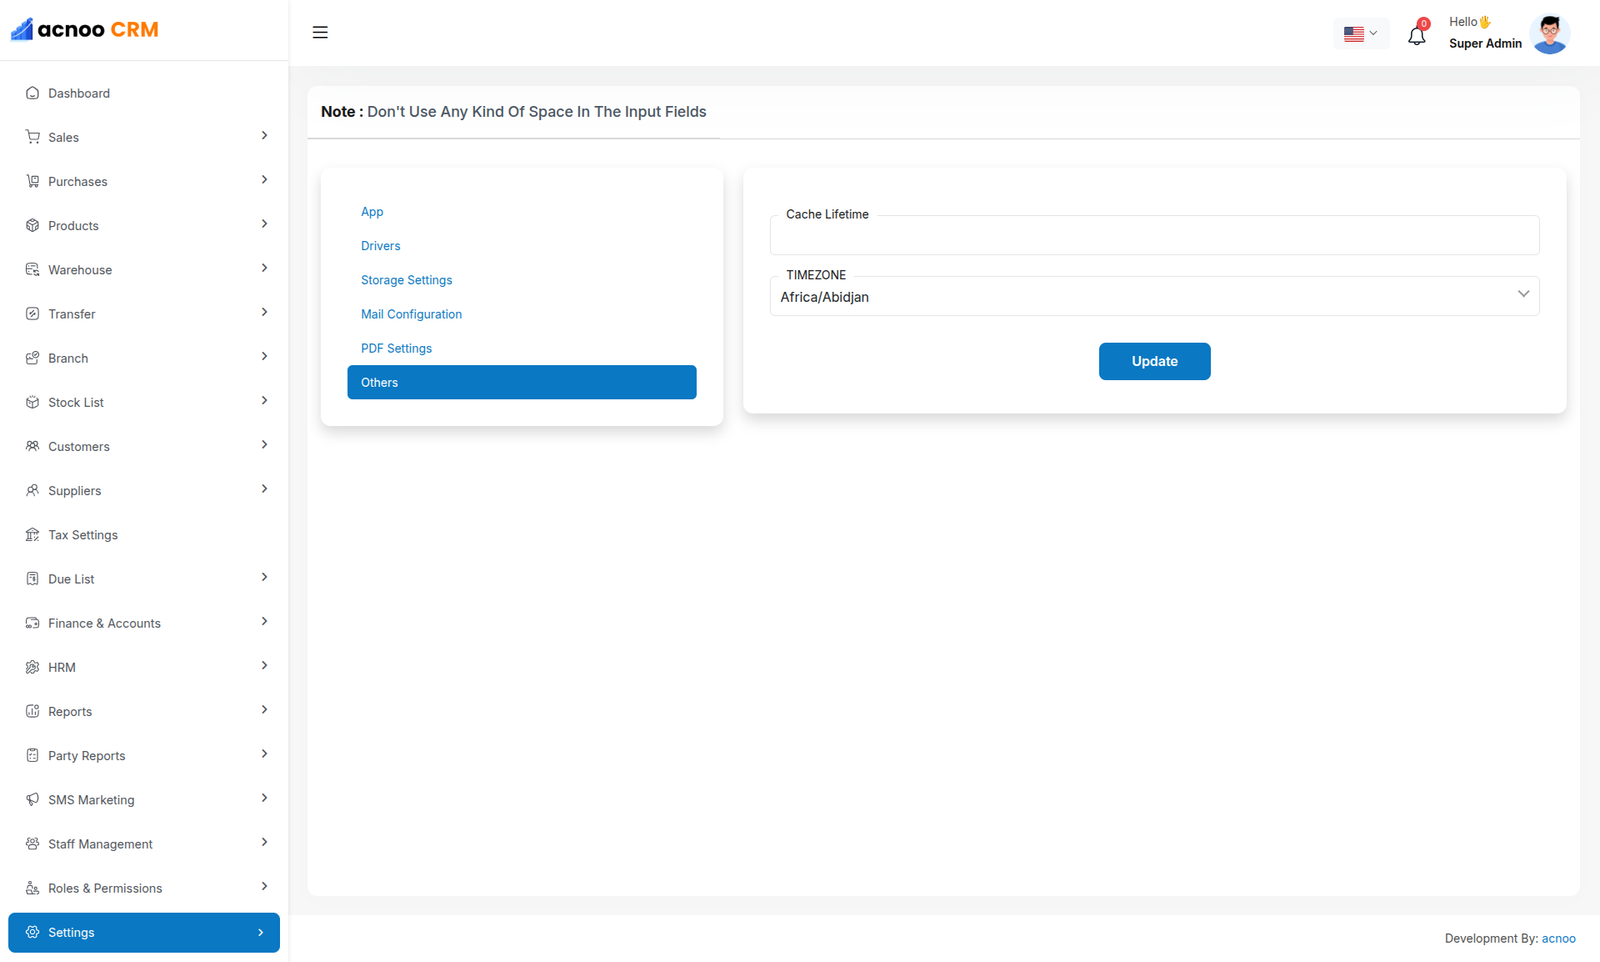
Others
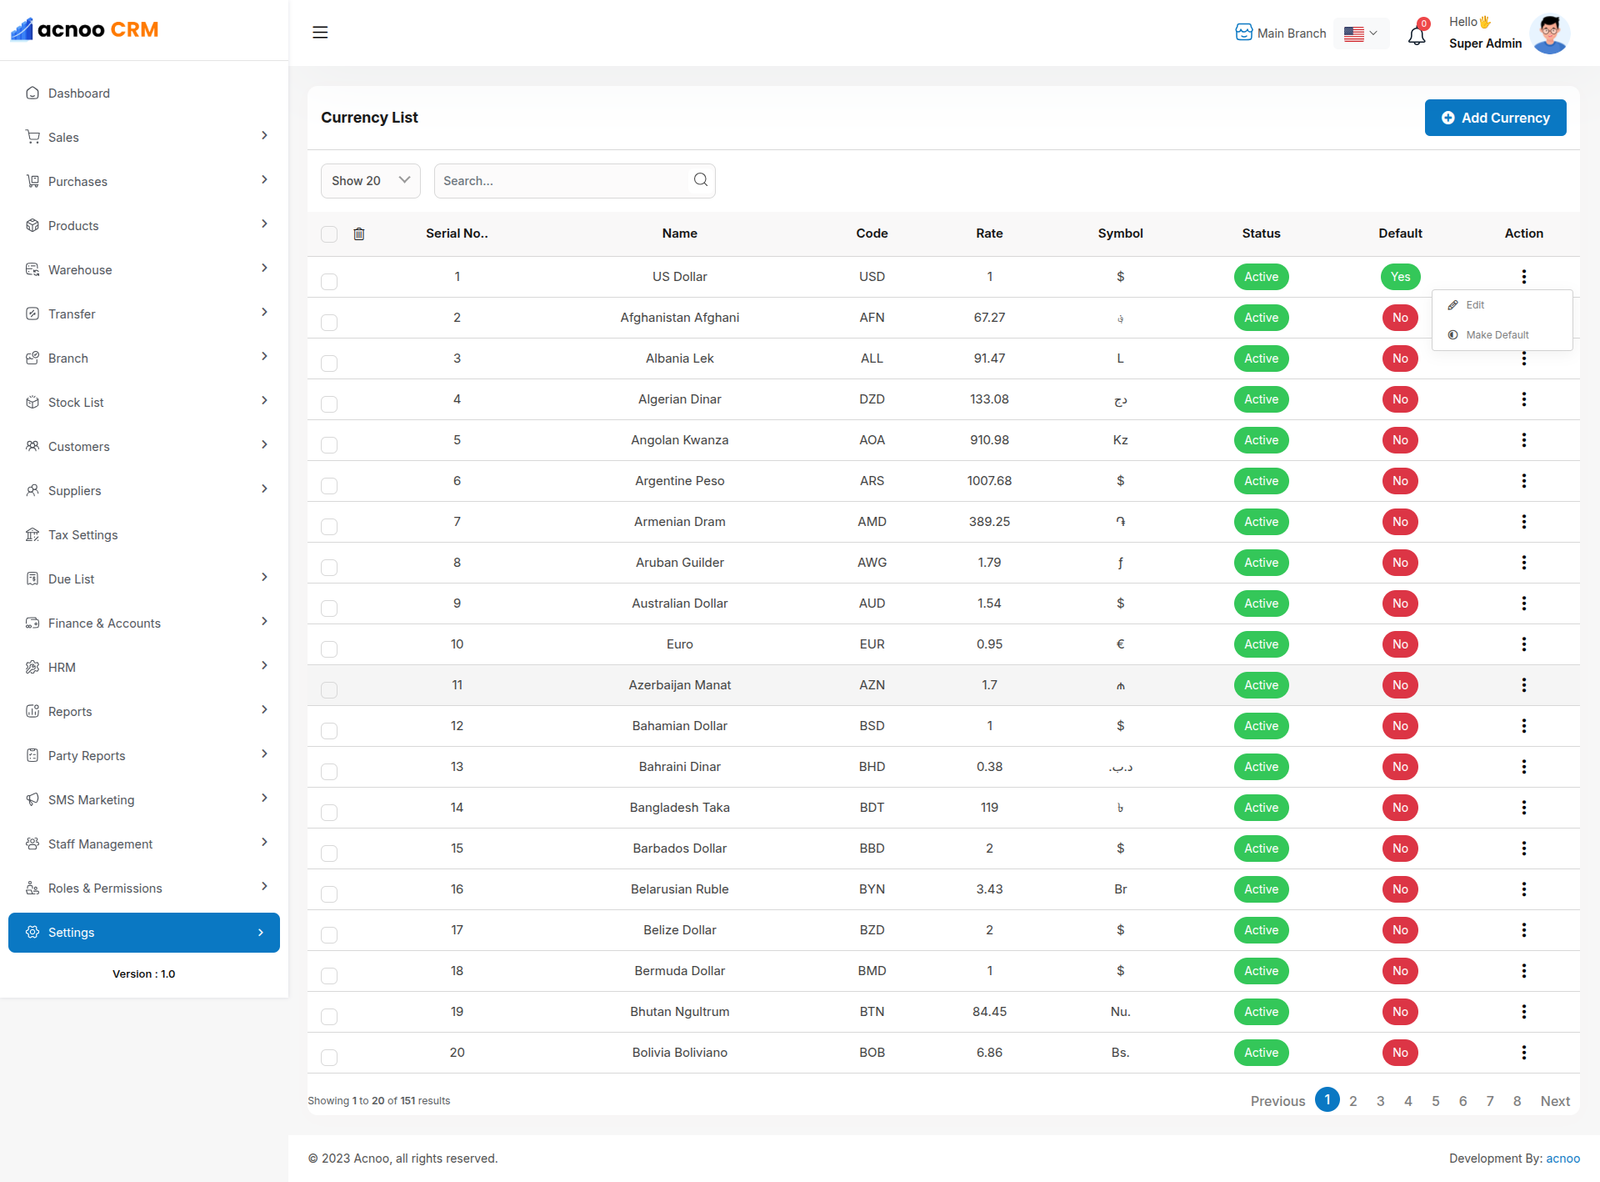
Currency list
Here, you can view a list of currencies with filtering options. Additionally, there is an option to edit currencies, and you can also set a default currency.
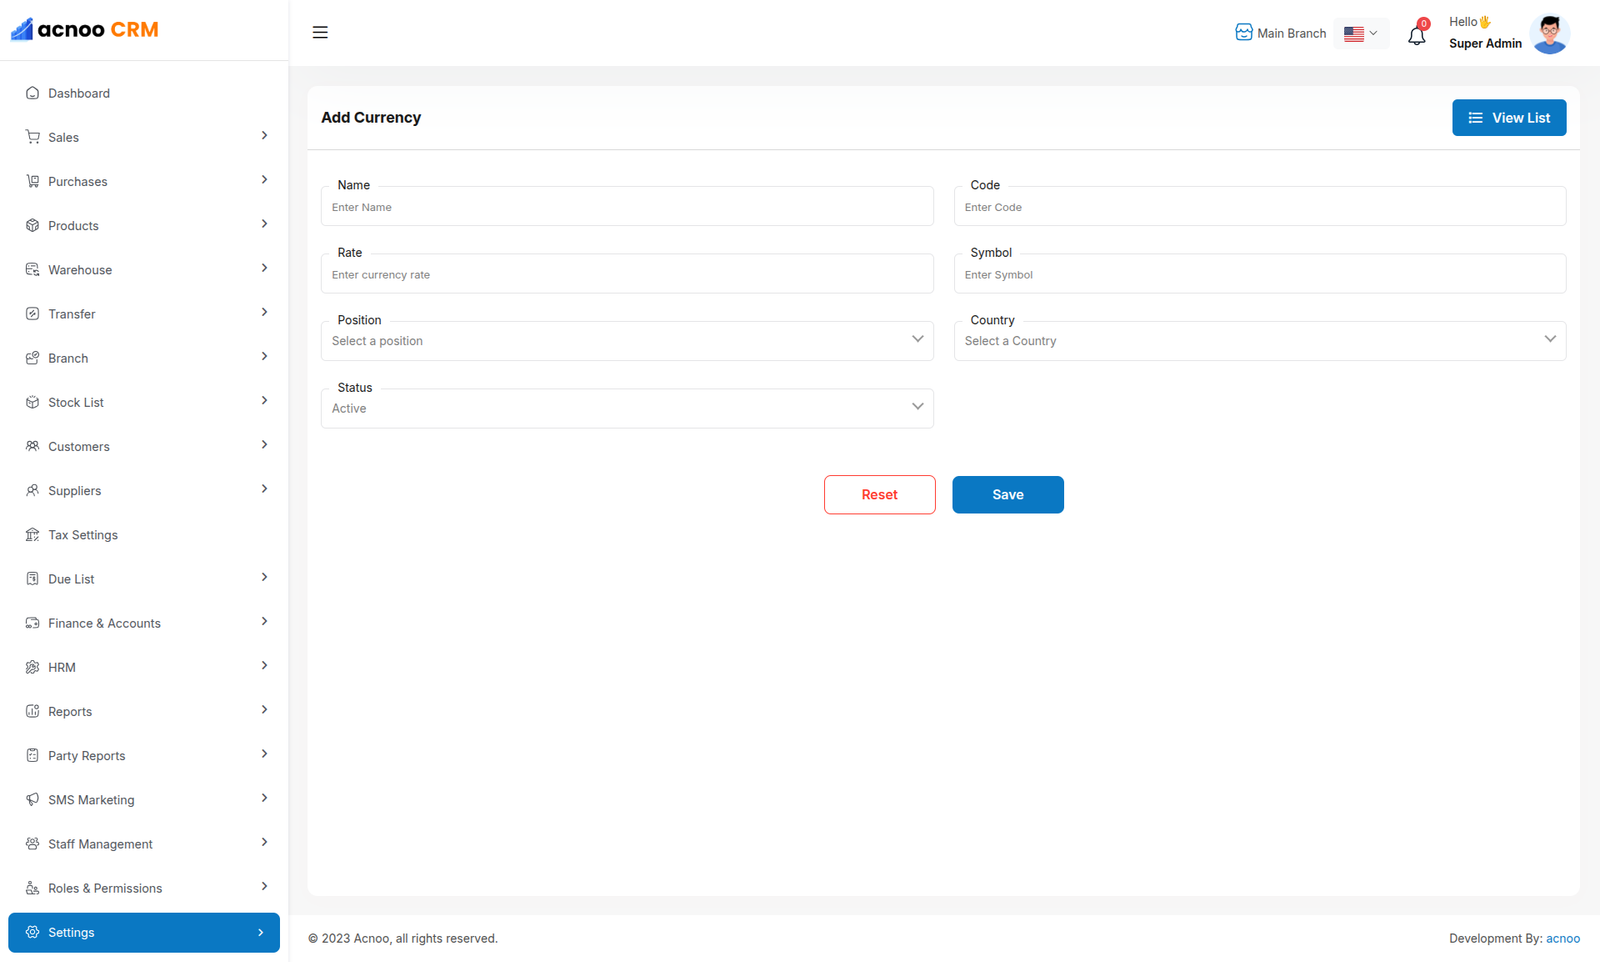
Create Currency
You have the option to include currency from this location.
Others
Admin Change Logs & Update Guide
Initial Release: 1.0.0 ( 22 July 2026 )
HELP & SUPPORT
Free support policy includes troubleshooting, technical assistance with the product only. It does not include any customization, additional features integration or concerns about third- party plugins compatibility. But, support is applied to plugin(s) we have developed and integrated ourselves. We appreciate your understanding!
If you need assistance and information on purchased product that is not covered in documentation, mail them on our support at
support email: acnooteam@gmail.com
You can expect answer within 24-48 hours, usually as soon as possible in the order they were received.
Additionally, if any email has no response from the item owner for more than 7 days, that support email will be archived by default. However, if you need further assistance, you can mail us again.